| Oracle® Enterprise Manager Cloud Control Getting Started with Oracle Fusion Middleware Management 12c Release 1 (12.1.0.2) Part Number E24215-02 |
|
|
PDF · Mobi · ePub |
| Oracle® Enterprise Manager Cloud Control Getting Started with Oracle Fusion Middleware Management 12c Release 1 (12.1.0.2) Part Number E24215-02 |
|
|
PDF · Mobi · ePub |
This chapter describes the various tasks you can perform using JVM Diagnostics. In particular, it contains the following:
The JVMD Manager runs as an Enterprise JavaBeans (EJB) Technology on a WebLogic Server. The JVMD Agent is deployed on the targeted JVM (the one running a production WebLogic Server). It collects real-time data and transmits it to the JVM Diagnostics Manager. This data is stored in the Management Repository, and the collected information is displayed on Enterprise Manager Cloud Control console for monitoring purposes. The communication between the JVMD Manager and the JVMD Agent can be a secure (SSL) or non-secure connection.
The Middleware Diagnostics Page is a GUI based screen that enables you to deploy JVMD Manager, and monitor the health of the JVMD Manager application in a reliable and an efficient manner. Using Middleware Diagnostics Page, you can achieve the following:
Deploy JVM Diagnostics Manager
Monitor the availability of all the JVMD Managers
Access information about the JVMD Managers like hosts to which managers are deployed, the current status, the port on which they are running, version, and so on.
For more details on installing JVM Diagnostics, see Enterprise Manager Cloud Control Basic Installation Guide.
If you need to monitor a standalone JVM, you can manually deploy the JVM Diagnostics Agent by following these steps:
From the Setup menu, select Middleware Diagnostics, then click Deploy Diagnostics Manager in the Middleware Diagnostics page. Check if the JVM Diagnostics Manager has been enabled. You do not need the ADP Manager as the JVMD Manager is independent and will run in a WLS target in the same domain as the Cloud Control OMS server that is already running. This is essentially another WLS container in the same domain and is very lightweight, so it can run well on the same server as the Cloud Control OMS instances.
From the Setup menu, select Middleware Diagnostics, then click Setup JVM Diagnostics in the Middleware Diagnostics page. Click the JVMs and Pools tab and click Downloads to download the jamagent.war file.
Add the jamagent.war to the CLASSPATH as follows:
CLASSPATH=$CLASSPATH:/scratch/ssmith/jvmd/jamagent.war
export CLASSPATH
Start JVM Diagnostics with the JVM Diagnostics Agent as follows:
$JAVA_HOME/bin/java -cp $CLASSPATH $JVM_OPT $SYS_OPT jamagent.jamrun [$JAMAGENT_PARAMS_LIST] $TARGET_CLASS $TARGET_CLASS_PARAMS
where [$JAMAGENT_PARAMS_LIST] refers to the JVM Diagnostics Agent parameters. The mandatory parameters are:
jamconshost = JVM Diagnostics Manager Host
jamconsport = Listening port of JVM Diagnostics Manager
oracle.ad4j.groupidprop = [UniqueJVMPoolName]/[UniqueJVMName]
An example is given below:
CLASSPATH="$CLASSPATH:/scratch/ssmith/jamagent.war"
$JAVA_HOME/bin/java -cp $CLASSPATH $JVM_OPT $SYS_OPT jamagent.jamrun
jamconshost=10.229.187.109 jamconsport=3800
oracle.ad4j.groupidprop= MyJVMPool1/JVM50
Follow these steps to set up and configure JVM Diagnostics:
From the Setup menu, select Middleware Diagnostics, then click Setup JVM Diagnostics in the Diagnostics Managers page.
In the JVMD Manager Parameters page, enter the following details:
JVMD Manager Log Level: The log level for console diagnostics messages. Log levels 1 to 5 are supported where:
1 = Error
2 = Warning
3 = Info
4 = Debug
5 = Trace
The default log level is 3.
Cross Tier Log Level: The log level for cross-tier diagnostic messages. Log levels 1 to 5 are supported where:
1 = Error
2 = Warning
3 = Info
4 = Debug
5 = Trace
The default log level is 3.
Agent Request Timeout: The number of seconds that the JVMD Manager waits for the JVMD Agent to respond. You can increase this value if the monitored JVMs are extremely busy and the console times out and disconnects while waiting for a response.
Agent Loop Request Timeout: The number of seconds that the JVMD Agent waits before it makes the next attempt to communicate to the JVMD Manager.
Monitoring Aggregation Interval: The frequency at which the detailed monitoring samples should be aggregated into summary data.
System Sample Interval: The frequency at which system details (cumulative CPU counters, heap size, number of GCs) should be collected in monitoring.
Purge Data Older Than: The period for which the detailed monitoring samples should be retained.
Enable Monitoring: Select this check box to start or stop monitoring.
Retry Changing Threads: If a thread stack changes during a sample (this can happen when a thread is using CPU), JVM Diagnostics will skip that thread for that sample. If you find missing samples, use this feature to retrace the changed stacks. This will retry (up to 5 times) threads with changing stacks. It will also make system calls to get the stack if possible.
Note:
This field is not applicable to the JVMTI (level 0) optimization.Click Save to save the parameters.
Follow these steps to view a list of registered JVMs and JVM Managers:
From the Setup menu, select Middleware Diagnostics, then click Setup JVM Diagnostics in the Middleware Diagnostics page.
The following tables are displayed:
Registered Managers: The following details are displayed:
Manager ID: The unique ID assigned to the JVM Manager. This ID identifies the JVM Manager in all the processes.
Host: The machine on which the JVM Manager has been deployed.
Port: The port of the machine on which the JVM Manager has been deployed.
SSL Port: The SSL Port of the machine on which the JVM Manager has been deployed.
Build Version: The build version of this JVM Manager.Status: The status of the JVM Manager (Active/Inactive)
Registered JVMs: The following details are displayed:
Manager ID: The ID of the Manager to which this JVM is connected.
JVM ID: This is a unique ID given to the Agent and is used to identify the Agent in all the processes.
Pool: The JVM Pool with which the JVM is associated.
Host: The Host on which the JVM is running.
JVM Name: The name given to the JVM for identification. The basic format of the JVM Name is <HOST>_<PORT>_jvm or <EMFarm>/<Domain>/<Server>_jvm.
CPUs: The number of CPUs.
ID: The port on which the JVM is running. (Default: 5555)
Heap Size (Kb): The total Heap Size used.
Heap Dump Dir: The location of the directory in which the heap snapshots are temporarily stored.
Log Level: The log level of the JVM.
Status: The status of the JVM (active or inactive).
Check the Select check box and click the Edit icon to edit the JVM. In the Edit JVM Information page, you can select a different JVM Pool, modify the JVM Name, Heap Dump Dir, and Log Level. Click Save to save the changes or Reset to restore the previous values.
Registered DB Agents: The following details are displayed:
Manager ID: The ID of the Manager to which this DB Agent is connected.
DB ID: This is a unique ID given to the DB Agent and is used to identify the DB Agent in all the processes.
Host: The host on which the DB Agent is running.
CPUs: The number of CPUs.
OS User: The user who started the DB Agent.
ID: The port on which the DB Agent is running (Default is 5555).
Log Level: The log level of the DB Agent.
Status: The status of the DB Agent (active or inactive)
Check the Select check box and click the Edit icon to edit the DB Agent.
You can group sets of JVMs into JVM pools that provide monitoring information across all related JVMs in a single view. You can view all the JVM pools in the WebLogic Domain, create a new JVM pool, and edit existing JVM pools.
From the Setup menu, select Middleware Diagnostics and click Setup JVM Diagnostics in the Middleware Diagnostics page.
Click the Pools tab. The list of all available JVM pools is displayed. For each pool, you can view the polling interval, whether polling is enabled, and the e-mail notification recipient. If the Polling Enabled flag is set to Y, JVMs belonging to this pool will be polled for active requests periodically based on the Poll Interval.
Click New Pool to create a new pool.
In the Add JVM Pool Information page, enter the name and description of the JVM pool.
In the Poll Interval field, specify the sample interval for JVMs belonging to this pool when monitoring (polling) is enabled.
Check the Poll Enabled check box to poll the JVMs belonging to this pool.
Click Save to save the JVM Pool information.
To delete a pool, check the select check box and click the Delete icon. You cannot delete the Default and Other pools.
Click the Edit icon to edit an existing JVM pool.
Modify the JVM pool details and click Save to save the changes.
To modify the pool thresholds, click Set Thresholds. See Section 10.2.2.1, "Updating Pool Thresholds" for details.
Follow these steps to edit the pool thresholds:
From the Setup menu, select Middleware Diagnostics and click Setup JVM Diagnostics in the Middleware Diagnostics page.
Click the Pools tab to view the Show JVM Pools page.
Click the Edit icon of the JVM pool you want to edit.
In the Edit JVM Pool Information page, click Set Thresholds.
In the Edit Thresholds for JVM Pool page, the following details are displayed:
Level: Thresholds violations can have a level of R (red) or Y (yellow).
Metric: The attribute or metric that is being monitored.
Threshold: The value against which the metric is being compared. A violation occurs when the threshold is exceeded after a minimum number of samples have been monitored.
Action URL: The URL to be invoked when a threshold violation occurs. This includes internal URLs into the JVMD Console and external URLs. The Action URL can be used to trace a particular thread, all active threads, or dump a heap in response to a threshold violation. The Action URL can be any valid URL on a remote system. It can also accept URLs on the local JVMD Console. The Action URL should be a valid URL as called from a browser. If not specified, default parameters for the traceThread and heapdump will be added to the URL.
Click Save to save the threshold values.
After the JVM pools have set up and configured correctly, you must enable monitoring so that the JVMs in the pool can be monitored. Follow these steps to enable monitoring for a JVM pool:
From the Setup menu, select Middleware Diagnostics, then click Setup JVM Diagnostics in the Middleware Diagnostics page.
Click the Monitoring tab to view the monitoring status of the JVM pools.
Click the Edit icon to enable or disable monitoring of pools or change their polling intervals by updating the pool properties.
You can mark a thread as idle by adding it to an Idle Thread Rule. All threads that have been marked as idle will not be monitored. Click New Rule to create a new Idle Thread Rule.
Rule Type: The Rule Type can be:
Monitor (Waiting on Lock): Select this type if you want to ignore threads that are locked with a lock of the specified nameCurrent Call: Select this type if you want to ignore all threads that are making a call to the selected function.
Rule Value: The Rule Value should contain the class name, method, followed by class+method. An example of a Current Call is weblogic.socket.PosixSocketMuxer->processSockets. An example of a Monitor (Waiting on Lock) is weblogic.socket.PosiSocketMuxer$1.
All threads that meet the criteria specified in the Idle Thread Rule will not appear in the View Active Threads screen.
You can manually download the various binaries such as JVM Diagnostics Agent, JVM Diagnostics Manager, Database Agent, Load Heap, and deploy them.
Follow these steps to download the binaries:
From the Setup menu, select Middleware Diagnostics, then click Setup JVM Diagnostics in the Middleware Diagnostics page.
Click the Downloads tab. The list of JVM Diagnostics components that can be downloaded is displayed.
Click on the download icon for the component to be downloaded. You can download:
JVM Diagnostics Agent WAR File: The JVM Diagnostics Agent Parameters web.xml Parameters window is displayed. From the Available Managers drop-down, you can select entries that are in the format <host>:<port> - for normal communication, <host>:<port>(secure communication) for communication over the SSL Port or you can select Other. If you select Other, you need to specify the Manager IP Address and the Manager Port to which the JVM Diagnostics Agent is connecting to. While downloading the Agent, you can modify the following parameters:
Tuning Timeouts Parameters: You can modify the Connection Retry Time, GC Wait Timeout, Long Request Timeout, and Idle Agent Timeout.
Target Association Parameters: If you select WebLogic Server, you can specify the Target Name, and Pool Name. If you select Other Server, you can specify the Group ID Property and Pool Name.
Logging Parameters: You can modify the Agent Log Level.
Optimization Level: You can modify the Optimization Level.
JVM Diagnostics Manager EAR File: You can open the jammanager.ear file or save it to a specified location.
Load Heap: The loadheap.zip is saved to a specified location.
Follow these steps to register the database:
From the Setup menu, select Middleware Diagnostics, then click Setup JVM Diagnostics in the Middleware Diagnostics page.
Click the Register Database tab.
The list of registered databases are displayed. The database name, host, Oracle SID for the monitored database, and listener port number is displayed. You will also see a flag indicating whether the database agent is required.
You can do the following:
Add a Database Instance: From the Add menu, select Database Instance to register an Enterprise Manager database target.
Add a Custom Database: From the Add menu, select Custom Database to register an external database target. Specify the Name, Host, Port, SID, Instance ID, Username, and Password and click Test Connection to validate the database details. After the validation, click OK to register the database.
Remove: Select a database from list and click Remove to remove a registered database.
Edit: You cannot edit a Database Instance. Only custom databases can be edited. Select a custom database from the list and click Edit.
Note:
The OS User you specify here must be the same OS User running the database agent. This user must have full database privileges and appropriate environment settings using the SID and path binaries.
The DB User must the same as the user running the application is being monitored.
Multiple registrations may be necessary for a single database agent if different database users are running multiple applications.
For Oracle RAC databases, each node must be registered.
After the database has been registered, the JVM Diagnostics Manager will start monitoring the cross-tier JVM calls between applications being monitored for a particular JVM and the underlying database.
After you have deployed the JVM Diagnostics Manager and configured JVM Diagnostics, you can start using the features. Navigate to the Middleware tab in Enterprise Manager and click on a JVM Pool, Java Virtual Machine, WebLogic Server, WebLogic Domain or Cluster target. The Home page for the target is displayed.
To start using JVM Diagnostics, select the JVM Diagnostics option from the JVM Pool drop-down menu and choose the appropriate option.
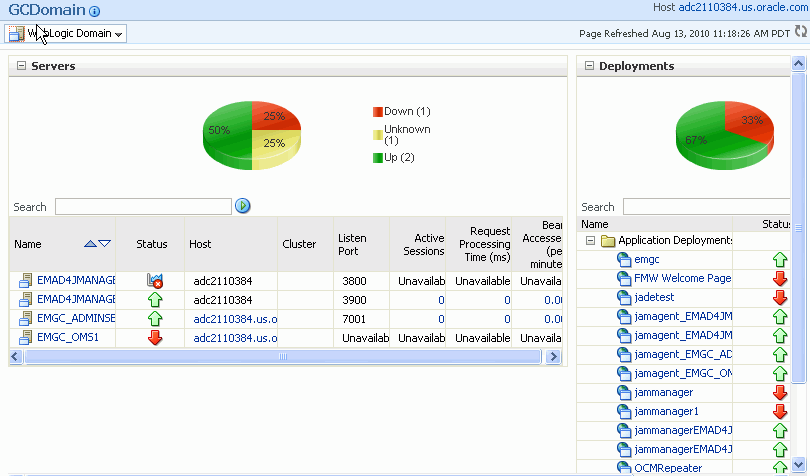
You can group sets of JVMs into JVM pools that provide monitoring information across all related JVMs in a single view. You can monitor all the JVMs in a pool, view historical and real time data for the JVM pool, manage threads and heap snapshots, create a new pool, and edit an existing JVM pool. JVMs and JVM Pools are now targets in Enterprise Manager. You can do the following:
View the JVM Pool Home Page
View JVM Pool Performance Diagnostics
View the JVM Pool Live Thread Analysis
Manage Thread Snapshots
Manage Heap Snapshots
Setup JVM Diagnostics
The JVM Pool Home page shows the details of all JVMs in the pool.
It shows the following details:
Summary: Shows whether poll is enabled and the Polling Interval.
Availability: This region shows the availability status of the members in the JVM Pool. Click on a Member link to drill down JVM Home Page.
Incident: This region shows any open incidents that have occurred, the type, and category of the incident. Click the Summary link to drill down to the Incident Details page.
Realtime Thread States: This region shows the realtime thread status for each JVM in the pool. The current activity of the JVM including CPU usage, memory, number of threads waiting for a database response, number of threads waiting for synchronization lock, and other details are displayed. Click on the JVM link to drill down to the JVM Performance Diagnostics page.
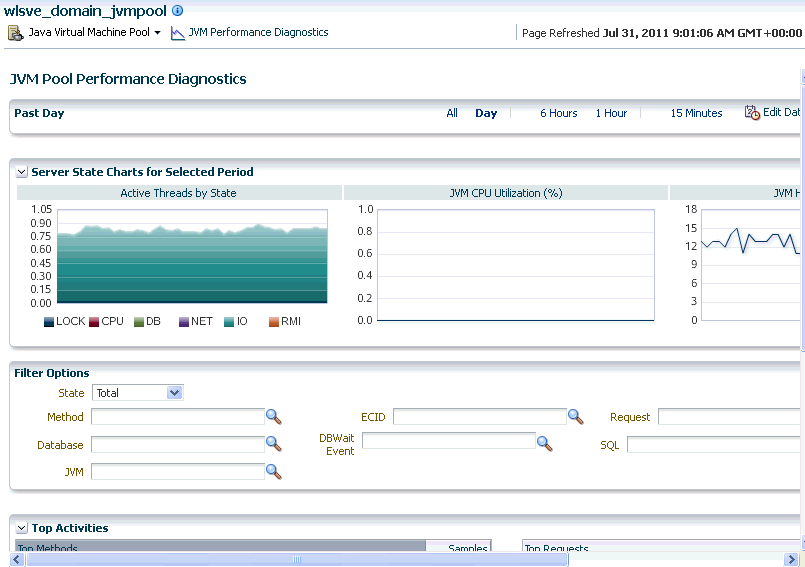
You can view the summary and detailed information of the selected JVM Pool on this page. You can also compare the JVM pool data across two specific time periods. To view this page, select Middleware from the Targets menu and click on a JVM Pool target. Select the JVM Performance Diagnostics option from the Java Virtual Machine Pool menu.
This page shows the summary details of the JVM pools which include the Server State Charts, and a list of Top Methods and Top Requests. You can view the Server State Charts, list of Top Methods, Top Requests, Top DBStates, and Top SQLs. You can filter the data that is displayed by specifying various criteria such as Method Name, JVM Name, Thread State, DBState, and so on. The list of all JVMs in the pool and the server state charts for each JVM is displayed. Click the link to drill down to the Java Virtual Machine Home page.
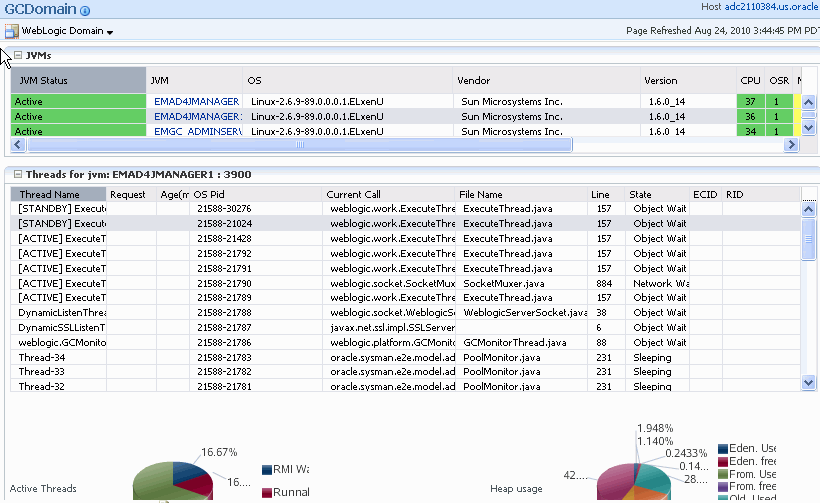
This page shows the real-time data for all the JVMs in the selected pool. This data is useful in analyzing the various active and idle threads on the JVM. During analysis you can drill down from the thread level to methods used in the thread to local variables that are part of the method. To view this page, select Middleware from the Targets menu and click on a Java Virtual Machine Pool target. Select the Live Thread Analysis option from the Java Virtual Machine Pool menu.
This page shows the following:
JVMs: This table shows the list of JVMs and the current status of each JVM. The current activity of the JVM including CPU usage, memory, number of threads waiting for a database response, number of threads waiting for synchronization lock, and other details are displayed
Threads for JVM: This t able shows a list of all the threads running in the JVM. For each thread, the Thread Name, Request, Age, OS PID, Current Call, File Name, Line, State, Waiting On, Wait Time, Lock Held, ECID. If the thread is in the DB Wait State, click on the link to drill down to the Database Home page. See Section 10.5.4.1, "Cross Tier Analysis" for more details.
If the ADP Agent is running, the Request Name and Request Age is displayed. If a thread is in the DB Wait State, the Waiting On column displays the name of the database the thread is waiting on, and the time the thread has to wait is displayed in the Wait Time column.
You can also see two charts, the first one displays the active threads in the JVM, the second one displays the heap status for the JVM.
You can monitor a specific JVM in a pool, view historical and real time data, and so on. You can do the following:
View the JVM Home Page
View JVM Performance Diagnostics
View JVM Performance Summary
View the Live Thread Analysis Page
View the Live Heap Analysis Page
Manage Thread Snapshots
Manage Heap Snapshots
Setup JVM Properties
The JVM Home page shows the summary and configuration information of all the JVMs in the JVM pool. Follow these steps to view the JVM Home page:
From the Targets menu, select Middleware, then click on a Java Virtual Machine target.
The JVM Home page with the following details is displayed.
Summary: Shows details of the JVM such as the JVM Pool it belongs to, the host, Agent Optimization Level, Agent Log Level, JVM Version, and vendor details.
Incident: Shows the thresholds and alerts if any for this JVM.
Availability: The availability status of the JVM.
Active Threads: The number of active threads in the JVM in the last 24 hours.
Realtime Thread States: Shows the state of the various threads in the JVM in the color coded columns. Click on a JVM to view the list of threads in the JVM and the details of each thread.
This page shows the summary and detailed information for a specific JVM. To view this page, select Middleware from the Targets menu and click on a Java Virtual Machine target. Select the JVM Performance Diagnostics option from the Java Virtual Machine menu.
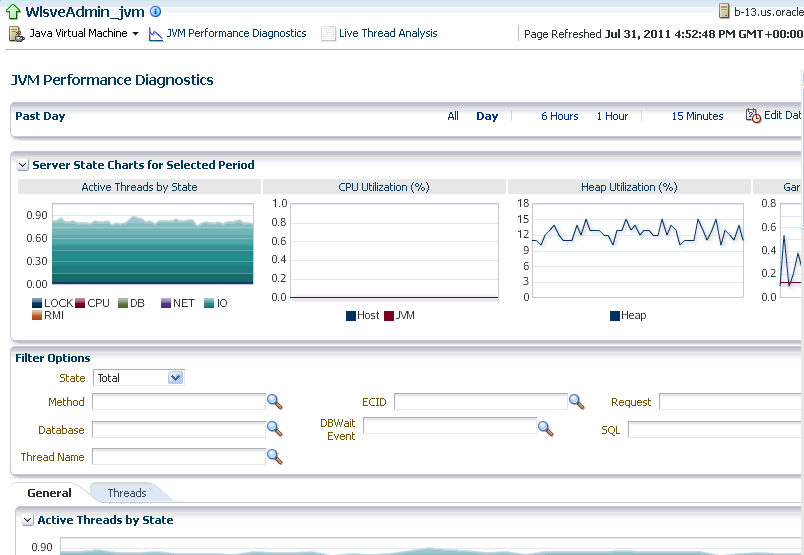
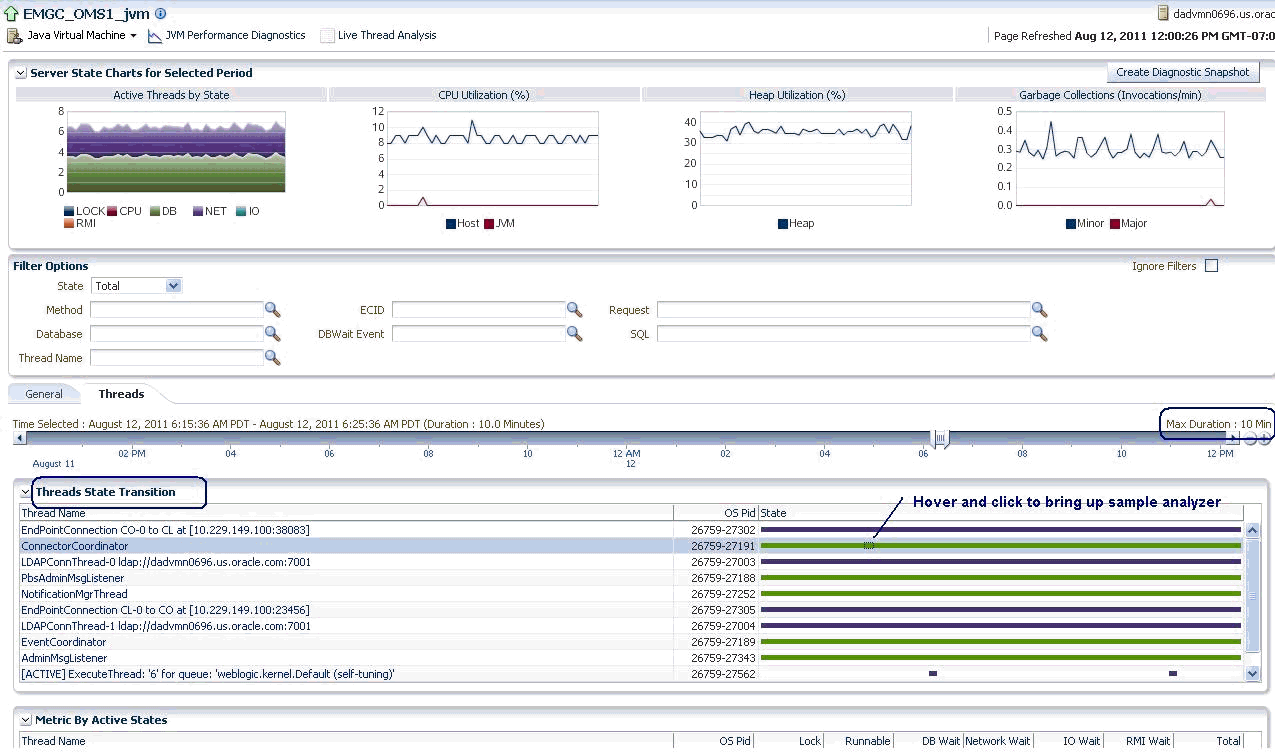
This page shows the summary details of the JVM which include the Server State Charts, Active Threads by State, Top Methods, Top Requests, Top DBWait Events, Top SQLs, and Top Databases. You can filter the data that is displayed by specifying various criteria such as Method Name, JVM Name, Thread State, DBState, and so on.
Click on the Threads tab to view the Thread State Transition chart. This chart shows how the threads have transitioned from one state to the other in the selected period. You can change the time interval and move it to a different time period by using the quick time selection control at the top of the page. You can hover over the colored bars to see the transition changes from one state to the other, for example from Runnable to Not Active or to Runnable.
Click on a bar graph in the State column to view a detailed analysis on the state of the thread. This feature allows you to analyze each sample (JVM snapshot at a specific time) in the monitored data.
Click the Create Diagnostics Snapshot link to collect diagnostic data for the JVM target for a specific period and analyze this data in an offline mode. For more details, see Section 10.12, "JVM Offline Diagnostics"
You can view the performance metrics (system and active threads) for a JVM target on the Performance Summary page. A set of charts are displayed on this page for the JVM target. To view the JVM performance metrics, follow these steps:
From the Targets menu, select Middleware, then click on a Java Virtual Machine target.
Select the Performance Summary option from the Java Virtual Machine menu.
A set of default charts that show the values of the JVM performance metrics over a period of time are displayed. Click the Show Metric Palette button.
The metric palette has a folder for the current target (JVM) and the related targets. You can add or remove metric charts. Leaf nodes act as check boxes. Clicking a leaf node on causes a chart to be added. Clicking it off removes the metric. Dragging a leaf node from the palette to a chart or legend adds the metric to that chart.
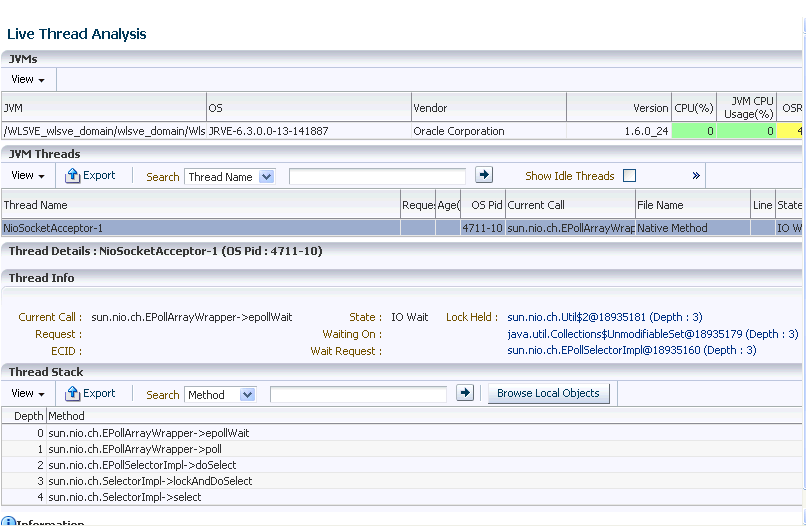
This page shows the real-time data for a selected JVM. This data is useful in analyzing the various active and idle threads on the JVM. During analysis you can drill down from the thread level to methods used in the thread to local variables that are part of the method. To view this page, select Middleware from the Targets menu and click on a Java Virtual Machine target. Select the Live Thread Analysis option from the Java Virtual Machine menu.
This page shows the following:
JVM Threads: This table shows a list of all the threads running in the JVM. Click on a thread to view the thread details in the Thread Info table. For each thread, the Thread Name, Request, Age, OS PID, Current Call, File Name, Line, State, Waiting On, Wait Time, Lock Held, ECID.
If the ADP Agent is running, the Request Name and Request Age is displayed. If a thread is in the DB Wait State, the Waiting On column displays the name of the database the thread is waiting on, and the time the thread has to wait is displayed in the Wait Time column.
You can perform the following actions:
Take Snapshot of a Selected Thread or Active Threads: Select a thread from the list and choose the Take Snapshot of a Selected Thread option from the Actions menu. The Thread Snapshot page is displayed where you take a snapshot. If you select the Take Snapshot of Active Threads option, you can take a snapshot of all active threads running on this JVM. You can specify the following parameters for each snapshot:
Poll Interval: Interval after which snapshot should be repeated.
Poll Duration: Duration for which the snapshot should be taken.
Thread Details: You can specify if the thread details need be included in the snapshot.
Try Changing Threads: Sometimes the stack associated with the thread may change rapidly which makes taking the snapshot difficult. If you select this parameter, you can suspend the thread and take the snapshot.
Include Network Waits: Specify if network wait threads need to be included in the snapshot.
All Threads: Specify if all threads (active and idle) must be included in the snapshot.
Allow Trace Interrupt: Indicate whether the trace process can be interrupted.
Mark Idle: Select a thread from the list and click Actions > Mark Idle to mark a thread as idle.
Mark Active: If you selected the Show Idle Threads check box, a list of idle threads are displayed. Select a thread and click Actions > Mark Active to mark it as an active thread.
Show Idle Threads: Select this check box to list only the idle threads in the JVM Threads table.
Export: Click Export to export the thread details to an Excel file.
Thread Info: This section shows the detailed information for a selected thread. Details of thread including Current Call, Request, ECID, State, Waiting On, and Wait Request are displayed. If the thread is in the DB Wait State, click on the link to drill down to the Database Home page. See Section 10.5.4.1, "Cross Tier Analysis" for more details.
Thread Stack: The Thread Stack table shows the details of the selected thread such as the depth of the thread, methods used in the thread, file where the method is used, and the line number. You can drill down from the method level to a lower level. Select a method from the table and click Browse Local Objects. A popup window is displayed which shows the local variables, objects, their classes, and values.You can export these details to a file by clicking Export. You are prompted to specify the directory in which the file is to be stored. Enter the path and click Save to save file in .csv format.
You can trace any JVM activity from the JVM thread to the database. You can view cross tier correlation for live threads and historical monitored data.
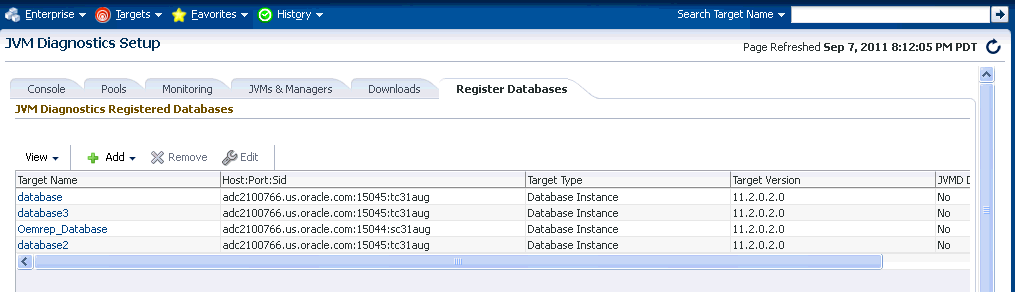
Before you establish cross tier correlation, ensure that the database is an Enterprise Manager target and has been registered with JVM Diagnostics. To register the database, select the Middleware Diagnostics option from the Setup menu, then click Setup JVM Diagnostics in the Middleware Diagnostics page. Click on the Register Databases tab. The list of registered database targets are displayed.
If the JVMD Agent Required field has a No value, you can proceed with the cross tier analysis. If the field has an Yes value, you must ensure that the root user or the same OS user who started the database must be running the JVM Diagnostics Database Agent on the target database machine. If the JVMD Agent Required field has a Status Unavailable value, you cannot perform cross tier analysis as the JDBC connection to the database cannot be established.
To view the cross tier correlation for live threads, follow these steps:
From the Targets menu, select Middleware, then click on a Java Virtual Machine target. Select the Live Thread Analysis option from the Java Virtual Machine menu. See Figure 10-4.
In the JVM Threads column, select a thread with a DB Wait State.
The thread details are displayed in the Thread Info section. If cross tier correlation has been established, you can see SID=<value>"SERIALNUM=<value> when you hover over the State field. Click the DB Wait link.
The Database Details popup is displayed which shows the host, port, SID, user, and JDBC URL for the target database. Click the Register All DB Targets link to register all database targets with JVM Diagnostics and refresh the Live Thread Analysis page.
Oracle Database 11g Release 2 supports special cross tier requirements for JVM Diagnostics and cross tier correlation is automatically established when you click the Register All DB Targets link. If you are using an earlier Oracle Database version, the registration process prompts you to run the JVM Diagnostics Agent on the host machine.
Click View Register Databases to navigate to the Registered Databases page where you can manually register the database target with JVM Diagnostics and check the value in the DB Agent Required column. Click Add, to add a database instance or a custom database. If you register a database as a custom database, the DB Name is displayed in the Waiting field in the Threads Info section but the cross tier correlation cannot be established.
To view the cross tier correlation for historical monitored data, follow these steps:
From the Targets menu, select Middleware, then click on a Java Virtual Machine target. Select the JVM Performance Diagnostics option from the Java Virtual Machine menu.
The three tables Top Databases, Top SQLS, and Top DBWait Events related to the cross tier are displayed. The Top Databases table shows the top databases in which JVM or JVMs in the pool have activities. The Top DBWait Events table shows the top DB Wait events caused by the JVM threads in the database. The Top SQLs table shows the top SQLs executed by the JVM threads in the database. Click the top field of a table to launch a popup which shows the names of the database on which activity was performed.
Click the Database Name link to drill down to the Database Diagnostics page which shows the corresponding database activity.
Click the Top SQLs and Top DBWait Events links to navigate to the SQL Details page and the ASH Viewer page of database diagnostics.
If cross tier correlation has been established, you can view JVM Diagnostics activities for a database (drilling up from Database Diagnostics to JVM Diagnostics). Click the JVM Diagnostics link in the Performance page to drill up to the JVM Performance Diagnostics page. Data relevant to the time interval, database and other filters is displayed.
Oracle Real Application Cluster (Oracle RAC) databases have a complex configuration of database instances and listeners. User applications use Oracle RAC services to connect to the database instead of SIDs that are used for single instance databases. User applications connect to Oracle RAC listeners that are listening on different machines than the actual database instances. In JVM Diagnostics, cross tier correlation is established automatically for Oracle RAC databases.
Cross tier correlation cannot be established if the listener is not registered in Enterprise Manager. In this scenario, you can establish cross tier correlation by using either of the following options:
If you know the database instance that which your application is being connected, add the details of the listener as a property for any database instance in that Oracle RAC. Before you add the listener, you must ensure that it is registered in JVM Diagnostics. For example, to add the jvmd_db_listeners_additional_info property to the database instance, follow these steps:
Insert into mgmt_target_properties (TARGET_GUID, PROPERTY_NAME, PROPERTY_VALUE) values ((select target_guid from mgmt_targets where target_name='<DB Instance Name>'), jvmd_db_listeners_additional_info','LISTENER_adc2110865.us.oracle.com:adc2110865-v.us.oracle.com:10.232.132.249:1521')
Remove the database instance target (DB_INSTANCE_NAME) that was specified in the query.
Ensure that there are no custom databases registered for any of the database target instances which are in Oracle RAC.
Register a custom database with the same name and SID as the Database Instance. The host, port and service must be the same as the one used in the connect string.
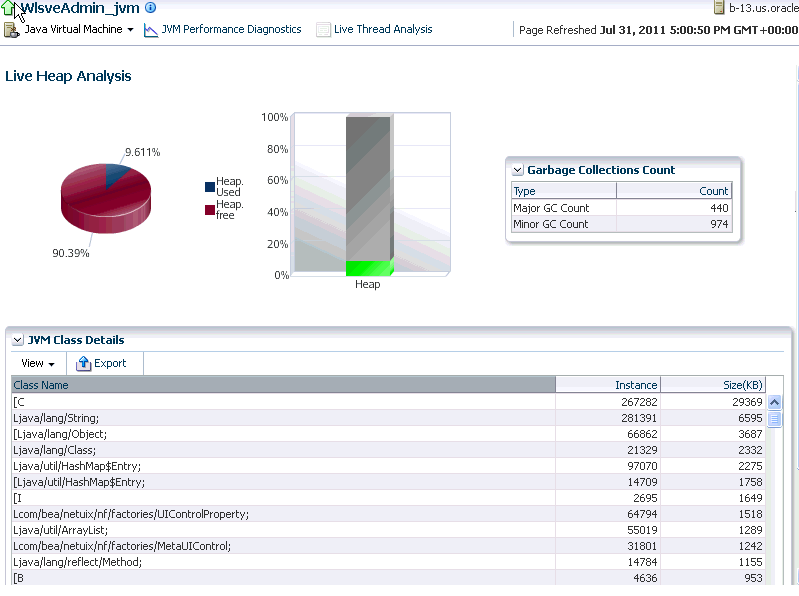
This page shows the real time organization of all objects in the JVM Heap. To view this page, select Middleware from the Targets menu and click on a JVM Pool target. Select the Live Heap Analysis option from the Java Virtual Machine menu.
If the JVM is running at Optimization Level 0, the following details are displayed:
Pie Charts and Bar Charts that show the percentage utilization of the entire heap (free versus used)
Major and Minor Garbage Collections Count
Options to take snapshots of active threads or a specific thread.
JVM Class Details table that displays all the classes in the JVM Heap in decreasing order of their size (in KB). You can export this data to an .xls file using the Export option.
Note:
For JVMs running at optimization level, the following details are displayed:JVM Heap Memory Usage table where the usage (in KB) in various heap spaces.
JVM Heap Number of Objects table which displays the number of objects in various heap spaces.
The following details are displayed:
Garbage Collections: The number of objects that have been added to the garbage collection. The type of garbage collection i.e. minor or major, and the number of garbage collections of a particular type is displayed.
JVM Class Details: This table provides a summary of the heap usage by different types of objects in the heap.
Space name: The name of the space within the JVM heap.
Class: The memory usage by classes in a heap space (in KB).
Instance: The number of heap objects for number of instances of classes in a heap space.
Size: The size of the JVM heap.
Click Create Heap Snapshot to take a heap snapshot. See Section 10.7.2, "Taking a Heap Snapshot" for details. Click Export to Excel to export the live heap data an Excel file.
This page lists all the traces that have been loaded into the repository using the Trace Active Threads option. The Thread column indicates if all active threads or a specific thread has been traced. The number of samples taken during the trace are displayed. Select a thread and click the Details link to drill down to the Diagnostic Image Analysis page. Click the Upload link to take a thread snapshot of active threads.
You can upload thread snapshots to a file and view the data at a later date. You can upload a thread snapshot from the client machine to the OMS. Click the Thread Snapshots link from the JVM Pool menu. Click the Upload link in the Thread Snapshots page. The Uploading Thread Snapshots page is displayed.
When you run the Trace Threads option, you can save the trace file in your local machine or on the OMS. To upload the trace file from the:
Thread Snapshot Path: Click Modify and specify the location of the diagnostic snapshots on the OMS.
Thread Snapshot File: Click Browse to select the Trace Diagnostic Image File and click Start Upload.
The list of thread snapshots is displayed. Select a file and click the Load icon to load the thread snapshot to the database. A message indicating that the trace file has been loaded successfully is displayed. Click the Loaded Successfully, Goto Saved Trace link to view the Diagnostic Image Analysis page.
The JVM Diagnostics memory analysis feature allows you to not only find the objects responsible for the growth but also track their reachability from the root-set. With this feature, you can find the dangling reference responsible for memory leaks.To find a memory leak, you take snapshots of the JVM heap at different points in time. Between the snapshots, your JVM and Java applications continue running at full speed with zero overhead.
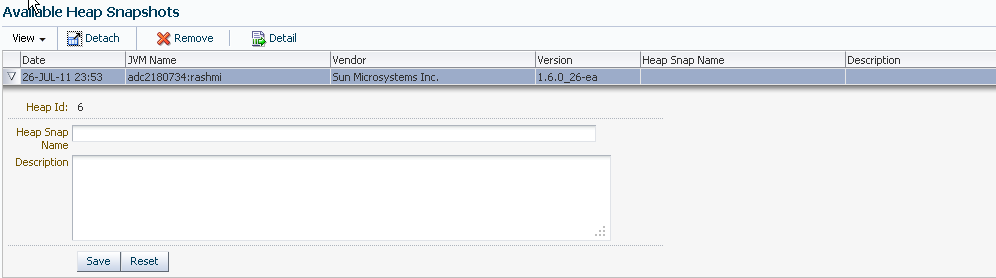
A heap snapshot is a snapshot of JVM memory. Each snapshot stores information about the objects in the heap, their relationships and root-set reachability. You can load the snapshots into the repository, and compare them to see where the memory growth has occurred. Click Heap Snapshots from the menu in the JVM Pool or JVM Home page.
The list of available heaps is displayed with the following details:
Date: The date on which the heap snapshot was taken.
JVM Name: The server on which the JVM is running.
Vendor: The name of the JVM Vendor.
Size: The total size of the Java heap. An adequate heap size helps improve the performance of the application.
Used: The amount of heap that has already been used.
%: The percentage of heap used.
Select a heap from the list and click Details. The Heap Root and Usage page is displayed.
The JVM Diagnostics memory analysis feature allows you to not only find the objects responsible for the growth but also track their reachability from the root-set. With this feature, you can find the dangling reference responsible for memory leaks.To find a memory leak, you take snapshots of the JVM heap at different points in time. Between the snapshots, your JVM and Java applications continue running at full speed with zero overhead.A heap snapshot is a snapshot of JVM memory. Each snapshot stores information about the objects in the heap, their relationships and root-set reachability. You can load the snapshots into the repository, and compare them to see where the memory growth has occurred.
To view and analyze the heap usage, click the Heap Snapshots option from the JVM Pool menu. The list of available heaps with the JVM Name, vendor, size and other details is displayed.
Select a heap snapshot and click the Detail link to drill down to the Roots page.
To view the heap usage by each class of root, follow these steps:
From the Targets menu, select Middleware, then click on a Java Virtual Machine or a Java Virtual Machine Pool target.
Select Heap Snapshots option from the Java Virtual Machine or Java Virtual Machine Pool target.
The list of available heaps is displayed.
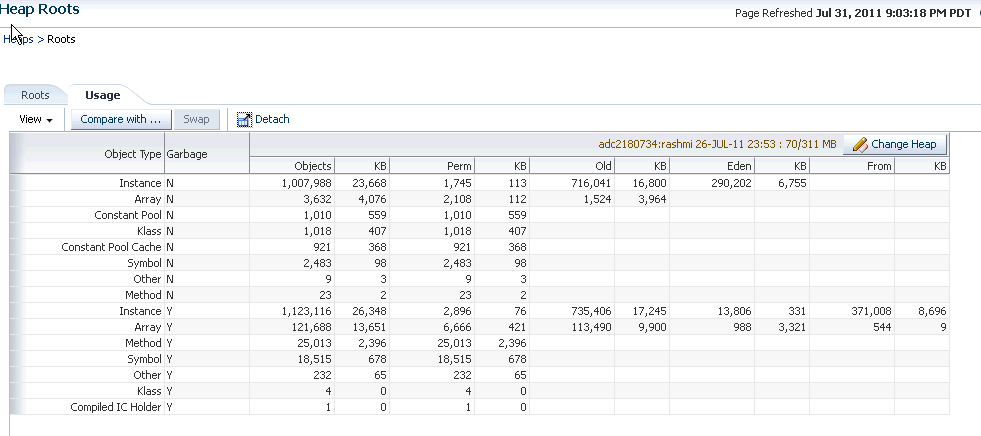
Click on the Heap Details tab to view the number of objects and memory reachable from each root. Click on the Root link to view the objects directly reachable from the root. The following details are displayed:
Root: The name of the root is displayed here. Click on the name to drill down to the Top 40 Objects page.
Object: The total number of objects reachable from this root.
KB: The total amount of memory reachable from this root.
Adj: The adjusted memory reachable from this root. This parameter is useful in tracking the memory leak hot-spots.
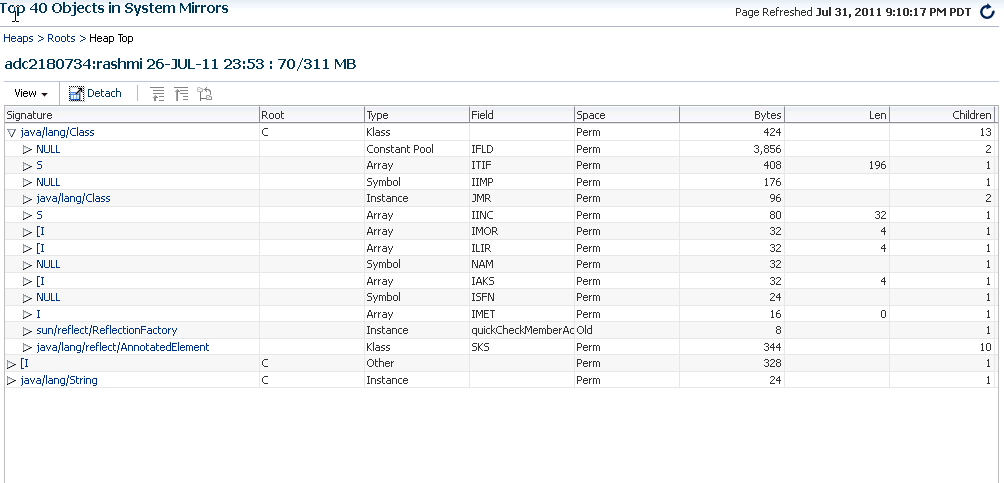
This page shows the top 40 objects reachable from a root. The objects are sorted in descending order by the ascending memory reachable from the object (or the difference of the adjusted memory reachable when comparing two heaps). This view provides a lot of rich detailed information like the amount of memory used by an object, amount of memory reachable by an object (total memory used by all the children), and number of objects reachable from a given object.
The following details are displayed:
Signature: The signature of the object. Click on the link to drill down to the Details page.
Root: This is the internal root identifier.
Type: The type of the object which can be Klass, Instance, Method, and so on.
Space: The heap space in which the object is present.
Bytes: The amount of space used by the object.
Len: If the object is an array, the length of the array is displayed here.
Children: The number of descendants reachable from the object.
Adj: Adjusted memory reachable from this object.
Depth: Indicates how far this object is from the root.
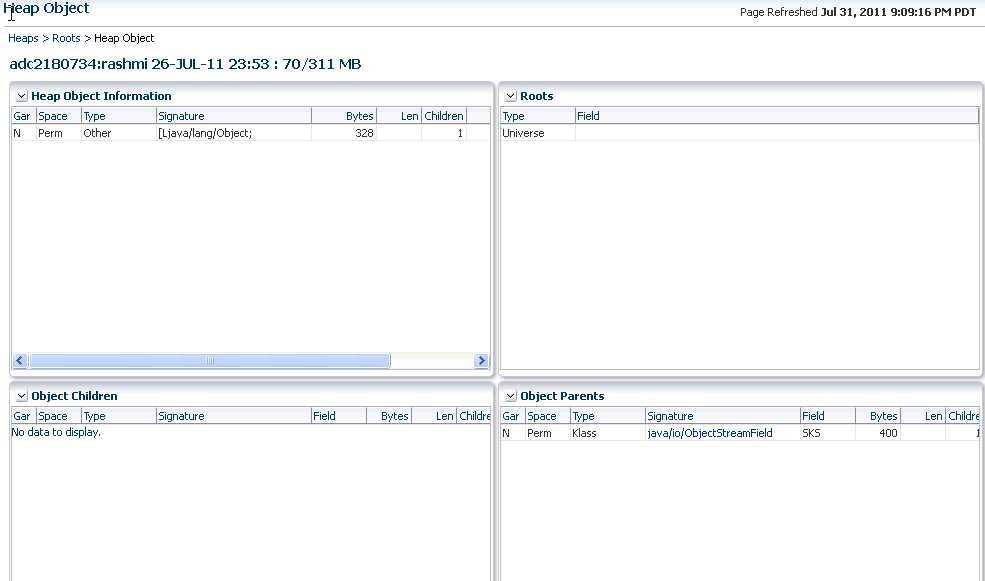
This page shows information about a specific object in the heap snapshot. The following details are displayed:
Heap Object Information
Gar: Indicates whether this object is garbage or reachable from the root.
Space: The heap space in which the object is present.
Type: The type of the object which can be Klass, Instance, Method, and so on.
Signature: The signature of the object.
Bytes: The amount of space used by the object.
Len: If the object is an array, the length of the array is displayed here.
Children: The number of descendants reachable from the object.
Adj: Adjusted memory reachable from this object.
Depth: Indicates how far this object is from the root.
Roots
Type: The type of root which can be Klass, Instance, Method, and so on.
Field: If the root is a local thread, this field contains information about the thread and method.
Object Children
Gar: Indicates whether this child is garbage or reachable from the root.
Space: The heap space in which the child is present.
Type: The type of the child which can be Klass, Instance, Method, and so on.
Signature: The signature of the child. Click on the link to drill down to the Details page.
Bytes: The amount of space used by the child.
Len: If the child is an array, the length of the array is displayed here.
Children: The number of descendants reachable from the child.
Adj: Adjusted memory reachable from this child.
Depth: Indicates how far this child is from the root.
Object Parents
Gar: Indicates whether this parent is garbage or reachable from the root.
Space: The heap space in which the parent is present.
Type: The type of the parent which can be Klass, Instance, Method, and so on.
Signature: The signature of the parent. Click on the link to drill down to the Details page.
Bytes: The amount of space used by the parent.
Len: If the parent is an array, the length of the array is displayed here.
Children: The number of descendants reachable from the parent.
Adj: Adjusted memory reachable from this parent.
Depth: Indicates how far this parent is from the root.
To find a memory leak, you can take snapshots of the JVM Heap at different points in time. Each snapshot stores information about the objects in the heap, their relationships and root-set reachability. You can compare two heap snapshots to see where the memory growth has occurred.
From the Targets menu, select Middleware, then click on a JVM or JVM Pool target.
Select Heap Snapshots option from the Java Virtual Machine or Java Virtual Machine Pool menu.
The list of available heaps is displayed. Click the Compare Heaps tab. The first heap in the list is selected for comparison and you are prompted to select the second heap.
The two heaps are compared and a comparison table is displayed in the Diff Heaps page. The details of each heap with the following details are displayed:
Objects: The total number of objects reachable from the root.
KB: The total amount of memory reachable from the root.
Adj: The adjusted memory reachable from this root. This parameter is useful in tracking the memory leak hot-spots. It provides a better representation of the memory used by an object by ignoring backwards pointing references from child objects to their respective parent object.
Delta: The difference in the total memory and adjusted reachable memory of the two heaps that are being compared.
Click on the root-set with the most growth to diagnose the memory leak.
Click the View Summary button to see a bottom up view of memory reachable by class of objects.
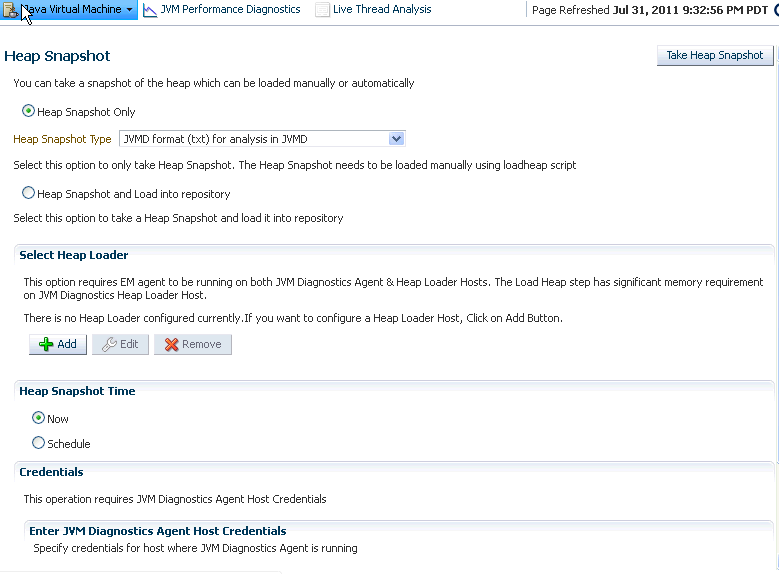
A heap snapshot is a snapshot of JVM memory. It shows a view of all objects in the JVM along with the references between those objects. It can be used to study memory usage patterns and detect possible memory leaks. To take a heap snapshot, follow these steps:
From the Targets menu, select Middleware, then click on a JVM target. The JVM Home page is displayed.
Select the Heap Snapshots option from the Java Virtual Machine menu.
The list of available heaps is displayed. Click Create in the Available Heaps page.
The Heap Snapshot page is displayed.
You can use the following options to take a heap snapshot:
Taking A Heap Snapshot Only: Choose this option to take a heap snapshot and load it manually to repository using the loadheap script.
Taking a Heap Snapshot And Loading Into Repository: Choose this option to take a snapshot and automatically load it to the repository.
To take a heap snapshot and load it manually into the repository using the loadheap script, follow these steps:
Select the Heap Snapshot Only option.
Select the Heap Snapshot Type which can either of the following:
JVMD Format (txt) for analysis in JVMD
HPROF Forma (binary) for analysis with external tools
Click Take Snapshot. The heap snapshot is generated and the file name in which it is stored is displayed. You can upload the heap snapshot and analyze it using appropriate options from the Heap Snapshots menu.
Select this option to take a heap snapshot and automatically load it into the repository.
Prerequisites
The Management Agent must be deployed on the host machine on which the JVM target is running.
The Heap Loader Host is a standalone machine (with high CPU and Memory) on which the Management Agent has been deployed.
DB Client Home which is the location of ORACLE_HOME where sqlldr & sqllplus are present.
There should be sufficient disk space in the system temp directory.
A JVM Diagnostics DB User must have been created using the create_jvm_diagnostic_db_user script.
To take a heap snapshot and load it into the repository, follow these steps:
Select the Heap Snapshot and Load Into Repository option. You can select this option if the Management Agent is running on the JVM Diagnostics Agent and the Heap Loader Host.
If the Heap Loader Host has not been configured, click Add. Specify the Heap Loader Name, DB Client Home (the ORACLE_HOME (full absolute path) on the Heap Loader Host where sqlldr and sqlplus are present), and the Heap Loader Host and click Save.
If the Heap Loader Host has already been configured, the Available Heap Loaders are displayed. Select a heap loader from the list and enter the Host, DB User, and JVM Diagnostics Agent credentials.
Note:
If preferred credentials for JVM Target & Heap Loader host are set, then the Enter Credentials region will not be displayed.
If the Named Credentials for the JVM Diagnostics DB User is set, the Enter Credentials region will not be displayed.
Enter the schedule for the heap snapshot and click Take Snapshot. The heap snapshot is generated and loaded into the repository.
If a particular request is slow or hanging or if the entire application is slow, you can run the real-time transaction trace to view current Java application activity. You can look at the offending threads and their execution stack and analyze how much time a thread spent in waiting for DB wait or wait on a lock. Complex problems such as activity in one thread (or request) affecting the activity in the other thread or rest of the JVM can be found very quickly.
You can trace all active threads and generate a trace file which contains details such as resource usage, thread states, call stack information etc. During tracing, the state and stack of the target thread is sampled at set intervals for the desired duration. Follow these steps to trace active threads:
From the Targets menu, select Middleware, then select a Java Virtual Machine target.
Select the Thread Snapshots option from the Java Virtual Machine menu, then click Create.
In the Trace Active Threads page, specify the time interval between successive samples and the duration of the trace. Optionally, you can select the following parameters:
Trace Thread Details: If this box is unchecked, only the last user call for the active thread will be stored. If the box is checked, all calls for the active thread will be stored, so you can view the call stack. Checking the box increases the overhead and space requirements
Try Changing Threads: If a thread stack changes during a sample (this can happen when a thread is using CPU), JVM Diagnostics will skip that thread for that sample. If you find missing samples, use this feature to retrace the changed stacks. This will retry (up to 5 times) threads with changing stacks. It will also make system calls to get the stack if possible.
Include Network Waits: Most JVMs have large number of idle threads waiting for network events. If you leave this check box unchecked, idle threads will not be included in the trace. Checking this box increases the overhead and space requirements.
Trace All Threads: Check this box if both idle and active threads will be included in the trace.
Allow Trace Interrupt: Allows you to interrupt the trace process.
Click Start Trace to generate the trace file. When the trace has been completed successfully, click Goto Saved Trace link to view the trace data. The Diagnostic Image Analysis page has the following details:
JVM Trace Results: This table provides information about when and where the trace was run. It also shows any filters which have been applied to the results of tracing. Most of the filters are applied by clicking the appropriate link from the tables below. The only exception is the JVM State filter which is applied from here by selecting from the drop-down.
Resource Usage: This section shows the system activities such as CPU utilization, heap usage, and garbage collection during tracing.
Top States: This chart shows the JVM Trace Analysis for the duration of the trace. Click DB Wait to view the DB activity.
Top Methods: This section shows a pie-chart of the top methods for the duration of the trace. It shows the name of the method and the number of samples.
Threads by State: This table shows the state time line for each thread colored by the state activity. It shows the number of samples in each state for each thread. Click on a thread to drill down to the Thread Details page.
Requests by State: This table shows the number of samples in each state for each request. Click on a request to view activity only for that request
Methods by State: This table shows number of samples in each state for each method. Click on a method to view activity only for that method.
You can upload trace data and heap data to a file and view it at a later date.
Uploading Trace Data
This file can be uploaded and stored on the OMS or on the database. To upload trace data (trace diagnostic image), follow these steps:
From the Targets menu, select Middleware, then click on a Java Virtual Machine Pool or a Java Virtual Machine target.
Select the Thread Snapshots option from the Java Virtual Machine Pool or Java Virtual Machine menu. The list of available thread snapshots is displayed.
Click Upload. The Upload Trace Diagnostic Images page is displayed.
When you run the Trace Threads option, the trace file is saved on your local machine or on the OMS. To upload the trace file:
Thread Snapshot Path: Click Modify and specify the location of the diagnostic snapshots on the OMS.
Thread Snapshot File: Click Browse to select the Trace Diagnostic Image File and click Start Upload.
The list of trace files present on the specified location on the OMS are displayed. Select a file and click the Load icon to load the trace file to the database.
A message indicating that the trace file has been loaded successfully is displayed. Click the Loaded Successfully, Goto Saved Trace link to view the Diagnostic Image Analysis page or click Ignore to remain on the same page.
Uploading Heap Data
A heap snapshot is a snapshot of JVM memory. It shows a view of all objects in the JVM along with the references between those objects. You can upload these heap snapshots into the repository and analyze them to detect memory leaks. To upload a heap snapshot, follow these steps:
From the Targets menu, select Middleware, then click on a Java Virtual Machine target.
Select the Heap Snapshots option from the Java Virtual Machine menu. The list of available heap snapshots is displayed.
Click Upload. The Upload Trace Diagnostic Image page is displayed.
When you run the Take Heap Snapshot option, the heap snapshot is saved on your local machine or on the OMS. To upload the heap snapshot:
Thread Snapshot Path: Click Modify and specify the location of the diagnostic snapshots on the OMS.
Thread Snapshot File: Click Browse to select the Trace Diagnostic Image File and click Start Upload.
The list of heap snapshots present on the specified location on the OMS are displayed. Select a file and click the Load icon to load the heap snapshot to the database.
A message indicating that the heap snapshot has been loaded successfully is displayed. Click the Loaded Successfully, Goto Saved Snapshot link or click Ignore to remain on the same page.
The Diagnostic Image Analysis page is displayed. Click Description to view details of the heap snapshot being analyzed. The following Server State charts are displayed:
The following details are displayed:
Garbage Collections: The number of objects that have been added to the garbage collection.
JVM Heap Memory Usage: This table provides a summary of the heap usage by different types of objects in the heap.
JVM Heap No of Objects: This table provides details of all the objects in the heap.
Click Change / Manage Heap Snapshots. A list of available heap snapshots for the JVM is displayed.
Select a heap snapshot file and click Analyze to view the Diagnostic Image Analysis page.
This page lists all the traces that have been loaded into the repository. To view a list of all the available traces, follow these steps:
From the Targets menu, select Middleware, then click on a Java Virtual Machine Pool or Java Virtual Machine target. The Home page for the target is displayed.
Select the Thread Snapshots option from the Java Virtual Machine Pool or Java Virtual Machine menu.
The list of traces that have been loaded are displayed. The Trace ID, the date, the JVM Name is displayed. The Thread column indicates if all threads or only active threads have been traced.
Select a thread from the list and click Details. The Diagnostic Image Analysis page with the detailed analysis of the trace file is displayed.
A trace diagnostic image contains details such as resource usage, thread states, call stack information etc. The trace diagnostic image captures thread data at short intervals. If an application is hanging or is slow, you can analyze these threads and find out the application tier that causing the delay.
On the Diagnostic Image Analysis page, you can:
Click Description to view details of the thread snapshot being analyzed. The following Server State charts are displayed:
Active Threads by State: This chart shows the status of all threads in the JVM. The threads can be in different states like RMI, IO, NET, DB, CPU, and LOCK.
CPU Utilization by JVM: This chart shows the CPU utilization in the JVM.
Heap Utilization by JVM: This chart shows the heap utilization in the JVM.
You can filter the data that is displayed by specifying various criteria such as Method Name, JVM Name, Thread State, DBState, and so on. Check the Ignore Filters check box if you want to ignore the specified filters. The Active Threads by State, Top Requests, Top Methods, Top SQLs, Top DBWait Events, and Top Databases charts are displayed.
Click on the Threads tab to view the Thread State Transition, Metric By Active States, and Method data.
Click Change / Manage Traces. A list of available trace files for the JVM Pool is displayed in the List of Traces Loaded page. The following details are displayed:
Trace ID: The port number for the JVM.
Date: The date and time the trace was run.
JVM Name: The name of the host on which the JVM is running.
Thread: Indicates whether the trace was run for a specific thread or all active threads.
Seconds: The trace duration in seconds.
Samples: The number of samples in the trace.
Select a trace file and click Analyze. The trace details are displayed in the Diagnostic Image Analysis page.
Click Offline Diagnostics to create a diagnostic snapshot.
Diagnostic data for one or JVM targets can be collected for a specific period and analyzed in an offline mode. This section describes the various options that are available to collect live JVM data and analyze it in offline mode. It contains the following sections:
Creating a Diagnostic Snapshot
Using the Diagnostics Snapshot Page
Analyzing a Diagnostics Snapshot
Viewing a Diagnostics Snapshot
You can create diagnostic snapshots for one or more JVM targets for a specified period. To create a diagnostic snapshot, specify the following:
From the Targets menu, select Middleware.
Select the Manage Diagnostic Snapshots option from the Middleware Features menu.
The Create Diagnostic Snapshot option is also available in the JVM Performance Diagnostics page. Navigate the Performance Diagnostics page for a JVM, specify the time range for which you want to create the collection and click Create Diagnostic Snapshot.
Click Create in the Diagnostic Snapshots page. You can navigate to this page by clicking Offline Diagnostics on the Diagnostic Image Analysis page.
Enter a name and description for the diagnostic snapshot.
Specify the duration for the diagnostic snapshot.
Click Add. Select one or more JVM targets for which the diagnostic data is to be collected.
Note:
The JVM targets that you select must belong to the same JVM Pool.Select the diagnostic types for the selected target and click OK. You will see a pop-up window that indicates that the diagnostic snapshot is being created. Click Close after the diagnostic snapshot has been created. You will return to the Diagnostic Snapshots page.
You can collect diagnostic data for one or more JVM targets and analyze them in an offline mode. This page shows the list of diagnostic snapshots that have been created. You can specify search criteria to retrieve a specific snapshot. You can do the following:
Create: Click Create to create diagnostic snapshots for one or more JVMs. The Create Diagnostic Snapshot page is displayed.
Export: Select a file and click Export to export the diagnostic data to a file. Enter the location in which the file is to be stored. You can review and analyze the saved file in an offline mode on the same or a different host machine.
Import: Click Import to import an exported file with diagnostic data for a particular collection object. Specify the name of the file and upload the file from your system. You can analyze the exported file and view a summary of the diagnostic snapshot.
Analyze: Select a file and click Analyze. The Analyze Diagnostic Snapshot page is displayed.
Delete: Select a diagnostic snapshot from the list and click Delete. A confirmation message is displayed. Click OK to delete the diagnostic snapshot.
View: Select a file and click View. The View Diagnostic Snapshot page is displayed.
This page displays the summary details of the diagnostic snapshot and a summary of all the diagnostic types of the diagnostic snapshot. You can view the thread stack, thread states, CPU Utilization, Heap Utilization, Active Threads Graphs, and Garbage Collections.
To analyze a diagnostic snapshot, follow these steps:
From the Targets menu, select Middleware.
Select the Manage Diagnostic Snapshots option from the Middleware Features menu.
In the Diagnostic Snapshots page, select a snapshot from the list and click Analyze.
You can analyze details for each JVM for the specified time interval. Click More Details to view detailed diagnostics information for the JVM. The Diagnostic Image Analysis page is displayed.
This page displays the summary of the targets, target types and the diagnostic information collected.
From the Targets menu, select Middleware.
Select the Manage Diagnostic Snapshots option from the Middleware Features menu.
In the Diagnostic Snapshots page, select a snapshot from the list and click View.
The summary details for the selected JVM target, target types, and the diagnostic information collected for the JVM is displayed.
An event is a discrete occurrence detected by Enterprise Manager related to one or more managed entities at a particular point in time which may indicate normal or problematic behavior. Examples of events include: a database target going down, performance threshold violation, change in application configuration files, successful completion of job execution, or job failure.
JVM Diagnostics threshold violations are now integrated with the Enterprise Manager Event subsystem. When a threshold violation occurs, an Enterprise Manager event is generated. To view the event, follow these steps:
From the Enterprise menu, select Monitoring, then select Incident Manager.
In the View panel, click Events without Incidents. The JVM Diagnostics events are displayed if there are any outstanding JVMD threshold violations.
Click on the link in the Target Name column of a JVM Diagnostics Event.
The JVMD threshold violations will show up in the Incidents table of the JVM or JVM Pool Home page only if the events have been promoted to incidents. For more information on promoting events to incidents, see the Enterprise Manager Administration Guide.
|
Copyright © 2011, 2012, Oracle and/or its affiliates. All rights reserved. Legal Notices |
|