| Oracle® Database 2 Day DBA 11g Release 2 (11.2) Part Number E10897-09 |
|
|
PDF · Mobi · ePub |
| Oracle® Database 2 Day DBA 11g Release 2 (11.2) Part Number E10897-09 |
|
|
PDF · Mobi · ePub |
This chapter provides a brief roadmap for administering your database. It introduces you to Oracle Enterprise Manager Database Control (Database Control), the Web-based interface for managing an Oracle database.
This chapter contains the following sections:
Granting Access to Database Control for Nonadministrative Users
Getting Started with Oracle Enterprise Manager: Oracle By Example Series
This section provides an overview of the tasks involved in managing an Oracle database instance. Each chapter in this guide describes a different task in detail.
To manage your Oracle database:
Start the database instance.
After the installation, your instance is started and your database is open. In the future, there will be times, perhaps for doing database maintenance or because of a power or media failure, that you shut down your database instance and later restart it.
Optionally, configure the network environment to enable clients to connect to your database.
Review your database storage structures: tablespaces and data files, online redo log files, and control files. Create or modify storage structures as needed.
Review memory allocation and adjust as needed.
See "Managing Memory".
Review, unlock, and reset passwords for predefined database users as needed. Create new users, and assign privileges and roles to them.
Create the necessary schema objects, including tables, views, and indexes. Populate the tables with data.
Create or review the backup strategy for the database and back up the database.
Enable archiving of online redo log files, if not already done.
Monitor database performance, diagnose performance problems, and tune the database as necessary.
Investigate, gather diagnostic data for, and report to Oracle Support Services any critical database errors.
See Chapter 11, "Investigating, Reporting, and Resolving Problems".
Keep Oracle Database software up-to-date with the latest releases.
Oracle Enterprise Manager Database Control (Database Control) is the primary tool for managing your Oracle database. It is installed with the database.
Using Database Control, you can perform administrative tasks such as creating schema objects (tables, views, indexes, and so on), managing user security, managing database memory and storage, backing up and recovering your database, and importing and exporting data. You can also view performance and status information about your database.
Database Home Page
The main page for database administration is the Database Home page. This is the page that loads when you log in to Database Control. See "Accessing the Database Home Page".
Online Help
You can access context-sensitive online help by clicking the Help link displayed at the top of every page. On any help page, click Contents for links to all help topics. A search facility enables you to search the contents of online help.
Navigation
Navigational features of Database Control include the following:
Subpage links at the top of the page. These links take you to the various Database Control subpages that organize management tasks into distinct categories. For example, you click Availability to perform tasks associated with backing up and recovering your data.

Drill-down links that provide increasing levels of detail.

For example, clicking the link next to the label Host provides additional details about the computer on which the database runs.
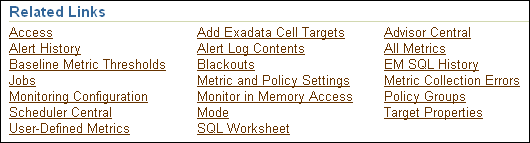
Suggested related links for more information.
Before using certain tools that access the Oracle database, such as SQL*Plus, you must configure environment variables for your operating system. These environment variables are used by Oracle Database to determine the database instance to which the tool should connect.
To configure operating system environment variables for your database instance on Linux and UNIX systems:
Open an operating system command window.
Ensure that the environment variables ORACLE_HOME and ORACLE_SID are set properly. The commands to use to set these environment variables depend on the shell you use to interface with the operating system. For example:
(bash or ksh) export ORACLE_SID=orcl
(csh or tcsh) setenv ORACLE_SID=orcl
You can set these with the scripts coraenv (for the C shell) and oraenv (for other shells). These scripts are typically located in the /usr/local/bin directory.
Ensure that the $ORACLE_HOME/bin directory is in your PATH environment variable.
You can also edit the profile file for your default shell in the home directory of the software owner, for example /home/oracle, so that these environment variables are set every time you log in as that user.
To configure operating system environment variables for your database instance on Windows systems:
Open an operating system command window.
Use either regedit or the Oracle Administration Assistant for Windows to make sure the ORACLE_HOME and ORACLE_SID parameters are set to the correct values in the HKEY_LOCAL_MACHINE\SOFTWARE\ORACLE\KEY_HOME_NAME registry subkey.
Ensure that the %ORACLE_HOME%\bin directory is in your PATH environment variable. At a command prompt, use a command similar to the following:
set PATH=%ORACLE_HOME%\bin;%PATH%
See Also:
Oracle Database Administrator's Reference for Linux and UNIX-Based Operating Systems for more information about setting environment variables
Oracle Database Platform Guide for Microsoft Windows for details on modifying the registry entries
To access Oracle Enterprise Manager Database Control (Database Control) from a browser, the Database Control console process dbconsole must be running on the database host computer. The dbconsole process is automatically started after installation. However, if the system must be restarted, you can start the dbconsole process manually at the command line or start it as a service in Windows. You can also run commands to stop the dbconsole process or view its status. If the dbconsole process is stopped, then it must be manually restarted before you use Database Control.
To start or stop, or to view the status of the dbconsole process from the command line:
Configure the operating system environment variables, as described in "Configuring the Operating System Environment Variables".
Do one of the following:
To start the dbconsole process, run the following command:
./emctl start dbconsole
To stop the dbconsole process, run the following command:
./emctl stop dbconsole
To view the status of the dbconsole process, run the following command:
./emctl status dbconsole
Note:
If you are prompted to set theORACLE_UNQNAME environment variable, then set this variable and run the emctl command again. Set the variable to the database unique name (the value of the DB_UNIQUE_NAME database parameter). A typical value for DB_UNIQUE_NAME is orcl.To start or stop dbconsole as a service on Microsoft Windows:
Do one of the following:
On Windows XP and Windows Server 2003, click Start, and then select Control Panel.
On Windows 2000 Server, click Start, select Settings, and then select Control Panel.
The Control Panel window opens.
Double-click the Administrative Tools icon, and then double-click the Services icon.
The Services window opens.
Oracle Database services begin with Oracle. The dbconsole service is listed as OracleDBConsoleOracle_sid, where Oracle_sid is the system identifier (SID) for your database instance. The status of this process (either started or stopped) is listed in the Status column.
Double-click the OracleDBConsoleOracle_sid
The service properties window opens.
In the Startup Type list, ensure that either Manual or Automatic is selected.
Do one of the following:
To start dbconsole, click Start, and then click OK.
To stop dbconsole, click Stop, and then click OK.
The Database Home page is the main database management page in Oracle Enterprise Manager Database Control (Database Control).
To access the Database Home page:
Ensure that the dbconsole process is running on the database host computer.
See "Starting and Stopping the Database Control Console Process".
In your Web browser, enter the following URL:
https://hostname:portnumber/em
For example, if you installed the database on a host computer named comp42.example.com, and the installer indicated that your Enterprise Manager Console HTTP port number is 1158, then enter the following URL:
https://comp42.example.com:1158/em
If you have recently installed Oracle Database, you can determine the port number for Database Control on Linux and UNIX systems by viewing the $ORACLE_HOME/install/portlist.ini file. Otherwise, you can determine the port number for Database Control by searching for REPOSITORY_URL in the $ORACLE_HOME/Oracle_sid/sysman/config/emd.properties file, where Oracle_sid is the system identifier (SID) for your database instance.
If the database instance is running, then the Login page appears when you access Database Control. If the database is down and must be restarted, Database Control displays the Startup/Shutdown and Perform Recovery page.
You must do the following to start the database:
Click Startup/Shutdown, enter the host login user name and password, and then enter the database login user name and password.
For the database user name and password, enter SYS and the password that you specified during installation.
Click OK to start the database instance, and then in the Confirmation page, click Yes to start the database in open mode.
Log in to the database with a user account that is authorized to access Database Control.
This user initially could be SYS or SYSTEM, with the password that you specified during database installation.
Although the SYSTEM account can be used to perform day-to-day administrative tasks, Oracle strongly recommends creating a named user account for administering the Oracle database to enable monitoring of database activity. To back up, recover, or upgrade the database, you must log in as a SYSDBA user.
Database Control displays the Database Home page.
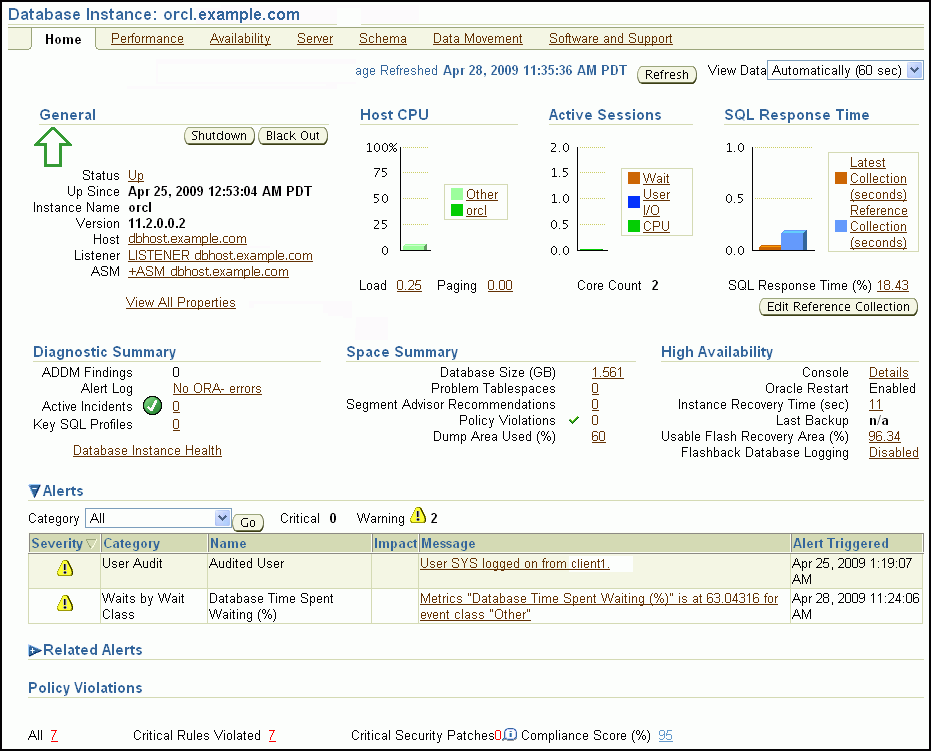
The subpage links across the top of the page enable you to access performance, availability, and other administration pages to manage your database. The features provided by these pages are discussed in other sections of this documentation.
The various sections of the Database Home page provide information about the environment and status of the database. For example, the Alerts and Diagnostic Summary sections warn you of errors and performance problems that are impacting the operation of your database. You can click the provided links to see more detail about the problem areas, and, in some cases, to obtain recommendations for resolving the problems. These topics are discussed in Chapter 10, "Monitoring and Tuning the Database".
As a database administrator, you can log in to Oracle Enterprise Manager Database Control (Database Control) with the SYS or SYSTEM user account to perform administrative and other tasks. Nonadministrative users may also want to log in to Database Control. For example, application developers may want to take advantage of the Database Control interface to create or modify tables, indexes, views, and so on. You must grant access to Database Control to these users before they can log in.
For nonadministrative users to have access to Database Control, they must be granted the SELECT_CATALOG_ROLE role. See "Example: Granting Privileges and Roles to a User Account".
See Also:
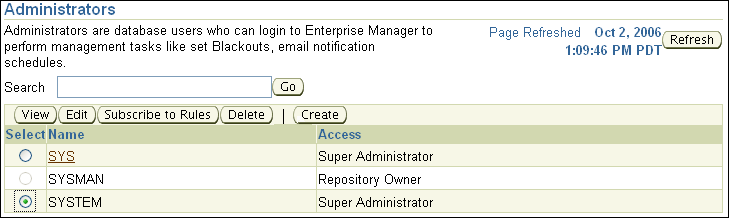
When you log in to Oracle Enterprise Manager Database Control (Database Control) using the SYS, SYSTEM, or SYSMAN user accounts, you are logging in as the Database Control super user. These are the only accounts that are automatically granted the roles and privileges required to administer Database Control itself. Examples of Database Control administration tasks include the following:
Creating other Database Control administrators
Configuring e-mail and other notification methods
Setting alert thresholds for database metrics, such as tablespace space usage percentage exceeded or SQL response time exceeded
See "Managing Alerts".
Selecting database policies to apply, so that Database Control can show alerts if a policy is violated. (An example policy is "A nonsystem user cannot use the SYSTEM or SYSAUX tablespace as its default tablespace.")
Defining blackouts, which are time periods in which database monitoring is suspended so that maintenance operations do not skew monitoring data or generate needless alerts.
You can create Database Control administrative users who have enough privileges to administer Database Control itself, but lack the high-level database administration privileges of the SYS and SYSTEM users. This practice enables you to assign the minimum privileges required for other Database Control administrators to do their jobs, which is a best practice for database security. You can also create a Database Control administrative account for yourself, thus avoiding logging in as SYS or SYSTEM until you must perform database administration tasks.
Using the following procedure, you can assign Database Control administrative privileges to an existing database user or create a new Database Control administrative user. When you create a new Database Control administrative user, a user account is created for that user for the database. You must then decide which system privileges, object privileges, or roles to grant the user, if any, to perform database administration tasks.
To create a Database Control administrative user:
On any Database Control page, at the top of the page, click Setup.
The Enterprise Manager Configuration page appears, showing the Overview of Setup page.
In the left navigation bar, click Administrators.
The Administrators page appears.
Click Create.
The Create Administrator: Properties page appears.
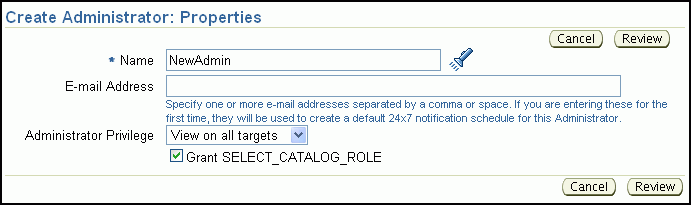
In the Name field, enter the name of an existing database user, or click the flashlight icon next to the field and select an existing database user.
Enter one or more e-mail addresses for this administrator only if you plan to set up e-mail notifications for the database.
See "Setting Up Direct Alert Notification" for more information.
Click Review to view a page that summarizes the information that you entered.
Click Finish to configure the database user as a Database Control administrative user.
The Administrators page appears, showing the new administrator in the list.
This section discusses setting user preferences for Oracle Enterprise Manager Database Control (Database Control). It contains the following topics:
Database Control enables you to set user preferences in the following areas:
Notification
These settings enable Database Control to e-mail you alerts. Alerts are notifications that the database is in an undesirable state and needs your attention. By default, the Database Home page lists all alerts. However, setup is required for e-mail notification. For more information about alerts and setting up notifications, see "Setting Up Direct Alert Notification".
Blackout Administration
Blackouts suspend the collection of database monitoring data and the sending of alerts by Database Control. Blackouts enable you to perform scheduled maintenance on the database without receiving needless alerts and without skewing the monitoring data.
For example, you can stop data collections during a database backup or a hardware upgrade. If you continue monitoring during these periods, then the collected data shows trends and other monitoring information that is not the result of typical day-to-day operations. To get a more accurate, long-term picture of database performance, you can use blackouts to exclude these special-case situations from data analysis. See "Defining Blackout Periods" for more information.
Preferred Credentials
Database Control can automatically execute many routine administrative tasks, such as backups. You can use a job scheduling system that is built into Database Control for these routine tasks. To keep your environment secure, setting up tasks for automatic execution in Enterprise Manager requires you to provide login information for the host computer and database. To avoid entering this information every time you create or run a job or task, Database Control enables you to save this information as preferred credentials. Preferred credentials are stored in the database in encrypted mode to protect them from unauthorized use. See "Setting Preferred Credentials".
You can define one or more one-time or repeating blackout periods during which collection of database monitoring information and the sending of alerts are suspended.
To define a blackout period:
On any Database Control page, at the top of the page, click Setup.
The Enterprise Manager Configuration page appears, showing the Overview of Setup page.
In the left-hand pane, click Blackouts.
The Blackouts page appears.
Click Create to start the Create Blackout wizard.
The Create Blackout: Properties page appears.
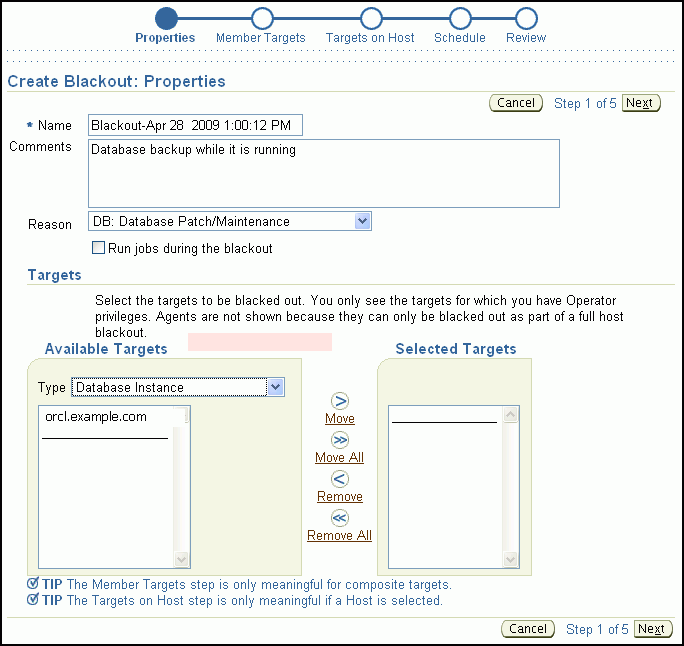
(Optional) Replace the default blackout name with one of your choosing.
(Optional) In the Comments field, enter text that describes the purpose of the blackout.
In the Reason list, select the blackout reason that is most appropriate.
In the Available Targets section, in the Type list, select Database Instance.
The fully qualified name for your database instance appears in the Available Targets list.
In the Available Targets list, select your instance, and then click the Move icon.
Note:
You can also double-click the instance name.The instance name is moved from the Available Targets list to the Selected Targets list.
Click Next.
The Create Blackout Schedule page appears.
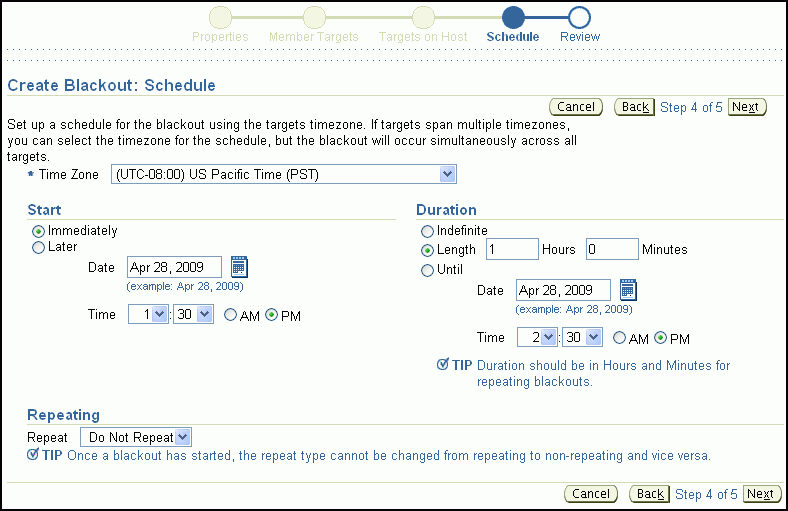
On the Create Blackout Schedule page, do the following:
In the Start section, schedule the blackout either immediately or for a later date and time.
In the Duration section, indicate the duration of the blackout.
To repeat the blackout periodically, in the Repeating section, select a repeat frequency from the Repeat list. Otherwise, use the default value of Do Not Repeat.
Click Next.
The review page appears.
Review what you have entered. You can click Back to change a setting.
Click Finish.
The Confirmation heading appears on the Blackouts page, and the new blackout period is shown in the list.
See Also:
When you set preferred credentials, Database Control automatically fills in host computer and database login credentials for you at times when it usually prompts for these credentials. Database Control also fills in these credentials when it is about to run a job that requires credentials.
To set preferred credentials for the database:
From any Database Control page, at the top of the page, click Preferences.
The Preferences page appears.
Click Preferred Credentials in the left-hand pane.
The Preferred Credentials page appears, showing a table of targets.
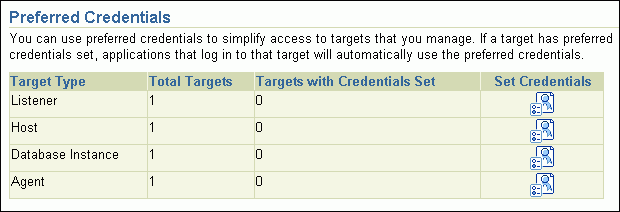
In the table row for the Database Instance, click the icon under Set Credentials.
The Database Preferred Credentials page appears.
Enter the following credentials:
Database credentials for Username/Password and SYSDBA Username/SYSDBA Password
Host credentials for Host Username/Host Password
For example, you might typically connect as the user SYSTEM, use the SYS account for SYSDBA access, and use oracle for the host user name.
Note:
The host user may require certain host privileges to run background jobs such as database backups. For example, on UNIX and Linux, the host user must belong to theOSDBA group (typically dba). On Windows, the host user must be a member of the Administrators group and must be granted the Log on as batch job logon right. See your platform documentation for more information.Click Test to test your credentials.
A confirmation message is displayed if your credentials can be verified.
Click Apply to apply the changes.
In addition to using the graphical user interface (GUI) pages presented in Database Control, you can use other Oracle tools such as SQL Developer and SQL*Plus to administer your database. These tools enable you to perform database management operations, and to query, insert, update, or delete data directly in the database.
The following sections provide details:
To perform many of its operations, Oracle Enterprise Manager Database Control (Database Control) submits structured query language (SQL) statements to the database. SQL (pronounced like sequel) is an industry-standard English-like computer programming language for querying and updating databases.
The following is an example of a SQL query that lists information about countries in a countries table, which is owned by user hr:
SELECT COUNTRY_ID, COUNTRY_NAME FROM HR.COUNTRIES;
SQL is a powerful language that can also be used to perform a variety of database administration tasks. The following SQL statement creates the database user nick and assigns him a password of your choosing, represented by password:
CREATE USER nick IDENTIFIED BY password;
When performing an administrative task in Database Control, you can click Show SQL to see the SQL statements that Database Control generates and submits.
SQL*Plus is a command-line program that you use to submit SQL and PL/SQL statements to an Oracle database. You can submit statements interactively or as SQL*Plus scripts. SQL*Plus is installed with the database and is located in your ORACLE_HOME/bin directory.
You can start SQL*Plus from the command line, or on Microsoft Windows, from the Start menu.
When SQL*Plus loads, it issues the SQL prompt, which looks like this:
SQL>
At the SQL prompt, you can enter statements that perform administrative tasks such as shutting down the database or creating a new user, or you can query, insert, update, and delete data.
You can enter a single SQL statement on multiple lines. You must end each statement with a semicolon (;). For most statements, you can rerun a statement by entering a slash (/) on a line by itself.
The section describes how to start SQL*Plus and connect to the database from both the command line and the Windows start menu.
For a new installation, you connect to the database using either the SYS or SYSTEM database accounts. When you enter SYS or a slash (/) as the user name and provide the AS SYSDBA clause, your access is authenticated using operating system authentication. Operating system authentication uses your Windows, UNIX, or Linux host user account to authenticate you to Oracle Database. You must have logged in to the host computer with a user account that is a member of a special host user group. On UNIX and Linux, this user group is typically dba. This type of authentication enables you to connect to an Oracle database that is not yet started, so that you can start it up. See Oracle Database Administrator's Guide for more information.
The following procedures show how to log in to the database as user SYS using the SYSDBA privilege.
To start SQL*Plus and connect to the database from the command line:
Open a command window.
Configure the operating system environment variables, as described in "Configuring the Operating System Environment Variables".
Start SQL*plus using a command in the following format:
sqlplus {username | /} [as sysdba]
An example of this command is the following:
$ sqlplus / AS SYSDBA
Enter password: password
For username, you can use the SYS or SYSTEM administrative users. At the prompt, enter the password that you set up during installation. If you use the SYS user, you must include AS SYSDBA after the username.
SQL*Plus connects you to the default database instance (Microsoft Windows) or the database instance specified by environment variables (Linux and UNIX).
To start SQL*Plus and connect to the database from the Windows Start menu:
Configure the operating system environment variables, as described in "Configuring the Operating System Environment Variables".
Click Start, select Programs (or All Programs), then Oracle - HOME_NAME, then Application Development, and then SQL*Plus.
When prompted, enter the user name and password for the account to use to connect to the database.
For the user name, you can use the SYS or SYSTEM administrative accounts, and you can use the password that you set up during installation.
If you use SYS or / as the user name, follow them with a space and then the clause AS SYSDBA, as shown in the following examples:
Enter user-name: SYS AS SYSDBA
Enter password: password

or

Enter user-name: / AS SYSDBA
SQL Developer provides another GUI for accessing your Oracle database. SQL Developer supports development in both the SQL and PL/SQL languages. It is available in the default installation of Oracle Database.
With SQL Developer, you can browse database objects, run SQL statements and SQL scripts, and edit and debug PL/SQL statements. You can also run any number of provided reports, also create and save your own.
You can download SQL Developer from the Oracle Technology Network (OTN) Web site.
See Also:
Oracle Database 2 Day Developer's Guide for instructions for starting SQL Developer
Oracle By Example (OBE) has a series on the Oracle Database 2 Day DBA guide. This OBE steps you through the tasks in this chapter and includes annotated screenshots.
To view the Getting Started with Oracle Enterprise Manager OBE, in your browser, enter the following URL:
|
Copyright © 2004, 2012, Oracle and/or its affiliates. All rights reserved. Legal Notices |
|