| Oracle® Fusion Middleware Developer's Guide for Oracle WebCenter Portal (Oracle Fusion Applications Edition) 11g Release 1 (11.1.1.6.3) Part Number E25595-02 |
|
|
PDF · Mobi · ePub |
| Oracle® Fusion Middleware Developer's Guide for Oracle WebCenter Portal (Oracle Fusion Applications Edition) 11g Release 1 (11.1.1.6.3) Part Number E25595-02 |
|
|
PDF · Mobi · ePub |
WebCenter Portal provides templates for creating two kinds of applications: Framework applications and Portlet Producer applications. A Framework application is an ADF web application that is configured for building portal Web applications that include navigations, social computing services, and runtime customization. A Portlet Producer application is configured for building and deploying standards-based portlets.
This chapter includes these topics:
To readily find and use the appropriate components in your Framework or Portlet Producer application, you must ensure that the right technology scopes are set, tag libraries added, and required Java classes are added to the class path. Once you do this, relevant components are included in the Component Palette and relevant context menus become available in JDeveloper.
Fortunately, Oracle provides out-of-the-box application templates to ensure that scopes are set properly and the right tag and Java libraries are added to create Framework or Portlet Producer applications.
Using the WebCenter Portal – Framework Application template generates default WebCenter Portal: Framework projects with unique technology scopes, libraries, and default files. Additionally, the template limits the types of options that are exposed in the JDeveloper user interface to those appropriate for Framework projects.
Note:
In addition to populating the application with default files and folders, the template populates the Resource Palette with the WebCenter Portal – Framework Catalog and the WebCenter Portal – Services Catalog. The Services Catalog contains data controls and task flows that you can use to integrate WebCenter Portal services in your application. The WebCenter Portal – Framework Catalog contains a collection of components that are most commonly used for building portals. For more information see Chapter 16, "Creating and Managing Resource Catalogs."
Application templates provide a means of easily creating an application with a pre-defined set of projects and technology scopes. Templates also provide a means of partitioning an application into projects that reflect a logical separation of the overall work.
The application templates include:
WebCenter Portal – Framework Application: Populates the application with a portal project and a static application resources project. The portal project includes features like site navigation, page hierarchies, delegated administration, security, page templates, and runtime customization. A Framework application can consume portlets, incorporate content management services, and include WebCenter social computing services. The static application resources project includes static application resources like HTML and image files. By default, this project is called PortalWebAssets. By separating the static resources into a separate project, it is possible to deploy those resources to a dedicated server. See Section 5.2, "Creating a Framework Application" and Section 5.4, "Understanding the PortalWebAssets Project."
WebCenter Portal – Portlet Producer Application: Populates the application with a project scoped for creation of JSR 286 (standards-based) and Oracle PDK-Java portlets. See Section 60.1.2, "Introduction to PDK-Java Portlets."
It is not required that you use these templates. If you prefer, you can create your own Framework or Portlet Producer applications by manually scoping the application technologies and creating the relevant projects. For more information, see Section 6.1, "Manually Configuring a Framework Application With Technology Scopes."
If you are working with an existing application that was created with some other template, you can also extend it with WebCenter Portal components. To do this, you must manually add any required projects, technology scopes, and tag libraries. For information about extending existing applications, see Section 6.2, "Extending Non-WebCenter Portal: Framework Applications to Include WebCenter Capabilities."
This section describes how to create an application using the WebCenter Portal – Framework Application template.
Note:
Technology scopes control the options that appear by default in the New Gallery dialog. They can also be used to control the context menus that appear in JDeveloper and to add tag libraries to the project so that tags appear in the Component Palette.
This section explains how to create a WebCenter Portal: Framework application. A Framework application is a portal created with a special template called the WebCenter Portal – Framework Application template. For more information about portals, see Chapter 9, "Understanding Framework Applications."
Tip:
The WebCenter Portal – Framework Application template prepopulates the Framework application with a single portal project that includes features like site navigation, page hierarchies, delegated administration, security, page templates, and runtime customization. For more information, see Section 9.12, "How are WebCenter Portal Files Organized?."
A Framework application is a portal you create using the WebCenter Portal – Framework Application template. To create a portal with this template:
Access the application creation wizard. JDeveloper provides several ways for you to access this wizard. For example:
From the File menu, choose New. In the New Gallery dialog, expand Applications, select WebCenter Portal – Framework Application, and click OK. For example, see Figure 5-1.
From the Application menu, select New. In the dialog select WebCenter Portal – Framework Application.
If you have an existing application that is open, in the Application Navigator, right-click <Application-Name> and choose New. In the New Gallery dialog, expand Applications, select WebCenter Portal – Framework Application, and click OK.
If you have an existing application that is open, in the Application Navigator, from the <Application-Name> drop down menu, select New. In the New Gallery dialog, expand Applications, select WebCenter Portal – Framework Application, and click OK.
Note:
At this point, you are on the first page of the Create WebCenter Portal – Framework Application wizard. The wizard includes four pages, which are explained in the following steps.
Enter a name for the application in the Application Name field, as shown in Figure 5-2.
Figure 5-2 Create WebCenter Portal – Framework Application Wizard Step 1 of 5
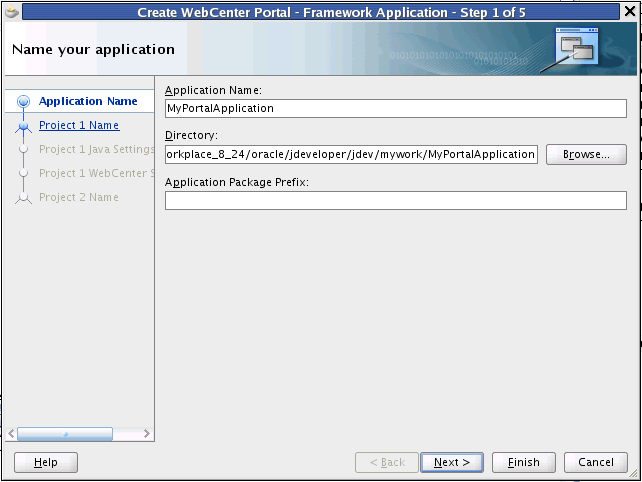
In the Directory field, enter a path to the directory where you wish to store the application, or accept the default path.
For example:
C:\JDeveloper\mywork\Application1
Optionally, click the Browse button to navigate to the desired directory.
If required, in the Application Package Prefix field, enter a prefix to use for packages created within this application.
Note:
Depending on how you launched the wizard, you might see an Application Template list. If you do see this list, make sure WebCenter Portal – Framework Application is selected.
Tip:
At this point, you could click Finish to create a project with default Framework features, including page hierarchies and navigations. We'll continue and review the rest of the wizard pages.
Click Next.
Enter a project name, as shown in Figure 5-3.
Figure 5-3 Create WebCenter Portal – Framework Application Wizard Step 2 of 5
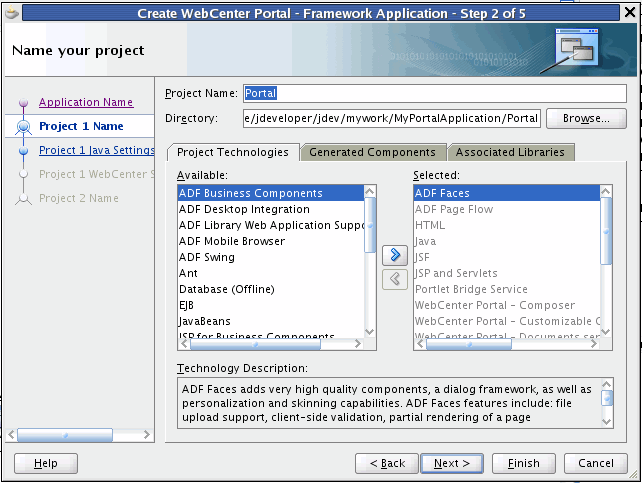
Enter a directory in which to place the project, or use the Browse button to select a directory.
Optionally add or remove Project Technologies. For more information, see Section 6.1.3, "What Are the Default Technology Scopes for a Framework Application?."
If you wish, select the Generated Components and Associated Libraries tabs to view additional configuration files and libraries that will be added to the project. For more information, see Section 1.10, "What Configuration Files Should I Know About?."
Click Next.
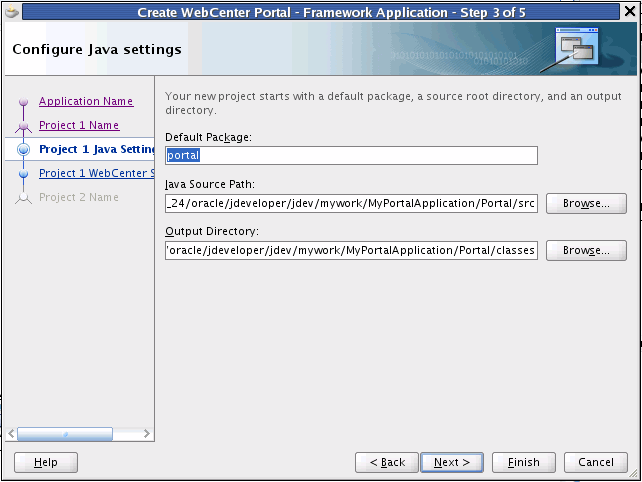
If you wish, enter a Default Package name and directories for the default Java source files and output class files, as shown in Figure 5-4.
Figure 5-4 Create WebCenter Portal – Framework Application Wizard Step 3 of 5
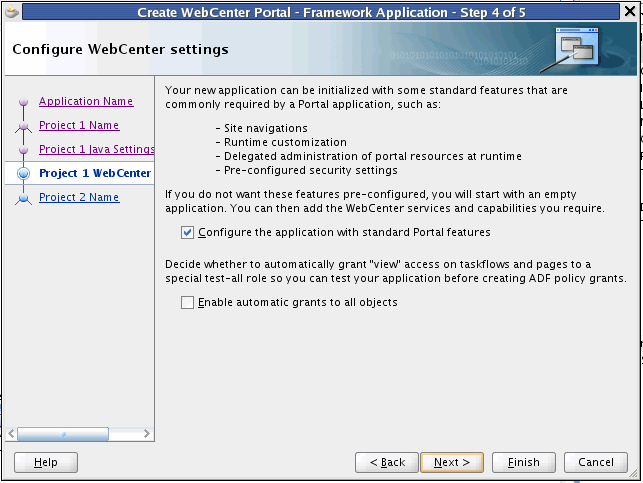
In the next wizard page, two check boxes appear, as shown in Figure 5-5. Generally, the default settings are recommended; however, see the following note for more information on this wizard page.
Figure 5-5 Create WebCenter Portal – Portal Framework Wizard Step 4 of 5
Note:
If you want your application to include the features of Oracle WebCenter Portal: Framework, like page hierarchies and navigations, leave the first box checked (Configure the application with standard Portal features). If you uncheck this box, the result is that you will create a traditional Oracle Fusion Web Application that does not contain Framework features. For detailed information on the effect of checking or unchecking this box, see Section 6.1, "Manually Configuring a Framework Application With Technology Scopes."
Oracle recommends that you leave the first checkbox selected, unless you know for sure that you do not want to use the Oracle WebCenter Portal: Framework features.
The second checkbox, Enable automatic grants to all objects, allows you to create a special role called test-all with View access on all taskflows and pages. This option is primarily added to make testing the application easier. It is unchecked by default.
Click Next.
In the final wizard page you are given a chance to configure the static application resources project. By default, this project is called PortalWebAssets. The project includes static application resources like HTML and image files. By separating the static resources into a separate project, it is possible to deploy those resources to a dedicated server. See For more information, see Section 5.4, "Understanding the PortalWebAssets Project.".
Figure 5-6 Create WebCenter Portal: Framework Application Wizard Step 5 of 5
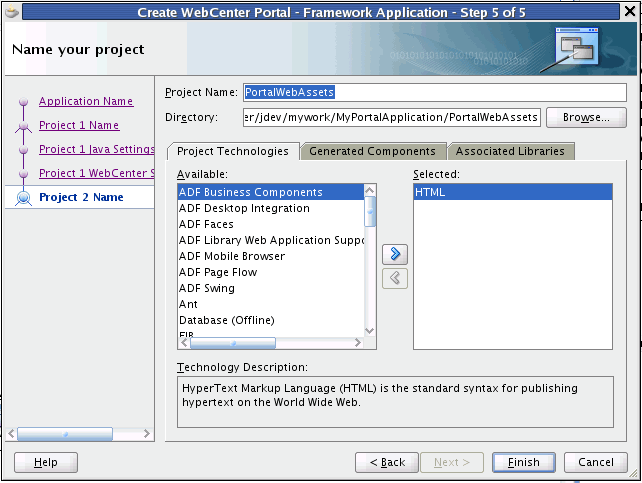
Click Finish to create the Framework application.
The WebCenter Portal – Framework Application template populates a new portal application with several pages. This section explains how to add new pages to your portal application. See also Section 9.5.1, "Understanding Pages, Page Templates, and the Portal Page Hierarchy."
Note:
Always create portal pages in JDeveloper as JSP documents (.jspx) rather than JSP pages (.jsp). For page customizations to be stored, the page must be represented in XML. By choosing to create an XML representation of the JSP document (.jspx), you ensure that customizations are always possible for the Framework application page.
Start JDeveloper.
In the Application Navigator, right-click the pages folder (Web Content/oracle/webcenter/portalapp/pages) in your portal project and select New.
In the New Gallery, expand Web Tier, select JSF and then JSF Page, and click OK.
In the Create JSF Page dialog (Figure 5-7), enter a file name for the page.
Select Create as XML Document (*.jspx).
Select a page template. For more information on page templates, see Section 9.5.1, "Understanding Pages, Page Templates, and the Portal Page Hierarchy."
Click OK.
For information about the other settings in this dialog that are not specific to Framework application pages, see the Oracle Fusion Middleware Web User Interface Developer's Guide for Oracle Application Development Framework.
This section discusses the PortalWebAssets project. If you wish, you can place static resources like HTML files and images in this project. The PortalWebAssets project is created, by default, in new Framework applications.
Static resources for a web application, like HTML and image files, are typically bundled and deployed with the application. Requests for both dynamic and static resources are generally handled by the host application server. One way to optimize server performance is to separate the static resources from the application and deploy them on a different (possibly less expensive and more scalable) server. Framework applications support this scenario with a static application resources project, which can include static resources like HTML and images. By default, this project is called PortalWebAssets, but you can rename the project if you wish. See Figure 5-8.
To use the static resources project, simply add content (like HTML or image files) to the project. You can do this directly from the file system, by adding files under the ../PortalWebAssets/public_html directory, or by adding in JDeveloper. For instance, to add an HTML file, select New from the File menu, and use the New Gallery wizard to create the resource.
Note:
CSS files used for skins must remain in the Framework application project. Do not attempt to place skin CSS files in the static application resources project.
By default, a portal project includes the static application resources project (PortalWebAssets) as a dependency. This means they are built together and deployed to the same server. If you do not wish to deploy static resources to another server, then you do not need to take any action with respect to the static resources project.
If you wish to decouple the PortalWebAssets project from the Portal project, do the following:
Right-click the Portal project and select Project Properties.
In the Project Properties dialog, select the Dependencies node, as shown in Figure 5-9.
To remove the dependency, click the Delete button, or select the Edit button and deselect the project in the Edit Dependencies dialog, as shown in Figure 5-10.
Generate two distinct archives (Portal.ear and PortalWebAssets.jar), and deploy them to separate servers. See Section 5.4.3, "Deployment Options."
The Portal.ear file is typically deployed to the application's managed server. The PortalWebAssets.jar file can be deployed to any J2EE compliant server container, usually by creating a WAR deployment profile in the PortalWebAssets project and including it in an EAR deployment profile. Another, simpler, option is to unzip the JAR file into an Apache web server. See also Chapter 70, "Deploying and Testing Your WebCenter Portal: Framework Application."
Developers can use EL expressions to dynamically generate the target URL for static resources. You have two options for using EL. With the first option, you need to define a base URL preference. The second allows you to map URLs dynamically.
This solution provides a single preference that uses a "base" URL to redirect resources to a desired server. With this option, EL expressions take a format that is illustrated by the following sample:
<af:image source="#{preferenceBean.baseResourceURL}/images/globe.png"/>
To configure this option, add a preference to the adf-config.xml file as follows:
<portal:preferences>
...
    <portal:preference id="oracle.webcenter.portalapp.baseresourceurl"
        desc="Default Base Resource URL EL"
        value=
       "#{request.scheme}://#{request.serverName}:#{request.serverPort}#{request.contextPath}"
       resourceType="BaseResourceURL" display="true"
    />
...
</portal:preferences>
The only limitation of this technique is that you can only map values to one server. There is only one preference value that can be returned. If you want to dynamically configure URLs, choose the technique described in the next section, Section 5.4.4.2, "Mapping URLs Dynamically."
This solution lets you construct URLs dynamically through the ability to specify multiple namespaces. With this option, resources become a parameter to the preference, allowing the resources to be mapped to the correct namespace.
This solution supports two ADF component categories:
The first category includes static resources referenced by ADF Faces components. This type of call is illustrated by the following sample:
<af:image source="#{preferenceBean.staticResourceURL['/oracle/webcenter/portalapp/static/images/globe.png']}"/>
The second category includes static resources referenced through the inlineStyle of ADF Faces components. This type of call is illustrated by the following sample:
<af:panelBorderLayout id="pt_pgl1"
inlineStyle='background-image:url(#{preferenceBean.staticResourceURL["/oracle/webcenter/portalapp/static/images/globe.png"]});'>
The EL expression:
#{preferenceBean.staticResourceURL['<resource path>']}
performs a resource namespace lookup to derive the resource URL prefix. The input to the lookup is the path of the resource (for example: /oracle/webcenter/portalapp/static/images/globe.png). To establish the mappings between resource namespaces and URLs, edit the <portal:resource-mappings> section of the adf-config.xml file.
To configure this option, add a preference to the adf-config.xml file as follows:
<portal:adf-portal-config>
    <portal:preferences>
    ...
    </portal:preferences>
    <portal:resource-mappings>
        <portal:resource-mapping path="/"
 url-prefix="#{request.scheme}://#{request.serverName}:#{request.serverPort}#{request.contextPath}"
       />
    </portal:resource-mappings>
</portal:adf-portal-config>
The lookup yields the prefix of the resource URL. The final value of the resource URL is derived by concatenating the URL prefix with the path to the resource. For example,
/oracle/webcenter/portalapp/static/images/globe.png
yields:
http://myserver/static_resources/oracle/webcenter/portalapp/static/images/globe.png
At development time, the url-prefix lookup always resolves to the application's context URL, for example: http://<server>:<port>/<context root>.
Example 5-1 shows a sample mapping configuration in adf-config.xml:
Example 5-1 Sample Namespace Lookup Mapping
<portal:adf-portal-config>
    <portal:preferences>
    ...
    </portal:preferences>
    <portal:resource-mappings>
        <portal:resource-mapping path="/oracle/webcenter/portalapp/static"
            url-prefix="http://myserver/static_resources"/>
        <portal:resource-mapping path="/mycompany/static/images"
            url-prefix="http://myserver/static_resources"/>
        <portal:resource-mapping path="/mycompany/myapp/static/images"
            url-prefix="http://myserver/static_resources/myapp2"/>
    </portal:resource-mappings>
</portal:adf-portal-config>
A portlet producer application is configured to build standards-based (JSR286) and Oracle PDK-Java portlets. This section explains how to create a portlet application using the Portlet Producer Application template. See also Chapter 58, "Overview of Portlets."
For information about extending an existing application to enable portlet creation, see Section 6.2, "Extending Non-WebCenter Portal: Framework Applications to Include WebCenter Capabilities."
This section includes these topics:
Section 5.5.1, "How to Create a Portlet Application Using a Template"
Section 5.5.2, "What Happens When You Use a Portlet Producer Application Template"
The Portlet Producer Application template consists of a single project, Portlets. Use the Portlets project to create JSR 286 (standards-based) and Oracle PDK-Java portlets.
To create an application using the Portlet Producer Application template:
Access the application creation wizard in any of the following ways:
From the File menu, choose New. In the New Gallery dialog, expand Applications, select Portlet Producer Application, and click OK.
From the Application Navigator, select New Application.
If you have an application open, then in the Application Navigator open the application name drop down menu and select New Application.
In the Application Navigator, right-click the application name and choose New. In the New Gallery dialog, expand Applications, select Portlet Producer Application, and click OK.
In the Name your application page of the creation wizard, enter a name for the application in the Application Name field.
In the Directory field, accept the default path or enter a path to the directory where the application should be stored.
For example:
C:\JDeveloper\mywork\Application1
Optionally, click the Browse button to navigate to the desired directory.
If required, in the Application Package Prefix field, enter a prefix to use for packages to be created within this application.
From the Application Template list, select Portlet Producer Application.
Note:
The Application Template list appears only when you invoke the wizard by clicking New Application in the Application Navigator as described in step 1.
Click Finish to create the portlet application with default project configurations.
Using the Portlet Producer Application template generates the default Portlets project with the Java, JSP and Servlets, and Portlet technology scopes. It limits the types of options that are exposed in the JDeveloper user interface to those appropriate for creating portlets.
When you right-click this new project, options to create JSR 286 and Oracle PDK-Java portlets are provided.
By default, a WebCenter Portal: Framework application is configured with ADF security. A default username and password (weblogic/weblogic1) are created automatically for you, and you can use this username/password combination for testing purposes immediately.
Default login and logout pages are also provided with the WebCenter Portal: Framework Application template.
For more information on ADF security, see Chapter 69, "Securing Your WebCenter Portal: Framework Application." See also the section on Enforcing ADF Security in a Fusion Web Application in the Oracle Fusion Middleware Fusion Developer's Guide for Oracle Application Development Framework.