 Understanding PeopleSoft EPM Business Rule Setups
This chapter provides overviews of PeopleSoft EPM business rule setups and discusses how to:
Review installed products.
Specify your EPM sources.
Set up country and state information.
Define accounting calendars.
Set up the Gregorian calendar. [EPM Warehouses]
Set up time zones. [EPM Warehouses]
Define units of measure.
Define and maintain dimensions.
Define operator defaults.
Archive EPM data.
Set up chart viewing and printing results [Analytical Applications]
Set up ledger-based nVision reporting for EPM
Note. When the term EPM Warehouses or Analytical Applications appears in the task titles below, it means that the task applies only to that particular EPM product line. When neither term appears in the task title, it means the task applies to both EPM product lines.
Understanding PeopleSoft EPM Business Rule SetupsAfter installing EPM, you must set up the infrastructure, key business rules, and processing variables that support the product. These rules provide the foundation on which EPM operates and can include country and state, unit of measure, and calendar rules. Because these rules act as a foundation and span the entire EPM product suite, you must perform these setup tasks prior to beginning other EPM implementation tasks documented in this guide.
The business rules and processing variables that you define for EPM are stored in EPM database tables. You define these rules and populate the EPM tables using the PeopleSoft Pure Internet Architecture (PIA) pages in the EPM Foundation setup menu. These pages are built over EPM tables that are shared across many EPM products.
Note. Please be aware that the order in which the setup tasks are presented in this chapter do not necessarily indicate the actual order in which they should be performed during implementation. It is highly recommended that you use Setup Manager to determine the implementation tasks that are required for your organization and the related implementation sequence.
Reviewing Installed Products
Before you can begin working with any PeopleSoft EPM application, you must specify installation options to indicate how you plan to use the system and which applications you will be using. Installation options are defined for your entire database—they are not specific to a business unit or setID.
This section discusses how to:
Review installed PeopleSoft EPM products.
Review installed PeopleSoft Enterprise Resource Planning (ERP) products.
Set Web Services options.
 Pages Used to Set Installation Options
|
Page Name |
Definition Name |
Navigation |
Usage |
|
EPM Products |
INSTALLATION_PF1 |
EPM Foundation, EPM Setup, Installation Analysis & Options, Installation Options, EPM Products |
Review installed PeopleSoft EPM products. |
|
ERP Products |
INSTALLATION_PF2 |
EPM Foundation, EPM Setup, Installation Analysis & Options, Installation Options, ERP Products |
Review installed PeopleSoft ERP products. |
|
Web Services |
INSTALLATION_PF3 |
EPM Foundation, EPM Setup, Installation Analysis & Options, Installation Options, Web Services |
Set web services options. |
Reviewing Installed PeopleSoft EPM Products
Access the EPM Products page (EPM Foundation, EPM Setup, Installation Analysis & Options, Installation Options, EPM Products).
Foundation
If you have installed the EPM Foundation toolset on your database, it is automatically selected here.
Use the Country field to select a default country, which determines the address format for pages that use address fields.
You define the address formats on the Country Table - Address Format page.
Analytic Applications
Any EPM analytical applications that have been installed in your database are automatically selected.
CRM Warehouse
If you have installed the CRM Warehouse on your database, the warehouse and its data marts are automatically selected here.
Financials Warehouse
If you have installed the CRM Warehouse on your database, the warehouse and its data marts are automatically selected here.
HCM Warehouse
If you have installed the HCM Warehouse on your database, the warehouse and its data marts are automatically selected here.
Supply Chain Warehouse
If you have installed the SCM Warehouse on your database, the warehouse and its data marts are automatically selected here.
Campus Solutions Warehouse
If you have installed the Campus Solutions Warehouse on your database, the warehouse and its data marts are automatically selected here.
Fusion Intelligence
If you have installed the Fusion Campus Solutions Intelligence application on your database, it is automatically selected here.
Other
Any other products that relate to your EPM implementation are automatically selected.
Reviewing Installed PeopleSoft ERP Products
Access the ERP Products page (EPM Foundation, EPM Setup, Installation Analysis & Options, Installation Options, ERP Products).
Other PeopleSoft Products
Any other PeopleSoft ERP products that have been installed in your database are automatically selected.
Setting Web Services Options
Access the Web Services page (EPM Foundation, EPM Setup, Installation Analysis & Options, Installation Options, Web Services).
|
Enter the number of concurrent merges allowed in your installation. The default is 3, which matches the number of record suites that are delivered with your system. |
|
|
Process wait time (Seconds) |
Enter the process wait time. The default is 60 seconds. Waiting improves performance of processes by eliminating repeated database requests. |
Warning! Because each merge job in a jobstream reads in the number of concurrent updates, changing its value while merge processes are running can have unexpected results. Changes to the process wait time affect only subsequent runs of the engine.
|
Select if you are using applets with PeopleSoft Activity-Based Management or Scorecard. See the application-specific PeopleBooks for more information on using the chart server and enabling applets. |
|
|
Select if you are using the chart server to create charts through PeopleSoft Activity-Based Management, Scorecard, or the financial services industry applications (PeopleSoft Risk-Weighted Capital, Asset Liability Management, or Funds Transfer Pricing). |
See Also
Streamlining Processing with Jobstreams
Specifying Your EPM Sources
This section provides an overview of the relationship between source system data and EPM, and discusses how to define warehouse sources.
Understanding Source System Data and EPM EPM enables you to extract, transform, and consolidate data from multiple source transaction systems into a series of target warehouse tables in the EPM database. This means that the EPM database is able to accommodate data from several PeopleSoft sources. Although the data is commingled in the EPM database, certain EPM processes require the ability to trace the data in target warehouse tables to its original source (original source transaction system). Other EPM processes use specific attributes associated with the source transaction system to process data. For example, the language swap utility uses the source system's base language for multiple language processing.
Because source system information is required, you must define the source in EPM and specify the attributes associated with that source using the Define Warehouse Sources page. Information specified on this page include source system ID (SRC_SYS_ID), base currency, and base language, and is used in several different EPM processes. Most notably, the source system ID is used in the ETL process and helps to maintain source data history as well as data uniqueness. Currency and rate type are used in multiple currency processing. The source system ID and default setID are used later to define warehouse business units.
Single Signon and Your GL Source Database
The Global Consolidations analytical application has a feature that enables you to drill down to your source GL database from the consolidation audit using the PeopleTools single signon feature. The single signon feature enables you to access additional PeopleSoft FSCM transaction databases without entering an ID or a password after you have already been authenticated in another PeopleSoft database.
In order to use the Global Consolidations GL drill-down feature you must set up the single signon feature for each GL source in PeopleTools. You must also use the Define Warehouse Sources page to associate the GL source system ID with its corresponding single signon portal information. This information is used to build the URL to transfer to a GL instance.
See PeopleSoft Global Consolidations Preface.
See PeopleSoft PeopleTools PeopleBook: Security Administration
See Also
Importing Source Business Units into EPM to Create Warehouse Business Units
Page Used to Specify EPM Sources|
Page Name |
Definition Name |
Navigation |
Usage |
|
Define Warehouse Sources |
PF_WAREHOUSE_SRC |
EPM Foundation, EPM Setup, Warehouse Sources & Bus Units, Define Warehouse Sources |
Specify a source ID for a source transaction system and define its basic attributes, such as base language and currency. |
Defining Warehouse SourcesAccess the Define Warehouse Sources page (EPM Foundation, EPM Setup, Warehouse Sources & Bus Units, Define Warehouse Sources).
|
Warehouse Source ID |
Displays the unique source ID for the source transaction system from which you are extracting data; you define this code when you first define a new source system. This code can be up to five characters long and should be unique. The source ID is primarily used for ETL processing. |
|
Source DB Base Language Code (source database base language code) |
Select the base language used by the specified source transaction system. This code is used for multilanguage processing for the EPM warehouses (for example, the Campus Solutions Warehouse). |
|
Source Type |
Specify whether the source transaction system is an Enterprise (PeopleSoft) or Other source. |
|
Default Set ID |
Enter a default setID for the tableset associated with the selected source system. |
Defaults for WBU Creation (Defaults for Warehouse Business Unit Creation)
|
Base Currency |
Select the base currency used by the selected source system. Base currency is used in multiple currency processing and the creation of warehouse business units. |
|
Rate Type |
Select the rate type used by the selected source system. Rate type is used in multiple currency processing and the creation of warehouse business units. |
Single Signon Portal Details (Optional)
Use this section to associate a GL source system ID with its corresponding single signon portal information. Completing this section is optional if you are not implementing the GL drill down feature of the Global Consolidations analytical application.
|
Portal Name |
Enter the single signon portal name where the source database transaction data can be found. |
|
Hosted by this Node |
Enter the name of the node hosting the portal. |
|
Content Provider Name |
Enter the name of the local default node for the source database. |
Setting Up Country and State Information
This section discusses how to:
Review country descriptions.
Select an address format by country.
Validate addresses.
Define countries for reporting.
Specify state information.
Pages Used to Set up Country and State Information|
Page Name |
Definition Name |
Navigation |
Usage |
|
Country Table - Country Description |
COUNTRY_DEFN |
EPM Foundation, EPM Setup, Common Definitions, Country and State Info, Country Table, Country Description |
Review country descriptions. |
|
Country Table - Address Format |
ADDR_FORMAT_TABLE |
EPM Foundation, EPM Setup, Common Definitions, Country and State Info, Country Table, Address Format |
Select an address format by country. You do so by configuring address fields and field descriptions so that addresses conform to the customary address format of the specified country. After the address format is set, it appears everywhere that the system uses the address subrecord. |
|
Country Table - Valid Address |
EO_ADDR_VALIDAT |
EPM Foundation, EPM Setup, Common Definitions, Country and State Info, Country Table, Valid Address |
Validate addresses by adding valid combinations of address fields. |
|
Country Statistics |
COUNTRY_STAT_PNL |
EPM Foundation, EPM Setup, Common Definitions, Country and State Info, Country Statistics |
Specify countries for reporting. |
|
State |
STATE_DEFN |
EPM Foundation, EPM Setup, Common Definitions, Country and State Info, State Table, State |
Specify state, province, or other geopolitical region information. |
Reviewing Country Descriptions
Access the Country Table - Country Description page (EPM Foundation, EPM Setup, Common Definitions, Country and State Info, Country Table, Country Description).
The system displays the country code, description, and a short description for the country.
PeopleSoft delivers a fully populated country code table, which is updated as national boundaries and designations change.
|
2-Char Country Code (two-character country code) |
Enter a country code. Country codes are informational indicators that record the value-added tax (VAT) registration ID for each country where your company does business. |
|
EU Member State (European Union member state) |
Select to specify that the country is a member of the European Union. |
Selecting an Address Format by Country
Access the Country Table - Address Format page (EPM Foundation, EPM Setup, Common Definitions, Country and State Info, Country Table, Address Format).
Use this page to set up three aspects of the address: editing, displaying, and printing.
The address format that you specify on this page appears everywhere that the address subrecord is used in the system.
|
Address Edit Page |
Displays the secondary page used for editing the address. You can create a new secondary page by using PeopleSoft Application Designer. On the new address secondary page that you create, use page fields from the DERIVED_ADDRESS record definition. You then need to add a secondary page control to ADDRESS_SBP that points to your new secondary page. After you complete these steps, the secondary page is accessible in this field. PeopleSoft delivers default address edit pages that contain the address definitions. |
|
Enable Address Search |
Select to enable users to search for a valid value. Selecting this check box enables the Used in Search column and the Valid Address page. |
|
Enable Address Validation |
Available only when Enable Address Search is selected. Select to ensure validation of all values that are selected. When you select this check box, users must select a value from the search list. If this check box is deselected, users can select from the search list or enter a new value. |
Address Fields
The system lists available address fields. The settings of these fields are controlled by the selected address edit page.
|
Field Name |
Displays the field options available for the address page. |
|
Edit Label Override |
(Optional) Enter an alternative label for the field. The new label is used when prompting for the field. You can customize address formats so that they conform to the address requirements of each location. For example, for a U.S. address, you might change the Postal field label to ZIP Code. Keep in mind the distinctions between county and state:
|
|
Used in Search? |
Available only when you select the Enable Address Search check box. Select the fields over which you want users to be able to search. |
|
Include in Display? |
Select to activate the corresponding address field as part of the standard address format for the selected country. To remove a field, deselect the check box. When entering addresses, users enter a country code, after which the system updates the page to display the fields appropriate for that country. |
|
Include in Print? |
Select to include the field when printing reports. |
|
Line Number and Position Number |
Enter the physical location of the fields for displaying and printing. |
|
Use Description |
Select to display the description for the field value. For example, for addresses in Japan, select this option to display the description of the state rather than the state code, because the code is numeric. |
|
Pre Separator and Post Separator |
Enter characters to be used surrounding the address field. For example, in the United States, a comma generally follows the city name, such as in San Francisco, CA. In India, there are parentheses around the postal code, for example (123). |
Validating Addresses
Access the Valid Address page (EPM Foundation, EPM Setup, Common Definitions, Country and State Info, Country Table, Valid Address).
To enable this page, select the Enable Address Search check box on the Address Format page, which enables the Used in Search column. The fields that you select to be used in a search appear on the Valid Address page as columns. Enter the valid address combinations that the user can search for and select.
Defining Countries for Reporting
Access the Country Statistics page (EPM Foundation, EPM Setup, Common Definitions, Country and State Info, Country Statistics).
PeopleSoft EPM only uses this page to establish the countries for statistical purposes. So most of the information is for informational purposes only, because the reports mentioned are not available through the PeopleSoft EPM database. For more information on the reports mentioned in the following section, refer to the appropriate PeopleSoft Financials application documentation.
|
Country |
Select the country on which you would like to report. |
|
Use for Statistics |
If this check box is selected, the country recognized by the International Standards Organization (ISO) is also recognized by the European statistical offices. If the check box is not selected, the country is recognized only by the ISO. In this case, European statistical offices assume that the country is a part of another country when producing statistical data such as the gross national product (GNP). For example, for the ISO, the principality of Monaco has its own country code, but for statistical purposes, Monaco is assumed to be part of France, and therefore has the same statistical country code as France. |
|
2-Char Intrastat Country Cd (two-character intrastat country code) |
The country identifier for the European statistical offices. This code often appears on intrastat layout forms. |
|
2-Char ESL Country Cd (two-character ESL country code) |
Used for countries that are members of the European Union. It usually appears as part of the VAT registration information on the European Sales List (ESL). |
|
3-Dig Stat Country Cd (three-digit statistical country code) |
Used as a country identifier for the European statistical offices. It usually appears on the intrastat report to identify source or destination countries to which or from which goods are shipped. |
|
7-Char Country Descr (seven-character country description) |
Used for the German international Electronic Funds Transfer (EFT) layout. It identifies countries into which or from which electronic funds are sent or received. |
|
Sales/Use Tax Code |
Informational only. This field can be set to None, Sales, or Use. |
Specifying State Information
Access the State page (EPM Foundation, EPM Setup, Common Definitions, Country and State Info, State Table, State).
PeopleSoft delivers a fully populated state code table. PeopleSoft updates the state table as changes occur. This table provides states, provinces, and equivalent geopolitical entities (for example, Dutch communities and French departments) for all supported countries. The codes are based on standard postal codes.
|
Numeric Code |
Assign a number to a state or province for statistics and reporting purposes. |
Defining Accounting Calendars
This section provides an overview of accounting calendar setup, lists common elements, and discusses how to:
Define a base calendar.
Modify or add detail calendars.
Define summary calendars.
(Optional) Define business calendars.
(Optional) Define daily calendars.
(Optional) Define budget calendars.
Define calendar frequencies.
Define frequency details.
Define timespans.
Understanding Accounting Calendar Setup
In PeopleSoft systems, you can establish an accounting period configuration based on the beginning and ending period dates that you normally use and combine these periods to create accounting calendars. These calendars define the time periods to which you post transactions or create reports for different ledger group and business unit combinations. You select the calendar that defines the periods for a business unit and ledger group combination.
You can maintain an unlimited number of accounting periods over any span of years. You can maintain traditional monthly periods, including an additional adjustment period, or you can define your own periods.
Note. In the PeopleSoft EPM product line, calendars are used mostly for reporting. However, for the system to properly handle data (for example, general ledger data) from your transaction database, you must be sure that the detail calendars match those in your transaction accounting system. You can move calendars from your PeopleSoft transaction database into your PeopleSoft EPM database using PeopleTools such as Data Mover.
The PeopleSoft system supports multiple calendars, so you can keep one calendar for actuals, another for budget and forecast activity, and still others for special reporting needs. Because you store calendars in tables, you can share them across business units, helping to provide consistency in period dates and easing the process of acquisition and consolidation.
PeopleSoft uses the following calendar definition options:
|
Calendar Builder |
Use to create a base calendar from which to create other calendars such as the detail calendar. |
|
Detail Calendar |
Define detail calendars that include the number and duration of accounting periods in your fiscal year and the beginning and ending dates for each period. These calendars also identify the adjustment periods for the calendar. |
|
Summary Calendar |
Use summary calendars to group detail calendar periods for inquiries and reporting, such as for quarterly reports and semiannual reviews. In this way, your financial information is always ready to be summarized into the timespans that you use most frequently. |
|
(Optional) Business Calendar |
Use to create the business or working calendar that identifies holidays and non work days. |
|
(Optional) Daily Calendar |
Use for reporting purposes. |
|
(Optional) Budget Period Calendar |
Use to manually define fiscal and non fiscal detail budget period calendars. |
|
Calendar Frequencies |
Use to define frequency relationships among multiple calendars. You can use frequencies to create multiple relationships among calendars or assign a frequency designation to a calendar. For example, you might have a calendar with a quarterly frequency. This quarterly frequency might be based on the monthly detail calendar. |
|
Timespans control the number of periods for which data can be extracted from the ledger table. They enable you to easily select and retrieve information for use in allocations and inquiries. Many timespans are expressed relative to the current period, so that they automatically adapt the content of a report to the date it is produced. Others are defined for specific periods. While many commonly used timespans are included in your PeopleSoft system, you can define additional timespans on the TimeSpan page as necessary. |
Common Elements Used in This Section|
Periods Per FY (periods per fiscal year) |
Enter the number of periods in an accounting year for a calendar. |
|
Description |
Enter a description. The description appears on prompt lists, inquiries, and reports. |
|
Descr (description) |
Enter a detailed description of the calendar. |
Pages Used to Define Accounting Calendars|
Page Name |
Definition Name |
Navigation |
Usage |
|
Calendar Builder |
CALENDAR_BUILDER |
EPM Foundation, EPM Setup, Common Definitions, Calendars, Calendar Builder |
Define a base calendar to be used by other calendars that you create. The calendar that you create is by default a detail calendar. |
|
Detail Calendar |
DETAIL_CALENDAR1 |
EPM Foundation, EPM Setup, Common Definitions, Calendars, Detail Calendar |
Modify or add detail accounting calendars that match or differ from your general ledger calendars. |
|
Summary Calendar |
SUMMARY_CALENDAR |
EPM Foundation, EPM Setup, Common Definitions, Calendars, Summary Calendar, Summary Calendar |
Define a summary calendar to group or combine periods from detail calendars. |
|
Summary Budget Period Calendar |
SUMMARY_BP_CAL |
EPM Foundation, EPM Setup, Common Definitions, Calendars, Summary BP Calendar, Summary Budget Period Calendar |
Define a summary budget period calendar to group or combine periods from detail calendars. |
|
Business Day Calendar |
BUS_CALENDAR |
EPM Foundation, EPM Setup, Common Definitions, Calendars, Business Day Calendar |
Define a business calendar to specify your normal business week and the holidays observed by your banks. |
|
Daily Calendar |
DAILY_CALENDAR |
EPM Foundation, EPM Setup, Common Definitions, Calendars, Daily Calendar |
Define a daily calendar for reporting purposes. |
|
Budget Calendar |
CAL_BP_TBL |
EPM Foundation, EPM Setup, Common Definitions, Calendars, Budget Calendar |
Define a budget calendar for controlled budget processing. |
|
Frequency Definition |
PF_FREQUENCY_DEFN |
EPM Foundation, EPM Setup, Common Definitions, Calendars, Frequency, Frequency Definition |
Define calendar frequencies. Add and modify frequency definitions. |
|
Frequency Details |
PF_FREQUENCY_DTL |
EPM Foundation, EPM Setup, Common Definitions, Calendars, Frequency Details |
Define frequency details by assigning the frequencies to calendars. |
|
TimeSpan |
TIME_SPAN |
EPM Foundation, EPM Setup, Common Definitions, Calendars, TimeSpan |
Define timespans. |
Defining a Base Calendar
Access the Calendar Builder page (EPM Foundation, EPM Setup, Common Definitions, Calendars, Calendar Builder ).
|
Begin Date |
Enter the beginning date for the calendar. The system uses this date and the end date to create the range of periods for the calendar. |
|
End Date |
Enter the end date for the calendar. The system uses this date with the begin date to create the range of periods for the calendar. |
|
Start Fiscal Year |
The system enters a default year for this field based on the year that you enter in the begin date field. |
|
Calendar Method |
Select one of the following options to determine the number of periods in the calendar: daily, weekly, bi-weekly, monthly, bi-monthly, quarterly, semi-annual, or yearly. For example, a daily calendar has 365 periods and a quarterly will have 4 periods. The system updates to display the number of periods in the Periods Per FY (periods per fiscal year) field. |
|
Monthly Allocation Type |
Use to select the appropriate period allocations for a monthly calendar. Select from the following: 12 period Calendar, 13 period Calendar, 445 Calendar (4 weeks, 4 weeks, 5 weeks), 454 Calendar (4 weeks, 5 weeks, 4 weeks), or 544 Calendar (5 weeks, 4 weeks, 4 weeks). |
|
Generate |
Click this option to have the system generate the calendar. The generated calendar periods display begin and end dates in the grid at the bottom of the page. |
|
Period Name and Abbreviation |
Use these fields to change the generated calendar period name and abbreviation if applicable. |
Note. As you define calendars, keep in mind that in all instances in which a PeopleSoft EPM warehouse business unit is related to a general ledger business unit, the calendars for the business units should be the same. Warehouse business units are described elsewhere in this chapter.
After you have saved a calendar using the calendar builder, you can only modify the calendar description or long description on the Calendar Builder page. If you need to modify the saved calendar further, use the other calendar pages, (for example the Detail Calendar page).
By default, a calendar that you create with the Calendar Builder is a detail calendar.
Adding or Modifying Detail Calendars
Access the Detail Calendar page (EPM Foundation, EPM Setup, Common Definitions, Calendars, Detail Calendar).
You create detail calendars using the Calendar Builder. Use this page to modify calendars after they have been created.
|
Periods per FY (periods per fiscal year) |
Displays the appropriate number of periods for the calendar. For example, 4 indicates a quarterly calendar. |
|
End Date Default |
This setting specifies which periodic intervals the system creates. Values are: month, bimonth (bi-monthly), quarter, semi-annual, year, and days. If you select days, enter the number of days to include in the calendar. The system uses the end date default setting to populate the subsequent begin and end date values in the grid at the bottom of the page. |
|
Detail Periods |
Displays the detail periods for the calendar, including the begin and end dates, period name, and abbreviation. |
|
Adjustment Periods |
Displays any adjustment periods defined for the calendar, including the period name and abbreviation. |
When you enter period dates, you can define monthly calendar periods or any fiscal period that matches your accounting calendar (such as weekly or bimonthly) as long as the beginning and ending dates of successive periods don't overlap. Every day of the year must be included in a period; you cannot leave gaps between period dates. Make sure that your detail calendar includes a period for the oldest transaction that you want to enter. After installing your PeopleSoft system, you might want to make this earliest date more restrictive.
You will need to return to this page to enter ensuing years manually. You can enter several years at a time or treat the task as part of your end-of-year system maintenance.
After you define your detail calendar, you can use it to manage open periods for the generation of journals. You can also use it to define the periods that store summarized results in a summary ledger.
Note. The MODEL calendar delivered with your system contains data from 1957 to 2025. You can use the MODEL calendar rather than entering your own data; if you do so, make a copy of MODEL first, and make changes to the copy.
Defining Summary Calendars
Access the Summary Calendar page (EPM Foundation, EPM Setup, Common Definitions, Calendars, Summary Calendar, Summary Calendar ).
Consider the following when setting up summary calendars. A quarterly summary calendar, for example, might have four periods, each consisting of three periods from a monthly detail calendar. A summary calendar can also combine cumulative detail calendar accounting periods to create year-to-date balances. Summary calendars are especially useful for determining how your models will roll up for reporting purposes. As with detail calendars, you can include as many fiscal years as you need in one summary calendar.
Enter a description and periods per fiscal year to specify the number of periods in the accounting year for this calendar.
|
Detail Calendar |
Select the ID of the detail calendar on which this calendar is based. Every summary calendar must be based on a detail calendar. |
Supply the fiscal year, period, period name, and abbreviation.
|
From Budget Period and To Budget Period |
Enter the detail calendar periods to be summarized in each summary period. |
Note. You can define as many years on a calendar as necessary. Be sure to include any years that you use to store historical information.
Defining Summary Budget Period Calendars
Access the Summary Budget Period Calendar page (EPM Foundation, EPM Setup, Common Definitions, Calendars, Summary BP Calendar, Summary Budget Period Calendar ).
Summary calendars are especially useful for determining how your models will roll up for reporting purposes. Enter a description, budget period, and from/to periods to specify the number of budget periods in the accounting year for this calendar.
Defining Business Calendars (Optional)
Access the Business Day Calendar page (EPM Foundation, EPM Setup, Common Definitions, Calendars, Business Day Calendar).
|
Normal Business Days |
Select the business days of the week to include. |
|
Notes |
Enter any notes to further describe this calendar. |
In the grid at the bottom of the page enter a row for each holiday on which you know businesses won't operate.
|
Year and Date |
Specify the year and date for any holidays that you include. |
|
Holiday Name |
Enter the name of the holiday on which your business does not operate. |
In multinational corporations, you accommodate the various locations and different holidays observed by defining as many business calendars as you need for each setID.
Note. Business calendars determine the number of workdays in each month, for reporting purposes only.
Note. If you use PeopleSoft Asset Liability Management, Funds Transfer Pricing, or Risk-Weighted Capital, you must create a business day calendar to define your holidays.
Defining Daily Calendars (Optional)
Access the Daily Calendar page (EPM Foundation, EPM Setup, Common Definitions, Calendars, Daily Calendar).
|
Create |
Click to access the Create Detail Periods secondary page, on which you can enter the fiscal year and start date for creating daily periods. |
|
Update |
Click to access the Create Detail Periods secondary page, on which you can enter a new fiscal year. |
Remember to set up a calendar for each fiscal year. To display the detail periods for existing calendars, click the Update button.
Note. For leap years, you must change the periods per fiscal year value from 365 to 366 to create the last period for the leap year (for example, December 31, 2004).
Defining Budget Calendars (Optional)
Access the Budget Calendar page (EPM Foundation, EPM Setup, Common Definitions, Calendars, Budget Calendar ).
For budget calendars, you might want to enter a descriptive calendar ID such as AN for an annual calendar budget.
Enter the budget periods, begin and end dates, and period names.
Defining Calendar Frequencies
Access the Frequency Definition page (EPM Foundation, EPM Setup, Common Definitions, Calendars, Frequency, Frequency Definition).
Define frequencies by adding a row with a description or by updating an existing description.
Note. The frequencies you define on this page will comprise the list of valid values in the Frequency Details page.
Defining Frequency Details
Access the Frequency Details page (EPM Foundation, EPM Setup, Common Definitions, Calendars, Frequency Details).
|
Calendar ID |
Select a calendar. The calendar ID that you select represents the calendar that you want to associate with the frequency. You can have more than one frequency defined for a single calendar. The system updates to display calendar detail. You can also specify all frequencies that are associated with any other frequency definition for this frequency group. You can define frequency relationships across multiple calendars. |
|
Process |
Select for any of the accounting periods that you want to process. |
Defining Timespans
Access the TimeSpan page (EPM Foundation, EPM Setup, Common Definitions, Calendars, TimeSpan).
|
Start Year and Start Period |
Enter the appropriate value. The value that you enter depends on the type that you select. |
|
End Year and End Period |
Enter the appropriate value. The value that you enter depends on the type that you select. |
|
Type |
Select from the following: Absolute Period or Absolute Year: You can enter any year or period that has been defined in the timespans calendar. Relative to Current Period or Relative to Current Year: Enter 0 as the period or year to select the current year or period, -1 to indicate the previous year or period, 1 to indicate the next, and so forth. |
|
Use Scenario Calendar |
Select this check box to use the specified scenario calendar with this timespan. This enables you to have a scenario-based timespan. |
|
Include Balance Forward |
Select this check box if you use nVision for the consolidation ledger or any ledger with balance forward accounts. If you select this check box, nVision will compute ledger balance. |
|
Calendar ID |
Select the calendar that you want to use with this timespan. |
Note. Balance forward accounts store balance forward amounts. For example, in your regular accounting system you might want to specify asset, liability, and equity accounts as balance forward accounts, but not revenue or expense accounts. The account balance forward function rolls forward the accounts on any date specified for flexible year-end processing.
See Also
PeopleSoft Global Consolidations 9.1 PeopleBook
Setting Up the Gregorian Calendar [EPM Warehouses]
The Calendar dimension represents calendars that fall into two broad functional categories. The Gregorian calendar (the calendar that is commonly used) has one row for each day. The business calendar represents the functionality the PeopleSoft provides to define various types of business calendars, such as detail calendars, summary calendars, budget calendars, and so on.
Gregorian calendar setup is a onetime setup as part of the MDW setup. You can generate the Gregorian calendar for a range of years. For each day in the year range, the Gregorian calendar has one row. (You do not define business calendars in the MDW; their definitions are imported from source systems and the OWE).
To set up the Gregorian calendar, use the Day Dimension (D_DAY) component and the Time Dimension (D_TIME) component.
This section discusses how to set up the Gregorian Calendar for the EPM warehouses.
Pages Used to Set Up the Gregorian Calendar|
Page Name |
Definition Name |
Navigation |
Usage |
|
D_DAY |
EPM Foundation, EPM Setup, Common Definitions, Calendars, Gregorian Calendar, Gregorian Calendar Dimension, Day Dimension |
Populate the Day dimension. |
|
|
D_TIME |
EPM Foundation, EPM Setup, Common Definitions, Calendars, Gregorian Calendar, Time Dimension, Time Dimension |
Populate the Time dimension. |
Populating the Day DimensionAccess the Day Dimension page (EPM Foundation, EPM Setup, Common Definitions, Calendars, Gregorian Calendar, Gregorian Calendar Dimension, Day Dimension).
|
Start Date |
Enter the beginning date for this calendar. |
|
End Date |
Enter the ending date for this calendar. |
|
Jobstream ID |
Enter D_DAY. |
|
Weekend Flag |
Check the days that represent weekend days. |
|
Retry Enabled |
This field will be available for future use. |
Save the page and click Run.
Click the Process Monitor link to check the status of application engine program. After a period of time, it should display the status as Success.
Populating the Time DimensionAccess the Time Dimension page (EPM Foundation, EPM Setup, Common Definitions, Calendars, Gregorian Calendar, Time Dimension, Time Dimension).
|
Time Format |
Select either 12 Hour Format or 24 Hour Format. |
Save the page and click Run.
Click the Process Monitor link to check the status of application engine program. After a period of time, it should display the status as Success.
Setting Up Time Zones [EPM Warehouses]
EPM extract, transform, and load (ETL) jobs use the date time stamp in conjunction with source records to perform incremental loads. However, data can be extracted from multiple source transaction systems, each of which might reside in different database servers that use different time zones and different date and time stamps. This can lead to mismatched dates and times between the source and the EPM database. However, EPM target warehouse tables may include a source time zone field for records that have a date-time or time value depending upon the design and requirement.
When a target warehouse table contains a time zone field, prepackaged ETL jobs populate it with your source time zone values. Not all target warehouse tables contain a time zone field and only one source time zone value can be populated in the target warehouse table.
Populating warehouse target tables with source time zone values is the first step in ensuring the synchronicity of source and EPM time zones. However, you are responsible for converting the source time zone value to the EPM database time zone.
Note. You only need provide time zone data if you are using Enterprise Learning Management reports.
Defining Units of Measure
Units of measure (UOM) determine how resources are quantified. Each resource must be associated with a standard unit of measure. Standardization helps you to control the units that appear in reports and enables you to use the PeopleSoft automatic conversion features. ETL jobs move unit of measure data from your source transaction system to EPM target warehouse tables. You need only use the Unit of Measure PIA page to redefine or modify your existing unit of measure data.
This section discusses how to:
Import UOM values from your source.
Display and modify UOMs.
Importing Unit of Measure Values from Your SourceEPM enables you to extract and consolidate source data from various source transaction systems. As such, certain source systems might contain UOM values that are different from those offered in EPM. This causes mismatched UOM values between the source and the EPM database. However, EPM target warehouse tables include source UOM definitions and conversion rate fields for all records that store UOM data. Prepackaged ETL jobs populate these fields with your source UOM definitions and conversion rate values.
PeopleSoft-delivered ETL jobs populate the following target warehouse tables with UOM values:
UNITS_TBL
UNITS_CVT_TBL
INV_ITEM (for Supply Chain Management only)
UOM_TYPE_INV (for Supply Chain Management only)
Populating warehouse target tables with source UOM values is the first step in ensuring the synchronicity of source and EPM UOM values. However, you are responsible for converting the source UOM value to the EPM database UOM.
Page Used to Modify UOMs|
Page Name |
Definition Name |
Navigation |
Usage |
|
Unit of Measure |
UNITS_TBL1 |
EPM Foundation, EPM Setup, Common Definitions, Unit of Measure |
Display and modify units of measure to determine how resources are quantified. |
Displaying and Modifying UOMs
Access the Unit of Measure page (EPM Foundation, EPM Setup, Common Definitions, Unit of Measure).
|
Convert To, Conversion Rate, and Inverse Conversion Rate |
Specify the conversion rules of a particular UOM. For example, by specifying a conversion from cubic feet to cubic yards and an appropriate conversion rate, when you enter a resource amount in cubic feet, the system automatically converts the amount to cubic yards. Automatic conversion is a key feature of PeopleSoft statistical accounting. It enables you to enter resource amounts in whatever unit is readily available or convenient at the time, and converts the units to the required standard. The system also automatically calculates the inverse conversion rate. |
Defining and Maintaining Dimensions
This section provides an overview of dimensions and discusses how to:
Define dimensions.
Define dimension details for an Operational Warehouse - Enriched (OWE) warehouse table.
Define dimension details for a Multidimensional Warehouse (MDW) table.
Understanding DimensionsDimension metadata is associated with specific record metadata and its fields. For example, you can define the dimension DEPARTMENT that references the record DEPARTMENT_TBL and the DEPT_ID column in that record. Dimension metadata captures additional column, key, and security information that is not included with a standard datamap, such as alternate key fields and dimension security. A single dimension can be defined for both an OWE and MDW tables, enabling you to use the same dimension name for both table types.
Dimension metadata is used by the EPM Warehouses, applications, security, and KPI manager.
Dimension Security
Because EPM is delivered with no security restrictions, dimensions are also delivered unsecured. Before you can grant a user access to a dimension you must first indicate to the system that a particular dimension requires securing. Dimensions that are not secured are classified as public, or unsecured. All EPM users can view these objects.
You specify dimensions that require securing using the Dimension page. After you specify a dimension to secure you must associate that dimension with a security join table to complete dimension security. Security join tables are EPM database tables that store the security profiles for users along with the corresponding dimension values for which they have access. During security processing, a security join table acts as a lookup. For example, when a user is trying to access a row of data, the SQL that processes this request uses the security join table to identify the user and her access to the particular row of data.
A security join table must be created for every dimension that you plan to secure. Each security join table should match the key structure of the dimension table for which it is defined. Each row in a security join table identifies a user or security role and his access to a specific dimension value. A user who is granted access to multiple values in a single dimension table has several rows in the security join table. In the event that a user has access to an entire dimension, you can insert a single row designated all and prevent the table from ballooning in size with several rows of data. A user that is granted access to multiple dimensions appears in several security join tables. The following is an example of a security join table.
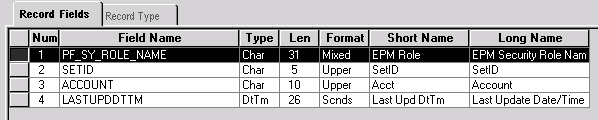
Account security join table
The security join table model is better than a single security output table for two main reasons: Processing smaller tables is more efficient when you are inserting or deleting data, or querying the table to determine access privileges, and modeling individual security tables enable you to be in sync with the anticipated migration to data objects in future releases.
See Defining Dimension and Metric Security.
Pages Used to Set Up Dimensions|
Page Name |
Definition Name |
Navigation |
Usage |
|
Dimension |
PF_DIM_DEFN |
EPM Foundation, Foundation Metadata, Metadata Creation and Editing, Define Dimension |
Define dimension metadata. |
|
OWE Detail for Dimension |
PF_DIM_OWE_DETL |
Click the Define link on the Dimension page |
Define dimension metadata details for an OWE dimension and apply security parameters. |
|
MDW Detail for Dimension |
PF_DIM_MDW_DETL |
Click the Define link on the Dimension page |
Define dimension metadata details for an MDW dimension and apply security parameters. |
Defining Dimensions
Access the Dimension page (EPM Foundation, Foundation Metadata, Metadata Creation and Editing, Define Dimension).
|
Warehouse |
Indicates the warehouse layer that is associated with each dimension type. |
|
Define |
Click to access the OWE Detail for Dimension or MDW Detail for Dimension page, depending on which dimension type you are defining. |
|
Record Name |
Displays the name of the record that is associated with a particular dimension. |
|
Owner ID |
Select an owner ID for this dimension. The owner represents an EPM functional area (such as ABM or Budgeting) that is associated with the dimension. Assign an owner ID to help organize and group the metadata—making locating and auditing easier. |
Defining Dimension Details for an OWE Warehouse TableAccess the OWE Detail for Dimension page (Click the Define link on the Dimension page).
Record Information
|
Record Name |
Select the record that you want to associate with this dimension. |
|
Leading Key |
Select a leading key for set processing. SetID indicates that the leading key is a setID. Business Unit indicates that the leading key is a business unit. None indicates that there is no leading key. |
|
Business Key |
Select a business key to serve as the primary key for the selected dimension. |
|
Business Key Label |
Select a label for your business key. |
|
Description |
Select a description for the business key field. On Same Record indicates that the description is available in the record. If you select this option, specify a value for the Description Fieldname field. Translate Value indicates that the description is available through the translate table. |
|
Description Fieldname |
Select the field which contains the description of the business key field. |
|
Create Record Metadata |
Select to access the Record Metadata page and define new record metadata to associate with this dimension. If you select an existing record from the prompt, this field displays the name of the record metadata. |
Security
|
Is Secured |
Select this check box to indicate whether this dimension is secured. If you secure this dimension, you must specify its related security join table in the Security Join Table field. |
|
Security Join Table |
Select a security join table to associate with this dimension. The security join table is an EPM table that stores the security profiles for users along with the corresponding dimension values to which they have access. Only Dimensions that are associated with security join tables are presented to a security administrator when security is defined. |
Alternate Fields
|
Field Name |
Select an alternate name for your dimension fields. Alternate field names share the same IDs as the primary field and can be used by different fact tables to join to the same ID. Specifying alternate field names is optional. |
Defining Dimension Details for an MDW TableAccess the MDW Detail for Dimension page (Click the Define link on the Dimension page).
The MDW Detail for Dimension page contains the same fields as the OWE Detail for Dimension page with the addition of the following three fields.
|
Surrogate Key |
Select a surrogate key for this dimension. MDW dimensions are keyed by surrogate key, and not business unit. |
|
Source ID |
Select the source transaction system that is associated with the data in the record. |
|
Prompt View |
Enter a key to map the surrogate key to the business key. This field enables you to select data using meaningful keys instead of surrogate keys, which are generated numbers. |
Defining Operator Defaults
Operator defaults enable you to assign a default business unit and setID for each user per country. You specify operator defaults on the Operator Defaults page.
Page Used to Specify Operator Defaults|
Page Name |
Definition Name |
Navigation |
Usage |
|
Operator Defaults |
OPR_DEF_TABLE_FS1 |
EPM Foundation, EPM Setup, Installation Analysis and Options, Personal Defaults, Operator Defaults |
Specify default user preferences for PeopleSoft users. |
Specifying Default User Preferences
Access the Operator Defaults page (EPM Foundation, EPM Setup, Installation Analysis and Options, Personal Defaults, Operator Defaults).
|
Business Unit and SetID |
The values that you select become the user's default values in the business unit and setID search fields. |
|
Localization Country |
Enter the default country for this user ID. |
Note. You can control the business unit, setID, and address format default values by using the Operator Defaults page.
Archiving EPM Data
This section provides an overview of EPM data archive and discusses how to define a warehouse archive project.
Understanding EPM Data ArchivingYou can use the warehouse archive project functionality to archive your OWE or MDW data. The Warehouse Archive Project links to the PeopleTools archive tool when you have defined your selection criteria. The archived data is deleted from the database and saved to a flat file.
Page Used to Archive EPM Data|
Page Name |
Definition Name |
Navigation |
Usage |
|
Warehouse Archive Project |
PF_ARCH |
EPM Foundation, Foundation Metadata, Other Metadata Operations, Build Archive Project, Warehouse Archive Project |
Archive your EPM data. |
Defining a Warehouse Archive Project
Access the Warehouse Archive Project page (EPM Foundation, Foundation Metadata, Other Metadata Operations, Build Archive Project, Warehouse Archive Project).
Note. Make sure the Archive to Flat File check box is selected on the PeopleTools Record Criteria page (ARCH_PROJ).
Setting Up Chart Viewing and Printing Results [Analytical Applications]
Some analytical applications use charts. To view these charts, the AVS charting tool must be installed. In addition, complete the following procedure to set up required options:
Navigate to EPM Foundation, EPM Setup, Installation Analysis & Options, Installation Options, Web Services.
Select the Chart Server check box.
This enables you to use the basic charting features.
To enable applets, select the Applets check box.
Note that applets download code to the client workstation.
You can also print any of the pages that display results. To produce an optimal printout, set your internet browser to print background colors and images.
In Internet Explorer, follow these steps to set this option:
Select Tools, Internet Options.
Select the Advanced tab.
Scroll through the list of settings to view the Printing options.
Select the Print background colors and images check box, and click OK.
Setting Up Ledger-Based nVision Reporting for EPM
This section discusses how to set up ledger-based nVision reporting over EPM ledger tables.
Understanding Ledger-Based Reporting and Setup in EPMnVision is a reporting tool that can retrieve information from a PeopleSoft database and place that data into a Microsoft Excel spreadsheet for further analysis. nVision selects data from a PeopleSoft database using a query or a ledger. nVision query-based reporting uses PS query to extract information and can be used with the EPM database. However, nVision ledger-based reporting must be modified to extract data from the EPM database. This is due to the manner in which ledger-based reporting extracts data and the unique structure of EPM ledger tables.
nVision ledger-based reporting uses the LEDGER key to distinguish sets of ledger data and identify which rows should be extracted from ledger tables. However, the LEDGER key does not exist in the EPM ledger tables (such as PF_LEDGER_F00). Instead, EPM ledger tables use the key, PF_SCENARIO_ID, to distinguish sets of data. Consequently, the ledger-based reporting process must be modified to accommodate the PF_SCENARIO_ID used by EPM ledger tables.
To incorporate the PF_SCENARIO_ID key into the nVision ledger-based reporting process, you must create a view of your EPM ledger tables and map the PF_SCENARIO_ID column to the LEDGER column in the view. EPM delivers a view of the PF_LEDGER_F00 table called PF_LEDGER_VW, so you do not need to create one. You only need to create additional ledger views for those ledger tables associated with EPM analytical applications (for example, GC_LEDGER_F00 for Global Consolidations). For more information about application ledger tables that require a view, see the PeopleBook for your PeopleSoft EPM analytical application.
In addition to mapping keys with a ledger view, you must also set up related nVision ledger pages in PIA. The EPM nVision PIA pages populate tables that are used during the ledger-based reporting process (for example, PF_LED_DEFN). When nVision processes a request, it looks for the SET_ID and LEDGER keys located in the PF_LED_DEFN table. The PF_LED_DEFN table is tied to the PF_LED_TEMPLATE table via the LEDGER key, and that connection is used to determine the related data associated with a particular ledger view and PF_SCENARIO_ID. Most of this information is defined in the EPM nVision PIA pages, which are described in the subsequent sections.
See PeopleSoft PeopleTools PeopleBook: PS/nVision
See PeopleSoft PeopleTools PeopleBook:PeopleSoft Application Designer Developers Guide
Ledger-Based Reporting Setup
The following steps are required to implement ledger-based nVision reporting for EPM:
Create a ledger template for each ledger view in your database.
The Ledger Template page populates the LED_TMPLT_TBL table, which stores the ledger view information, used to tie the LEDGER key to the PF_SCENARIO_ID key.
Create a detail ledger definition for each scenario.
The Detail Ledger page populates the LED_DEFN_TBL table, which stores the LEDGER and SET_ID keys, used for lookup by nVision reporting.
Create a ledger group for each detail ledger.
The Group Definition page enables you to create a ledger group for one or more detail ledgers and specify base currency for those ledgers.
Create a ledger group for each detail ledger.
The Ledgers for a Unit Definition page enables you to associate a calendar ID with a ledger group.
Pages Used to Set Up nVision Ledger-Based Reporting in EPM|
Page Name |
Definition Name |
Navigation |
Usage |
|
Ledger Template |
NVS_LED_TMPLT |
EPM Foundation, EPM Setup, Ledger Setup, nVision Ledgers, Ledger Template, Ledger Template |
Set up ledger templates for your views. |
|
Detail Ledger |
NVS_LEDGER_DETAIL |
EPM Foundation, EPM Setup, Ledger Setup, nVision Ledgers, Detail Ledger, Detail Ledger |
Create detail ledgers for your scenarios. |
|
Group Definition |
NVS_LEDGER_GROUP |
EPM Foundation, EPM Setup, Ledger Setup, nVision Ledgers, Ledger Group, Definition |
Create a ledger group for one or more detail ledgers and specify base currency for those ledgers. |
|
Ledgers for a Unit Definition |
NVS_BU_LED1 |
EPM Foundation, EPM Setup, Ledger Setup, nVision Ledgers, Ledgers for a Unit, Definition |
Associate a calendar ID with a ledger group |
Defining a Ledger TemplateAccess the Ledger Template page (EPM Foundation, EPM Setup, Ledger Setup, nVision Ledgers, Ledger Template, Ledger Template).
|
Record (Table) Name |
Select a view to associate with this template. Note. The record name you select must match the view defined for the EPM ledger record. |
|
Posted Total Amount |
Select the name of the record column that holds your posted total amount value. |
|
Secured Rept VW (Secured Report View) |
Enter the name of an alternate secured reporting view for the template. This field enables you to use an alternate view for reporting and overrides the view specified in the Record (Table) Name field. You can create a ledger template using a specific record, but allow the reporting of that record be accomplished through a different view. |
Defining a Detail LedgerAccess the Detail Ledger page (EPM Foundation, EPM Setup, Ledger Setup, nVision Ledgers, Detail Ledger, Detail Ledger ).
|
Ledger |
Displays the ledger record associated with the specified setID. |
|
Ledger Template |
Select the ledger template to associate with the specified ledger record. |
|
Ledger Type |
Displays the ledger record type |
Defining a Ledger Group for Detail LedgersAccess the Ledger Group Definition page (EPM Foundation, EPM Setup, Ledger Setup, nVision Ledgers, Ledger Group, Definition).
|
Ledger Template |
Select a ledger template to associate with the ledger group. |
Ledger Details
|
Ledger |
Select a ledger scenario to associate with the ledger group. |
|
Primary |
Select this check box to indicate the ledger scenario is the primary ledger for this ledger group. Note. You must specify at least one primary ledger record. |
|
Base Currency |
Select the base currency for the selected ledger record. |
Defining a Calendar for a Ledger GroupAccess the Ledgers for a Unit Definition page (EPM Foundation, EPM Setup, Ledger Setup, nVision Ledgers, Ledgers for a Unit, Definition).
The Ledgers for a Unit Definition page enables you to associate a calendar ID with a ledger group.
Note. The calendar ID should match the calendar ID that is specified on the Warehouse Business Unit Scenario Definition page.