6 Configuring Access to Built-in Sources
Among the built-in sources are the data repositories familiar to everyone, such as files, Web sites, and e-mail. Most of them can be set up very quickly. This chapter contains the following topics:
Setting Up Web Sources
A Web source enables users to search a Web site. The following procedures identify the basic steps for setting up a Web source using the Oracle SES Administration GUI. For more information on each page, click Help.
Oracle SES is configured to crawl Web sites on the intranet within the corporate fire wall. To crawl Web sites on the Internet (external Web sites), Oracle SES requires the HTTP proxy server information. See the Global Settings - Proxy Settings page.
You should review the default crawling parameters before you start crawling Internet sources.
To create a Web source:
-
On the home page, select the Sources secondary tab to display the Sources page.
-
For Source Type, select Web.
-
Click Create to display the Create Web Source page.
-
Complete the following fields:
-
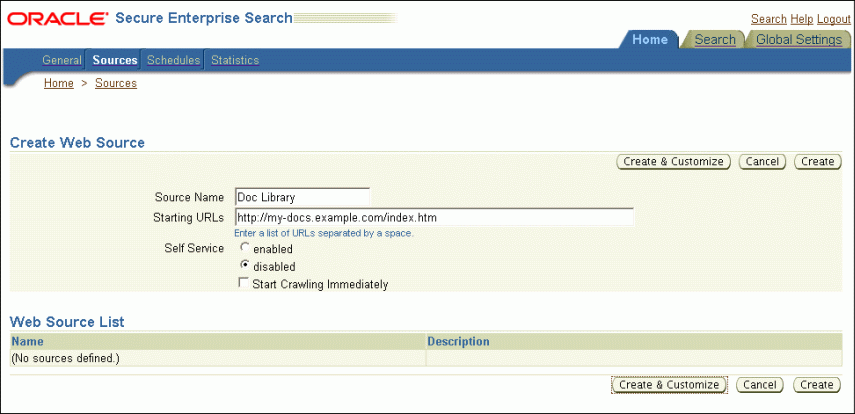
Source Name: Name that you assign to this Web source.
-
Starting URLs : The HTTP or HTTPS address of the Web site, starting at the top page to be searched.
-
Self Service : Disabled to use an identity management system or Enabled to prompt users for their credentials.
-
Start Crawling Immediately : Select this option to accept the default parameters and begin crawling, or deselect it to defer crawling.
-
-
Click Create or Create & Customize.
-
Follow the steps for crawling and indexing a source in "Getting Started Basics for the Oracle SES Administration GUI".
Figure 6-1 shows the Create Web Source page.
To customize a Web source:
-
When creating a Web source, click Create & Customize on the Create Web Source page to display the Customize Web Source page.
or
After creating a source, click the Edit icon on the Home - Sources page.
-
Click the following subtabs and make the desired changes.
-
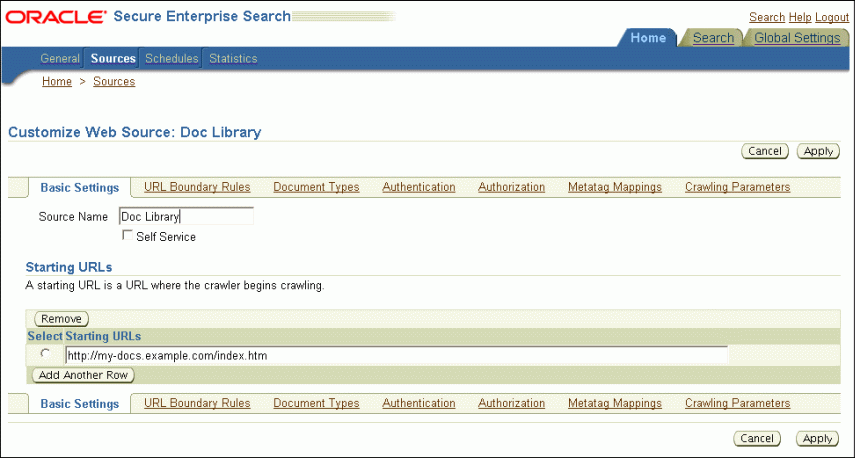
Basic Settings: The choices entered on the Create Web Source page.
-
Boundary Rules: Contents of a URL that include or exclude a page from crawling.
-
Document Types: Common document and image types that you can include or exclude from crawling. By default, Oracle SES crawls HTML, Excel, PowerPoint, Word, PDF and plain text.
-
Authentication: Configuration of HTTP, HTML forms, or Oracle Single-Sign-On methods of authentication. By default, no authentication is required.
-
Authorization: Configuration of an Access Control List or an authorization manager plug-in.
-
Metatag Mappings: Maps document attributes to Oracle SES search attributes. See "Web Document Attributes".
-
Crawling Parameters: Sets a variety of crawling conditions, such as depth, language, HTTP cookies.
-
-
Click Apply.
Figure 6-2 shows the Customize Web Source page.
Boundary Rules for Web Sources
When creating a Web source, the host name of the seed (top level URL) is automatically added to the boundary rule. However, subsequent changes to the seed URL are not reflected automatically to the rule. Remember to synchronize the boundary rule if there is any change to the seed URL. Currently, Oracle SES does not remove crawled URLs even if the original seed is removed: everything is controlled by the boundary rules.
Authentication Configuration for Protected Web Sources
Oracle SES supports crawling of protected Web sources. This functionality can be achieved by configuring the authentication parameters in the Authentication tab in the Create or Edit page for the protected Web source in the Administration GUI. You can configure the authentication parameters for any one of the following authentication mechanisms for accessing the protected Web sources:
-
HTTP: For HTTP authentication of basic and digest type, specify the proxy server details, such as, host name, realm, user name, and password.
-
HTML Forms: For HTML form authentication, specify the address of the registered HTML form, form action, and success URL.
-
Single Sign-On: For Single Sign-On authentication, specify the OracleAS Single Sign-On user name and password.
Note:
Oracle SES also supports crawling of Web sources that are protected by Oracle Access Manager (OAM) Single Sign-On mechanism. The following configurations must be done to use this feature:-
The Web source that is protected by OAM Single Sign-On must be configured in Oracle SES with either the SSO login credentials or the HTTP authentication credentials.
-
The OAM server must be configured to send a basic authentication challenge in response to a request coming from Oracle SES. Refer to OAM documentation to know how to configure OAM to send basic authentication challenge for a specific User-Agent request.
The following is the sequence of steps that get executed when the Oracle SES crawler tries to access the OAM protected Web source:
-
An HTTP request containing the appropriate User-Agent information is sent from the crawler to the Web source that is protected by OAM Single Sign-On.
-
OAM server responds with the status: 401 Basic Authentication.
-
The crawler reverts back to OAM server with the basic authentication credentials that are configured for the protected Web source in Oracle SES as either SSO login credentials or as HTTP authentication credentials.
-
The crawler gets access to the protected Web source after successful authentication.
Web Document Attributes
Oracle SES crawls and indexes these Web document attributes:
-
Title
-
Author
-
Description
-
Host
-
Keywords
-
Language
-
LastModifiedDate
-
Mimetype
-
Subject: Mapped to "Description". If there is no description metatag in the HTML file, then it is ignored.
-
Headline1: The highest H tag text; for example, "Annual Report" from
<H2>Annual Report</H2>when there is no H1 tag in the page. -
Headline2: The second highest H tag text
-
Reference Text: The anchor text from another Web page that points to this page.
You can define additional HTML metatags to map to a String attribute on the Home - Sources - Metatag Mapping page.
Setting Up Table Sources
A table source enables users to search a table or view in a relational database.
Database object names may be represented with a quoted identifier. A quoted identifier is case-sensitive and begins and ends with double quotation marks ("). If the database object is represented with a quoted identifier, then you must use the double quotation marks and the same case whenever you refer to that object.
When creating a table source in Oracle SES, if the table name is a quoted identifier, such as "1 (Table)", then in the Table Name field enter "1 (Table)", with the same case and double quotation marks. Similarly, if a primary key column or content column is named using a quoted identifier, then enter that name exactly as it appears in the database with double quotation marks.
See Also:
Oracle Database SQL Reference for more information about schema object names and qualifiersThe following procedures identify the basic steps for setting up a table source using the Oracle SES Administration GUI. For more information on each page, click Help.
To create a table source:
-
On the home page, select the Sources secondary tab to display the Sources page.
-
For Source Type, select Table.
-
Click Create to display the Create Table Source page.
-
Complete the following fields. Click Help for additional information.
Database Information
-
Source Name: Name that you assign to this table source.
-
Database Host Name : Name or IP address of the host computer for the database.
-
TCP Port Number: Port number of Oracle Net Listener. The default port number for Oracle Database is 1521.
-
SID: System identifier or instance name of the database.
-
User Name: Database user name with SELECT access rights to the table or view.
-
Password: Password for User Name.
-
Delete Passwords After Crawl: Select to ensure that Oracle SES does not store the database schema password for this source longer than is needed to crawl the source.
Table Information
-
Schema: Name of the database schema that owns the table or view.
-
Table Name: Name of the table or view.
-
Primary Key Column: Column or set of columns that uniquely identify each row in the table or view. For performance, the primary key must be indexed. Click Locate Table for a list of columns in the table.
-
Content Column: Column with searchable content for Oracle SES to crawl and index.
-
Content Type: Binary, plain text, or HTML.
-
-
Click Create or Create & Customize.
-
Follow the steps for crawling and indexing a source in "Getting Started Basics for the Oracle SES Administration GUI".
To customize a table source:
-
When creating a table source, click Create & Customize on the Create Table Source page to display the Customize Table Source page.
or
After creating a source, click the Edit icon on the Home - Sources page.
-
Click the following subtabs and make the desired changes.
-
Basic Settings: Identifies the source name and schema password. Any other changes to the original settings require a new source definition.
-
Table Column Mappings: Maps columns to Oracle SES search attributes. See "Table Search Attributes".
-
Language: Identifies the default language and different column languages.
-
Display URL: Specifies the URL that users see for security reasons instead of the actual URL.
-
Authorization: Configuration of an Access Control List or an authorization manager plug-in.
-
-
Click Apply.
Table Search Attributes
Table sources have no predefined attributes. The crawler collects attributes from columns defined during source creation. You must map the columns to the search attributes.
Setting Up File Sources
A file source enables users to search files on the local computer. The following procedures identify the basic steps for setting up a file source using the Oracle SES Administration GUI. For more information on each page, click Help.
To create a file source:
-
On the home page, select the Sources secondary tab to display the Sources page.
-
For Source Type, select File.
-
Click Create to display the Create File Source page.
-
Complete the following fields. Click Help for additional information.
-
Source Name: Name that you assign to this table source.
-
Starting URL: The URL of the top directory where the crawler begins. See "Tips for Using File Sources".
-
-
Click Create or Create & Customize.
-
Follow the steps for crawling and indexing a source in "Getting Started Basics for the Oracle SES Administration GUI".
To customize a file source:
-
When creating a file source, click Create & Customize on the Create File Source page to display the Customize File Source page.
or
After creating a source, click the Edit icon on the Home - Sources page.
-
Click the following subtabs and make the desired changes.
-
Basic Settings: Source name, language, and starting URL.
-
URL Boundary Rules: Contents of a URL that include or exclude a page from crawling.
-
Document Types: Common document and image types that you can include or exclude from crawling. By default, Oracle SES crawls HTML, Excel, PowerPoint, Word, PDF, and plain text.
-
Display URL: URL that users see for security reasons instead of the actual URL.
-
Authorization: Configuration of an Access Control List or an authorization manager plug-in.
-
Attribute Mapping: Maps document attributes to Oracle SES search attributes. See "File Document Attributes".
-
Crawling Parameters: Crawling conditions, such as depth, language, HTTP cookies.
-
-
Click Apply.
File Document Attributes
Oracle SES crawls and searches various attributes. By default, Oracle SES maps these search attributes to common document attributes, such as AUTHOR, CREATOR, KEYWORD, and SUBJECT. You can enter and map additional document attributes.
Oracle SES crawls and indexes these document attributes:
-
Title
-
Author
-
Description
-
Host
-
Keywords
-
Language
-
LastModifiedDate
-
Mimetype
-
Subject
Tips for Using File Sources
This section contains the following topics:
Crawling File Sources with Non-ASCII Character Sets
For Oracle SES to crawl file sources that contain file names in non-ASCII format, Oracle SES server, Oracle ESS server, and WebLogic Server middle tier should be configured with the same locale settings that are used for the file names. Set the LC_ALL environment variable in the following files to the correct locale by editing these files in a text editor
| Linux/UNIX Platform | Windows Platform |
|---|---|
ses_home/bin/clexecutor.sh |
ses_home\bin\clexecutor.cmd |
ses_home/bin/searchctl |
ses_home\bin\searchctl.bat |
ses_home/ess/archives/ess-app/APP-INF/classes/META-INF/ess-config.xml |
ses_home\ess\archives\ess-app\APP-INF\classes\META-INF\ess-config.xml |
wls_home/common/bin/commEnv.sh |
wls_home\common\bin\commEnv.bat |
For example, for Korean environment, set LC_ALL to ko_KR. Restart the Oracle SES instance after setting the appropriate locale encoding for the LC_ALL environment variable in all the above files.
Crawling File Sources with Symbolic Links
When crawling file sources on UNIX, the crawler resolves any symbolic link to its true directory path and enforce the boundary rule on it. For example, suppose directory /tmp/A has two children, B and C, where C is a link to /tmp2/beta. The crawl has the following URLs:
-
/tmp/A
-
/tmp/A/B
-
/tmp2/beta
-
/tmp/A/C
If the inclusion rule is /tmp/A, then /tmp2/beta is excluded. The seed URL is treated as is.
Note:
When using Display URL feature to modify the file URL, note the following points:-
File URL prefix should be a fully resolved path and it should not be a symbolic link.
-
When Display URL is specified, Inclusion/Exclusion rules get applied on the Display URL.
Crawling File URLs
For a plug-in to return file URLs to the crawler, the file URLs must be fully qualified. For example, file://localhost/.
If a file URL is to be used "as is", without going through Oracle SES to retrieve the file, then "file" in the Display URL Prefix should be upper case "FILE". For example, FILE://localhost/.... The starting URL is not case sensitive.
"As is" means that when a user clicks the search link of the document, the browser tries to use the specified file URL on the client computer to retrieve the file. Without that, Oracle SES uses this file URL on the server computer and sends the document through HTTP to the client computer.
Crawling File Sources from a Network Drive
If the files are crawled from a network drive, then the Oracle process should be started as a user who has access to the drive.
See Also:
"Required Tasks" for instructions on how to change the user running the Oracle process.Crawling File Sources in a Clustered Middle Tier Environment
When Oracle SES middle tier is deployed in a cluster, then for crawling a file source, all the nodes in the cluster should have access to the file source directory, that is, the file source directory must be shared across all the nodes in the cluster.
Setting Up E-Mail Sources
An e-mail source enables users to search e-mail messages on an IMAP server. The following procedures identify the basic steps for setting up an e-mail source using the Oracle SES Administration GUI. For more information on each page, click Help.
Note:
If Database and middle tier are present on different systems, then the e-mail source archive directory must be accessible from both these systems.To create an e-mail source:
-
On the home page, select the Sources secondary tab to display the Sources page.
-
For Source Type, select E-mail.
-
Click Create to display the Create E-Mail Source page.
-
Complete the following fields. Click Help for additional information.
-
Source Name: Name that you assign to this table source.
-
IMAP Server: Address of the IMAP server, such as
mail.example.com. -
Archive: Directory where crawled messages are stored.
-
Self Service : Enabled to prompt users for their credentials, or Disabled to provide credentials for a single user on this page.
-
-
Click Create.
-
Follow the steps for crawling and indexing a source in "Getting Started Basics for the Oracle SES Administration GUI".
Setting Up Mailing List Sources
A mailing list source enables users to search messages that were sent to a mailing list on an IMAP server.
The Oracle SES crawler is IMAP4 compliant. To crawl mailing list sources, you need an IMAP e-mail account. Oracle recommends that you create an e-mail account that is used solely for Oracle SES to crawl mailing list messages. The crawler is configured to crawl one IMAP account for all mailing list sources. Therefore, all mailing list messages to be crawled must be found in the Inbox of the e-mail account specified on this page. This e-mail account should be subscribed to all the mailing lists. New postings for all the mailing lists are sent to this single account and subsequently crawled.
Messages deleted from the global mailing list e-mail account are not removed from the Oracle SES index. The mailing list crawler deletes messages from the IMAP e-mail account as it crawls. The next time the IMAP account for mailing lists is crawled, the previous messages no longer exist. Any new messages in the account are added to the index and consequently deleted from the account. This keeps the global mailing list IMAP account clean. The Oracle SES index serves as a complete archive of all the mailing list messages.
Note:
For a Mailing List connector to work, you must create the directorydata/cache/mail under Oracle home on the system where Database is installed.The following procedures identify the basic steps for setting up a mailing list source using the Oracle SES Administration GUI. For more information on each page, click Help.
To create a mailing list source:
-
Enter the global mailing list settings:
-
On the Global Settings page, choose Mailing List Settings under Sources to display the Global Mailing List Settings page.
-
Complete the following fields. Click Help for additional information.
User Name: IMAP e-mail account that is used to crawl the messages. This user must be on all of the mailing lists identified as a mailing list source.
Password: Password for User Name.
IMAP Server: Address of the IMAP server, such as
mail.example.com. -
Click Apply.
-
-
On the home page, select the Sources secondary tab to display the Sources page.
-
For Source Type, select Mailing List.
-
Click Create to display the Create Mailing List Source page.
-
Complete the following fields. Click Help for additional information.
-
Source Name: Name that you assign to this table source.
-
Mailing List: Name of the mailing list to be searched, such as
news@example.com.
-
-
Click Create.
-
Follow the steps for crawling and indexing in "Getting Started Basics for the Oracle SES Administration GUI" for the mailing list schedule.
Setting Up OracleAS Portal Sources
An OracleAS Portal source enables users to search across multiple portal installations and repositories, such as Web pages, disk files, and pages on other OracleAS Portal instances. Oracle Secure Enterprise Search can securely crawl both public and private OracleAS Portal content.
Note:
Oracle SES 11.2.2.2 supports OracleAS Portal versions 10.1.2.0.2 and 10.1.4.2PS.To create an OracleAS Portal source:
-
On the home page, select the Sources secondary tab to display the Sources page.
-
For Source Type, select OracleAS Portal.
-
Click Create to display the Create OracleAS Portal Source page.
-
Complete the following fields. Click Help for additional information.
-
Source Name: Name that you assign to this OracleAS Portal source.
-
URL Base: Base URL for OracleAS Portal.
-
Page Groups: List of page groups in OracleAS Portal retrieved when you click Retrieve Page Groups. Select the ones to crawl.
-
-
Click Create & Customize.
-
Select the Authentication tab.
-
Select Enable OracleAS Single Sign-On Authentication and enter your credentials.
-
Click Apply.
-
Follow the steps for crawling and indexing in "Getting Started Basics for the Oracle SES Administration GUI" for the mailing list schedule.
Crawling a Folder or Page
The portal crawler can crawl a subtree under a specific folder or page instead of under an entire portal tree.
To set the boundary rule to crawl a specific folder or page:
-
On the home page, click the Sources secondary tab to display the Sources page.
-
Select a source and click Edit to display the Edit User-Defined Source page.
-
Click the URL Boundary Rules subtab.
-
Under Inclusion Rules for the URL, select the starts with rule and enter the value of the
PORTAL_PATHfor the folder or page.For example, to crawl only the P2 subtree of a portal tree, enter the path from the root to P2, such as
/Proot/P1/P2.
OracleAS Portal Search Attributes
The crawler picks up key attributes offered by OracleAS Portal, as described in Table 6-1.
Table 6-1 OracleAS Portal Source Attributes
| Attribute | Description |
|---|---|
|
createdate |
Date the document was created |
|
creator |
User name of the person who created the document |
|
author |
User-editable field so that they can specify a full name or whatever they want |
|
page_path |
Hierarchy path of the portal page/item in the portal tree (contains page titles) |
|
portal_path |
Hierarchy path of the portal page/item in the portal tree, used for browsing and boundary rules (contains page names) When searching OracleAS Portal 10.1.2, portal_path appears as upper case in the browse. When searching OracleAS Portal 10.1.4, portal_path appears in lowercase. |
|
title |
Title of the document |
|
description |
Brief description of the document |
|
keywords |
Keywords of the document |
|
expiredate |
Expiration date of the document |
|
host |
Portal host |
|
infosource |
Path of the Portal page in the browse hierarchy |
|
language |
Language of the portal page or item |
|
lastmodifieddate |
Last modified date of the document |
|
mimetype |
Usually 'text/html' for portal |
|
perspectives |
User-created markers that can be applied to pages or items, such as 'INTERNAL ONLY', 'REVIEWED', or 'DESIGN SPEC'. For example, a Portal containing recipes could have items representing recipes with perspectives such as 'Breakfast', 'Tea', 'Contains Nuts', 'Healthy' and one particular item could have several perspectives assigned to it. |
|
wwsbr_name_ |
Internal name of the portal page or item |
|
wwsbr_charset_ |
Character set of the portal page or item |
|
wwsbr_category_ |
Category of the portal page or item |
|
wwsbr_updatedate_ |
Date the last time the portal page or item was updated |
|
wwsbr_updator_ |
Person who last updated the page or item |
|
wwsbr_subtype_ |
Subtype of the portal page/item (for example, container) |
|
wwsbr_itemtype_ |
Portal item type |
|
wwsbr_mime_type_ |
Mimetype of the portal page or item |
|
wwsbr_publishdate_ |
Date the portal page or item was published |
|
wwsbr_version_number_ |
Version number of the portal item |
Tips for Using OracleAS Portal Sources
-
URL boundary rules are not enforced for URL items. A URL item is the metadata that resides on the OracleAS Portal server. Oracle SES does not touch the display URL or the boundary rules for URL items.
-
The
portal_pathattribute is used to compare boundary rules. Portal pages and items are organized in a tree structure. When a page is included or excluded, its entire subtree starting with that node is included or excluded. -
If OracleAS Portal user privileges change, the content the crawler collects might not be properly authorized. For example, in a Portal crawl, the user specified in the Home - Sources - Authentication page does not have privileges to see certain Portal pages. However, after privileges are granted to the user, on subsequent incremental crawls, the content still is not picked up by the crawler. Similarly, if privileges are revoked from the user, the content might still be picked up by the crawler.
To be certain that Oracle SES has the correct set of documents, whenever a user's privileges change, update the crawler re-crawl policy to Process All Documents on the Home - Schedules - Edit Schedules page, and restart the crawl.
Setting Up Federated Sources
Secure federated search enables searching secure content across distributed Oracle SES instances. An end user is authenticated to the Oracle SES federation broker. Along with querying the secure content in its own index, the federation broker federates the query to each federation endpoint on behalf of the authenticated end user. This mechanism necessitates propagation of user identity between the Oracle SES instances. In building a secure federated search environment, an important consideration is the secure propagation of user identities between the Oracle SES instances. This section explains how Oracle SES performs secure federation.
To create a federated source:
-
On the home page, select the Sources secondary tab to display the Sources page.
-
For Source Type, select Federated.
-
Click Create to display the Create Federated Source page.
-
Complete the following fields. See "Federation Trusted Entities" and click Help for additional information.
-
Source Name: Name that you assign to this federated source.
-
Web Service URL: The URL for the Web service.
-
Remote Entity Name: Name of the federation trusted entity on the federation endpoint.
-
Remote Entity Password: Password for Remote Entity Name.
-
Search User Attribute: Attribute used to authenticate users on the federation endpoint instance.
-
Filter Rule: Conditions for routing queries to this federated source. Filter rules can improve scalability. If no rule is defined, then the federation agent sends all queries to the federated source to perform the search.
-
-
Click Create or Create & Customize.
-
Follow the steps for crawling and indexing a source in "Getting Started Basics for the Oracle SES Administration GUI".
To customize a federated source:
-
When creating a federated source, click Create & Customize on the Create File Source page to display the Customize File Source page.
or
After creating a source, click the Edit icon on the Home - Sources page.
-
Click the following subtabs and make the desired changes. See "Customizing Federated Sources".
-
Basic Settings: Source name, Web Service URL, and so forth.
-
Search Restrictions: Controls whether the search is restricted, and if so, which source groups are searched.
-
Attribute Retrieval: Lists search attributes to retrieve at query time.
-
Attribute Mapping: Maps local and remote search attributes.
-
-
Click Apply.
Federation Trusted Entities
When performing a secure search on a federation endpoint, the federation broker must pass the identity of the logged-in user to the federation endpoint. If the endpoint instance trusts the broker instance, then the broker instance can proxy as the end user. To establish this trust relationship, Oracle SES instances should exchange some secret. This secret is exchanged in the form of a trusted entity.
A trusted entity consists of two values: entity name and entity password. Each Oracle SES instance can have one or more trusted entities that it can use to participate in secure federated search. (A trusted entity is also referred to as a proxy user.)
An Oracle SES instance can connect to an identity management (IDM) system for managing users and groups. An IDM system can be an LDAP-compliant directory, such as Oracle Internet Directory or Active Directory.
Each trusted entity can be authenticated by either an IDM system or by the Oracle SES instance directly, independent of an IDM system. For authentication by an IDM system, check the box Use Identity Plug-in for authentication when creating a trusted entity. In this case, the entity password is not required. This is useful when there is a user configured in the IDM system that can be used for proxy authentication. Ensure that the entity name is the name of the user that exists in the IDM system and is going to be used as the proxy user.
For authentication of the proxy user by Oracle SES, deselect Use Identity Plug-in for authentication when creating a trusted entity. Then use any name and password pair to create a trusted entity.
Use Authentication Attribute to specify the format of the user credential that the Oracle SES federation endpoint expects for this particular trusted entity in proxy authentication. The identity plug-in registered on the federation endpoint should be able to map this user identity to the default authentication format used on the federation endpoint. This is useful when a federation broker cannot send user identity in the default authentication format used on the federation endpoint for proxy authentication, but the identity plug-in registered on the federation endpoint can map the value from the attribute in which it receives the user identity during proxy authentication to the default authentication format used on the federation endpoint.
To use a proxy entity, use the Web services API proxyLogin user name and password for the entity name and entity password. The identity plug-in can validate the password instead of storing it. When a request is sent for proxyLogin, Oracle SES calls the identity plug-in (which returns the call) to authenticate the entity. The proxyLogin must supply a valid trusted entity registered in the federation trusted entities.
User names are not case sensitive.
To perform secure federated search, both the broker and the endpoint instances involved in the federation must have identity plug-ins registered. The identity plug-ins may or may not talk to the same IDM system.
Note:
All user names should be unique across all Oracle SES instances. If not, then there should be a clear mapping for the users to make them unique across all IDMs involved in the secure federation.Carefully specify the following parameters under the section Secure Federated Search when creating a federated source on the broker instance:
-
Remote Entity Name: This is the name of the federation trusted entity on the federation endpoint. It is provided by the administrator of the endpoint instance.
-
Remote Entity Password: This is the password of the federation trusted entity on the federation endpoint. It is provided by the administrator of the endpoint instance.
-
Search User Attribute: This attribute identifies, and is used to authenticate, a user on the federation endpoint instance. This parameter is optional parameter, unless the broker and endpoint use different authentication attributes to identify end users. For example, on the broker instance, an end user can be identified by user name; on the endpoint instance, the end user can be identified by e-mail address.
The identity plug-in registered on the broker instance should be able to map the user identity to this attribute based on the authentication attribute used during the registration of the identity plug-in. If this attribute is not specified during creation of the federation source, then the user identity on the broker instance is used to search on the endpoint instance.
Note:
If these parameters are not specified during the creation of the federated source, then the federated source is treated as a public source (that is, only public content is available to the search users). -
Secure Oracle HTTP Server-Oracle SES channel: Because any Oracle HTTP Server can potentially connect to the AJP13 port on the Oracle SES instances and masquerade as a specific person, either the channel between the Oracle HTTP Server and the Oracle SES instance must be SSL-enabled or the entire Oracle HTTP Server and Oracle SES instance computers must be protected by a fire wall.
Notes:
-
In a secure federated search environment, the broker or the endpoint instance might or might not be using OracleAS Single Sign-on (SSO). However, the Web service URL of the endpoint should not be behind OracleAS Single Sign-on.
-
Oracle strongly recommends that you SSL-protect the channel between Oracle HTTP Server and Oracle SES for secure content. The endpoint instance should be SSL-enabled, or you should be able to access the Web service using HTTPS.
See Also:
"Tips for Using Federated Sources"Example Creating a Federated Source
This section describes the steps for setting up a federated source that connects to Active Directory.
-
Activate the Active Directory identity plug-in on both the endpoint and broker instances. For example, on the Global Settings - Identity Management Setup page, enter the following:
-
Parameter Name: value
-
Directory URL:
ldap://ad.oracle.com:389 -
Directory account name: administrator@ad.oracle.com
-
Directory account password: Password for Directory account name.
-
Directory subscriber: dc=ad,dc=oracle,dc=com
-
Directory security protocol: none
-
-
Create federation trusted entities on the endpoint instance. For example, login to Oracle SES on the endpoint instance, navigate to the Global Settings - Federation Trusted Entities page, and enter the following:
-
Entity Name: Entity name
-
Entity Password: Password for Entity Name
-
-
Create a federated source on the broker side. For example, login to Oracle SES on the broker instance, navigate to the Home - Sources page, select the source type as Federated, and enter the following:
-
Source Name: Sourcename1
-
Web Service URL:
http://endpoint.cn.oracle.com:7777/search/query/OracleSearch -
Remote Entity Name: Entity name
-
Remote Entity Password: Password
-
-
To browse the federated source on broker side, create a source group and then add the federated source to the group.
Customizing Federated Sources
On the Home - Sources - Customize Federated Source page, you can change the source name, Web Service URL, remote entity name and password, and search user attribute.
This section describes the other ways you can customize a federated source:
Route Queries to the Federated Source
Enter a filter rule, which sets conditions for routing queries to the federated source, on the Home - Sources - Customize Federated Source page. Filter rules can improve scalability. If no rule is defined, then the federation agent sends all queries to the federated source to perform the search. The rules are applied only against the search query filter. They are not applied when an end user enters the attribute shortcut query.
Each rule has an attribute, a colon (:) and an expression. Rules can be based on end user properties, such as name or e-mail address, and on query information, such as document language, author, or document modified date. For example, an identity attribute could be mail or dn. A query attribute could be author or lastmodifieddate.
Multiple rules for the source are joined with the AND and OR operators. The attribute name and the operators are not case-sensitive. For example, the following rule defines that the federated source is for English documents and for users having an e-mail address starting with A in the identity management system:
(language:en ) AND (idm::mail:a.*)
The attribute can be Date, String, or Number type. For String attributes, the rule expression is regular expression. Oracle SES supports the regular expression syntax used in the JDK Pattern class (java.util.regex.Pattern). For Date and Number attributes, the expression contains the operator and value. The operators are =, >, >=, <, <=.
Filter Rule Examples
The following rule defines that the federated source is for documents larger than 1 M:
content-length:>1000000
The following rule defines that the federated source is for documents published after 12/31/2006:
lastmodifieddate:> 12/31/2006
The following example defines that the federated source has only documents for the last week:
lastmodifieddate:> sysdate - 7
The following rule defines that the federated source is for the login name, which could be an attribute of the identity management repository:
username:test00.*
Set Search Restrictions
Restrict search to a specific list of source groups on the Home - Sources - Customize Federated Source - Search Restrictions page.
Available source groups from the federated source are retrieved when the page is loaded. When Source Group Restricted Search is selected, you can move the source groups between the Not Searched and Searched lists. When Unrestricted Search is selected, all source groups on the remote instance are searched.
The Refresh Source Groups button refreshes the available source groups from the remote instance. If a source group is no longer available, then it is marked Not Available. All newly available source groups after a refresh appear in the Not Searched list by default, and all existing source groups remain in the list they are presently in. If a remote source group is renamed, the old name is marked Not Available and the new name appears in the Not Searched list. Unavailable source groups persist while they remain in the Searched list.
If the federated source is unavailable, then the available source groups are loaded from local storage. A warning message then states that Oracle SES cannot retrieve the available source groups from the remote instance, indicating that the available source groups may be out of date.
Note:
A federated source can be restricted to only explicitly-created source groups on the remote Oracle SES instance. For example, a federated source cannot be restricted to the Miscellaneous group on the remote Oracle SES instance.Retrieve Attributes
Identify which attributes to retrieve from the federated source on the Home - Sources - Customize Federated Source - Attribute Retrieval page.
Available attributes from the federated source are retrieved when the page is loaded. Move search attributes to retrieve between the Not Retrieved column and the Retrieved column. Attributes that are always retrieved by Oracle SES by default are in the Retrieved list and marked Mandatory. These attributes cannot be saved in the Not Retrieved list.
The Refresh Attributes button refreshes the available attributes from the remote instance. If an attribute is no longer available, then it is marked (Not Available). All newly available attributes after a refresh appear in the Not Retrieved list by default, and all existing attributes remain in the list they are presently in. If a remote attribute is renamed, then the old attribute name is marked Not Available, and the new name appears in the Not Retrieved list. Unavailable attributes persist while they remain on the Retrieved list or are used in an explicit attribute mapping.
If the federated source is unavailable, then the available attributes are loaded from local storage. A warning message then states that Oracle SES cannot retrieve the available attributes from the remote instance, so the available attributes may be out of date.
Map Attributes
Map local search attributes with federated search attributes on the Home - Sources - Customize Federated Source - Attribute Mapping page. For example, a local search attribute named Creator can be mapped to a remote attribute named Author. This is an explicit attribute mapping. Only one-to-one mappings between attributes of the same data type are supported.
Note:
For default Oracle SES search attributes, Oracle SES implicitly maps local attributes to remote attributes. For example, a remote attribute named Author is always mapped to local search attribute name Author. For all other attributes, explicit mappings must be created.Local search attributes are the available attributes on the local instance, as defined on the Global Settings - Search Attributes page. Local search attributes that are used in a mapping cannot be deleted on the Global Settings - Search Attributes page. Initially, there are no mappings.
Remote search attributes are the available attributes on the federated source. This list is retrieved when the page is loaded. If a remote attribute is mapped to a local attribute but the remote attribute is no longer available, then the remote attribute is marked (Not available). Only attribute mappings involving available remote attributes are used during queries.
Tips for Using Federated Sources
-
The Oracle SES federator caches the federator configuration (that is, all federation-related parameters including federated sources). As a result, any change in the configuration takes effect within five minutes.
-
If you entered proxy settings on the Global Settings - Proxy Settings page, then add the Web Services URL for the federated source as a proxy exception.
-
If the federation endpoint instance is set to secure mode 3 (require login to search secure and public content), then all documents (ACL stamped or not) are secure. For secure federated search, create a trusted entity in the federation endpoint instance, then edit the federated source with the trusted entity user name and password.
-
There can be consistency issues if you have configured a BIG-IP system as follows:
-
You have two Oracle SES instances configured identically (same crawls, same sources, and so on) behind a BIG-IP load balancer to act as a single logical Oracle SES instance.
-
You have two other Oracle SES instances configured identically along with Oracle HTTP Server and OracleAS Web Cache fronting each one and both servers behind BIG-IP. Each of these two instances federate to the logical Oracle SES instance. Web Cache is clustered between these two nodes to act as a single logical Oracle SES instance called broker instance.
When a user performs a search on the broker Oracle SES instance and tries to access the documents in the result, document access may not be consistent each time. As a work-around, ensure that the load balancer sends all the requests in one user session to the exact same node each time.
-
Looping Among Federated Sources
A federation loop or cycle refers to a deployment in which multiple SES instances federate to each other. For example, if SES Instance A federates to SES Instance B, and SES Instance B federates back to instance A, then a federation cycle is in the deployment. Federation cycles can cause a flood of queries and high CPU load on the participating SES instances.
SES does not detect federation cycles, thus the Oracle SES administrator is responsible for avoiding them. You can explicitly remove them from the deployments or use source-group-restricted federation. The previous example can be fixed with a source-group restriction: the source groups on Instance B selected for federation on Instance A do not have any federated sources for Instance A, and the converse. See "Set Search Restrictions".
Federated Search Characteristics
-
Federated search can improve performance by distributing query processing on multiple computers. It can be an efficient way to scale up search service by adding a cluster of Oracle SES instances.
-
The federated search quality depends on the network topology and the throughput of the entire federated Oracle SES environment.
Federated Search Limitations
-
There is a size limit of 200KB for the cached documents existing on the federation endpoint to be displayed on the Oracle SES federation broker instance.
-
For infosource browse, if the source hierarchies for both local and federated sources under one source group start with the same top level folder, then a sequence number is added to the folder name belonging to the federated source to distinguish the two hierarchies on the Browse page.
-
For federated infosource browse, a federated source should be put under an explicitly created source group.
-
On the Oracle SES federation broker, there is no direct access to documents on the federation endpoint through the display URL in the search result list for the following source types:
-
File (local files, not UNC)
-
Table
-
E-mail
-
Mailing list
For these source types, only the cached version of documents is accessible.
-