| Oracle® Communications IP Service Activator User's Guide Release 7.2 E35290-01 |
|
|
PDF · Mobi · ePub |
| Oracle® Communications IP Service Activator User's Guide Release 7.2 E35290-01 |
|
|
PDF · Mobi · ePub |
Before you can apply services or set up policies, you need to set up an accurate representation of the network to be managed. Oracle Communications IP Service Activator can automatically discover all IP addressable network elements within your network, that is, devices, hosts and network segments, and set up appropriate information. After you discover the devices to be managed, you can set up maps showing the network topology.
This chapter includes the following:
Introduction to network discovery
Steps you need to take before running device discovery, including setting the correct domain information
The initial discovery of the network, including different methods of network discovery
Steps you need to take after device discovery, to ensure that the information is complete
During network discovery, IP Service Activator finds out details of devices, hosts, and network segments within the domain that you are managing. It also retrieves interface capabilities of each device and, where possible, sets up the information that IP Service Activator needs in order to manage the devices. The discovery process includes the following stages:
Discovering devices, segments, and hosts
Assigning devices to proxy agents
Assigning policy roles to devices and interfaces
Setting up the security parameters that IP Service Activator needs to configure devices
Discovering the capabilities of devices and interfaces: the VPN, QoS, security, and measurement options that are available
The topology discovery process finds out information about the network topology by interrogating network nodes using SNMP. Given an IP address or DNS name, IP Service Activator discovers details of the node. If the node is classified as a device (that is, it forwards IP packets; for example, a router or a Layer 2 switch) details of connected network segments, interfaces and any PVC endpoints are obtained. From a segment, IP Service Activator can find further directly connected nodes, that is, hosts and devices.
The discovery process is controlled by a set of SNMP parameters; default values are assumed by IP Service Activator, but these can be overwritten if required.
The way in which discovery works depends on whether public or private IP addresses are used within the domain. See "Before Running Device Discovery" for more information.
All devices in the domain that are to be managed must be assigned to a proxy agent. The proxy agents are the IP Service Activator components that manage the low-level device driver commands for each device type.
Assigning devices to proxy agents is generally performed automatically during device discovery. You can set up IP Service Activator either to assign all devices to one proxy agent or to assign the devices equally to all active proxy agents. See "Setting Up Proxy Agent Assignment" for more information.
All devices and interfaces to be managed must be assigned a role in order to define the points in the network at which service configuration or policy will be applied. Devices can be classified with any system-defined and/or user-defined roles that have been set up within the domain.
For each device, security parameters, such as user IDs and passwords must be specified to allow IP Service Activator to configure the device. This information must be set up prior to discovery because IP Service Activator requires write access to routers before it can obtain the device and interface capabilities.
Setting up standard security information applies it automatically to all discovered devices. This can save time if you use the same access methods and passwords for a number of devices in your network. See "Defining Default Security Options for Discovery" for more details.
At the end of the discovery process, IP Service Activator attempts to discover the capabilities of each device and its interfaces. These capabilities dictate the VPN, QoS, security, and measurement options available. See "Checking Capabilities" for more information. If IP Service Activator is unable to discover capabilities, for example because security parameters are incorrectly set up, you can discover the device capabilities at a later point. See "Refetching Device Capabilities" for more information.
Note:
The discovery process can open a large number of file descriptors on Solaris systems. The size of the fd_set used is FD_SETSIZE, which is hard-coded to be 1024 on Solaris (in /usr/include/sys/select.h). By default, IP Service Activator can use half of this maximum. An alternative value can be set by specifying the following command-line parameter to the policy server:-SnmpMaxSessions <xxx>
where xxx is the maximum number of file descriptors, between 1 and 1024, with the default value being 512.
Each router managed by IP Service Activator has a BGP Autonomous System (AS) number. IP Service Activator supports a default AS at the domain level but individual routers within this domain may have a different AS than the domain default. A domain that contains devices belonging to different Autonomous Systems is referred to as a Multi-AS domain.
IP Service Activator supports Multi-AS domains by actively discovering the BGP AS number configured into each device as it is discovered, or re-discovered, in the system. All BGP provisioning on a device will use the last discovered BGP AS number. If a device changes its Autonomous System membership, it must be re-discovered to ensure IP Service Activator is aware of the change.
During device discovery, if the discovered AS number differs from the default Domain AS number, IP Service Activator raises a warning against the device (Code 1627):
DeviceName (DeviceManagementIPAddress) ASN on device does not match Domain ASN
This warning is for information purposes only and does not inhibit service provisioning using the discovered AS number. If the device being discovered already has roles, due to re-discovery, this behavior is seen only for devices assigned the role of Gateway or Core. For devices assigned the role of Access, such as CE devices, AS number validation is not performed against the default domain AS. Instead, if the device is found to belong to a VPN site and if the site connectivity includes eBGP, the discovered AS number is matched against the peer BGP AS number specified on the VPN site.
If a managed device is re-discovered, and the newly discovered AS number does not match the previously discovered AS number, a warning is raised against the device (Code 1631): "".
The device DeviceName (DeviceManagementIPAddress) has a non-zero ASN in the OM that is different from the discovered ASN
The pre-existing AS number for the device with IP Service Activator is not changed. To actually change the AS number for the device, the device must first be unmanaged and then re-discovered.
IP Service Activator displays the discovered device AS number (ASN) in the Device dialog box on the Device property page.
This section explains the steps that you need to take before starting the device discovery process:
Ensure domain details are correctly set up.
Ensure proxy agents are set up for automatic assignment.
Specify the system's use of IP addresses for device management.
Set up roles.
The way in which discovery works depends on whether public or private IP addresses are used within the domain. For the discovery process to work correctly, ensure that the domain type is set correctly on the Domain property page before running the discovery process. This can be Public, Private or MPLS VPN.
Note:
You must create one domain per AS region.See "Setting Up Domains" for information about setting up domain details.
If the domain is defined as Public, IP Service Activator can discover an entire network starting from a single device, because all IP addresses found are unique. The extent of the discovery can be controlled by specifying the number of hops to go from the original device. Alternatively, if no IP addresses or DNS names are known, a discovery can be started from the segment local to the policy server to find details of all connected devices, hosts and further segments.
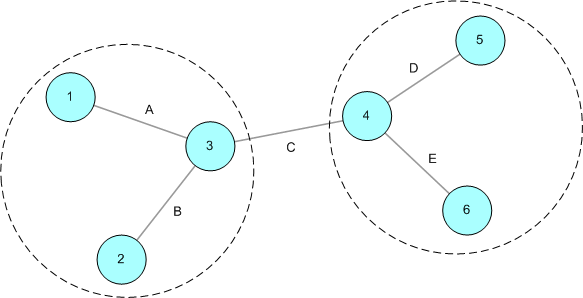
A device can only be in one domain, but where a segment links two devices that appear in two different domains, the segment appears in both domains, as shown in Figure 5-1.
If devices 1, 2 and 3 are in one domain and devices 4, 5 and 6 in another, a representation of segment C appears in both domains.
In a public domain, the IP address of a device specified for the discovery process may be changed. For example, if a Cisco device has a loopback address defined, this is used to identify the device in preference to any IP address previously used. The default loopback address used is 0 but may have been configured for the domain.
See "Setting the Default Loopback ID Value for Discovery" for details.
If the domain is defined as Private, each device must be identifiable by a unique IP address, which may be a public address or a Network Address Translation (NAT) address. However, some or all of the interface IP addresses are likely to be non-unique. Therefore the discovery process requires a unique IP address or DNS name to be specified, and is not able to find further devices. The Hops field on the Discovery dialog box is therefore ignored.
Note:
Connections between discovered segments are not automatically shown in the client, though these connections can be created manually by dragging one segment on to another.For MPLS VPNs, the core provider network is assumed to use public addresses, and IP Service Activator can discover an entire network starting from a single device. All CE routers are assumed to use private addresses and an IP address or DNS name must be specified in order to discover them.
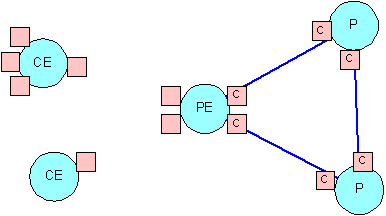
If PE interfaces that are connected to CE devices have public addresses, the PE and CE devices will be automatically connected to segments during discovery, as shown in Figure 5-2. Depending on the role assignment rules applied, devices and interfaces will be assigned appropriate roles.
If PE interfaces that are connected to CE devices have private addresses, connectivity cannot be determined, as shown in Figure 5-3. Therefore CE devices and access interfaces on PE devices are not automatically connected to segments. In addition, because the devices are not directly connected, interfaces are not automatically assigned roles.
The connections between the PE and CE devices can be applied manually, by dragging one interface on to another on the topology map.
Note:
If a role is assigned to the CE device, IP Service Activator does not show the CE device's connection to the PE device. If there is no role assigned to the CE device, however, IP Service Activator shows the connection.All devices in the domain that are to be managed by IP Service Activator must be assigned to a proxy agent. It is the proxy agent that controls when and what type of configuration is to be applied to a specific interface.
Although it is possible to assign devices to proxy agents manually, it is generally performed automatically during device discovery.
See "Setting Up Proxy Agent Assignment" for information about setting up proxy agents for automatic assignment.
IP Service Activator uses a specific IP address when managing devices. Commonly this is the loopback address, but if this is not a unique address it is possible to use an alternative. On the Options dialog box you can set up a global option to define the standard way in which IP addresses are used. If necessary you can override this for individual devices (see "Setting Specific IP Addresses for Device Management").
Note:
For complete dialog box and property page descriptions, refer to the Online Help.To set global IP address usage:
From the Tools menu, select Options.
The Options dialog box opens.
Select the Discovery property page.
Under CE Device IP Address Selection, select the global option used to set the IP address for CE devices. Choose from Choose loopback, Choose first WAN address, and Do not change.
See "Setting the Default Loopback ID Value for Discovery" for more information.
Click OK.
A role is a label that can be applied to one or more policy targets. Roles define:
The policy or service configuration that is applied to that object
For external collector systems, from which devices data is collected
See "Defining and Applying Roles" for information about defining roles.
The AutoDiscovery.cfg file is used to specify how IP Service Activator interprets discovery information from devices in terms of translating the SNMP MIB-2 data into objects. It does this through a number of rules matching the formats shown below. Each rule defines a set of matching conditions. If a discovered item matches the conditions, it is reported into IP Service Activator as the type of object the rule specifies.
The AutoDiscovery.cfg file is located in opt/OracleCommunications/IP Service Activator/Config.
Note:
Be careful when editing the AutoDiscovery.cfg file. Do not change the settings unless you fully understand the impact on discovery. You should fully understand SNMP, ifTable, ifStack, and core MIB-2 concepts before creating changes to the AutoDiscovery.cfg file. It is important to construct these statements with extreme care, because conflicts are possible between statements and particularly, regex statements.The Policy Server reads the AutoDiscovery.cfg file on startup. In order for changes to the AutoDiscovery.cfg file to take effect, the Policy Server must be restarted.
In general, the Boost regex (regular expression) is used.
The AutoDiscovery.cfg file is made up of the following types of entries. The basic mechanism is to evaluate each returned MIB-2 object from SNMP against the statements in the AutoDiscovery.cfg file. The discovery information is matched against the statement parameters to determine how IP Service Activator should handle the object.
The possible statement types in the AutoDiscovery.cfg are:
Enterprise:<enterpriseNumber>;<enterpriseName>;<deviceDriver>;<supported>;<accessType>;<configLevel>;
Subinterface:<enterpriseNumber>;<highIfType>;<lowerIfType>;<regexp>;<Invert>;
Sublayer:<enterpriseNumber>;<highIfType>;<lowerIfType>;<regexp>;<Invert>;
Vlan:<enterpriseNumber>;<highIfType>;<lowerIfType>;<regexp>;<Invert>;
Vlanport:<enterpriseNumber>;<highIfType>;<lowerIfType>;<regexp>;<invert>;
Main:<enterpriseNumber>;<highIfType>;<lowerIfType>;<regexp>;
Ignore:<enterpriseNumber>;<highIfType>;<regexp>;
Ifname:<enterpriseNumber1>;<enterpriseNumber2>;<ifType>
Ifdesc:<enterpriseNumber1>;<enterpriseNumber2>;<ifType>
Persistant:<enterpriseNumber1>;<enterpriseNumber2>;
Volatile:<enterpriseNumber1>;<enterpriseNumber2>;
Rename:<enterpriseNumber>;<ifType>;<pattern to match>;<pattern to substitute>;
Icmp:[on | off]
AtmVcInterfaceSource:<enterpriseNumber>;<aal5VccTable/atmVclTable>
Host:<enterpriseNumber1>;<enterpriseNumber2>;
Device:<enterpriseNumber1>;<enterpriseNumber2>;
Controller:<enterpriseNumber>;<ifType>;<regexp>;
Most of the statements function in a similar way. Generally for statement X, if the MIB-2 information for an object matches the parameters in the statement, the object is treated as an object of type X in the IP Service Activator object model.
The Enterprise type defines a vendor to the discovery system. The Enterprise type identifies the device as belonging to a particular vendor and defines how IP Service Activator can communicate with the device, and what paradigm IP Service Activator uses when we configure the device.The syntax is as follows:
Enterprise:<enterpriseNumber>;<enterpriseName>;<deviceDriver>;<supported>;<accessType>;<configLevel>;
where:
<enterpriseNumber> - registered enterprise number to match on (e.g. Cisco = 9). This comes from the sysObjectId in the MIB2 report from the device for this vendor.
<enterpriseName> - text string used to visually represent the vendor
<deviceDriver> - the device driver / cartridge type that must be used to deal with devices from this vendor (if not supported, leave empty).
<supported> - tells IP Service Activator whether any configuration other than discovery can be performed with this vendor's devices (yes/no).
<accessType> - the default mechanism to get into the device for the purpose of command delivery (TACACS, NamedUser, anonymous, SNMPv1, SNMPv2c, none, PasswordOnly) - the details of the access mechanisms are documented in the Discovery section of the IP Service Activator online Help.
<configLevel> - defines whether the device is to be configured as a whole or if it can be treated as a number of individual interfaces. Specify either Device or Interface.
For example:
Enterprise:9;Cisco;cisco;yes;TACACS;Interface;
This statement indicates that for devices with enterprise number 9, name the vendor as ’Cisco', use the cisco device driver, access the devices using TACACS, and treat the device as though it has a number of interfaces below the device in hierarchy.
The syntax for Subinterface is as follow:
Subinterface:<enterpriseNumber>;<highIfType>;<lowerIfType>;<regexp>;<Invert>;
<enterprise_number> - registered enterprise number to match on.
<highIfType> - Interface IfType for higher layer in ifStack.
<lowerIfType> - Interface IfType for lower layer in ifStack.
<regexp> - regular expression to match the reported name on.
<Invert> - invert flag. The optional Invert value indicates that IP Service Activator should invert whatever relationship was reported by SNMP. For example, if SNMP reports that 'B' is lower than ’A', we might actually want ’A' to be a Subinterface not ’B'. The invert flag compensates for this situation.
The use of the Subinterface, Sublayer, and Main statements is to enforce the hierarchy of interfaces based on type (and regex matching on the name).
Subinterface:9;32;32;.*;
This statement indicates that an interface discovered that has an enterprise number of 9 and if ifStack reports a higher ifType of 32 and a lower ifType of 32, and the object is named anything, treat it as a subinterface.
The parameters for Sublayer are similar to Subinterface.
Sometimes devices deal with interfaces at a level of abstraction or granularity that is not reflected in the available discovery types in IP Service Activator. Objects can be reported as interfaces that are not actually configurable interfaces. For example, some artifacts of configuration are reported through SNMP as interfaces.
For example:
Sublayer:9;134;0;.*\.0;
The Sublayer statement is used to keep the reported object matching the statement in the IP Service Activator object model without storing it as an interface or subinterface.
The syntax for Vlan and Vlanport are as follows:
Vlan:<enterpriseNumber>;<highIfType>;<lowerIfType>;<regexp>;<Invert>; Vlanport:<enterpriseNumber>;<highIfType>;<lowerIfType>;<regexp>;<invert>;
The parameters for Vlan and Vlan port are similar to Subinterface.
VLAN and VLAN Port identify the discovered interfaces as VLAN or VLAN Port interfaces respectively as opposed to general use interfaces for devices for which these are not reported correctly through SNMP.
The syntax for Main is as follows:
Main:<enterpriseNumber>;<highIfType>;<lowerIfType>;<regexp>;
The parameters for Main are similar to Subinterface.
For this an interface, if the enterprise number, interface pair, and optionally the regex match, treat it as a main interface in IP Service Activator.
For example:
Main:9;32;39;îSerial.*;
This example would map Cisco Frame Relay interfaces on a SONET controller as main interfaces in IP Service Activator if the description matches the regular expression îSerial.*.
The syntax for Ignore is as follows:
Ignore:<enterpriseNumber>;<highIfType>;<regexp>;
This means for the device matching the enterprise number, interfaces matching the high interface type number (and optionally matching the regex) are ignored. Discovery of matching interfaces will not be reported to IP Service Activator. For example:
Ignore:9;94;.*-adsl;
This statement causes discovery to ignore ASDL interfaces on Cisco devices.
The syntax are as follow:
Ifname:<enterpriseNumber1>;<enterpriseNumber2>;<ifType> Ifdesc:<enterpriseNumber1>;<enterpriseNumber2>;<ifType>
SNMP supports two different text representations of the interface - name and description. Some vendors put the canonical name of the interface in the 'name' field, while other put it in the 'desc' field. These statements allow you to account for these variations. By default, IP Service Activator uses the description to map to the description of the interface in the object model. However, by supplying an enterprise identifier and interface type in an Ifdesc statement, you specify that the discovered interface's name will be supplied from the description reported by SNMP. For example:
ifname:9;5;0;
CatOS interfaces discovered store their name in 'name', not 'desc'.
The syntax is as follows:
Icmp:[on | off]
Icmp controls whether IP Service Activator should ping a destination first before attempting SNMP discovery. This is used when a range of IP addresses (as specified by an address/mask subnet identification) are being discovered, or during segment-based discovery. All viable IP addresses are contacted and addresses which respond are discovered. This setting is 'on' by default.
The syntax is as follows:
Volatile:<enterpriseNumber1>;<enterpriseNumber2>;
For the given device (where its sysObjectId matches <enterpriseNumber1>,<enterpriseNumber2>), assume that the ifIndex values assigned to each interface are either preserved (i.e. Persistent) or recomputed on restarts or similar situations, and therefore can change (i.e. Volatile). This statement indicates to IP Service Activator whether the ifIndex value of an interface can be used to find matches and uniqueness. (When IP Service Activator re-discovers a device, it needs to map the interfaces coming out of SNMP discovery to the already-discovered interfaces in the object model).
The syntax is as follows:
Rename:<enterpriseNumber>;<ifType>;<string-to-match>;<string-to-replace>;
For this interface number, for this interface type, if you find an interface name that matches this pattern, use the substitute pattern to modify the name that is reported to IP Service Activator.For example:
Rename:9;134;-atm subif;;
In this example, ATM subinterfaces are renamed so that the text "-atm subif" is removed from the name (i.e. is replaced with nothing).
The syntax is as follows:
AtmVcInterfaceSource:<enterpriseNumber>;<aal5VccTable/atmVclTable>
There are two different SNMP MIBs that can supply virtual circuit information to IP Service Activator - the AAL5 table, and the ATM/VCL table. In some cases, SNMP reports data from both, even though only one is accurate. This statement lets you indicate, for the given enterprise number, which type of reporting of ATM VC Interfaces should be used by IP Service Activator.For example:
AtmVcInterfaceSource:9;aal5VccTable;
Cisco devices will be have the aal5VccTable information reported to IP Service Activator for Cisco ATM VCs.
The syntax is as follows:
Host:<enterpriseNumber1>;<enterpriseNumber2>; Device:<enterpriseNumber1>;<enterpriseNumber2>;
These statements let you indicate which enterprise number pairs indicate hosts, and which indicate devices, in terms of the IP Service Activator object model.For example:
Device:3224;0;
Juniper Netscreen devices will be discovered as devices, not hosts.
The syntax is as follows:
Controller:<enterpriseNumber>;<ifType>;<regexp>;
Devices sometimes report hardware controllers as interfaces, even though they are not. This statement lets you indicate that reported items matching the values given in the statement are hardware controllers.
To discover controllers:
Take a backup of Config/AutoDiscovery.cfg.
Open Config/AutoDiscovery.cfg in a text editor.
Comment out the appropriate lines. For this, find blocks of lines delimited at the top by the line:
//: Comment out the following lines to discover controllers
The block is delimited at the bottom by the line:
//: END Controller Discovery
For each line in the middle of these two delimiters, add "//:" as a prefix to comment it out.
Note:
You can ignore lines that are already commented out.Uncomment the appropriate lines. For this, find blocks of lines delimited at the top by the line:
//: Uncomment the following lines to discover controllers
and delimited at the bottom by the line:
//: END Controller Discovery
For each line between these two delimiters, remove the prefix "//:".
Note:
You can ignore lines that are commented out with the "//: " prefix. Note any additional space, these are really comments and should be kept commented out.Save the Config/AutoDiscovery.cfg. Ensure that you have preserved user id, group id and permissions on the file. It is recommended you run a "diff" between the saved version and the modified version to confirm that all required changes have been made and no unwanted changes have been made.
Rediscover the devices.
All discovery operations initiated from now onwards will attempt to discover controllers as well.
When comparing discovered information against the AutoDiscovery.cfg file, the Policy Server considers statements in this order.
Enterprise ID
Device or Host
AtmVcInterfaceSource
Interfaces: Main, Sub, Lay, VLAN, VLAN Port, or Controller
Ifname and Ifdef
Rename
Tip:
Use an SNMP MIB Browser to determine what information is coming from SNMP about your devices. Then you can determine which exceptions in the returned information you need to create statements for.After you set up the domain parameters and roles, you can set up the network topology. There are several alternative methods of doing this:
You can initiate a discovery process from one or more device IP addresses or DNS names. This is the recommended method.
If you do not know the names and addresses of any devices, you can initiate a discovery from the host system running the policy server.
Note:
Network discovery and related tasks, such as fetching capabilities, cannot be carried out part way through the current transaction. These tasks can only be performed immediately after a transaction has been saved or committed and before a new transaction is started.To open the Topology Discovery dialog box, from the Discovery menu, select Discover.
The Topology Discovery dialog box opens.
Note:
The Discover menu option is available only when network objects appear in the Details pane (either a map view or a details list).The Discover menu option is not available if there are unsaved changes in the client.Set up parameters on the three property pages of this dialog box:
Discovery parameters specify the type of discovery
SNMP parameters control the way SNMP works
Security parameters specify access settings that apply to all discovered devices
The settings you select on the Discovery property page depend on the type of discovery you want to perform.
If you know the IP address or DNS name of one or more of the devices in your network you can use the Discover option in the Topology Discovery dialog box to discover its details and the network nodes to which it is connected.
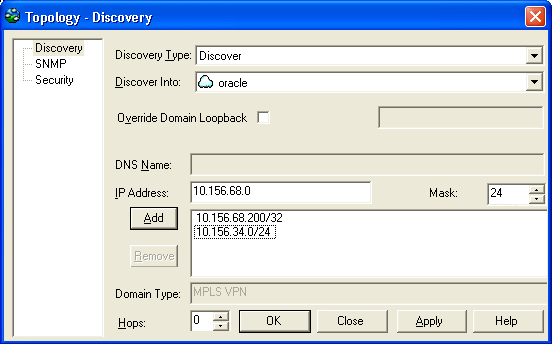
Figure 5-4 shows the Topology Discovery dialog box.
Note:
A device can only be discovered into a single domain – a device cannot feature in two domains.On the Topology Discovery dialog box, select Discover from the Discovery Type list.
In the Discover Into field, select the network to which you want discovered devices to be assigned.
(Optional) Override the default loopback ID value set for the Domain. See "Setting the Default Loopback ID Value for Discovery" for more information.
Enter the DNS name, or the IP address and mask for the device.
Click Add to add it to the list of devices to be discovered.
The IP Address field accommodates both IPv4 and IPv6 addresses.
The mask defaults to 32, unless an IP address in the format X.X.X.0 is entered in which it is defaults to 24. It can be set to any value from 16 through 32.
The mask defaults to 32, unless an IP address in the format X.X.X.0 is entered in which it is defaults to 24. It can be set to any value from 24 through 32.
You can discover a number of devices at once, either by listing them individually or by specifying an IP address and mask.
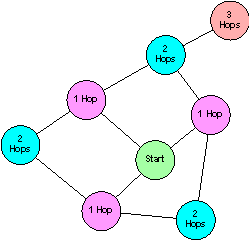
In a domain defined as Public or MPLS VPN, you can set the Hops field to a value between 1 and 10 to specify that the discovery process is to search for connected devices within a certain number of hops from the original device.
The default hop number is zero, that is, only the specified devices are found. Increasing the hop count value broadens the discovery process and results in more of the network topology being discovered in a single discovery operation. Note that the more hops, the longer the process takes.
Note:
In a domain defined as Private the Hops field is ignored, as the discovery process requires a unique IP address or DNS name in order to find a device.It is not possible to discover Juniper M-series devices using the hop count method. These devices do not make their routing tables available via SNMP, the protocol used by IP Service Activator to interrogate devices and network segments.
Figure 5-5 shows an example hop pattern from a starting device.
If you do not know the IP addresses or DNS names of any devices in your network you can use the Local Segment option to start a discovery from the host system running the policy server.
Note:
This method cannot be used in a domain defined as Private. Note also that the policy server workstation must be running an SNMP agent.To discover devices using the Local Segment option:
On the Topology Discovery dialog box, select Local Segment from the Discovery Type list.
In the Discover Into field, select the network to which you want discovered devices to be assigned.
Set the Hops field to a value between 1 and 10 to specify that the discovery process is to search for connected devices the specified number of hops from the original device.
Because the segment on which this discovery process is performed includes the policy server, it is likely that the segment is a local subnet outside the enterprise or service provider WAN. Therefore, it is a good idea to set the hop value to at least three so that some nodes in the WAN are discovered.
The parameters controlling the way in which the discovery process operates are set up on the SNMP property page of the Topology Discovery dialog box.
On this property page, you can select SNMP v1 and/or SNMP v2c to be used for device discovery. If you also want to use SNMP v3 for device discovery, you must select an SNMP Profile on this property page. More details follow:
If you are using an SNMP Profile to set SNMP for discovery, select the check box and select a profile in the drop-down menu. An SNMP Profile allows you to use SNMP v3 for discovery, as well as SNMP v1 and SNMP v2C. Details for using SNMP profiles are provided in the IP Service Activator online Help.
IP Service Activator follows an SNMP ”fallback” sequence until successful communication is established with a device. For example, if you select three SNMP versions for discovery, IP Service Activator starts the communication using SNMP v3, then falls back to SNMP v2c, and then to SNMP v1 if required, to establish the communication.
The default number of Retries is 2 and the default Timeout period is 3 seconds. You may need to increase these values if your network is slow, or if you set a high hop count for the discovery process and select the Next hop route discovery method.
By default both SNMP v1 and SNMP v2c check boxes are selected. This means that the discovery process will try SNMP v2c first and, if this fails, will try SNMP v1. If you specify SNMP v2c only, there is a possibility that you will not discover some devices in your network. In particular, Cisco devices that are running an IOS earlier than version 12.0 do not support SNMP v2c. Selecting both versions of SNMP for the discovery process ensures that current and older router models can be discovered. If you are sure that only one version is in use you can deselect one version in order to speed up the discovery.
The default Read Community setting is public; you need to change this if an alternative SNMP community has been set up on the devices.
The MaxRepetitions field is used to set the value for max-repetitions in the get bulk operation when SNMP v2c is selected for discovery. It specifies the maximum number of rows that will fetch from a network resource in a single get-bulk request. The default value of this field is 100. Permitted range for this filed is 1 to 100. Decrease the value of Max-Repetitions if the routers don't respond to the default value of 100.
Note:
If the discovery of a Juniper device times out using SNMP v2 but can be successfully discovered using SNMP v1, then adjust this value.The Discovery Method setting is only applied if the Hops value on the Discovery property page is greater than zero. The default setting is Next hop route, which queries the device's routing tables – this is normally faster, but if you have Internet routers with very large routing tables, it can be slow. If you select Segment scan the discovery process scans each newly-discovered segment checking each address in turn. This process is comprehensive but can be slow.
When a device has been discovered, the specific SNMP settings used are saved as device-specific parameters. For example, if SNMP v1 was used, only the SNMP v1 check box is selected on the device-specific SNMP settings. The device-specific settings always override the global settings when devices are rediscovered.
Note:
If SNMP compression is configured on a device, discovery of that device will not work. Ensure SNMP compression is not configured on the device. Note that Juniper M-series devices have SNMP compression turned on by default.You are recommended to set up default security parameters before running the device discovery. This ensures:
That security settings are automatically applied to all subsequently discovered devices.
That QoS, security and VPN capabilities are retrieved from all devices (write access to devices is required in order to ascertain the capabilities).
If you do not set these values, you must set security settings for each device individually. In addition, IP Service Activator will be unable to obtain device capabilities.
The access parameters are set on the Security property page of the Topology Discovery dialog box.
The Access Style is the mode in which IP Service Activator accesses the discovered devices for configuration. Access Styles include:
Named User
Anonymous
TACACS+
SNMP v1
SNMP v2c
SSH with password authentication
SSH with keyed authentication
Password Only
None
The selection determines which additional fields are displayed on the screen. Access methods are device-specific; at present, IP Service Activator configures devices as follows:
Cisco devices are configured via the command-line interface using an anonymous user login with password authentication, via SSH with password authentication, or via a TACACS+ server if configured.
Juniper M-series devices are configured via the command-line interface using Named User, via a TACACS+ server if configured, or via SSH with password authentication. (SSH with keyed authentication is not supported.)
Juniper E-series devices are configured via the command-line interface using an anonymous login with password authentication.
Alcatel devices are configured via the command-line interface using an anonymous login with password authentication, via a Named User login, or via SSH with password authentication. (SSH with keyed authentication is not supported.)
The access styles are as follows:
For login as a Named User, specify the command-line interface login details (Username and device Login and Enable passwords).
Note:
This method is not supported at present.For login as an Anonymous user, you just need to set up the Login and Enable passwords.
TACACS+ indicates that a TACACS+ server is used to control access. The appropriate passwords must be set up at network level (see "Setting Specific Security Settings").
For SNMP v1 or v2c you need to specify the SNMP Write Community for write access to the device. This must match the community set up on the device(s).
Note:
This method is not supported at present.Note:
SNMP v1 and v2c are not supported as access styles on any currently-supported devices.For SSH with password authentication, specify the Username and Login Password.
For SSH with keyed authentication, specify the Username and select a Key file. Specify the private key file – the public key file must be present on the device.
Note:
For details on creating SSH keys for devices supporting this access style, refer to the appropriate Device Driver Support guide.For the purposes of discovery, you can leave the access style as None. In this case, IP Service Activator applies a default access style according to the device type. The access styles are defined in the AutoDiscovery.cfg configuration file, which is installed in the Config subdirectory of the host system running the policy server. However, login and password information cannot be set and therefore must be set manually for each device.
Note:
Note that the specified access settings apply as defaults. You can amend them for specific discovered devices, in which case the device-specific settings will override the global settings when devices are rediscovered.Table 5-1 displays the Access Style supported for each cartridge, using the Network Processor. Y indicates the style is supported, whereas N indicates it is not supported.
As soon as the changes are committed to the database, the network discovery starts. IP Service Activator initially creates a list of nodes to be discovered. When discovering a segment, each additional node found is added to the end of the list. If a timeout or failure occurs, the process moves on to the next node on the list.
Discovered devices are linked to the network object that was selected when the discovery process was started.
After discovery, devices are allocated to a proxy agent (see "Setting Up Proxy Agent Assignment"). Where possible, device and interface capabilities are ascertained.
You must also assign roles to devices and their interfaces.
The length of time that the discovery process takes varies depending on the number of devices and segments found, the type of discovery and the speed of the network. If you have set a high hop count, a large number of devices may be found.
The status bar indicates the number of discovered devices.
The number indicates the number of nodes currently on the discovery list. This can initially increase as new devices and segments are found and interrogated, and will return to Idle when the discovery is complete.
When discovery is complete, IP Service Activator interrogates each device for its interface capabilities. The status bar indicates that this phase is in progress.
If a device's capabilities could not be obtained, or IP Service Activator obtained capabilities for one but not all of its interfaces, an error is generated.
The topology section of the object model is updated with details of the discovered devices, segments and hosts.
By default, you create a network map by arranging devices manually. However, if you have selected automatic layout, the discovered network objects are added to the network map automatically while the discovery process runs.
In automatic mapping, you create a layout filter that defines which network objects are displayed on the map. Up to 200 network objects can be mapped automatically with minimal delay in display time. For greater numbers of network objects, there may be some delay in mapping and displaying the objects.
See "How Objects are Represented" for information on automatic and manual mapping options.
If necessary, you can stop the discovery process. To stop discovery of the current object only:
Select Stop from the Discovery menu
The discovery process continues with the next node on the list, if there is one.
To terminate the discovery process completely:
Select Stop all from the Discovery menu or select Stop all from the Discovery Type drop-down list on the Topology Discovery dialog.
All devices and segments discovered prior to this command are retained in the object model, but discovery queries in progress at the time are stopped and the rest of the items on the discovery node list ignored.
Juniper ERX devices are discovered using the ERX Discovery Module, which is installed along with IP Service Activator. The ERX Discovery module can be accessed through the client.
Note:
In the Configuration GUI, ensure that the Juniper JUNOSe Discovery Module check box under Component Manager Entries is selected. See IP Service Activator System Administrator's Guide for more information on the Configuration GUI.To discover Juniper ERX devices:
Right-click the domain into which you want to discover the devices.
Select Modules from the context list, and then select ERX Discovery.
Select Discover New ERX. This displays the ERX Discovery dialog box.
In the ERX Discovery dialog box, select Discovery. This displays the Discovery property page.
In the Discovery property page:
Select the Discovery Type and the domain into which you want to discover the Juniper ERX device
Enter the IP address of the ERX device you want to discover.
Select the device from the Device Type list
In the SNMP property page:
Enter the read community value
Enter the values for the number of retries and timeouts
In the Security property page, enter access-related information in the Security property page
Click OK to start the discovery process.
This section explains the steps you need to take after discovery is complete to ensure your network is set up satisfactorily. You need to check the following:
Ensure devices are assigned policy roles, and apply roles manually if necessary.
Ensure devices are assigned to proxy agents.
Set any specific IP addresses used to manage devices.
Define how the system is to deal with manually-applied configuration.
Set any specific security settings required for IP Service Activator to configure devices.
Create your MIPSA registry in the cartridge tool (Cisco).
Set devices to Managed to ensure that they will be configured by IP Service Activator.
You should also check any errors listed in the current faults pane and correct any problems. Occasionally, a new device type may be reported.
See "Assigning Roles" for information on applying roles manually.
All devices that are to be managed by IP Service Activator must be assigned to a proxy agent. This is normally done automatically during device discovery, but if devices are not assigned to the correct proxy agents, you need to assign them manually.
To check which devices are assigned to a proxy agent:
On the System tab, open the System Hosts folder.
Open the component manager and the relevant proxy agent. IP Service Activator lists the devices that are assigned to the proxy agent in the Hierarchy pane.
To check whether a device is assigned to a proxy agent:
Display the ancestry pane by selecting Ancestry Tree from the View menu.
On the Topology tab, select the device.
If the device is assigned to a proxy agent, IP Service Activator lists the proxy agent in the ancestry pane.
To assign a device to a proxy agent manually:
In the Details pane, double-click the relevant network cloud (display devices in Map view or Details view)
The devices are displayed.
Select the System tab and display the proxy agent in the System Hosts folder.
Drag the device from the Details pane and drop it on to the proxy agent that will control it.
Alternatively, select the device and select Copy from the Edit menu (or click the Copy button). Then select the proxy agent on the System tab and select Paste Link from the Edit menu.
To unassign a device from a proxy agent:
Select the System tab and display the proxy agent in the System Hosts folder.
Select the device under its parent proxy agent and click the Unlink button on the toolbar.
IP Service Activator requires a unique IP address when communicating with and managing devices. This is frequently a loopback address, but an alternative can be specified.
You can set up global standards for IP address usage in the Options dialog box (see "Defining How IP Addresses are Used"). However, if necessary you can override these defaults with device-specific settings.
Note:
For Juniper E-series devices, the address used to manage the device must not be changed from that used for discovery. This is because the IP address used must be the one valid for the default virtual router. If an alternative address is used, the device is discovered but the driver cannot communicate with it.To set a specific IP address for device management
Right-click the device, and select Properties.
The Device dialog box opens.
Select the Management property page.
Select the IP address to be used for managing the device by choosing from one of the known addresses listed in the Management IP Address list, or by entering the management IP address in the edit box.
Click OK.
You can specify the action that IP Service Activator takes if it discovers that a device has been configured manually. A domain-level setting specifies the default behavior (see "Setting Up Domains"), but you can override this for particular devices.
Note:
This section does not apply to the Network Processor.To set up manual configuration behavior for a device:
Right-click the device, and select Properties.
Select the required behavior from the Manual config list:
Inherit from domain: the setting for the device is inherited from the domain-level setting. For more information, see "Setting Up Domains".
Delete: if manual configuration is detected, it is deleted and the device reset to the original configuration.
Warn and delete: if manual configuration is detected, a warning message is output and the device is reset to the original IP Service Activator configuration.
Fail and don't delete: if manual configuration is detected, a critical fault is raised. The device status is set to Intervention Required and no configuration is applied.
Note:
For VPN-related configuration, IP Service Activator always preserves manually pre-configured VRF tables, even if a delete option is selected in the Manual config field. However, BGP configuration is deleted unless the Fail and don't delete option is selected.Before you can configure the network, you need to set up security and authentication settings to allow IP Service Activator to access the managed devices.
If you set up security values before you run a device discovery, (see "Defining Default Security Options for Discovery") these settings apply to all discovered devices within the domain. However, you can overwrite these with device-specific settings. If you have not set default security settings, you need to set suitable values for all devices to be managed.
The security settings you need to define depend partly on:
The requirements of the device driver.
The set-up of your network – for example, whether you are logging on as a named user or authenticating via a TACACS+ security server.
If you are using the same authentication details for all devices, you can set the security parameters at network level. If you have created subsidiary networks within the domain, you can specify that these networks inherit access parameters from the parent network.
To set security parameters for a network:
On the Topology tab, right-click the network object, and select Properties.
Select the Security property page.
(Optional) Click the Inherit from parent network check box.
Do this if it is a sub-network. The security settings are then inherited from the network to which the sub-network belongs.
Enter the details required.
Specify the private key file for SSH with keyed authentication.
A public key file must be present on each device in the network
Note:
Note that if the Inherit from parent network check box is selected, these field values are inherited from the parent network object and are therefore read-only.Click OK to close the dialog box.
To check or set the security parameters for a device:
From the Topology tab, right-click the device, and select Properties.
Select the Security property page.
To set individual security parameters for this device, deselect the Inherit network login check box.
Select an Access Style and set parameters.
Click OK.
Managing and unmanaging a device controls whether or not IP Service Activator configures the device.
A device's status is automatically set to Unmanaged when it is first discovered. Before a device can be configured, its status must be set to Managed.
Note:
A device must also be assigned to a proxy agent before it can be configured by IP Service Activator, even if its status is set to Managed. See "Assigning Devices to Proxy Agents" for more information.You can stop a device from being managed by setting its status to Unmanaged. An Unmanaged device's configuration is not updated when you commit a transaction. You should unmanage devices that are no longer within the policy domain. You may also need to unmanage a device temporarily if attempts to configure it with IP Service Activator result in a fault that cannot be resolved.
You can manage or unmanage devices on a domain-wide basis or device-by-device. When you manage or unmanage a device, its color changes to reflect its new status. A managed device is represented by a green icon, an unmanaged device is represented by a blue icon.
To manage or unmanage all devices within a domain:
Right-click the network object that represents the entire domain, and select Manage All Devices or Unmanage All Devices.
To manage or unmanage an individual device:
Right-click a device, and select Properties.
On the Management property page, click the Manage or Unmanage button.
By default, when you unmanage a device any configuration that IP Service Activator writes to the device remains configured. However, you can specify that the configuration is removed when a device is unmanaged. You can do this on a system-wide or device-by-device basis.
To specify the unmanage action globally:
From the Tools menu, select Options.
The Options dialog box opens.
Under Unmanaged Action, select Leave.
The IP Service Activator configuration is maintained on devices when they are unmanaged.
To specify the unmanage action for a device:
Right-click a device, and select Properties.
The Device dialog box opens.
Select the Management property page and select one of the following:
Inherit System Action: applies the global unmanage action to this device (this is the default setting).
Leave: maintains the IP Service Activator configuration on the device when it is unmanaged
Selecting Leave overrides any global setting.
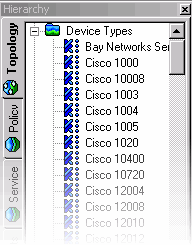
A device type defines the device driver to use to control the device. Every router in the network is classified according to type. The association between a router type and the device driver that will be used to control it is defined in the DeviceTypes.cfg configuration file. The information from this file populates the Device Types folder on the Topology tab.
Figure 5-6 shows the device types list in the Hierarchy pane.
Some of the routers in the network may fall outside the classification types recognized by IP Service Activator. Where this is the case, IP Service Activator classifies the router according to its SNMP SysObjectId parameter during the discovery process.
For details of the devices currently supported by IP Service Activator, see the relevant device driver guide.
When the discovery process runs, IP Service Activator checks the device type of each discovered device against the DeviceTypes.cfg file. If it discovers a new device type, IP Service Activator automatically adds its details to the database and displays notice 1609 - New device type has been created in the current faults pane. This indicates that you need to check and amend the type's details and set up the appropriate device driver in the Device Type dialog box
Note:
You may discover some devices that cannot be managed by IP Service Activator. The discovery process discovers most SNMP-enabled devices and hosts that support MIB-II. If you discover a device type that is not supported by any device driver, you can configure the new device type's details but attempts to configure the device are likely to result in error messages.To set up a new device type:
Double-click the relevant message 1609 in the current faults pane.
The Device Type dialog box opens.
In the Device driver field, enter the name of the device driver that you want to use to manage this device. This must match exactly the name specified in the appropriate Driver properties dialog box. You can access a device driver's properties dialog box via the System tab and the System Hosts folder.
(Optional) Change the Vendor field and Product field to provide more meaningful information.
These fields are for information only.
The Model, s/w Vn field identifies the device type, and appears on the Device property page, so it can be useful to provide more meaningful information. To edit this field, select the Edit fields check box.
Caution:
Do not edit the SysObject ID field and Configure level field.Click OK.
The data is saved when the transaction is committed.
Caution:
If you set up a new device type in this way, it is at your own risk. If you require this device to be certified as tested by Oracle Communications, you must contact Oracle Communications Technical Support.The Device Types folder lists a large number of device types. If you delete a device type from the folder, it is recreated the next time the policy server is started because the DeviceTypes.cfg file is reloaded at this point. If you want to reduce the number of listed device types, you can edit the DeviceTypes.cfg file using a text editor.
Caution:
We strongly recommend that you create a backup copy of the file before editing.Use configuration thresholding to restrict the number of commands provisioned on devices in a single transaction.
Configuration Thresholding provides a safety mechanism that blocks any device configuration action by IP Service Activator that exceeds certain user-specified parameters. The threshold is configured by means of two values: a regular expression (regex) against which to match commands, and the threshold value itself.
The regular expression uses a syntax based on the Boost regex library. See the Boost Website at:
This feature is turned off by default. All Network and Device settings for the threshold are set to No Limit. The feature starts working when you change this setting for a Network or Device.
The regular expression against which to match commands is not accessible through the client. The threshold value can be set at the Network or the Device level.
Configuration Threshold settings applied at the network level (on the Network Properties dialog box, Device Management property page) are automatically inherited by the other networks and devices inside that network.
These settings can be overridden for individual devices (or networks under a parent network for that matter.) Use the Device Properties dialog box, Management property page to set values for a device. In most cases, you will configure devices to inherit values from their parent network. Only the most sensitive devices (such as PE devices) require specific settings.
If you make changes, you must wait for propagation to occur before they are enforced.
See "Setting up Configuration Thresholding" for step-by-step instructions.
If a transaction causes more configuration commands than specified by the threshold value, which matches the regular expression, the Telnet session to that device is ended and everything done in that Telnet session is undone. No commands are sent to the device, and the device is placed into Intervention Required mode.
As well, a Critical fault is raised against the router (visible in both the client and the OIM). This fault provides the threshold value as well as the current match count in the fault details. The aborted commands are logged to the Audit Trail file for that day with the prefix "max-transaction-exceeded".
The threshold parameters are applied only to commands generated by the IP Service Activator device driver. Specifically, it is not applied to commands generated by CDK scripts and modules.
When a device enters the intervention required state, no further configuration is sent to the device. To recover, you must examine the aborted commands in the audit trail. If these commands are legitimate (that is, it was your intent to issue such commands), you must increase the threshold value for that router, delete the fault, and commit.
If the commands are incorrect due to operator error, you must undo the actions that led to the behavior (for example, taking a role off a device), delete the fault, and commit.
If the commands are incorrect due to an IP Service Activator internal problem, or if you are not able to make a determination, contact Global Customer Care.
It is highly recommended that you undertake device recovery during a maintenance period.
The command pattern to match against (that is, the regex) can be viewed, but not modified, in the client. It can be modified only through the OIM.
Some features with deficient implementations unnecessarily remove and re-install configuration on devices. Such removal commands may be counted towards the maximum transaction size, if they match the pattern.
If the threshold value is modified and the role removed from a device in the same transaction, the new threshold does not take effect until a new role is added to the device.
If the threshold value is modified and the device unmanaged (with the unmanage action set to remove) in the same transaction, the new threshold does not take effect until the device is re-managed.
This topic contains a sample procedure for setting up Configuration Thresholding.
Tip:
It is recommended that you group devices that are at the same functional category. For example, PE routers that behave the same way can be grouped within sub-networks.To set configuration thresholding values:
Right-click on a network, select Properties, and set the maximum number of removal commands per device session on the Network Properties dialog box, Device Management property page.
Note:
By default, devices and sub-networks inherit the configuration thresholding settings from their parent network.Enter values for your network configuration, including Inherit from Parent Network, No Limit, Limit To, and Match Expression.
If there are other sub-networks, repeat the previous step to set the threshold limit for each of them.
Customize the settings for a devices by right-clicking the device, selecting Properties, and accessing the device properties - Management property page. Uncheck the Inherit from network check box, and provide device-level settings.
Note:
The commands included in the threshold count can be set only using Integration Manager or using OIM python scripts.To use the Integration Manager, launch its CLI and log in.
If you know the name of the network to set up, skip this step. To find all the networks and their IDs, use the command:
find / network:"*"
To set the regular expression to match configuration statements when counting for Configuration Thresholding for a particular network:
find / network:"<network-name>"
getattributes <network id>
modify <network id> MatchesPatternTransactionSize="<regex>"
commit
A sample regex expression is: no\\s(?!alias|auto-summary|synchronization)
This would count any configuration statements starting with the word "no" except for those that start with "no alias", "no auto-summary" or "no synchronization".
Note:
The threshold value can be set usingMaxTransactionSize or set using the client.As well as discovering existing devices, you can manually create device and interface objects to represent those that IP Service Activator has not discovered. This allows devices not managed by IP Service Activator, such as those in the core network, to be modeled in the system in the form of virtual devices.
Note:
Virtual devices and their interfaces cannot be discovered or managed.To create a virtual device:
Right-click a network object, and select Add Device.
The Device dialog box opens.
Note that the Management, Security, Script Context, Capabilities, and Discovery property pages are not displayed.
Enter identifying details for the device.
You can set the Name, IP Address, Device Type, and Description fields; other information is read-only.
Click OK.
Devices created in this way always have a status of Virtual, and the device icon appears in dark gray.
To create an interface on a virtual device:
Right-click the virtual device object, and select Add Interface.
The Interface dialog box opens.
Note that the Capabilities, Script Context, and Details property pages are not displayed.
Enter identifying details for the interface.
You can set the Number, IP Address, Description and Media Type fields; other information is read-only.
Click OK.
Interfaces created in this way always have a status of Unknown, and the interface icon appears in dark gray.
Note:
You can set roles for virtual devices and their interfaces, but this is only for identification purposes because they are not managed or configured by IP Service Activator.You need to ensure that the network you are managing is accurately represented within IP Service Activator. For example, if new routers are added or existing ones reconfigured, you must ensure that IP Service Activator is updated accordingly. You can rediscover the entire domain, update individual devices and if required, set up the discovery process to run automatically on a regular basis.
You can rerun the discovery process at any time if changes are made to the network configuration, or to ensure that the information you have is accurate.
Note:
The rediscovery of an entire domain may take some time. You can monitor its progress from the status bar at the bottom of the screen.To update the topology of a domain:
Within a domain, select Discover from the Discovery menu.
The Topology dialog box opens.
On the Discovery property page, select Domain Refresh from the Discovery Type list.
(Optional) Set the Hops field.
Note:
The Hops setting only applies to new devices and segments found.Click OK.
Note:
You cannot change the SNMP or Security settings on a domain refresh. The settings that were saved in the database from the previous discovery for each device or host are used.You can re-run the discovery process at any time for a selected device, segment, or host.
To re-run device discovery for an existing device, segment, or host:
Select the device, segment, or host (either on the map or anywhere within a domain management window).
From the Discovery menu, select Refresh, or right-click the object and select Discover.
IP Service Activator uses SNMP to discover details of the device, such as its interfaces, or any further devices or segments connected to it.New nodes that are discovered appear in the palette.
(Optional) Drag new nodes on to the map and run the discovery process on each new node in turn.
The IP Service Activator discovery process uses SNMP to identify devices and interfaces and stores a representation of the discovered network topology in its internal object model. Interfaces are discovered by their ifIndex values, but IP Service Activator also records the value of each interface's ifName and/or ifDescription variable.
On a rediscovery of the network, previously discovered interfaces are primarily matched against interfaces encountered in the current discovery using the interface name (based on the ifName/ifDescription). However, if no match can be made, IP Service Activator compares the interfaces' ifIndex values and, where values coincide, matches the interfaces.
If IP Service Activator cannot match details held for an interface in its object model against any ifName/ifDescription or ifIndex values encountered during a new discovery, it regards the interface as ’missing'. A missing interface is assigned a status of Not Found and its ifIndex value is set to zero in IP Service Activator's object model.
Note that an interface is only classified as missing if it has been assigned a role or is linked to a site in a VPN or a layer 2 site in a TLS. If neither of these conditions apply to a missing interface, the interface is automatically deleted.
An interface whose status is Not Found is represented in the following way in the client.
Possible reasons for an interface to be assigned the Not Found status are:
The interface has been deleted from the device, either deliberately or accidentally.
The interface has been relabelled on the device – that is, both the interface's ifName/ifDescription and ifIndex details have changed. This sometimes occurs, for example, when a device's operating system is upgraded.
Caution:
You must investigate the cause of an interface being reported as Not Found before you consider deleting the interface.The interface might be deleted deliberately or by accident:
If the interface is deleted deliberately, delete the Not Found interface in IP Service Activator.
If the interface is deleted accidentally, re-create the interface on the device (you can Telnet to the device from the client) before rediscovering the device.
When a device that has ’not found' interfaces is unmanaged, the client displays a popup warning about possible loss of configuration.
Neither the client nor the OSS Integration Manager interface allows you to manage a device with ’not found' interfaces. These have to either be discovered to be found or must be deleted individually.
Interfaces which are ’not found' can be restored to ’found' state by using the preserve missing interfaces command:
To preserve all missing interfaces on a device, right-click the device and select Preserve Missing Interface(s).
IP Service Activator restores the interfaces to its representation of the network.
To delete missing sub-interfaces on an interface, right-click the device and select Preserve Missing Interface(s).
IP Service Activator restores the missing sub-interfaces to its representation of the network.
To preserve a specific missing interface or sub-interface, right-click the interface or sub-interface and select Delete.
Interfaces can also be preserved from the OSS Integration Manager interface. Issue the command:
preservemissinginterfaces <object_id>
where <object_id> is the identifier for the device, interface, or sub-interface.
Note:
If an Interface or Sub-Interface is deleted when it is in Offline maintenance mode (either because the parent device, parent interface, sub-interface, or network processor is in Offline maintenance mode) the configuration on that device will not be removed from the device, but IP Service Activator will lose all knowledge of that configuration. In addition, if the deleted interface or sub-interface was created by IP Service Activator, it also will not be removed from the device, but IP Service Activator will lose ownership of that interface/sub-interface. The interface/sub-interface will reappear in the client during the subsequent re-discovery of that device.Because a full rediscovery of a large domain can take some time, you can set up IP Service Activator so that the device discovery process is run automatically every day, for example as an overnight process.
To set up discovery to run automatically:
Select the System tab on a global or domain level window.
Right-click the policy server object (master_server) and select Properties.
Select the Discovery property page on the Policy Server dialog box.
Click the In background check box and enter the time at which you want the discovery process to start each day
Click OK.
The discovery process is controlled by the SNMP parameters on the Discovery property page for each node. You should ensure these are set up correctly.
After the network discovery process has run each day, you should check the network topology and make any necessary corrections. For example:
If a device is not found, it is not deleted, but its status is changed to Not Found. You will need to check it.
If you are using manual mapping, any newly-discovered devices and segments are listed in the palette. You can drag them on to the appropriate map and ensure they are set up correctly.
Messages relating to new or incorrectly-configured devices may be reported in the current faults pane. You should fix any problems before proceeding.
|
Copyright © 2011, 2013, Oracle and/or its affiliates. All rights reserved. Legal Notices |
|