3 Setting Up the ADF Mobile Environment
This chapter provides information on setting up the ADF Mobile environment for application development and deployment.
This chapter includes the following sections:
-
Section 3.2, "Prerequisites for Developing ADF Mobile Applications"
-
Section 3.4, "Setting Up Development Tools for iOS Platform"
-
Section 3.5, "Setting Up Development Tools for Android Platform"
3.1 Introduction to the ADF Mobile Environment
Before developing an ADF Mobile application, you must set up your development environment by downloading, installing, and configuring various software components.
3.2 Prerequisites for Developing ADF Mobile Applications
Prerequisites for developing an ADF Mobile application vary depending on the type of work you are planning to do, as well as your target platform:
3.2.1 What You Need to Create an Application
Before you start creating an ADF Mobile application (see Chapter 4, "Getting Started with ADF Mobile Application Development") for iOS, ensure that you have the following components available:
-
A computer running Mac OS 10.6.7 or later
-
Xcode 4.2 or later (see
http://developer.apple.com/xcode/and Section 3.4.2, "How to Prepare Xcode") -
Version 5 or later of iOS SDK (see
http://developer.apple.com/devcenter/ios/) -
An Apple developer ID
-
Oracle JDeveloper (see Section 3.3, "Setting Up JDeveloper" and Section 3.4.1, "How to Configure JDeveloper for iOS Development")
-
Oracle JDeveloper extension for ADF Mobile (see Section 3.3, "Setting Up JDeveloper")
For more information, see Section 3.4, "Setting Up Development Tools for iOS Platform."
If Android is your target platform, the following is required:
-
Android SDK with Platform 2.3 or later and its tools (see
http://developer.android.com/sdk/) -
Oracle JDeveloper (see Section 3.3, "Setting Up JDeveloper" and Section 3.5.1, "How to Configure JDeveloper for Android Development")
-
Oracle JDeveloper extension for ADF Mobile (see Section 3.3, "Setting Up JDeveloper")
For more information, see Section 3.5, "Setting Up Development Tools for Android Platform."
You do not need to install any additional tools for creating specific types of ADF Mobile application content (HTML, remote URL, or ADF Mobile AMX). For more information, see Section 5.9, "Defining the Content Types for an Application Feature."
3.2.2 What You Need to Deploy an ADF Mobile Application to a Development Environment
Before you deploy your ADF Mobile application (see Chapter 4, "Getting Started with ADF Mobile Application Development"), ensure that you have the following components available:
-
All components listed in Section 3.2.1, "What You Need to Create an Application."
-
The ADF Mobile application.
-
Various login credentials. For more information, see Chapter 16, "Deploying ADF Mobile Applications."
3.3 Setting Up JDeveloper
Setting up your development environment starts with installing Oracle JDeveloper and its ADF Mobile extension.
Download and install Oracle JDeveloper. Select the Studio Developer (All Features) role when prompted.
For more information, see Oracle Fusion Middleware Installation Guide for Oracle JDeveloper. If your target platform is iOS, see the section about using Oracle JDeveloper on the Mac OS X platform in Oracle Fusion Middleware Installation Guide for Oracle JDeveloper.
To download and install the ADF Mobile extension:
-
In JDeveloper, choose Help, then Check for Updates, and then click Next.
Note:
You might need to configure proxy settings by selecting Tools > Preferences from the main menu, and then Web Browser and Proxy from the tree on the left of the Preferences dialog.
-
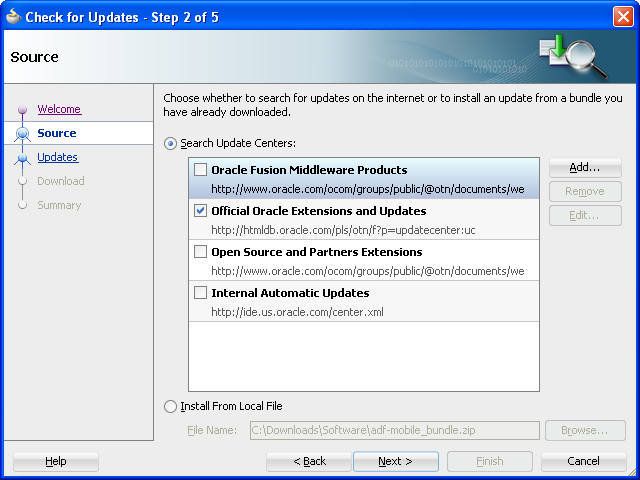
In the Source page that Figure 3-1 shows, select Official Oracle Extensions and Updates, and then click Next.
-
In the Updates dialog, select the ADF Mobile update.
-
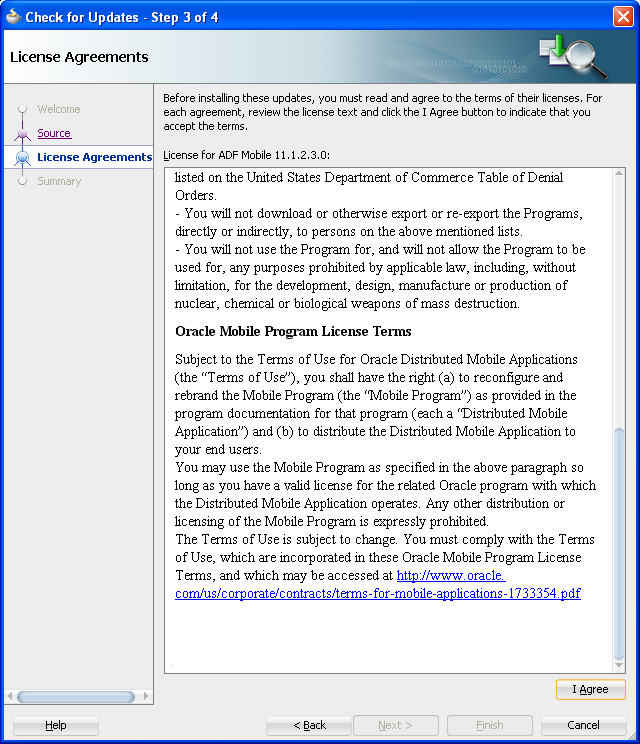
In the License Agreements page, shown in Figure 3-2, review The Oracle Technology Network License Terms for Oracle Mobile.
Note:
You must comply with all of the license terms and conditions with respect to the Oracle ADF Mobile Program. The Oracle ADF Mobile Program may be accessed at
http://www.oracle.com/technetwork/indexes/downloads/index.html. -
Click I Agree.
-
Click Next, and then click Finish.
-
Restart JDeveloper.
-
Check whether or not ADF Mobile was successfully added to JDeveloper:
-
Select File > New from the main menu to open the New Gallery.
-
Select the All Features tab.
-
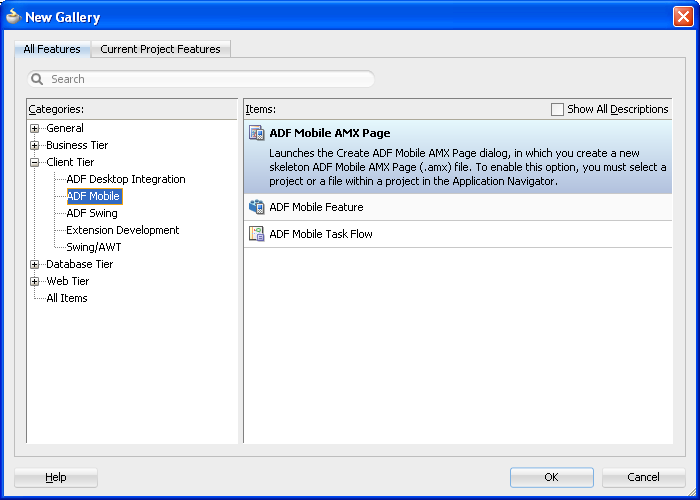
In the Categories pane, expand the Client Tier node and make sure it contains ADF Mobile (see Figure 3-3).
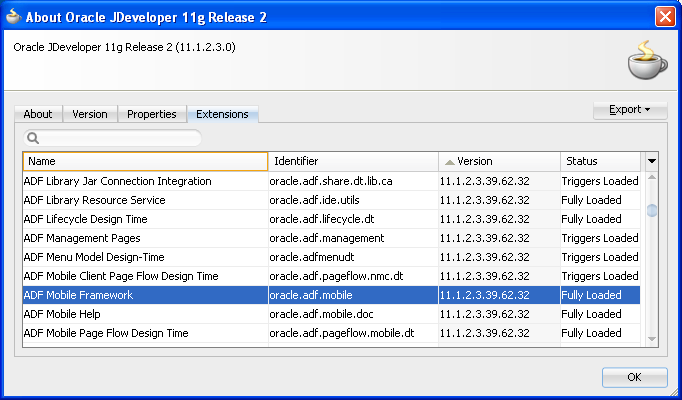
In addition, verify that you installed the correct version of ADF Mobile. To do so, select Help > About from the main menu, then select the Extensions tab on the About Oracle JDeveloper dialog, and then examine the extension list entries by scrolling down to ADF Mobile, as Figure 3-4 shows.
-
For platform-specific information, see the following:
-
Section 3.4.1, "How to Configure JDeveloper for iOS Development"
-
Section 3.5.1, "How to Configure JDeveloper for Android Development"
3.3.1 How to Configure the Development Environment for Platforms and Form Factors
Before you start developing an ADF Mobile application, you must configure JDeveloper Preferences for appropriate platforms (see Section 3.3.1.2, "Configuring the Environment for Target Platforms") and form factors (see Section 3.3.1.1, "Configuring the Environment for Form Factors").
3.3.1.1 Configuring the Environment for Form Factors
A form factor is a specific device configuration. Each form factor is identified by a name that you specify for it and contains information on the specified resolution denoted by pixel width and pixel height.
Form factors defined in preferences are used in the ADF Mobile AMX page Preview tab (see Section 7.3.2.2, "Using the Preview"). You can select or switch between various form factors to see how an ADF Mobile AMX page is rendered in various form factors. You can also see multiple form factors applied to the same page using the split screen view.
Download and install JDeveloper and the ADF Mobile extension, as described in Section 3.3, "Setting Up JDeveloper."
To configure the form factors:
-
Open Preferences by selecting Tools > Preferences from the main menu in JDeveloper.
-
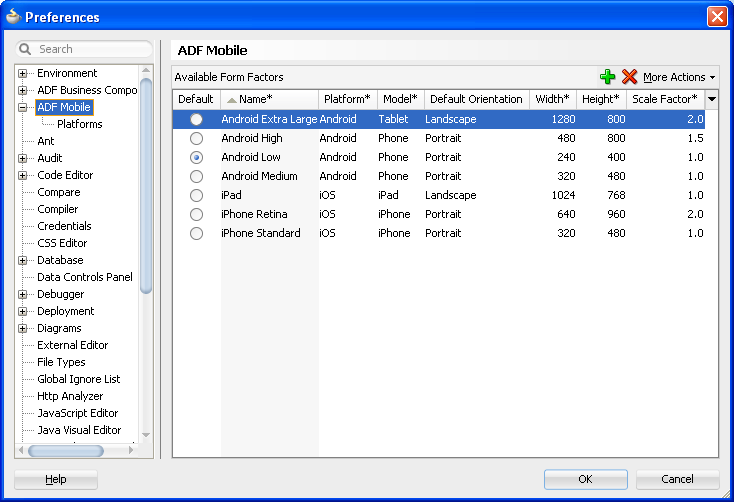
In the Preferences dialog that Figure 3-5 shows, select ADF Mobile from the tree on the left.
The ADF Mobile page is populated with default settings.
This preference page allows you to create and manage a set of named form factors that combine a screen resolution size and platform.
-
To create a new form factor, click New, and then set the following:
-
Name: a meaningful string that is used to identify the form factor.
-
Platform: the platform of the mobile device.
-
Model: the type of the mobile device.
-
Default Orientation: the default device orientation used in the ADF Mobile AMX page Preview tab. It might be Portrait or Landscape. Select this setting from the drop-down list of values. The default value is Portrait and it is prepopulated during creation of the new form factor.
-
Resolution Width: width, in pixels. This value must be a positive integer, and its input is validated.
-
Resolution Height: height, in pixels. This value must be a positive integer, and its input is validated.
-
Scale Factor: the display scale factor. This value must be either one of 1.0, 2.0, or 3.0.
Note:
If you do not set the name and resolution for your form, ADF Mobile will display an error message.
-
-
If you need to revert to default settings, click More Actions > Restore Defaults.
-
Click OK to finalize your settings.
3.3.1.2 Configuring the Environment for Target Platforms
To start developing for one of the platforms supported by ADF Mobile, you need to provide JDeveloper with such information as the name of the platform and directories on your development computer that are to house the platform-specific tools and data.
Download and install JDeveloper and the ADF Mobile extension, as described in Section 3.3, "Setting Up JDeveloper."
To configure your development environment for the target platforms:
-
Select Tools > Preferences from JDeveloper's main menu to open Preferences.
-
In the Preferences dialog that Figure 3-5 shows, select ADF Mobile from the tree. The ADF Mobile page that opens is populated with default form factor settings.
-
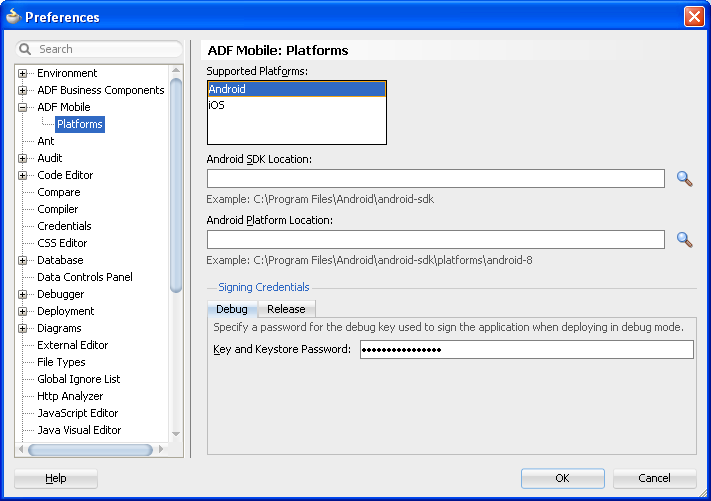
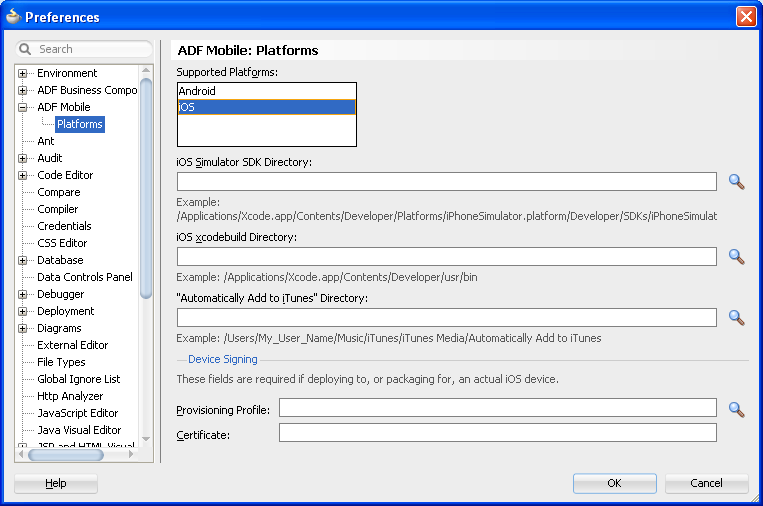
Select Platforms from the tree to open the ADF Mobile: Platforms page that contains the path and configuration parameters for the supported platforms, as Figure 3-6 and Figure 3-7 show.
Each platform-specific page hosts the preferences for the platform SDK (Android or iOS), collecting any necessary information such as the path that ADF Mobile needs to compile and deploy either Android or iOS projects:
-
If you select Android from the list of supported platforms, specify the Android SDK location on your computer, the local directory of your target Android platform, and provide information on the signing credentials (see Figure 3-6).
-
If you select iOS from the list of supported platforms (see Figure 3-7), specify the following:
-
iOS Simulator SDK location on your Mac OS-powered computer
-
Location of the Xcodebuild utility (see Section 16.4.1, "How to Deploy an iOS Application to an iOS Simulator")
-
Location of the iTunes media files, including the mobile applications that are synchronized to the iOS-powered device
-
The iOS-powered device signing information (see Section 16.2.4.2, "Setting the Device Signing Options")
-
-
3.4 Setting Up Development Tools for iOS Platform
In addition to general-purpose tools listed in Section 3.2.1, "What You Need to Create an Application," you might want to set up an iPhone or iPad when getting ready for development of an ADF Mobile application for the iOS platform (see Section 3.4.3, "How to Set Up an iPhone or iPad").
Since iPhone and iPad simulators are included in the iOS SDK installation, you do not need to separately install them. For more information, see Section 3.4.4, "How to Set Up an iPhone or iPad Simulator."
3.4.1 How to Configure JDeveloper for iOS Development
After installing components listed in Section 3.2.1, "What You Need to Create an Application," you have to configure JDeveloper to make use of them.
To configure JDeveloper for iOS development:
-
In JDeveloper, select Tools > Preferences > ADF Mobile from the main menu.
-
In the Preferences page, specify the Platforms. For more information, see Figure 3-7, "Configuring Platform Preferences for iOS" and Section 3.3.1.2, "Configuring the Environment for Target Platforms."
-
Click OK.
3.4.2 How to Prepare Xcode
After installing Xcode, you have to run it at least once and complete the Apple licensing and setup dialogs. If these steps are not performed, any build and deploy cycle from JDeveloper to Xcode or device simulator will fail with a "Return code 69" error.
3.4.3 How to Set Up an iPhone or iPad
In your ADF Mobile application development and deployment, you can use either the iPhone, iPad, or their simulators (see Section 3.4.4, "How to Set Up an iPhone or iPad Simulator"). If you are planning to use an actual iPhone or iPad, which is preferable for testing (see Section 18.2, "Testing ADF Mobile Applications"), you need to connect it to your computer to establish a link between the two devices.
To deploy to an iOS-powered device, you need to have an iOS-powered device with a valid license, certificates, and distribution profiles. For more information, see Chapter 16, "Deploying ADF Mobile Applications."
3.4.4 How to Set Up an iPhone or iPad Simulator
In your ADF Mobile application development and deployment, you can use either the iOS-powered device itself (see Section 3.4.3, "How to Set Up an iPhone or iPad") or its simulator. Deploying to a simulator is usually much faster than deploying to a device, and it also means that you do not have to sign the application first.
A simulator can be invoked automatically, without any additional setup.
Note:
Before attempting to deploy your application from JDeveloper to a device simulator, you must first run the simulator.
If you are planning to use web services in your application and you are behind a corporate firewall, you might need to configure the external network access. You do so by modifying the network settings in the System Preferences on your development computer. For more information, see the "Setting Browser Proxy Information" section in Oracle Fusion Middleware Fusion Developer's Guide for Oracle Application Development Framework.
3.5 Setting Up Development Tools for Android Platform
In addition to the general-purpose tools listed in Section 3.2.1, "What You Need to Create an Application," you might want to set up an Android-powered device when getting ready for development of an ADF Mobile application for the Android platform (see Section 3.5.3, "How to Set Up an Android-Powered Device").
Since emulators are included in the Android SDK installation, you do not need to separately install them. However, you cannot use an emulator until you create its configuration. For more information, see Section 3.5.4, "How to Set Up an Android Emulator."
To develop for the Android platform, you can use any operating system that is supported by both JDeveloper and Android.
For more information, see the Android Developers web site at http://developer.android.com/tools/index.html.
3.5.1 How to Configure JDeveloper for Android Development
After you installed and configured components listed in Section 3.2.1, "What You Need to Create an Application," you have to configure JDeveloper to make use of them:
To configure JDeveloper for Android development:
-
Follow instructions relevant to Android provided in Section 3.3, "Setting Up JDeveloper" and Section 3.3.1, "How to Configure the Development Environment for Platforms and Form Factors."
-
Click OK.
3.5.2 How to Install the Android SDK
Android SDK includes development tools that you need to build applications for Android-powered devices. Since the Android SDK is modular, it allows you to download components separately depending on your target Android platform and your application requirements.
When choosing the platform, keep in mind that ADF Mobile supports Android 2.3 or later.
Ensure that your environment meets the operating system, JDK version, and hardware requirements listed in http://developer.android.com/sdk/index.html.
Note:
Ant, Eclipse, and Linux requirements are not applicable to the ADF Mobile development environment.
-
Download the Android SDK starter package from
http://developer.android.com/sdk/index.html. -
Complete the installation by following the instructions provided in
http://developer.android.com/sdk/installing.html. Skip step 3 in the Android SDK installation instructions, as configuring Eclipse is not required for the ADF Mobile application development.
3.5.3 How to Set Up an Android-Powered Device
In your ADF Mobile application development and deployment, you can use either the Android device itself, which is preferable for testing (see Section 18.2, "Testing ADF Mobile Applications"), or an emulator (see Section 3.5.4, "How to Set Up an Android Emulator").
For information on how to set up the Android-powered device, follow the instructions from the "Using Hardware Devices" section of the Android Developers web site at http://developer.android.com/tools/device.html.
Note:
You might experience issues when using USB connectivity for the device-based debugging. For more information, see Section 18, "Testing and Debugging ADF Mobile Applications."
Your target Android-powered device might not be listed in the USB device driver's.inf file, resulting in the failure to install the Android Debug Bridge (ADB). You can eliminate this issue as follows:
-
Find the correct values for your device.
-
Update the
[Google.NXx86]and[Google.NTamd64]sections of theandroid_winusb.inffile.
For more information, see http://developer.android.com/sdk/win-usb.html.
3.5.4 How to Set Up an Android Emulator
In your ADF Mobile application development and deployment, you can use either the Android device itself (see Section 3.5.3, "How to Set Up an Android-Powered Device") or its emulator. Deploying to an emulator is usually much faster than deploying to a device, and it also means that you do not have to sign the application first.
For information on how to create an emulator configuration called Android Virtual Device (AVD), follow the instructions from the "Managing Virtual Devices" section of the Android Developers web site at http://developer.android.com/tools/devices/index.html.
You need to create an AVD for each Android platform on which you are planning to test your application.
For information on how to use the emulator, see the "Using the Android Emulator" section in the Android Developers web site at http://developer.android.com/tools/devices/emulator.html.
3.5.4.1 Saving the Emulator State
You may find it useful to be able to save the emulator state or reuse the saved state. To do so, you manipulate the avd files or folders that are located in the C:\Users\username\.android\avd directory (on a Windows computer). Each avd folder contains several files, such as userdata.img, userdata.qemu.img, and cache.img. You can copy the cache.img file to another emulator's avd folder to use that state with another emulator. Alternatively, you can run commands listed in Table 3-1 from the command line.
Table 3-1 Commands for Saving the Android Emulator State
| Command | Description |
|---|---|
|
|
File that contains all the emulator state snapshots. Default value: |
|
|
Disables all of the emulator state snapshot functionality by preventing a snapshot storage file from being mounted. |
|
|
Name of the emulator state snapshot within the storage file for the autostart and autosave. Default value: |
|
|
Performs a full boot without performing autosave; |
|
|
Does not autosave to snapshot on exit; abandons the changed state. |
|
|
Shows a list of available snapshots. |
|
|
Does not try to correct the snapshot time on restore. |
|
|
Resets the use data image by copying it from |
For example, to use the saved state from the testsnap snapshot and auto-save back to it on exit, the following command should be executed from C:\Android\android sdk directory\tools>:
emulator -avd Android_2.2_1 -snapshot testsnap
Caution:
When using this utility, keep in mind that in the process of loading, all contents of the system, including the user data and SD card images, will be overwritten with the contents they held when the snapshot was made. Unless saved in a different snapshot, any changes will be lost.
3.5.4.2 Creating, Saving, and Reusing the SD Card
Execute the following commands to create, save, and reuse the SD card:
-
To create an SD card:
C:\android sdk directory\tools>mksdcard -l SD500M 500M C:\Android\sd500m.img -
To list existing AVDs:
C:\android sdk directory\tools>android list avdThis produces a listing similar to the following:
Name: Android_2.2_1
Path: C:\Users\username\.android\avd\Android_2.2_1.avd
Target: Android 2.2 (API level 8)
Skin: WVGA800
Sdcard: 200M
------------
Name: Android_2.3.1
Path: C:\Users\username\.android\avd\Android_2.3.1.avd
Target: Android 2.3.1 (API level 9)
Skin: WVGA800
------------
Name: Android_2.3.3
Path: C:\Users\username\.android\avd\Android_2.3.3.avd
Target: Android 2.3.3 (API level 10)
Skin: WVGA800
------------
Name: Android_3.0
Path: C:\Users\username\.android\avd\Android_3.0.avd
Target: Android 3.0 (API level 11)
Skin: WXGA
-
To start the Android_2.2_1 with the SD card that has just been created:
C:\Android\android sdk directory\tools>emulator -avd Android_2.2_1 -sdcard C:\Android\sd500m.img -
To list the running Android emulator instances:
C:\Android\android sdk directory\platform-tools>adb devices -
To copy a test image to the SD card (this requires the emulator to restart):
C:\Android\sdk\platform-tools>adb push test.png sdcard/Pictures
85 KB/s (1494 bytes in 0.017s)
3.5.4.3 Configuring the Network
From the Android emulator, you can access your host computer through the 10.0.2.2 IP. To connect to the emulator from the host computer, you have to execute the adb command from a command line on your development computer or from a script to set up the port forwarding.
To forward socket connections, execute
adb forward local remote
using the following forward specifications:
-
tcp:port -
localabstract:unix domain socket name -
localreserved:unix domain socket name -
localfilesystem:unix domain socket name -
dev:character device name -
jdwp:process pid(remote only)
For example, an arbitrary client can request connection to a server running on the emulator at port 55000 as follows:
adb -e forward tcp:8555 tcp:55000
In this example, from the host computer, the client would connect to localhost:8555 and communicate through that socket.
For more information, see the "Android Debug Bridge" section in the Android Developers web site at http://developer.android.com/tools/help/adb.html.
