4 Troubleshooting STB and STB Components
This chapter describes common troubleshooting steps for Oracle Services Tools Bundle (STB) and associated components. The following troubleshooting resolution steps are provided:
4.1 Troubleshooting STB Installation
Refer to the sections below for information on troubleshooting your Oracle Services Tools Bundle installation:
4.1.1 STB Error Messages
It is possible that an error occurs when you are running Explorer. Most STB install error messages have the format STB-nnnnn. You can get more information on this as follows:
explorer -X STB-nnnnn
For example:
-
Error message:
STB-02004: Cannot publish the IPS repository -
Cause: The IPS repository in the installation area cannot be published.
-
Action: Check that the origins of all active IPS repositories on this box are reachable.
4.1.2 STB Check Sum Error
Error message: STB-00010: Incorrect payload check sum
Cause: This error message indicates that the STB payload, which was extracted from the installation script, does not have the correct check sum. If the check sums do not match, then it is most likely that the STB bundle has become corrupted. Possible causes for such a file corruption include:
-
If the STB bundle was downloaded onto a non-Solaris machine (such as a PC), and then copied to the Solaris machine, then the copying process from one system to the other may have encountered an error. Such an error may contribute to the file corruption.
-
If the STB bundle was downloaded via FTP to a Solaris system, then it could become corrupted if you did not use
bin(binary) and instead transferred the file as ASCII text. -
If the STB bundle was downloaded to a PC, then the download settings of the PC may have automatically unzipped the bundle, which could cause the file to become corrupted.
Action: In most cases, you can download the STB bundle again and retry the installation. If possible, download the STB bundle from Oracle directly to the Solaris system that you want to install STB.
-
Select a platform to download from Knowledge Article 1153444.1. You can access this article in My Oracle Support:
https://support.oracle.com
-
From the Patchset README, note the size of the STB bundle:
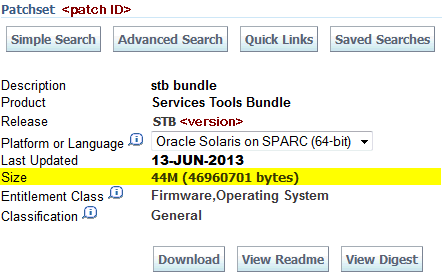
In this example for the SPARC 64-bit platform, the size is 44M (46960701 bytes).
-
Click the Download button to download the file.
-
In the directory where you downloaded the STB bundle, run the
ls -lcommand. The output for this command would look like this:# ls -l -rw-r--r-- 1 root root 46960701 Jun 15 12:12 <patchID>_SOLARIS64.zip
The file size from the ls -l command output should match the size you note in the patchset README.
4.1.3 The Installation Log
When errors occur during the installation, you can review the installation log, which keeps track of all attempted installations. The log is located in /var/log with a file name install_stb-v<STB-VERSION>.log (for example, /var/log/install_stb-v7.0.log). This log can provide you with more information on an issue. For every install that you do, the installer writes log messages to this file. Make sure that you only inspect the relevant (probably last) part of the log file.
Note:
It is also possible to trace the STB installation. See Tracing an STB Installation.4.1.4 Possible Issues with IPS Installation
Other IPS installation error examples include:
-
STB-02004: Cannot publish the IPS repository
-
STB-02023: IPS installation of support/sneep failed
-
STB-02023: IPS installation of support/act failed
-
STB-02013: Cannot unpublish the IPS repository
Typically you will find lines like this in the log file:
Installing support/explorer ...

   Errors were encountered while attempting to retrieve
   package or file data for the requested operation.
   Details follow:

   http protocol error: code: 404 reason: Not Found
   URL: 'http://host1.mycompany.com/solaris11/release/
   solaris/manifest/0/support%2Fexplorer@6.10%2C5.11-12.4.17%3A20120417T105756Z'.
   (happened 4 times)

   STB-02023: IPS installation of support/explorer failed
If you get such an error message while installing STB and see lines like the above ones in the log file, the most likely cause is that there is an active IPS repository on the system, which can no longer be reached. To list the active IPS repositories, run:
# pkg publisher
Output should look like:
PUBLISHER             TYPE     STATUS   URI
solaris               origin   online   file:///var/tmp/stb/extract/ipsrepo/
In this case, we see a file-based IPS repository point to /var/tmp/stb/extract/ipsrepo. If someone has removed this file, the IPS actions, triggered by the STB installation, will all fail.
A similar case can happen when an HTTP-based repository can no longer be reached.
The remedy in this cases is to "deactivate" the non-reachable IPS repository by:
pkg set-publisher –G <ips repository> <publisher>
4.1.5 Tracing an STB Installation
You might find the STB installation slow or might even think the installation is hanging.
If you thing this is the case, start by using the -verbose option with the ./install_stb.sh script so that you get more information of what the installer is doing currently.
If you are still convinced that the installer is hanging, please send a full trace to Oracle. You can do this by:
./install_stb.sh –verbose –trace 2>&1 | tee /tmp/trace
Do not forget to type I(install) to start the actual installation.
4.1.6 Package Removal Error in STB Log File (Solaris 11 or Later, Only)
When installing Oracle STB 8.02 on a Solaris 11 domain, the command line output shows:
Identified actions for Oracle Explorer Data Collector (8.02):
 - Remove -SUNWexplo
 - Remove -SUNWexplu
 - Remove -SUNWrda
The installation log contains messages like:
- Failed to remove SUNWexplo
pkgrm: ERROR: unable to change current working directory to </var/sadm/pkg/SUNWexplo/install>
Similar messages can be present for SUNWexplu, SUNWrda, and SUNWsneep. The message is not always present for all packages.
These messages are normal.
The rationale is that it is possible, but not advisable, to install SVR4 packages on Solaris 11 or later. When SVR4 packages were installed, the STB installer will remove the SVR4 package and replace it with the IPS counterpart.
Since the IPS packages have legacy entries, it is not easy to test that the SVR4 packages are already on the system to avoid the message.
Having the legacy entries in the IPS packages, prevents the installation of the SVR4 packages on Solaris 11 or later.
4.2 Troubleshooting Explorer Collections
This section addresses known issues and workaround solutions for the Oracle Explorer Data Collector. The following Explorer-specific troubleshooting steps are provided:
4.2.1 Tracing an Explorer Collection
When an Explorer collection is running, there are three modes of operation:
-
The Explorer engine is running, which sets up the collection environment, starts up the Explorer modules and RDA, and does the post-processing (packaging the collection results and possibly forwarding them).
-
One of the native Explorer modules is running (for example, the
sysconfigmodule). -
RDA is started, which sets up the RDA collection environment, runs the RDA modules for Explorer, and converts the RDA results to Explorer format.
You can trace each of these modes of operations:
-
Engine tracing: set the
EXP_TRACEenvironment variable to a non-empty value. -
Native Explorer module tracing (for example, the sysconfig module): set the
EXP_TRACE_<module name in upper case>environment variable to a non-empty value. For example:EXP_TRACE_SYSCONFIG=1
To activate this tracing, it is necessary to also activate the Explorer engine tracing (
EXP_TRACE=1). -
RDA Explorer tracing: add
Set EXP_TRACE_RDA=1and export it and/or addRDA_XPLR_TRACE="1"as an entry to therdainput.txtfile in the Explorer configuration directory.
4.2.2 Finding Explorer Modules in RDA
To find out if the collection of an Explorer module is delegated to RDA, issue the following statement:
# <RDA location>/rda.sh -X Explorer can
This will typically list a series of modules. Typical output would look like:
samba ib lp etcextended
You can find out the RDA name of the module by inspecting the mrc.cfg file. The mrc.cfg file is located in the collect/EXPLORER subdirectory of the RDA base directory for Oracle Explorer Data Collector 7.3 or higher. Older versions of Explorer keep it in the modules subdirectory of the RDA base directory.
Note:
For Oracle Explorer Data Collector 7.3 or higher, the collection of all modules is delegated to RDA.4.2.3 Explorer Error Messages
All Explorer error messages are now in the following format:
EXPL-nnnnn: ....
To get more information on an Explorer error message, run:
explorer –X EXPL-nnnnn
For example:
explorer –X EXPL-00032
Output will look like this:
EXPL-00032: The temporary directory is not a directory

Cause: The specified location to be used as temporary directory is not a directory

Action: Remove the specified location or use an alternate location by setting the EXP_TMP environment variable.
4.2.4 ACT Truncated Output
Oracle Explorer Data Collector Release 6.6 may truncate the ACT output on certain Solaris 10 systems that has ACT versions between 8 and 8.14 installed. This truncation is done to avoid file system overflow described in ACT bug 6897128.
Work around: Download and install the latest version of ACT into the system.
4.2.5 Running Oracle Explorer Data Collector in the Background
If you attempt to run Oracle Explorer Data Collector as a background process in a terminal without -SR, -esc, or -case options, then the tool may wait for you to input (on Explorer type) at the background. In such cases, the tool will not complete its execution and will wait on your input.
Work around: You may note a stopped message on the terminal indicating the suspended process at the background. You will need to bring the suspended process to foreground and then provide the appropriate response to all the Oracle Explorer Data Collector to continue its run.
4.2.6 Explorer Hangs on Zone pkg.ksh (Solaris Only)
Launching the Oracle Explorer Data Collector from crontab can sometimes cause the application to hang. This problem is caused by an OS issue, which does not allow crontab directly or indirectly to run:
/usr/sbin/zlogin <zone> /usr/bin/pkginfo -l
See bug 14674009 in My Oracle Support for more details:
https://support.oracle.com
The installation of the latest CPU patch and patch 119254-86 solves this issue on Solaris 10.
4.3 Troubleshooting SNEEP
This section lists the various errors and issues encountered from using SNEEP:
4.3.1 SNEEP Performance
On most machines, SNEEP responds immediately; however, with other machines it can take longer.
Some Sun platforms provide the product serial number in the output of the prtdiag command. The prtdiag command communicates with the Platform Information and Control Library (PICL) daemon, and picld may need to communicate with the system controller or ILOM to get current hardware information.
This communication may take a few seconds, with 15 seconds not uncommon.
If SNEEP does not respond for a minute or more, the likely cause is that picld is not yet ready, or perhaps never started.
SNEEP may wait for picld to respond, retrying prtdiag several times before giving up. By default, there will be messages in the system log /var/adm/messages indicating these retries.
On Solaris 10, you can find out if picld is enabled and functioning by checking the picl service. It should look something like this:
$ svcs picl
STATE     TIME         FMRI
online    8:10:48      svc:/system/picl:default
Prior to Solaris 10, you can verify that the picld process is running, but that does not necessarily mean that it is functioning properly:
$ ps -ef | egrep 'PI[D]|picl[d]'
UID    PID   PPID C   STIME   TTY   TIME   CMD}}
root   296   1    0   Jan 11  ?     2:26   /usr/lib/picl/picld
4.3.2 EEPROM nvramrc Formatting with Veritas VxVM
If you use Veritas VxVM to manage your storage volumes, and after making a change to the root volume, you may notice that after using SNEEP, the EEPROM nvramrc may look strange (for example, everything is flattened onto one long line).
This is an example of the effect of a change made to Veritas VxVM's handling of the EEPROM nvramrc variable. This change has been returned to normal with recent VxVM "Rolling Patches" for their Maintenance Packs (MP). Versions of SNEEP before update 1.79 were not prepared for this change, and could lose track of the device alias names for the root volume, which VxVM stores in the eeprom nvramrc. This could even cause a system to fail to boot without manual assistance.
SNEEP update 1.92 and above are not bothered by this change, and can even repair the nvramrc variable if you either set a value with SNEEP, or wait for the automatic repair at the next reboot.
Note:
It is very important to upgrade to at least SNEEP update 1.92.Usually, the easiest value to set is the serial number, although you could make up any tag and value to set:
sneep                   # get the serial number
sneep -s serialnumber   # set it again to correct the nvramrc

or

sneep -t anything -s anyvalue    # make a change to nvramrc
sneep -t anything -s ""          # delete the made-up entry
If sneep -t reveals any strange SNEEP tags made accidentally by SNEEP releases lower than 1.92 (tags such as devalias or cr), you can remove them by setting them to an empty value.
Upgrade to SNEEP update 1.92 or newer, then remove them by setting them to a null value.
$ sneep -t cr -s ""
$ sneep -t devalias -s ""
4.3.3 SNEEP Returns Serial Number unknown
Depending on your hardware platform, running SNEEP may return a value of unknown. Most older Sun platforms have no way to know or report their serial number until after the serial number is manually entered into EEPROM with SNEEP.
Most newer Sun platforms natively provide serial number data through some hardware-based mechanism which can be read by SNEEP, but there are a variety of ways in which this data is provided.
While SNEEP is able to take advantage of many of the mechanisms which provide "hardware" serial number support, at this time, SNEEP does not know how to find serial data on every platform which can provide it in some way.
As part of the ongoing development of SNEEP, support is being added for as many of these methods and platforms as quickly as possible; however, not every mechanism will be supported.
For example, some platforms require a user to interactively log in to a system controller over a public network in order to obtain the serial. Even if SNEEP was capable of this, the configuration required for this is beyond what most users are willing to do.
It is easier for the user to log in manually once to obtain the serial, and then use SNEEP to store that serial into the EEPROM where it can be retrieved easily in the future.
If you are not using the latest SNEEP update, your version may not know how to get the serial number from your machine. A newer update of SNEEP might be able to do this.
There is also the possibility that your machine is one of the platforms for which it is always necessary that the user inform SNEEP of the serial number of the machine using:
sneep -s serialnumber
This should only need to be done one time, and after that, SNEEP will make it very easy for the user to get the serial number any time that it is needed.
4.3.4 Preserving SNEEP Settings After EEPROM Restore or Replace
Your SNEEP settings are preserved if you need to restore your EEPROM to default settings or if you need to replace the EEPROM entirely. SNEEP maintains a backup file /etc/default/SUNWsneep in which it keeps a copy of all settings. In case OBP defaults have been restored or if the EEPROM has been replaced without preserving the contents, SNEEP automatically restores the SNEEP EEPROM settings from the backup file when the system is rebooted. Alternatively, the data can be recovered simply by asking for it with SNEEP, and then setting the returned value again with SNEEP.
SNEEP has options designed to make it easy to recover data with very little effort, and under most circumstances it will be able to automatically recover the data at the next system boot. When this is done at system startup, SNEEP will log a message to tell you if the EEPROM is not consistent with the backup and whether or not it was recovered.
See the SNEEP man page for the usage of -T, -d, and -P options.
4.3.5 Preserving SNEEP Settings After OBP Firmware Update
Your SNEEP settings are preserved if you need to update your OBP firmware. It is possible to lose the EEPROM settings in an OBP firmware update, but while it once was common, these updates have been very reliable and safe for several years.
If there is a problem, SNEEP will automatically recover the values from the backup.
4.3.6 Unable to Set hostname and hostid Tags
The hostname and hostid information is always retrieved from the hostname and hostid commands. To maintain data consistency, SNEEP no longer allows users to set these tags, which can and did create confusing and conflicting situations.
If SNEEP sees that tags exist, they are erased and further requests for the values of these tags are satisfied using the appropriate commands.
4.3.7 Overriding the Size Limit of the EEPROM nvramrc Variable
By default, SNEEP will prevent you from using too much nvram, but most platforms provide more nvram capacity than SNEEP will allow you to consume. If you are certain that there is more available on your particular platform, you can override SNEEP. If you need a few more bytes than SNEEP allows by default, there is no danger.
However, if you exceed the true maximum capacity of the nvramrc variable, some SPARC systems will show no immediate effect, while others will drop into OBP. After that, the system may not boot until the EEPROM defaults are restored:
( OBP> set-defaults )
A Solaris x86 system may not have an immediate reaction, but may fail to boot later.
Caution:
As these are very serious consequences, it is strongly recommended that you do NOT override the safety limits. If you do so, you are entirely responsible for any system outage or other damages. SNEEP takes care to notify you of this.4.3.8 SNEEP Reports a Bad String
If SNEEP reports a Bad String and is unresponsive, then you probably have an old version of SNEEP and are using a locale or language setting which involves UTF-8. The default tr program used in SNEEP did not work in UTF-8 locales. This is no longer a problem after SNEEP 2.5_R1.75.