| Oracle® Enterprise Data Quality for Product Data Task Manager Reference Guide Release 11g R1 (11.1.1.6) Part Number E29144-02 |
|
|
PDF · Mobi · ePub |
| Oracle® Enterprise Data Quality for Product Data Task Manager Reference Guide Release 11g R1 (11.1.1.6) Part Number E29144-02 |
|
|
PDF · Mobi · ePub |
The Governance Studio runs a DSA job using a data lens currently deployed into production or development. The results of the DSA are a set of actionable items shown on the various output tabs in the Governance Studio. The Business User reviews the results, makes decisions about those results, and prepares some or all of the output for downstream processing. Tasks created in the Governance Studio and can then be managed in Task Manager along with those created in Task Manager.
This chapter includes the following:
For complete details about using the Governance Studio application, see the Oracle Enterprise Data Quality for Product Data Governance Studio Reference Guide. This chapter presents Governance Studio examples in the context of the Task Manager management and processing.
You can create a new task to be executed by a user from within Task Manager. This method is particularly useful when you want to view all of your available DSAs, each of their steps and data lenses rather than opening each DSA individually. To create a task, select Tasks from the menu bar and then click Create New Task.
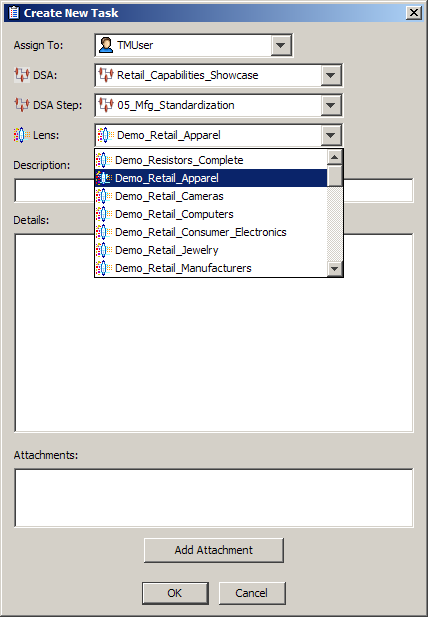
Complete this dialog as follows:
Select the user that you want assign the task to.
Using the DSA, DSA Step, and Lens drop-down lists, select what you would like the user to do. When you select a DSA, the DSA Step and Lens drop-down lists are populated with the corresponding selections based on the selected DSA. The DSA Step drop-down list is active only when a DSA has been selected.
Enter a description for the task for display in all task lists.
Enter what you want the assigned user to do to complete the task; this is required and the task cannot be added without it.
The task details could include the steps to take, a basic outline of your intent for the task, or other information regarding the execution of the task.
Optionally, you can use the Add Attachment button to add any supporting files that are pertinent to the task. Locate the files of interest, select them, and then click Attach. More than on file can be added simultaneously using the Ctrl or Shift keys. Multiple files of varying file types are acceptable.
Click OK to add the task.
The task is added to Task Manager. An email is sent to the assigned user to alert them about it and is similar to the following:
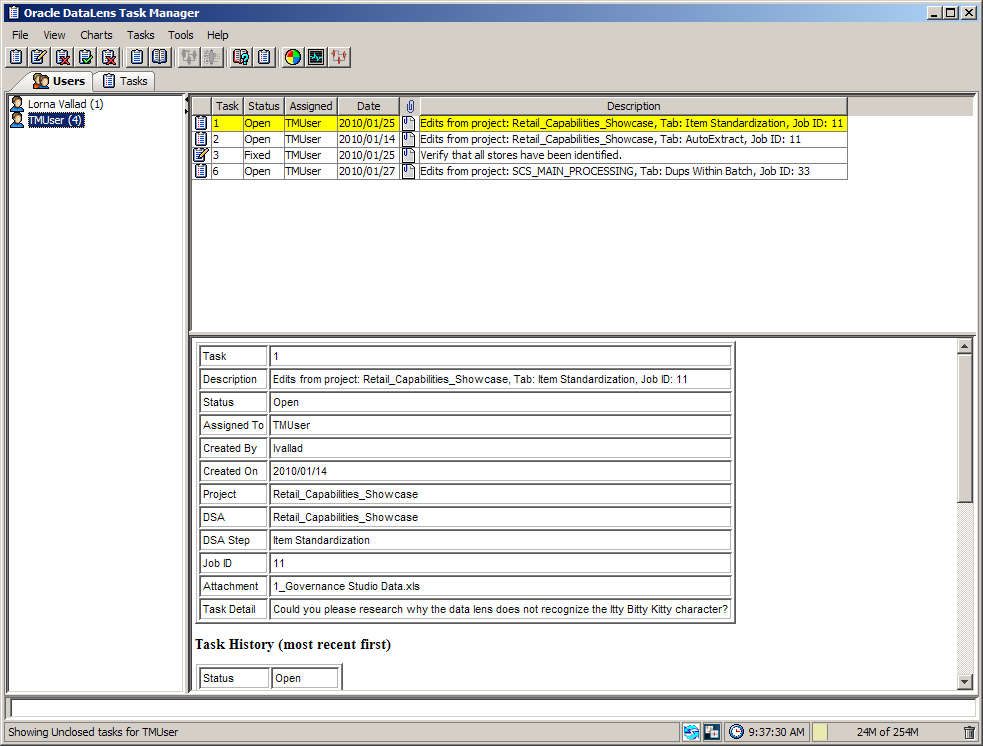
Task: 0
Description: Edits from project: Retail_Capabilities_Showcase, Tab: AutoExtract, Job ID: 11
Status: Open
Assigned To: Task User
Created By : Task User
Created On :
DSA: Retail_Capabilities_Showcase
DSA Step: Item Standardization
Data Lens: Demo_Retail_Apparel
Task Detail:
Please see why the data lens does not recognize the Itty Bitty Kitty character?
In Governance Studio, the Review, Approve, and Route Output tabs are identified by a green check mark icon adjacent to the name of the tab. These tabs contain output data in tabular format that correspond to a DSA output step.
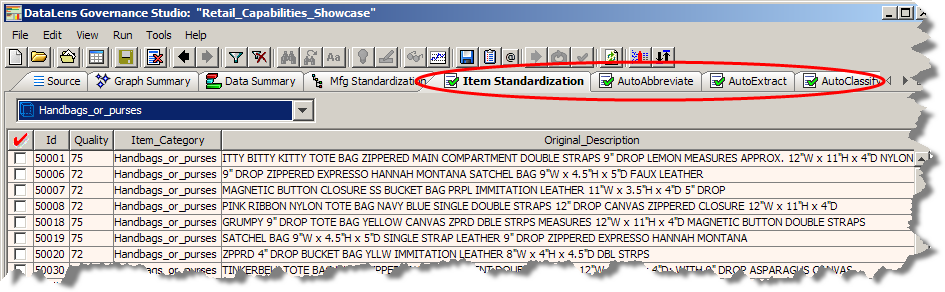
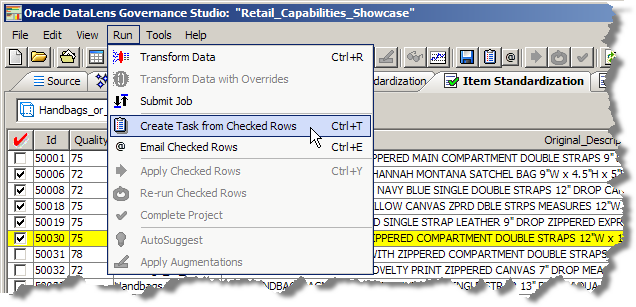
Data in these tabs may be selected to use to create a task, output to a file, output to another tab in the Governance Studio, edited, emailed, or run as input to a synchronous job. The following figure illustrates the creation of a task by checking one or more rows on a Review, Approve, and Route tab:
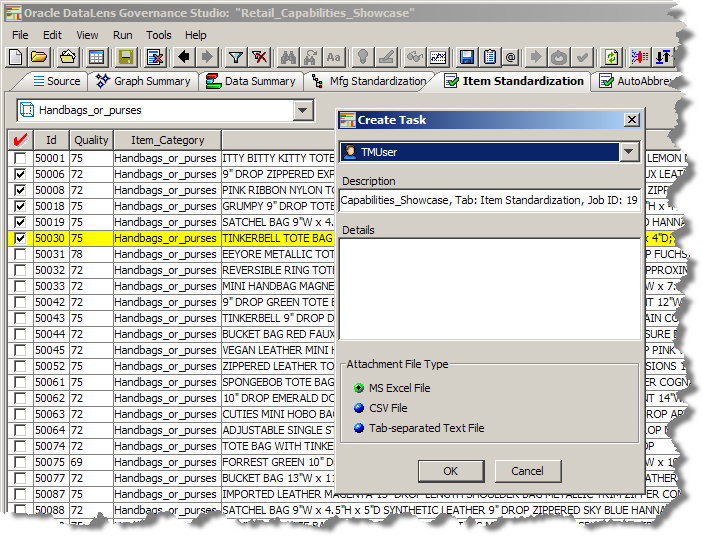
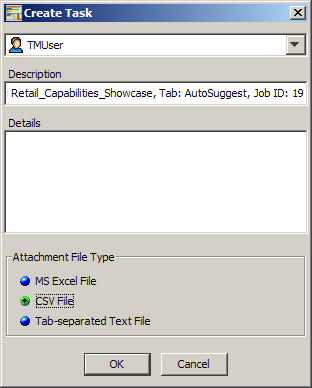
When you select the Create Task from Check Rows option, the Create Task dialog box appears as follows:
Note:
This Create Task dialog box is very different than the one described in "Creating a Task in Task Manager" because the DSA, DSA step, and data lens are already known.It allows you create and assign a task to a user as follows:
Select the user you want to assign the task to.
Enter a description for the task for display in all task lists.
Enter what you want the assigned user to do to complete the task; this is required and the task cannot be added without it.
Select the output file format for the contents of the selected rows from the following: a Microsoft Excel spreadsheet, CSV, or tab-separated text file.
Click OK.
The task is added and the assigned user receives an email advising them that they have a task to complete.
All tasks are displayed and are categorized by user as in the following example:
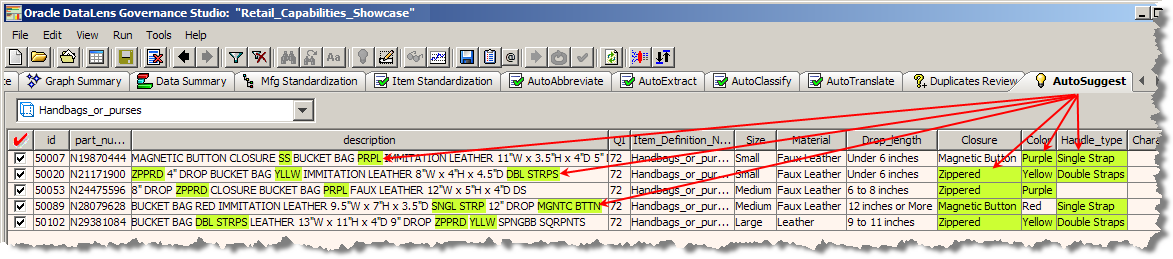
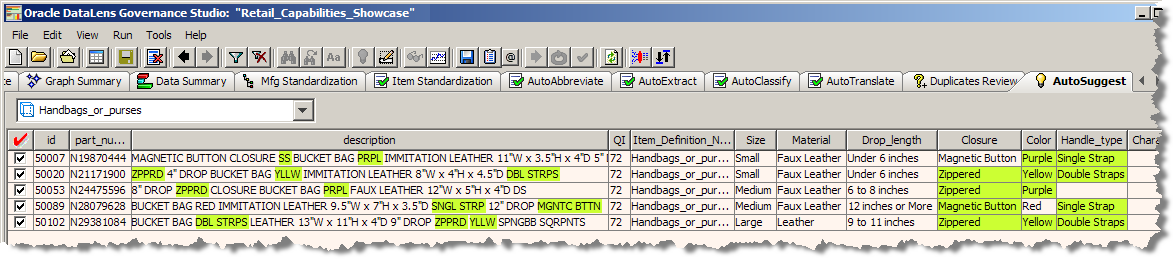
Another way to create a task in Governance Studio is to select one or more rows for the Task User to update in the data lens. The following figure shows the green colorized terms in the description and the associated suggestions in the attribute columns on the right.
To do create a task from a set of rows, check the rows you want included in the task. From the menu, select Run and then click Create Task from Checked Rows.
You complete this dialog box as described in "Creating a Task from an Output Tab" though the Description field is automatically populated for you with the name of the DSA, tab name, and the Job ID that it is assigned.
One of the ways to add a task is by using the AutoSuggest feature so that the Governance Studio automatically suggests attributes that may have been missed due to misspellings or abbreviations. Suggested data from the AutoSuggest process may then be transferred to an Output tab for further processing or the data can be sent by email or through a task to the Task User to update the data lens in the Knowledge Studio. This section describes the use of AutoSuggest results for Task Manager processing.
A typical example of the AutoSuggest process is a Business User presented with a set of exceptions that did not meet the Quality Index threshold because some of the attributes were not present.
You can use the AutoSuggest feature in Governance Studio to leverage the Enterprise DQ for Product to offer a set of suggestions based on variants of known terms.
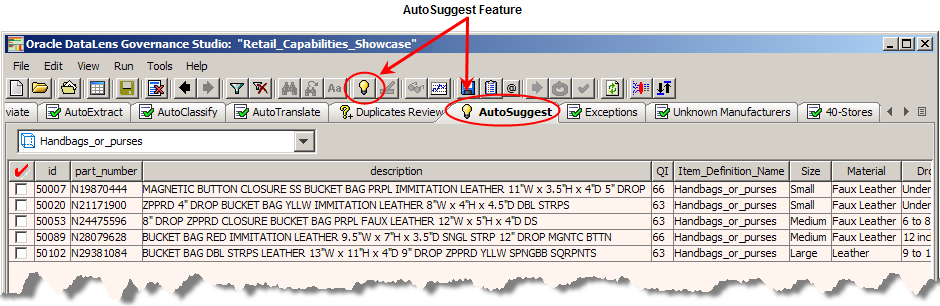
The AutoSuggest tab is identified by a light bulb icon to the left of the tab name. Data in these tabs may access the Governance Studio AutoSuggest feature that automatically predicts attributes that may have been missed due to misspellings and abbreviations or missing grammar. When this tab is populated, there are suggestions available and the AutoSuggest button is active. If no suggestions were found, this button is inactive.
After clicking on an AutoSuggest tab, you will also see a list of rows of data that were designated for output by the respective output step in the DSA. To view suggestions click on the AutoSuggest button on the menu bar. Suggestions are now colorized in green as shown in the following figure:
Several operations are allowed in the AutoSuggest table to process your data further and make it easy to edit or accept suggestions. The AutoSuggest table allows you to accept or reject suggestions by right click over it and select one of the Switch Augmentation options. The rejected suggestion is highlighted in pink showing that the attribute value has been rejected.
When you have finished working with your AutoSuggestions, create the task as described in "Creating a Task from Checked Rows""Creating a Task from Checked Rows"
For more information about the AutoSuggest feature, see the Oracle Enterprise Data Quality for Product Data Governance Studio Reference Guide.
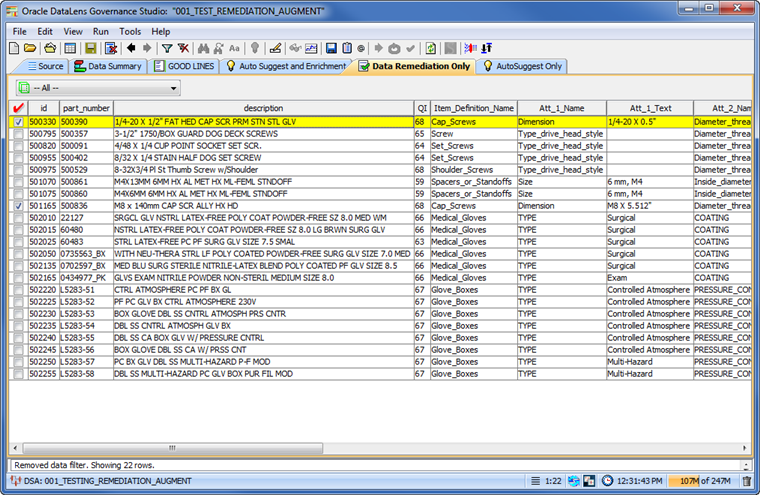
The "Data Remediation" Output tabs are identified by the green check mark icons on the tab. These types of tabs contain tables of output data and correspond to a DSA output step with the output type of 'Data Remediation'. Data in these tabs may be selected for output to a file, edited, emailed to others, or run as input to a synchronous job. The following figure shows an example of a 'Data Remediation' Output tab.
You can create one or more tasks from all of the data enrichment suggestions (AutoSuggestions, User suggestions both importable and not importable) that you have effected in your project. You then import into your data lens (or all data lenses in a data lens group) in the Knowledge Studio to update its semantic knowledge thus completing the data enrichment process.
To create an enrichment task from any project tab:
Remediate your data using the data remediation techniques in Governance Studio including adding valid values and AutoSuggest augmentation.
(Optional) On any AutoSuggest tab, approve or reject the AutoSuggest suggestions.
Click the Apply Enrichments button on the toolbar.
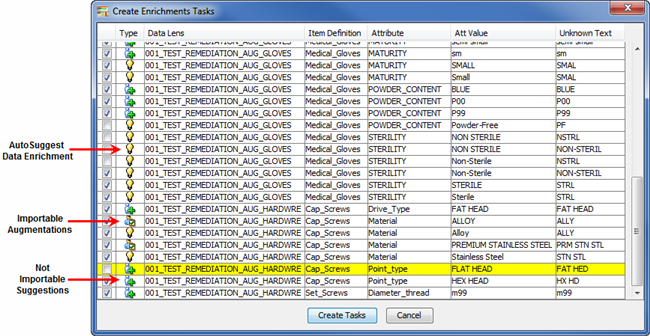
All of the available types of data enrichment are displayed including AutoSuggestions and both types of user suggestions, importable and not importable. Each of the three types is denoted with a different icon, as in the preceding example, so make identification easy. The default is that all enrichments are selected for task creation though this example shows that you can pick and choose items for enrichment.
You can deselect any of the data enrichments and they will not be included in the task.
Click Create Tasks.
The task is created with you assigned to it and the task number is displayed in the Status Field. The file that you can import into your data lens in the Knowledge Studio is stored on your Oracle DataLens Server.
|
Copyright © 2001, 2013, Oracle and/or its affiliates. All rights reserved. Legal Notices |
|