| Oracle® Healthcare Analytics Data Integration Secure Installation and Configuration Guide Release 3.1 for Oracle Data Integrator E29531-12 |
|
|
PDF · Mobi · ePub |
| Oracle® Healthcare Analytics Data Integration Secure Installation and Configuration Guide Release 3.1 for Oracle Data Integrator E29531-12 |
|
|
PDF · Mobi · ePub |
This chapter describes how to install OHADI. It contains the following sections:
To set up the installation environment, perform the following steps. This is common for both OHADI and HLI installation.
Download and unzip the media pack file into the Windows OS.
Create a directory in Linux installation server for copying OHADI 3.1 installation package files. For example, OHADI_INSTALL_DIR.
Locate and transfer the installer file OHADI_V31_ODI_Linux-x64.zip in the binary mode from Windows OS to the OHADI installation directory in the Linux server (for example, OHADI_INSTALL_DIR).
Convert the installer execution shell to SH shell as the installer script gets executed in SH shell of Linux or Unix OS.
Extract the contents of the OHADI_V31_ODI_Linux-x64.zip file in the <OHADI_INSTALL_DIR> directory using the following command:
unzip -a OHADI_V31_ODI_Linux-x64.zip
Note:
No error message must be prompted upon execution of the unzip command.Provide execute permission for all the scripts as per the following commands:
chmod 755 <OHADI_INSTALL_DIR>/Disk1/install/*
Create a directory oui_home in the path <OHADI_INSTALL_DIR>/ as per the following command:
cd <OHADI_INSTALL_DIR>/
mkdir oui_home
chmod 777 oui_home
Make sure that ORACLE_HOME environment variable is setup in installer execution session as shown below. Installer will require this for db credential validations else, the installer will display error.
export ORACLE_HOME=<path where oracle installed>
For example,
export ORACLE_HOME=/u01/app/oracle/product/112040
Copy the oraInst.loc file from ORACLE_HOME to the installation directory. Create a directory named inventory in the installation directory, and update the path of the inventory location (inventory_loc) in the oraInst.loc file.
Note:
If the oraInst.loc file is not found in the ORACLE_HOME directory, you can create one in the <OHADI_INSTALL_DIR>.For example,
inventory_loc=<OHADI_INSTALL_DIR>/inventory
inst_group=dba
Start the OUI from the path <OHADI_INSTALL_DIR>/Disk1/install/ by executing the command in Linux X-Windows prompt. Make sure that you have taken care of the Preinstallation checklist (see Section 2.1) before executing the installer.
cd <OHADI_INSTALL_DIR>/Disk1/install/
./runInstaller -invPtrLoc <OHADI_INSTALL_DIR>/oraInst.loc
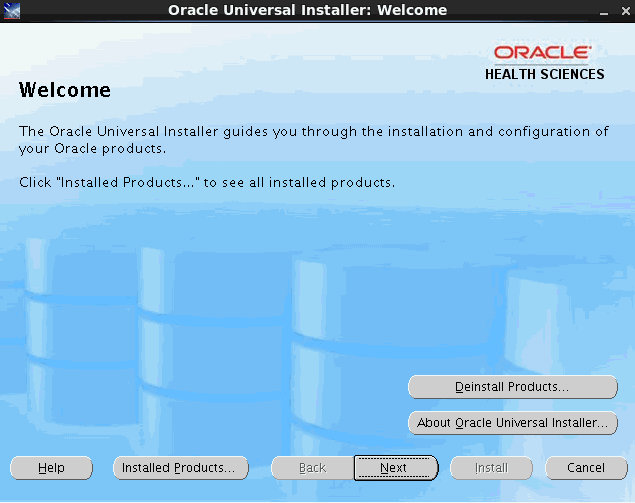
The OUI Welcome screen is displayed on Linux X- windows console.
To install OHADI, perform the following steps:
Note:
Values in the following graphics are examples. You can change these values.The OUI Welcome screen appears on running the installer on the supported platform.
Click Next to continue the installation.
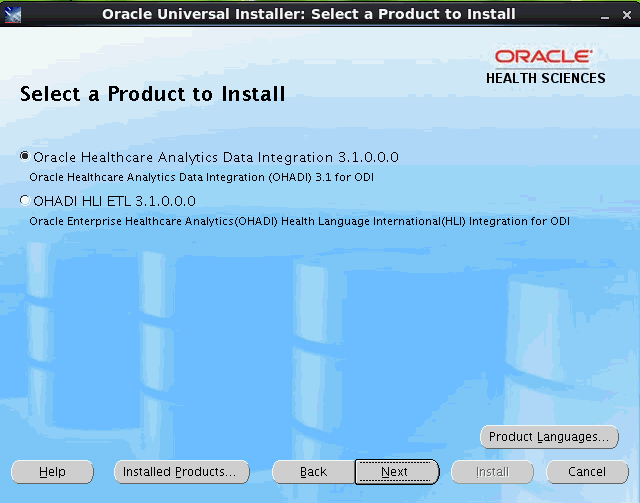
Select the product to install and click Next.
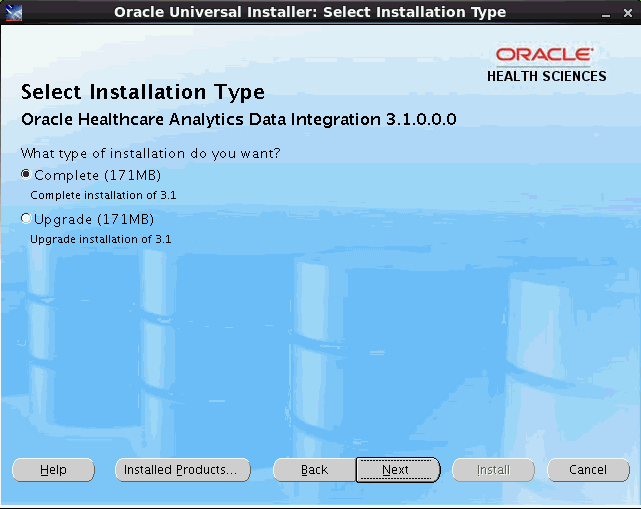
Select the required installation type and click Next:
Complete - Install a fresh OHADI 3.1
Upgrade - Upgrade from OHADI 3.0 to OHADI 3.1
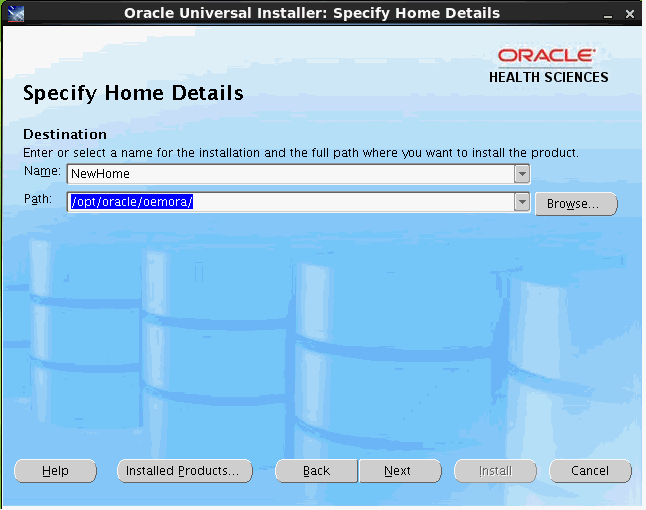
Specify the following home details:
Name - Select OUIHome1 from the drop-down list.
Path - Provide the complete path of oui_home. For example, <OHADI_INSTALL_DIR>/oui_home.
Note:
Do not modify the value in the Name field. If you are restarting the installer for installation failures, select OUIHome1 from the drop-down box.Also, enter the same installation directory for the Path field.
Click Next.
Before installing OHADI, make sure that the following prerequisites are met:
Figure 3-5 Installation Prerequisite Checklist
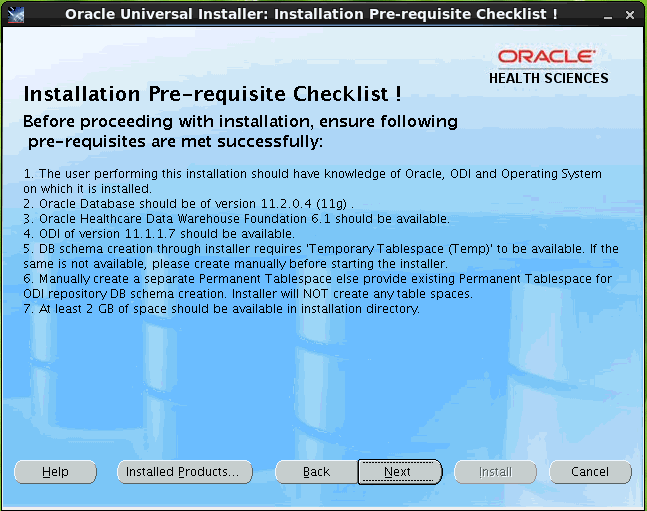
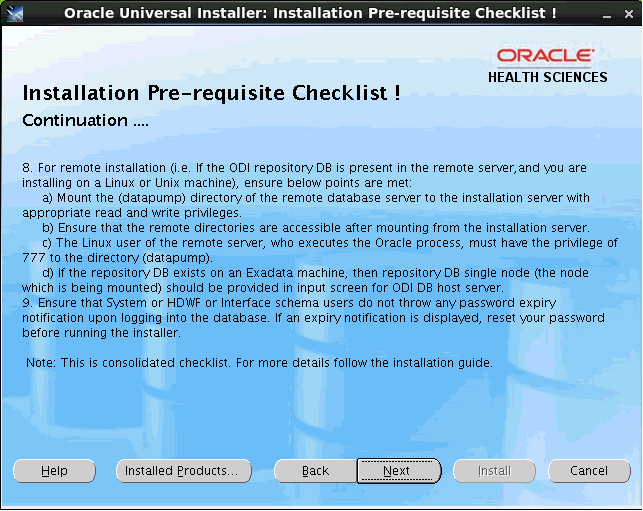
Figure 3-6 Installation Prerequisite Checklist Continued
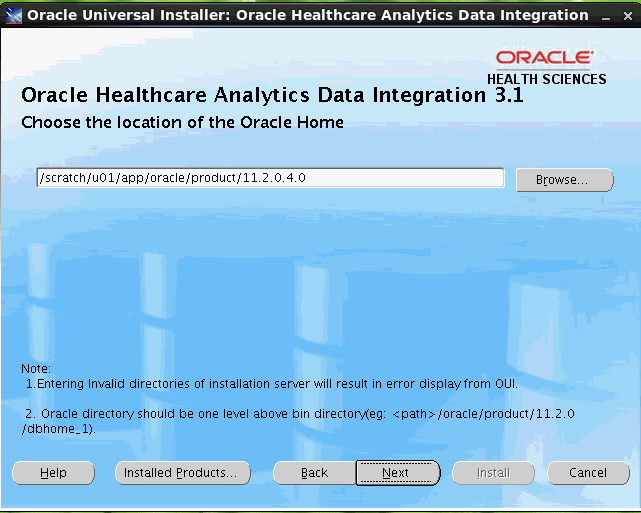
Select or specify the path where Oracle is installed on the installation server and click Next.
Figure 3-7 Select the Location of the Oracle Home
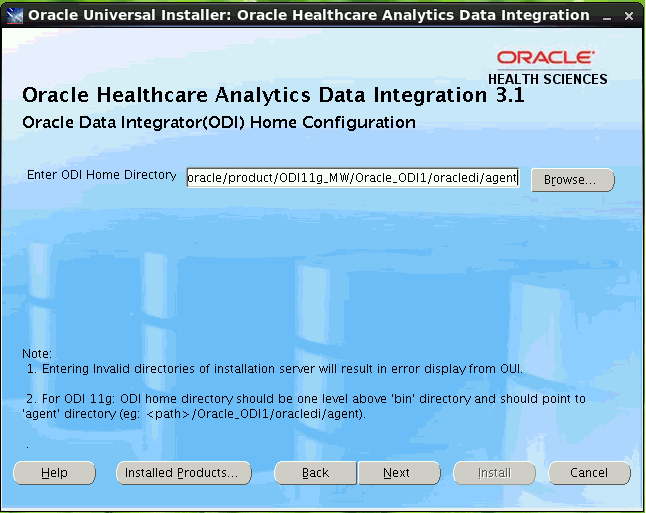
Select or specify the ODI Home Directory path where ODI is installed in the installation server. Read the notes at the bottom of the screen and provide input.
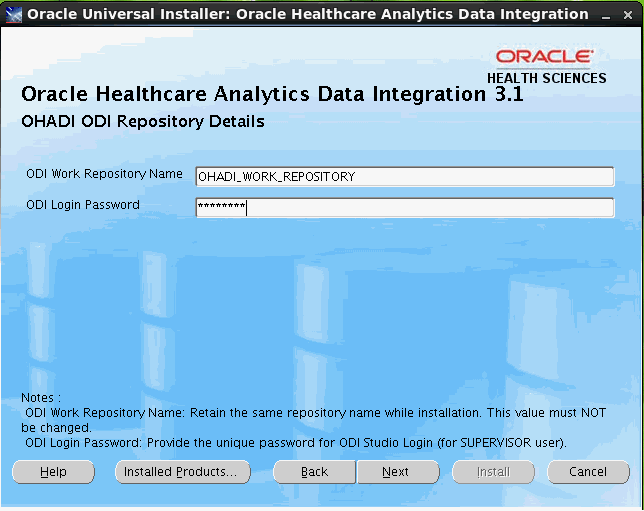
Enter the OHADI ODI repository database details where the OHADI Work and Master repository needs to be installed as shown in the Figure 3-9 and Figure 3-10.
Figure 3-9 Enter the OHADI ODI Repository Database Details
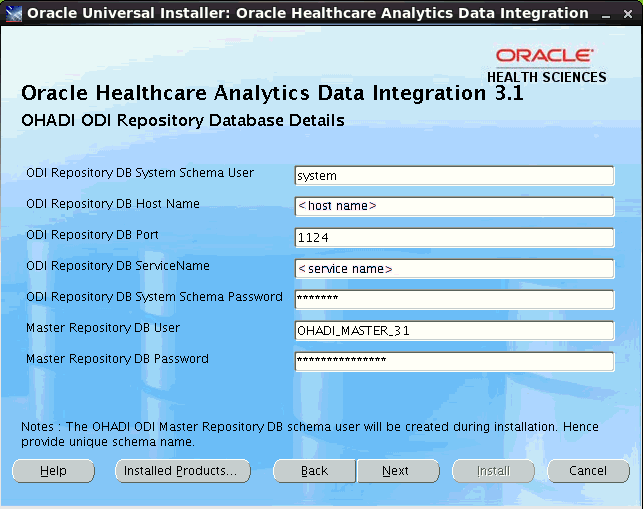
Note:
When invalid user name or password is encountered, verify the host name, port, service name, user name, and password of the relevant user.Figure 3-10 Enter the OHADI ODI Repository Database Details
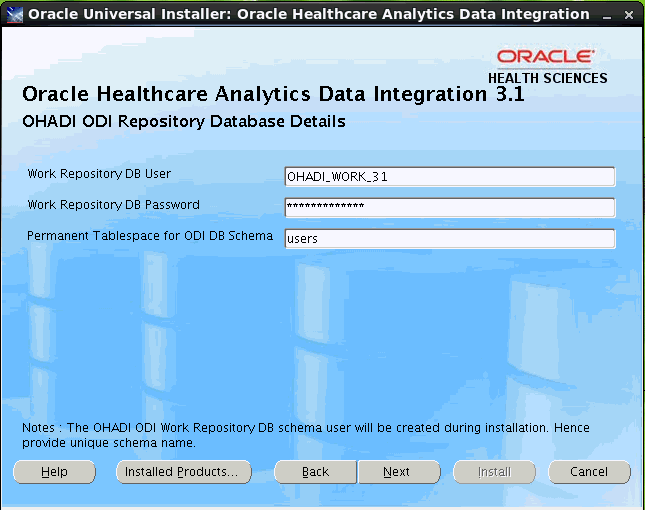
Note:
The DB schema passwords are case-sensitive. Make sure to enter the correct password. OUI validates the DB credentials, and upon entering incorrect password, it displays an error.
The OHADI ODI master repository and work repository DB schema users are created during runtime execution. Hence, provide unique schema name for each repository. Do not use an existing OHADI master or work repository DB schema names.
If the repository DB exists on Exadata machine, the repository DB single node (the node which is being mounted) should be provided as input for ODI Repository DB Host Name.
Enter the DB permanent tablespace for schema creation of ODI repository (see Section 2.2), that is, master repository and work repository schemas.
Click Next. The following screen is displayed.
Read the respective notes at the bottom of the screen and provide input. Click Next.
Enter the HDWF 6.1 (source and target) database configuration details in the following two screens and click Next.
Figure 3-12 Source and Target Database Configuration
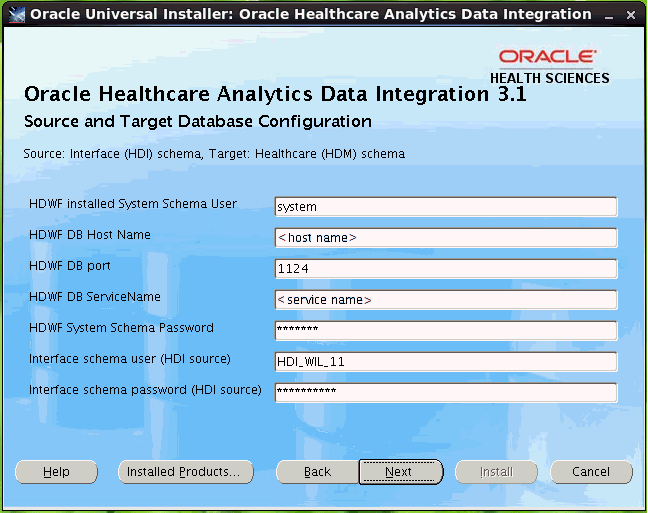
Note:
When invalid user name or password is encountered, verify the host name, port, service name, user name, and password of the relevant user.Figure 3-13 Source and Target Database Configuration
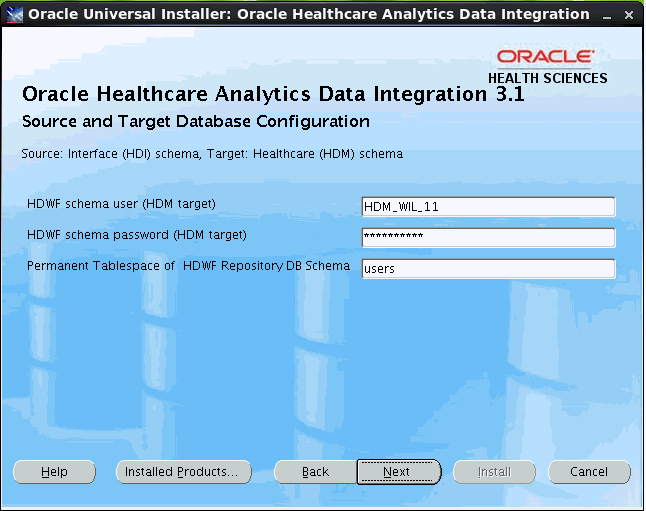
Note:
The DB schema passwords are case-sensitive. Make sure to enter the correct password. OUI validates the DB credentials, and upon entering incorrect password, it displays an error.
You cannot leave any text box field blank. The installation displays an error and you will not be able to proceed with the installation.
Enter the ETL metadata configuration schema details.
Figure 3-14 Enter the ETL Metadata Configuration Schema Details
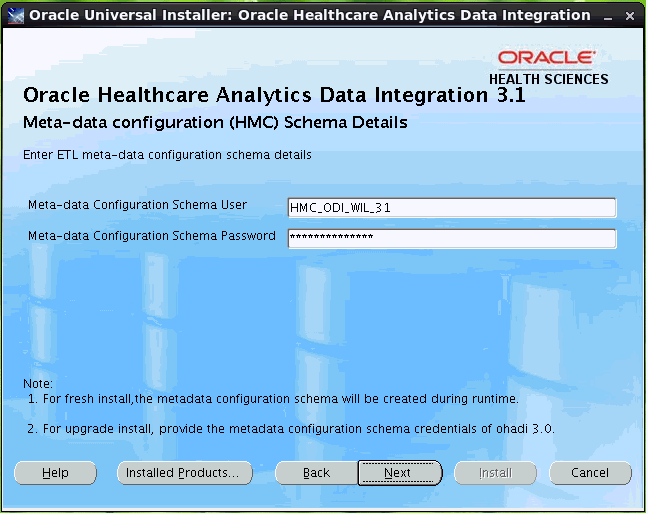
Note:
The metadata configuration schema is created during runtime execution of fresh OHADI installation. This schema is created in the database where HDWF is installed.For the upgrade option, make sure to use the metadata configuration details of the previous version.
Click Next.
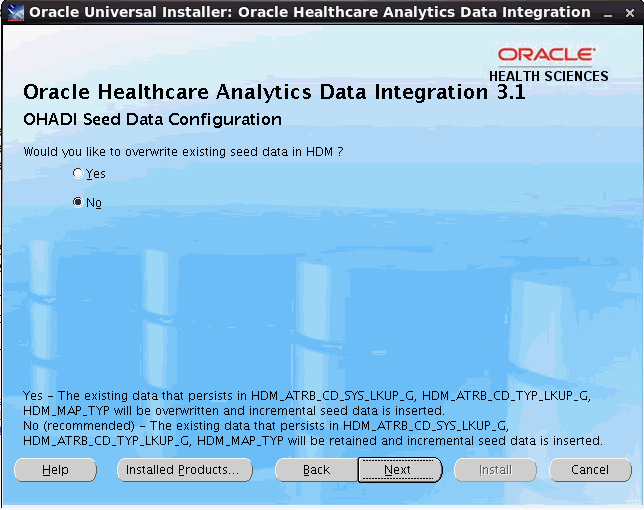
Figure 3-15 and Figure 3-16 are prompted only for Upgrade option for configuring OHADI seed data in the Interface and HDWF schema. Select the required option. Oracle recommends you to select No. For fresh installation, the default option is No.
Figure 3-15 OHADI Seed Data Configuration (HDI)
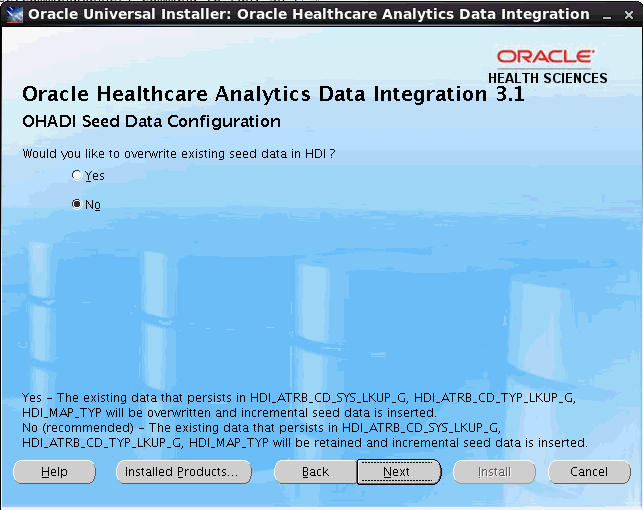
Figure 3-16 OHADI Seed Data Configuration (HDM)
Click Next. The Installation Server Configuration screen is displayed.
Figure 3-17 Installation Server Configuration
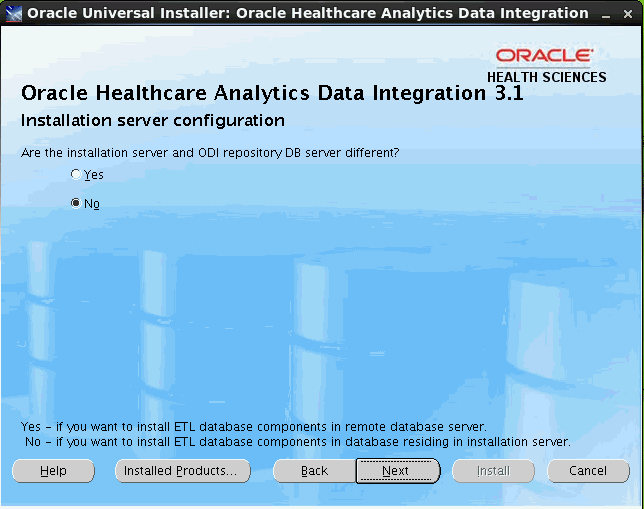
Click Yes if the installation server and ODI repository DB server are different else, click No.
Click Next. If you have selected Yes in step 18, the screen in step 20 is displayed. Else, the Installation Email Configuration screen (step 21) is displayed.
Enter the following mounted directory configuration details in which remote server directory is being mounted:
Mounted Directory of Repository DB server - Enter the remote server path.
Mounted Directory in Installation server - Enter the path in the installation server where mounting is done.
Figure 3-18 Mounted Directory Configuration
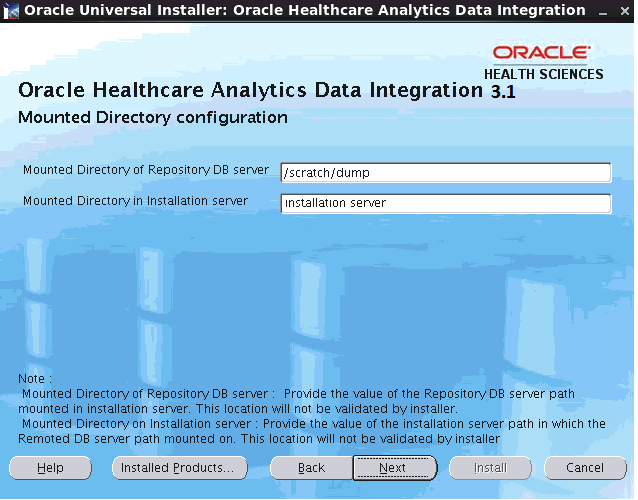
For example, you can obtain all storage drives available in the OHADI installation Linux machine by executing the df –h command. If the remote server directory is mounted on the installation server, the mounting is displayed as follows:
<Remote Server name>:<Remote server path> <total size> <used up space> < Available space> <use%> <Path in installation server where mounting was done>
For example,
abc:/scratch/dump

191G 138G 44G 76% /installation server
Note:
The directory (datapump) of the remote database server should be mounted to the installation server with appropriate read and write privileges.
Make sure that the remote directories are accessible after mounting from the installation server.
If the remote server mounted path is displayed as /, provide the absolute mounted path of the remote server.
The remote server Linux user who executes the Oracle process, must have minimum privilege of 777 to the directory (datapump).
Click Next. The Installation Email Configuration screen is displayed.
Enter the following email notification configuration details for installation summary details:
Notification Email List - Provide the email list for the installation notification.
Notification Email Subject - Retain the value as is.
Figure 3-19 Installation Email Configuration
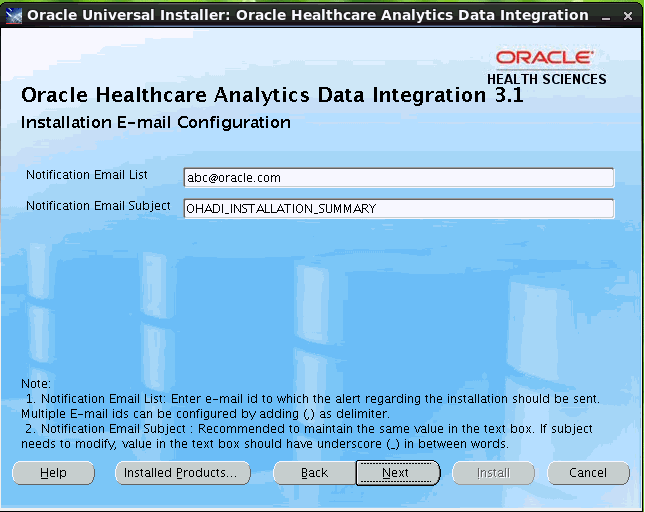
Click Next.
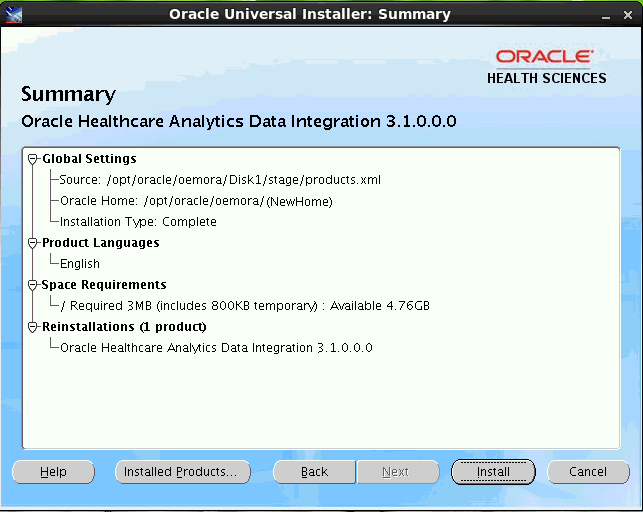
The next screen displays the data entered during the installation question phase. Verify these values. If there are any incorrect values, click Back to make the changes.
Click Next.
If the configuration is successful, the Summary screen is displayed, with all installation details.
Click Install to install OHADI product.
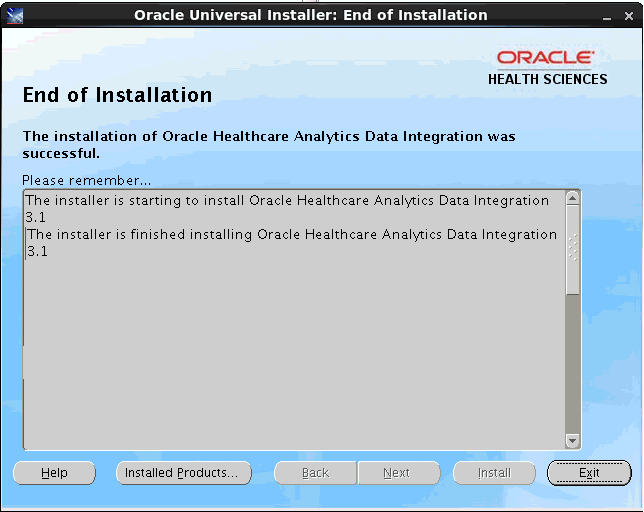
Once the installation is completed, the End of Installation screen is displayed.
Click Exit to exit the installer.
For the Exadata server DB, before executing the ETL, update the multi-node Exadata server name in the ODI Repository Connection and Topology connections manually, which is created during installation.
Perform the following steps:
Applicable for fresh installation only - After successfully installing OHADI:
Navigate to the ohadi_sql directory under OHADI installation folder.
Run the OHADI_HDWF_PERF_INDEX_CREATE_DDL.sql file in the HDWF schema (HDM).
Applicable for remote installation only - Unmount the mounted directory for remote installation. If you are installing HLI, perform this step after the HLI installation is complete.
|
Copyright © 2011, 2016, Oracle and/or its affiliates. All rights reserved. Legal Notices |
|