Table of Contents Previous Next PDF


Administration Tasks

Administration Tasks
The Oracle Tuxedo Administration Console simplifies the task of managing your Oracle Tuxedo application resources. The Oracle Tuxedo Administration Console enables you to quickly and easily perform the administrative tasks associated with managing mission-critical applications. With the Oracle Tuxedo Administration Console, you can create domains and administrative class objects (such as machines and services), as well as manage Tuxedo CORBA interfaces, factories, and interface queues. The Oracle Tuxedo Administration Console provides a browser-based solution for remote system administration.
This topic describes the administration tasks you can perform using the Oracle Tuxedo Administration Console.
This topic includes the following sections:
Setting Up Your Oracle Tuxedo Administration Console
The Oracle Tuxedo Administration Console allows you to customize your administrative environment and set default parameters. Setting up and customizing the Oracle Tuxedo Administration Console includes the following tasks:
Setting General Default Parameters
To set general default parameters for your administrative session:
1.
Figure 3‑1 Settings Window
Table 3‑1 explains the options available on the Settings window.
Table 3‑1 Settings Window
 
2.
Switching Edit and View Modes
You can set the Oracle Tuxedo Administration Console to the following default work modes:
By default, your Oracle Tuxedo Administration Console is set to Edit mode so that you can create or modify parameters by editing the appropriate fields in the configuration tab pages. (To change the default mode for the session, select Settings—>Defaults from the menu bar and follow the steps in Setting General Default Parameters.)
You can momentarily override the default setting for individual tree items. Most likely you will use this feature to override a default View mode to edit an attribute on an object. If you return to the same object later in the session, it reverts to the default mode (in this case, View only) unless you override the default again.
To change the mode for a specific object in the Tree View:
1.
2.
Controlling What the Tree Displays
You can customize the configuration Tree View so that only the administrative classes (tree objects) you want to see are displayed. To control what class folders are displayed in the tree, follow these steps:
1.
As shown in Figure 3‑2, the Select Folders window is displayed.
Figure 3‑2 Select Folders Dialog Box
Note:
2.
To select a class object for display, click it to enter a check mark. (Clicking again removes a check mark.) The Tree View will display only the selected classes (those with check marks).
3.
4.
Creating Administrative Class Objects
To create new domains and individual administrative class objects, you use the Create New Object window to define identifying attributes for the object such as name, location, and so on. The Oracle Tuxedo Administration Console provides a class-specific Create New Object window for each class to which you can add an object. The fields on the Create New Object window vary, depending on the administrative class.
You cannot create new objects for all of the classes displayed in the Tree View. (For example, you cannot create new Client class objects.) For a complete list of the administrative resources you can create, see Table 3‑2.
This section provides general instructions on how to create a new object via the Oracle Tuxedo Administration Console, using domains as an example. For detailed information on how to fill in attribute fields for a specific type of object, refer to the help topics listed in Table 3‑2.
Adding New Administrative Objects
To create any new administrative object, use the following general procedure:
1.
2.
Figure 3‑3 Quick Menu on a Device
Figure 3‑4 Quick Menu on a CORBA Interfaces Class Object
The Create New Object window is displayed as shown in Figure 3‑5, prompting you for the identifying attributes needed to establish a new device object, or as shown in Figure 3‑6, prompting you to establish a CORBA interface class object.
Figure 3‑5 Create New Object Window for a Device
Figure 3‑6 Create New Object Window for the CORBA Interfaces Class Object
3.
The new object appears in the tree contained under the folder you selected originally. (Or, at the same level as whatever non-folder object you selected originally.) The new object automatically includes empty folders of the appropriate subclasses in which you can create new member objects if needed.
Table 3‑2 lists topics that give detailed information on how to fill in the fields on the Create New Object window for a specific type of object.
 
Configuring Administrative Objects
To configure a domain and its administrative objects shown in the Tree View, you use the Configuration Tool tab pages displayed on the right side of the main window. The tab pages (also called tab folders) show the current attribute settings for the administrative object selected in the tree.
Depending on the type of administrative object you select, anywhere from one to eight tab pages is displayed—each page containing a set of attributes related to a particular administrative area for that object such as Networking, Security, Transactions, and so on. Many of the attribute fields on the tab pages are editable, so you can specify or change attributes as needed.
To configure an administrative object:
1.
The Configuration Tool tab pages for that administrative object are displayed on the right side of the main window, as shown in Figure 3‑7.
Figure 3‑7 Selecting an Administrative Object
2.
Note:
3.
Note:
Not all the fields on the tabbed folders can be edited; some information that cannot be changed, such as statistics for the current operation of the domain.
Table 3‑3 lists topics that give detailed information on how to fill in attribute fields on the Configuration Tool tab pages for a specific type of object.
 
Connecting to and Disconnecting from a Domain
There are a number of operations that you can perform only when you are connected to a domain. These include:
How to Connect to a Domain
You have two options for connecting to an existing domain.
To connect to a domain listed on the menu bar Domain list, select Domain—>Domain Name.
To open a domain not on the list:
1.
The Connect window is displayed as shown in Figure 3‑8.
Figure 3‑8 Connect Window
2.
 
3.
If the connection is successful, the Tree View displays the domain icon and name, and the Configuration Tool tab pages display information about the domain.
How to Disconnect from a Domain
The Oracle Tuxedo Administration Console automatically disconnects you from a domain whenever necessary (for example, when you select another domain name from the pull-down menu of Domains).
To disconnect from the domain to which you are currently connected, exit the GUI by selecting Domain—>Exit Application from the menu bar.
Activating Your Domain and Domain Resources
As the system administrator, you are the only user who is authorized to activate the Oracle Tuxedo domain and domain resources. You must perform the initial activation process on the Master machine on which the application configuration file is located.
You can activate all or part of a Oracle Tuxedo domain. Specifically, you can activate:
How to Activate a Domain
To activate a domain:
1.
The Oracle Tuxedo Administration Console displays the Activate Objects window. Click the Domain tab to display the Domain information as shown in Figure 3‑9.
Figure 3‑9 Activate Domain Tab Page
The Domain tab page contains a single option that indicates whether you want to activate only administrative servers for the domain, or the entire domain.
2.
The Oracle Tuxedo Administration Console displays the Progress of Activate window. For more information about this window, see How to Monitor the Progress of Activate.
How to Activate Class Objects
To activate domain and class objects:
1.
The Oracle Tuxedo Administration Console displays the Activate Objects window containing a set of class-specific tab pages (see Figure 3‑10). Click a tab to display the page for the type of object you want to activate.
The Activate Objects window contains six tab pages as shown in the following table.
 
2.
As shown in Figure 3‑10, all Activate class objects tab pages include the following list boxes:
All objects shown indicate their current state next to the object name.
Figure 3‑10 Activate Objects Window
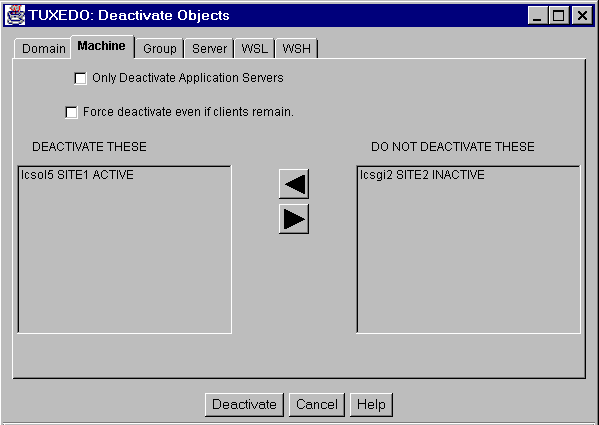
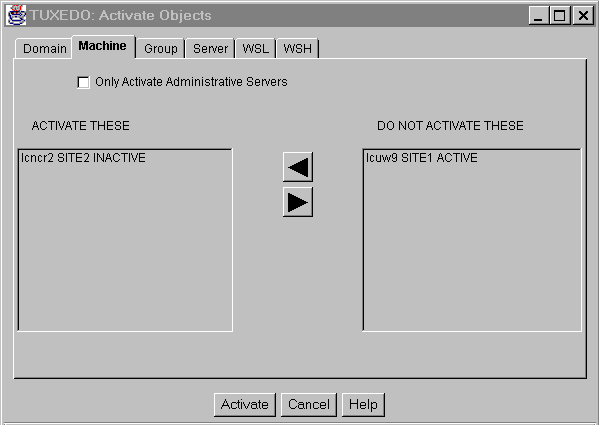
Move the object(s) you want to activate into the ACTIVATE THESE list and all other objects into the DO NOT ACTIVATE THESE list. (To move an object from one list (or column) to another, highlight the object name and click one of the arrow buttons between the two columns as shown in Table 3‑5.)
 
The Machines tab page also contains an option to Only Activate Administrative Servers. For more information about this option, see Activating Only Administrative Servers.
3.
To start the activate process for the objects on a particular tab, click Activate.
Note:
The Oracle Tuxedo Administration Console displays the Progress of Activate window. For more information about this window, see How to Monitor the Progress of Activate.
Activating Only Administrative Servers
The Bulletin Board Liaison Processes (BBLs) and the Distinguished Bulletin Board Liaison Process (DBBL) are Oracle Tuxedo administrative servers. Generally, these servers are activated first. If a BBL fails to activate, the other servers on that machine will not be activated. If the DBBL fails to activate, the entire application's activation process fails.
You can choose whether to limit your activation to BBLs and the DBBL for the entire domain or for selected machines as follows:
How to Monitor the Progress of Activate
As objects are activated, the Progress of Activate window is displayed (as shown in Figure 3‑11). The Progress of Activate window tracks the status of the activation process as it occurs. You can:
If you do not want to view the Progress of Activate window during the activation process, click Dismiss to close the window. The activation process continues in the background.
Figure 3‑11 Progress of Activate Window
Note:
Deactivating Your Domain
The Oracle Tuxedo Administration Console enables you to deactivate all or parts of a Oracle Tuxedo domain. Specifically, you can deactivate:
Note:
How to Deactivate a Domain
To deactivate a domain:
1.
The Oracle Tuxedo Administration Console displays the Deactivate Objects window. Click the Domain tab to display the Domain information as shown in Figure 3‑12.
Figure 3‑12 Deactivate Domain Tab Page
The Domain tab page contains the following options:
To select either of these options, click the check boxes. (A check mark indicates the associated action will be performed as a part of the deactivation).
2.
The Oracle Tuxedo Administration Console displays the Progress of Deactivate window. For more information about this window, see How to Monitor the Progress of Deactivate.
How to Deactivate Class Objects
To deactivate class objects:
1.
The Oracle Tuxedo Administration Console displays the Deactivate Objects window containing a set of class-specific tab pages (see Figure 3‑13). Click a tab to display the page for the type of object you want to deactivate.
The Deactivate Objects window contains six tab pages as shown in the following table.
 
2.
As shown in Figure 3‑13, all Deactivate class objects tab pages include the following list boxes:
All objects shown indicate their current state next to the object name.
Figure 3‑13 Deactivate Objects Window
Move the object(s) you want to deactivate into the DEACTIVATE THESE list and all other objects into the DO NOT DEACTIVATE THESE list. (To move an object from one list (or column) to another, highlight the object name and click one of the arrow buttons between the two columns as shown in Table 3‑5.)
The Machine tab page also contains options to:
3.
To start the deactivate process for the objects on a particular tab, click Deactivate.
Note:
The Oracle Tuxedo Administration Console displays the Progress of Deactivate window. For more information about this window, see How to Monitor the Progress of Deactivate.
Deactivating Only Application Servers
Application servers are user-defined or Oracle Tuxedo defined servers configured by the user in the UBBCONFIG file. You can deactivate only application servers for the entire domain or for selected machines as follows:
See also Forcing Deactivation.
Forcing Deactivation
If you attempt to deactivate application servers for a domain or machine while there are clients still connected to the machine, the deactivation fails.
However, you can force deactivation even if clients remain connected as follows:
How to Monitor the Progress of Deactivate
As objects are deactivated, the Progress of Deactivate window is displayed (as shown in Figure 3‑14). The Progress of Deactivate window tracks the status of the deactivation process as it occurs. You can:
If you do not want to view the Progress of Deactivate window during the deactivation process, click Dismiss to close the window. The deactivation process continues in the background.
Figure 3‑14 Progress of Deactivate Window
Note:
Migrating Tree Objects
Using the Oracle Tuxedo Administration Console, you can migrate server groups and machines to alternate processors. This allows you to schedule maintenance for the original machine. You can also move groups of services from one machine to an alternate machine. By doing so you can schedule maintenance for the original machine.
Note:
Before Starting a Migrate Task
Before you can migrate server groups and machines, MIGRATE must be an option for the domain (see the Options field on the System Parameters folder for the domain) and a backup machine must be specified (see the Master, Backup Machine field on the General folder for the domain).
When you migrate a server group, the environment on the destination machine must duplicate the environment on the source machine, including all packages such as database software and any other application software necessary to run the application.
Displaying the Migrate Objects Window
You use the Migrate Objects window to select the object(s) you want to migrate. To display the Migrate Objects window, select Tools —>Migrate from the menu bar. (Alternatively, you can click the Migrate toolbar button or right-click a Groups object in the tree and select Quick Menu—>Migrate.)
The Oracle Tuxedo Administration Console displays the Migrate Objects window containing a set of class-specific tab pages. Click a tab to display the page for the type of object you want to migrate.
Migrating a Server Group from One Machine to Another
To migrate a server group from one machine to another:
1.
2.
3.
4.
Your next steps depend entirely on the applications you are running. To ensure an orderly migration, you might need to drain queues, shut down groups, migrate databases using tools provided by the database vendor, and so on.
Migrating All Servers from One Machine to Another Machine
To migrate all servers from one machine to another:
1.
2.
3.
Your next steps depend entirely on the applications you have running. You may need to drain queues, shut down groups, migrate databases using tools provided by the database vendor, and so on, to ensure an orderly migration.
Monitoring the Progress of Migrate
As objects are migrated, the Progress of Migrate window is displayed. The Progress of Migrate window tracks the status of the migration process as it occurs. You can:
If you do not want to view the Progress of Migrate window during the migration process, click Dismiss to close the window. The migration process continues in the background.
Note:
Swapping the Master and Backup Machines
If you have identified one machine as a Master and a second machine as a Backup, you can choose to run the Oracle Tuxedo application from either machine. For example, you can swap the application from the Master to the Backup so that you can perform down-time maintenance on the Master machine. Or, if the Master processor loses the virtual circuit to other processors while the application is running, you can log in to the Backup machine. You can then bring up the DBBL on the backup node, and allow the application to continue running (although possibly in a degraded state).
Setting up Master and Backup Machines
To have the option to swap machines, you must have set the names of the machines that serve as the Master and Backup nodes of your system. You can set the Master and Backup machines, by either:
For more information about the Master, Backup Machine field, see the section Master Machine (TA_MASTER) in the section Configuring Domain Resources (T_DOMAIN Class) and Machine Role (TA_ROLE) in the section Configuring Machines (T_MACHINE Class).
To swap a Oracle Tuxedo domain from one machine to another:
1.
2.
3.
Cleaning a Machine
You can clean machines by removing dead, partitioned machines from the booted machine list or by checking for dead clients and servers if the machine is not partitioned.
Select Clean to clean the bulletin board on the specified machine to restart or clean up any servers that may require it. If the machine in question is partitioned, entries for processes and services identified as running on that machine are removed from all non-partitioned bulletin boards.
Occasionally, you may find it necessary to clean your machine (e.g., when the network has gone down or when clients or servers have been killed). The clean operation has the following effects:
If the machine is partitioned, entries for processes and services identified as running on the machine are removed from all non-partitioned bulletin boards. If the machine is not partitioned, any processes or services that cannot be restarted or cleaned up are removed.
If you clean a partitioned machine but the machine is still running, you have to kill the Oracle Tuxedo system application and processes and remove all of the Oracle Tuxedo system application shared memory, semaphores, and message queues by hand. A reboot is often faster.
How to Clean a Machine
To clean a machine:
1.
2.
A message is displayed indicating whether the Clean operation is successful or not.
Advertising, Unadvertising, Suspending, and Resuming Services
You can perform the following service-related operations shown in Table 3‑6.
 
Advertise a Service
To advertise a service (either from an existing service or from a service default object), complete the following steps:
1.
2.
The Advertise Service window is displayed as shown in Figure 3‑15.
Figure 3‑15 Advertise Service Window
3.
4.
5.
A confirmation message is displayed indicating whether the Advertise operation was successful or not.
Unadvertise a Service
To make a currently advertised service unavailable:
1.
2.
Suspend a Service
To suspend a service:
1.
2.
If the Suspend is successful, a Result of Requested Change menu is displayed.
If the service cannot be suspended, an error message is displayed specifying the reason.
Resume a Suspended Service
To reactivate a suspended service:
1.
2.
A Result of Requested Change window is displayed, indicating whether the reactivation is successful.
Suspending, Resuming, and Killing Clients
You can perform the following client-related tasks using the client Quick Menu shown in Table 3‑7.
 
Suspend a Client
If you want to isolate your client temporarily, you can suspend it.
To suspend a client:
1.
2.
If suspension is successful, the Oracle Tuxedo Administration Console displays a Result of Requested Change dialog box and the tree displays the suspended client icon.
If the client cannot be suspended, the Oracle Tuxedo Administration Console displays an error message.
When you suspend a client, the client is prevented from performing the following tasks:
Clients within a transaction can make these calls until they abort or commit the current transaction, at which time they are suspended.
Resume a Suspended Client
To reactivate a suspended client:
1.
2.
The Oracle Tuxedo Administration Console displays the Result of Requested Change window, indicating whether the reactivation is successful.
Kill a Client
A client can be killed, or abortively deactivated, to remove it from the Oracle Tuxedo application. The recommended method to kill a client is:
1.
2.
If the abortive deactivation is successful, a Result of Requested Change window is displayed, and the client icon is displayed as dead (icon with an X). To remove any dead items from the tree view, you need to use the Quick Menu Clean option.
If the client cannot be killed, an error message is displayed specifying the reason. Although the Oracle Tuxedo Administration Console process will refuse to kill itself; one Oracle Tuxedo Administration Console process can be used to kill another.
The application may not be able to kill the client due to platform or signaling restrictions. In this case, a native client is abortively terminated at its next access to Application-to-Transaction Manager Interface (ATMI), and a Workstation client connection to a workstation handler (WSH) will be preemptively torn down. The connections to all clients attached to that WSH are terminated.
Suspending, Resuming, and Killing Workstation Handlers
You can perform the following workstation handler-related tasks shown in Table 3‑8 using the Client Quick Menu .
 
Suspending Workstation Handlers
If you want to isolate the clients connected to a particular workstation handler temporarily, you can suspend it. When you suspend a workstation handler, the clients connected to it are prevented from performing any of the following tasks:
Making service requests using tpcall(3) or tpacall(3)
In addition, the suspended workstation handler will not accept any new client connections.
Note:
Suspend a Workstation Handler
To suspend a workstation handler:
1.
2.
If suspend is successful, a Result of Requested Change dialog box is displayed. The WorkStation Handler icon changes to indicate the suspended state.
If the workstation handler cannot be suspended, an error message is displayed specifying the reason.
Resume a Suspended Workstation Handler
To reactivate a suspended workstation handler:
1.
2.
A Result of Requested Change dialog box is displayed, indicating if the reactivation is successful.
Kill a Workstation Handler
A workstation handler can be killed, or abortively deactivated, to remove it from the Oracle Tuxedo application. The recommended method to kill a workstation handler is as follows:
1.
1.
2.
If the abortive deactivation is successful, a Result of Requested Change dialog box is displayed and the object is displayed as dead (icon with an X) until you clean it out with the Quick Menu Clean option. The connections to all clients attached to that workstation handler are terminated.
If you cannot kill the workstation handler, an error message is displayed, specifying the reason. The application may not be able to kill the workstation handler due to platform or signaling restrictions. In this case, a Workstation client connection to a workstation handler will be preemptively torn down.
Opening and Closing Application Queue Spaces
You can use the Oracle Tuxedo Administration Console to allocate and initialize shared memory and to remove shared memory and other IPC resources (for example, message queues and semaphores). The options that perform these functions are Open and Close.
Open an Application Queue Space
To open an application queue space:
1.
2.
A message is displayed indicating whether the application queue space opened successfully.
Close an Application Queue Space
To close an application queue space:
1.
2.
A message is displayed to tell you whether the application queue space closed successfully.
Deleting Application Queue Messages
You can delete an application queue message from its queue space if you do not need to keep it any longer.
Delete Application Queue Messages
To delete the application queue message:
1.
2.
A Result of Requested Change dialog box is displayed, indicating whether the application queue transaction was deleted successfully.
Aborting Transactions
If you must stop a transaction before it is complete, you can abort the transaction. Any data that changed as a result of that transaction is rolled back to its value at the start of the transaction. The transaction must be in either the ACTIVE, ABORTONLY, or COMCALLED state.
Caution:
To abort a transaction:
1.
2.
The Result of Requested Change dialog box is displayed, indicating whether the transaction aborted successfully.
If you cannot abort the transaction, an error message is displayed specifying the reason.
Creating Bridges Between Machines
A bridge is a connection or link between two machines in a multi-processor domain. From the Oracle Tuxedo Administration Console, you can perform the following tasks:
Create a Bridge
To create a bridge between two machines, complete the following steps:
1.
2.
The LMID is the first of two strings (separated by a /) that identify a machine in the tree. The second string is the physical machine ID, or PMID. For example, suppose the Machines class in your tree includes the following entry: SITE1/rcuw9. In this case, the LMID is SITE1 and the PMID is rcuw9.
3.
The Oracle Tuxedo Administration Console displays a message indicating whether the bridge was created successfully. If so, a bridge now connects the two sites.
Suspend a Bridge
To suspend a bridge:
1.
2.
The Oracle Tuxedo Administration Console displays a message indicating whether the bridge was suspended successfully.
Resume a Suspended Bridge
To resume a bridge:
1.
2.
The Oracle Tuxedo Administration Console displays a message indicating whether the bridge resumed successfully.
Deactivate a Bridge
To deactivate a bridge:
1.
2.
The Oracle Tuxedo Administration Console displays a message indicating whether the bridge was deactivated successfully.
Security Administration
You can manage application security with the Oracle Tuxedo Administration Console ACL objects. The Oracle Tuxedo Administration Console allows you to create new ACL groups, set configuration parameters for ACLs, and ACL Principals. Domain ACLs also allow you to control access to an entire domain.
Creating ACL Groups
To create new ACL Groups, display the Create New Object form and enter values for the fields:
1.
The Create New Object window is displayed.
2.
3.
(Or click Cancel to close the window without creating a new group.)
Managing Tuxedo CORBA Resources
Oracle Tuxedo system resources include CORBA interfaces, CORBA interface queues, and CORBA factories that are used in Oracle Tuxedo client and server applications. You can use the Oracle Tuxedo Administration Console to manage Oracle Tuxedo resources during run time as follows:
Suspending and Resuming Interfaces
During run time, you can perform the following actions shown in Table 3‑9 on a CORBA interface:
 
Suspending a CORBA Interface
If you want to isolate your interface temporarily, you can suspend it.
To suspend an interface:
1.
2.
If the suspend is successful, the Oracle Tuxedo Administration Console displays a Result of Requested Change dialog box and the tree represents the interface as suspended.
Note:
Resuming a Suspended CORBA Interface
To reactivate a suspended interface:
1.
2.
The Oracle Tuxedo Administration Console displays the Result of Requested Change dialog box, indicating whether the reactivation was successful.
Suspending and Resuming Interface Queues
During run time, you can perform the following actions shown in Table 3‑10 on a CORBA interface queue:
 
Suspending a CORBA Interface Queue
If you want to isolate your interface queue temporarily, you can suspend it.
To suspend a CORBA interface queue:
1.
2.
If the suspend is successful, the Oracle Tuxedo Administration Console displays a Result of Requested Change dialog box and the tree represents the interface queue as suspended.
If the interface cannot be suspended, the Oracle Tuxedo Administration Console displays an error message.
Resuming a Suspended CORBA Interface Queue
To reactivate a suspended CORBA interface queue:
1.
2.
The Oracle Tuxedo Administration Console displays the Result of Requested Change dialog box, indicating whether the reactivation is successful.
Viewing Attributes for Factories
The Oracle Tuxedo Administration Console only allows you to view Oracle Tuxedo CORBA factory information. You cannot make configuration changes to a factory and you cannot create new factories. You can use the Configuration Tool pane to view the interface name for a Factory, the Factory ID, and the object state.
Monitoring System Events
You can use the Oracle Tuxedo Administration Console to monitor and track system events. The following sections describe how to use the Oracle Tuxedo Administration Console for:
Viewing System Statistics
You can use the Oracle Tuxedo Administration Console to view current statistics for administrative class objects using the Statistics Tool window.
Displaying the Statistics Tool Window
The Statistics Tool window provides statistics for domains, machines, servers, services, and clients. To display the Statistics Tool window, select Tools —>Stats from the menu bar or click the Stats toolbar button. The Oracle Tuxedo Administration Console displays the Statistics Tool window as shown in Figure 3‑16.
The Statistics Tool displays the domain tab pages by default. You can click a tab to view the statistics for any of the other listed administrative class objects. The domain tab displays statistics for the following administrative classes in a domain:
Figure 3‑16 Statistics Tool window
Table 3‑11 lists the parts of the Statistics Tool window.
 
Changing the Refresh Rate
The Oracle Tuxedo Administration Console updates statistics at a regular interval. You can specify this interval in the Refresh field at the top of the Statistics Tool window. The interval value represents the number of seconds between Refresh operations. The default interval for refreshing the statistics is 60 seconds.
To suspend updating statistics, enter a zero in the Refresh field. To resume updating statistics, enter a number greater than zero. When you enter a zero in the Refresh field, the Hold button is re-labeled Resume; when you enter a value greater than zero, the Resume button toggles back to Hold.
Changing the Bar Graph View
You can display the statistics on any of the tab pages as either a two-dimensional or three-dimensional bar graph. To switch between these two types of graphs:
1.
2.
3.
Displaying More Statistics
The Oracle Tuxedo Administration Console can display statistics for all of the available objects in a class. At the bottom of the Statistics Tool window, the status line displays the number of class objects for which statistics are currently being displayed and the total number of objects of this type for which statistics are available. Figure 3‑16 lists [Domain] Displaying: 5 Total: 5. This line indicates statistics are displayed for all five of five possible objects.
You can select other available administrative objects and display their statistics using the Select Objects dialog box. To display this dialog box, click Select in the Statistics Tool window (upper left). As shown the following example, the Select Objects dialog box lists the available administrative objects for which you can display statistics.
To select one or more items from the list, highlight the item. Click OK to show statistics for your selection and close the Select Objects dialog box. Click Apply to show statistics for your selection and keep the Select Objects dialog box open for further selections.
Viewing System Events
If the system event broker server (TMSYSEVT) is configured, you can use the Oracle Tuxedo Administration Console to monitor system-generated events.
To view system events via the Event Tool:
1.
Figure 3‑17 Sample Initial Event Tool Window
The menu bar across the top of this window offers four options as shown in Table 3‑12.
 
Table 3‑12 Options
2.
Figure 3‑18 Event Tool Format Options Window
3.
4.
Viewing a ULOG File
Using the Oracle Tuxedo Administration Console, you can view the ULOG file from a selected machine in the active domain. You use the Logfile Tool window to display a ULOG file.
Displaying the Logfile Tool Window
To display the Logfile Tool window, select Tools —>Logfile from the menu bar or click the Logfile toolbar button. The Logfile button displays the ULOG file from a particular machine in the active domain.
The Logfile Tool window is shown in Figure 3‑19. The Logfile Tool initially displays a blank viewing area, a drop-down list box and several buttons. The following table describes the Logfile Tool window components.
 
Selecting a Machine to View its ULOG File
To view a ULOG file for a specific object, select a machine from the drop-down menu in the top left corner of the window. (To display the menu, press and hold the left mouse button on the down arrow. To select a menu item, drag the cursor to highlight a menu item and release the the mouse button.) As shown in Figure 3‑19, the Logfile Tool displays the ULOG file for the selected machine.
Figure 3‑19 Sample ULOG File in Logfile Tool Window
Taking a Snapshot of the ULOG File
To save a record of the displayed ULOG file, click Snapshot on the Logfile Tool window.
Setting the Format for the ULOG file
To modify the format of the ULOG display:
1.
The Logfile Format window is displayed, as shown in Figure 3‑20.
Figure 3‑20 Logfile Format OptionsWindow
2.
3.
Customizing the Logfile Tool Options
As shown in Figure 3‑21, the Logfile Tool provides additional options. When you first invoke the Logfile Tool only a single row of buttons appears in the upper left corner of the Logfile Tool window. To display the additional Logfile Tool options, click the + sign button. The six fields that are then displayed allow you to select a ULOG file and specify which parts of it you want to see.
Table 3‑13 shows how to customize the logfile tool options.
 
Specify the date of the ULOG file you want to view. By default, the ULOG file for the current day (on the server) is displayed.
Look for a particular record (in the portion of the ULOG file that you are viewing) by matching a string that appears in that record. Enter the string to be matched in this field.
Figure 3‑21 Logfile Tool with All Options Displayed
 

Copyright © 1994, 2017, Oracle and/or its affiliates. All rights reserved.