2 Installing the Mobile Client
One of the benefits of Oracle Database Mobile Server is that you can have an application downloaded onto a device, where data can be synchronized between the device and the back-end Oracle database. When you install the mobile client, Oracle Database Mobile Server installs the Sync Engine and Device Manager.
Note:
Every mention of the mobile client in this book refers to both the Berkeley DB Mobile Client and the SQLite Mobile Client.Each mention of Berkeley DB refers to the Berkeley DB SQL interface.
The following sections detail how to install the mobile client software on your client device:
-
Section 2.1, "Supported Platforms and Requirements for the Mobile Client"
-
Section 2.2, "Preparing the Device for a Mobile Application"
-
Section 2.4, "Configuring the Location of Mobile Client and Database Files"
-
Section 2.5, "Configuring for Automatic Synchronization When Installing the Client"
See Chapter 1, "Oracle Database Mobile Server Management" in the Oracle Database Mobile Server Administration and Deployment Guide for information on how to manage functionality from the mobile server.
2.1 Supported Platforms and Requirements for the Mobile Client
The Berkeley DB and SQLite Mobile Clients are certified on the following platforms:
Table 2-1 Supported Platforms for Berkley DB and SQLite
| Platform | Berkeley DB Mobile Client | SQLite Mobile Client |
|---|---|---|
|
Microsoft Windows XP Professional Edition with Service Pack 3, 32-bit |
Yes |
Yes |
|
Microsoft Windows 7 (32-bit and 64-bit) |
Yes |
Yes |
|
Microsoft Windows 2003 (64-bit) |
Yes |
Yes |
|
Microsoft Windows 2008 R2 (64-bit) |
Yes |
Yes |
|
Oracle Enterprise Linux 5.0, or 6.0 containing Unbreakable Enterprise Kernel (32-bit and 64-bit) |
Yes |
Yes |
|
OpenSUSE 12 (64-bit) |
Yes |
Yes |
|
Ubuntu 11 (64-bit) |
Yes |
Yes |
|
Fedora 16 (64-bit) |
Yes |
Yes |
|
Windows Mobile 5.0, 6.0 and 6.5 |
Yes |
Yes |
|
* Android 2.2, 2.3, 3.1 and 4.0 |
Yes |
Yes |
|
Blackberry RIM 5.0 and 6.0 |
No |
Yes |
|
Java SE 1.6 and 1.7 |
Yes |
Yes |
|
Java ME (OJEC 1.1) |
Yes |
No |
Note:
BDB client is not supported on Android 2.2.You can also install Berkley DB on Windows Mobile 5.0 and Berkeley DB and SQLite Mobile Clients on the Microsoft Windows Mobile 6 and 6.5 platforms.
Note:
You can configure only one device for a particular user. For example, it is not possible to have two devices both executing the mobile client for the userJOHN.Automatic synchronization and device management are available on most mobile client platforms. Table 2-2 displays what features are available on which platforms.
Table 2-2 Feature Support for Client Platforms
| Platform | Automatic Synchronization | Device management through the DM Agent |
|---|---|---|
|
Windows Mobile |
Yes |
Yes |
|
Win32 |
Yes |
Yes |
|
Linux |
Yes |
Yes |
|
Android |
Yes |
Yes |
|
Blackberry |
No |
No |
|
Java SE 1.6 and 1.7 |
Yes |
No |
|
Java ME (OJEC 1.1) |
Yes |
No |
2.1.1 Certified Operating Systems and Other Software Requirements
The following tables detail the requirements for the client platforms on which you may install the mobile client. The requirements do not include requirements for either client database, but are only the requirements for the mobile client including the Sync Engine and Device Manager.
-
Table 2-5, "Supported and Certified Technologies for Native Mobile Clients"
-
Table 2-6, "Pocket PC and Windows Mobile Supported Platforms"
-
Table 2-7, "Supported and Certified Technologies for Java Clients"
Table 2-3 BlackBerry and Android Platform Requirements
| Platform | Minimum Storage for Mobile Client |
|---|---|
|
BlackBerry |
100 KB |
|
Android |
100 KB |
Table 2-4 Software Requirements for Mobile Clients
| Device Platform | Certified Operating System | Other Software Requirements |
|---|---|---|
|
Win32 Minimum storage needed for mobile client is 2,756 KB. |
Windows 2003, Windows 2008, Windows XP Professional Edition with Service Pack 2, Windows 7 |
If using Java APIs for synchronization, use Oracle JDK 1.6 or 1.7 If implementing any .NET applications, use Compact Framework .NET 1.1 or 2.0 |
|
Windows Mobile |
Windows Mobile 5 Windows Mobile 6 Windows Mobile 6.5 |
If using Java APIs for synchronization, use Oracle JDK 1.6. ActiveSync version 4.5 or higher. Microsoft.NET Compact Framework 3.5 |
You should install all of the patches required for the JDK for the Windows operating system. This is constantly under review and published on the JDK download page on the Oracle Java Web site.
2.1.2 Supported and Certified Technologies for Native Mobile Clients
The following are the supported and certified technologies for native mobile clients:
Note:
Ensure that after you install the required software, the appropriate directories are included in thePATH. For example, after you install the JDK, ensure that the JAVA_HOME/bin is included in the PATH.ADO.Net is supported for both the Berkeley DB and SQLite Mobile Clients. For more information on ADO.Net support, see the following URL:
http://system.data.sqlite.org/index.html/doc/trunk/www/features.wiki
Table 2-5 Supported and Certified Technologies for Native Mobile Clients
| Device Platform | Supported Technologies | Certified Technologies |
|---|---|---|
|
Win32 |
|
Oracle JDK 1.6 or 1.7 |
|
Windows Mobile |
|
Oracle JDK 1.6 or 1.7 |
|
Linux |
|
Oracle JDK 1.6 or 1.7 |
Table 2-6 Pocket PC and Windows Mobile Supported Platforms
| Product Name | WinCE Version | Chipsets | Mobile Client CAB File |
|---|---|---|---|
|
|
|
ARMV4I |
PPC60 ARMV4I, <mobile_client>.cab |
|
|
|
ARMV4I |
PPC60 ARMV4I, <mobile_client>.cab |
|
|
|
ARMV4I |
PPC50 ARMV4I, <mobile_client>.cab |
2.2 Preparing the Device for a Mobile Application
To execute mobile applications on a device, do the following:
-
Install the mobile client software that is appropriate for the client platform on your client machine. For example, install the SQLite WIN32 on a Windows 32 client machine.
See Section 2.3, "Installing the Mobile Client" for a full description.
-
Download the user applications and its associated data.
Synchronize the mobile client for the first time. Sign in with the user name/password of the mobile user who owns the mobile applications. The data for each application is retrieved.
Notes:
For the restrictions on creating the user name and password, see Section 4.3.1.2.1, "Define User Name and Password" in the Oracle Database Mobile Server Administration and Deployment Guide.For more information about synchronization, see Chapter 5, "Managing Synchronization" in the Oracle Database Mobile Server Administration and Deployment Guide.
-
You can now launch your applications from your client machine or from your mobile device.
2.3 Installing the Mobile Client
The following sections provide directions for the mobile client install:
-
Section 2.3.1, "Installing the Mobile Client on Blackberry Devices"
-
Section 2.3.2, "Installing the Mobile Client on Android Devices"
-
Section 2.3.3, "Installing the Mobile Client for Win32, Windows Mobile or Linux"
We do not support the following configuration scenarios:
-
A mobile client and the Mobile Development Kit (MDK) cannot be installed on a single system.
-
A client user cannot have more than one device.
-
While you can synchronize multiple Berkeley DB or SQLite databases on the same client, you cannot synchronize both SQLite and Berkeley DB on the same mobile client.
2.3.1 Installing the Mobile Client on Blackberry Devices
To install the mobile client on Blackberry devices, perform the following:
Note:
Applications cannot be downloaded to your Blackberry device from the mobile server, since device management is not supported for this device. You must download all applications to your Blackberry device as documented on the Blackberry Web site athttp://www.blackberry.com.-
On the Blackberry device, open a browser to point to the mobile server setup page using the following URL.
http://<mobile_server>:<port>/mobile/setupNote:
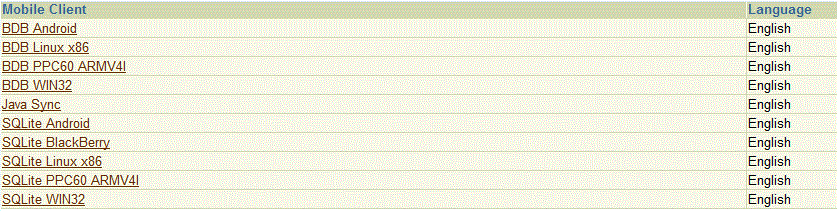
Substitutehttpsif using HTTP over SSL.Figure 2-10 displays the mobile client setup page, which contains links to install mobile client software for multiple languages. You can select another language than English on the Language pulldown.
-
Click the mobile client for your language and the Blackberry client platform. This downloads and installs the mobile client.
-
Perform a manual synchronization for the mobile client.
-
Synchronization requires you to enter the user name and password for the mobile user. During the first synchronization, all data for this user is brought down and installed on your mobile device.
Note:
For the restrictions on creating the user name and password, see Section 4.3.1.2.1, "Define User Name and Password" in the Oracle Database Mobile Server Administration and Deployment Guide.
2.3.2 Installing the Mobile Client on Android Devices
To install the mobile client on Android devices, perform the following:
-
On the Android device, open a browser to point to the mobile server setup page using the following URL.
http://<mobile_server>:<port>/mobile/setupNote:
Substitutehttpsif using HTTP over SSL.Figure 2-1 displays the mobile client setup page, which contains links to install mobile client software for multiple languages. You can select another language than English on the Language pulldown.
-
Click the mobile client for your language and the Android client platform. This downloads the setup.apk for SQLite Android client and setup_bdb.apk for BDB Android client.
-
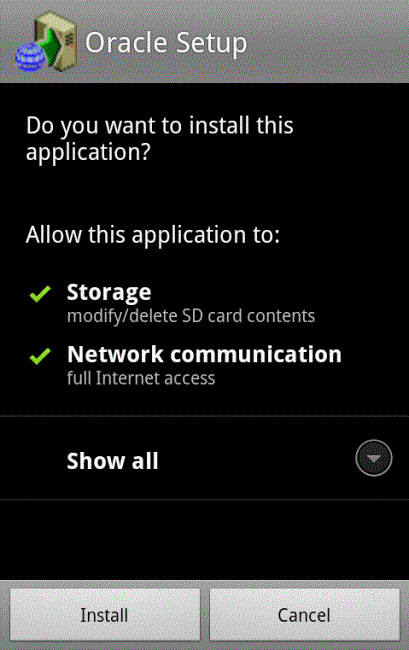
Bootstrap the setup_bdb.apk or setup.apk to install BDB Android or SQLite Android on the Android device. If you want to install the Oracle setup application, click the "Install" button when the system prompts you (see Figure 2-2).
-
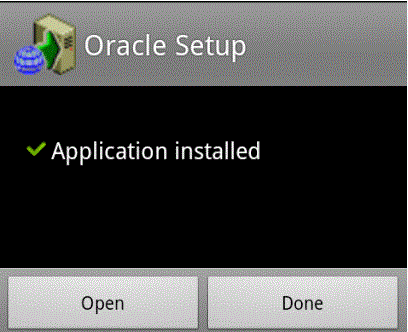
Figure 2-3 shows that the Oracle Setup application is installed successfully. Click the "Open" button to run the Oracle Setup application.
-
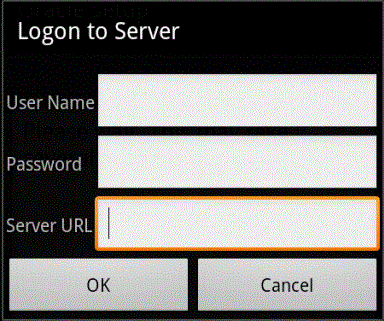
Figure 2-4 shows that the invocation of Oracle Setup application prompts you to input mobile user name, mobile user password and mobile server URL for registration purpose.
Input the necessary information and click OK.
-
The Oracle Setup application will download two other applications on the Android device - Oracle DMAgent and Oracle Update, and will install them one by one.
-
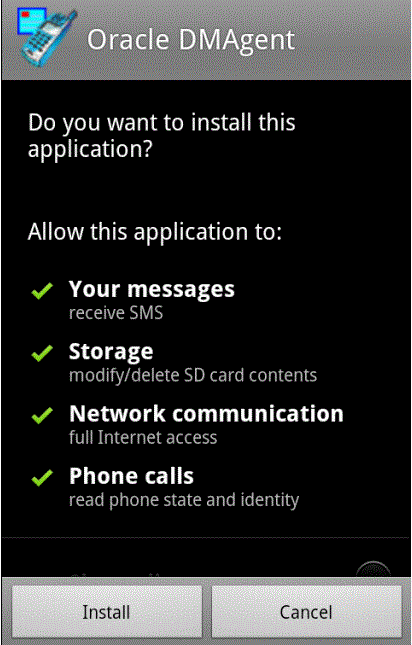
Oracle Setup downloads Oracle DMAgent application to the Android device and installs it. Click the "Install" button in Figure 2-5 to install Oracle DMAgent application.
-
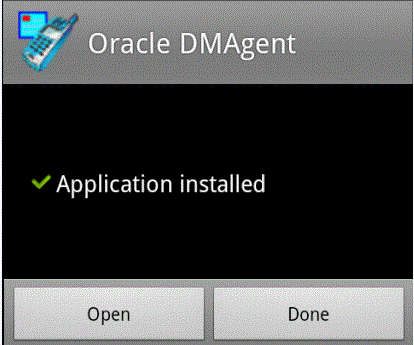
Figure 2-6 shows that the Oracle DMAgent application is installed successfully, Click the "Open" button to run the Oracle DMAgent application.
-
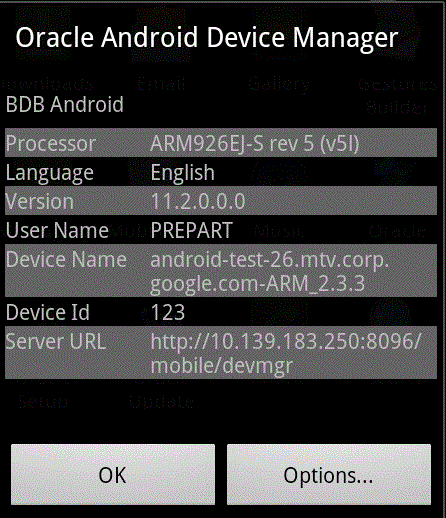
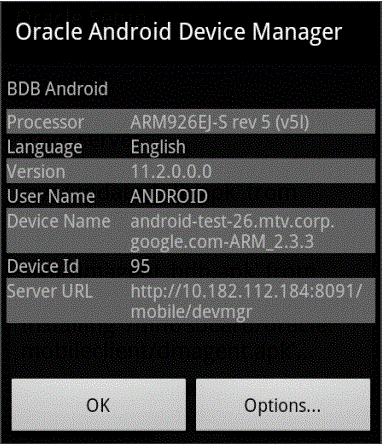
When Oracle DMAgent starts, it displays information like Mobile Device Type (BDB Android or SQLite Android), Processor, Language, the software version of the Oracle Android Device Manager, the User Name, the Device Name, the Mobile Device Id and the Mobile Server URL, as Figure 2-7 Oracle Android Device Manager page demonstrates.
Click OK to confirm this information.
-
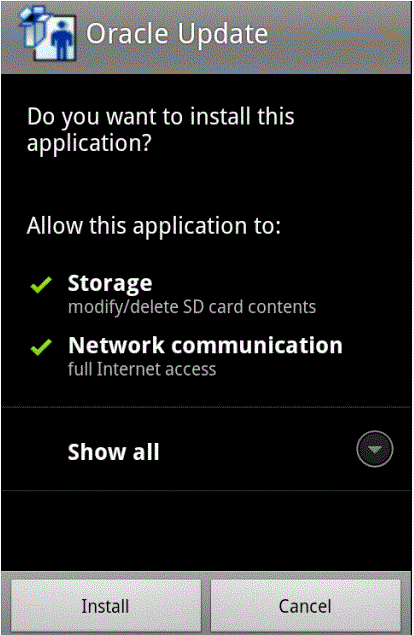
Oracle Setup also downloads Oracle Update application to the Android device and installs it. Click the "Install" button in Figure 2-8 to install Oracle Update application.
-
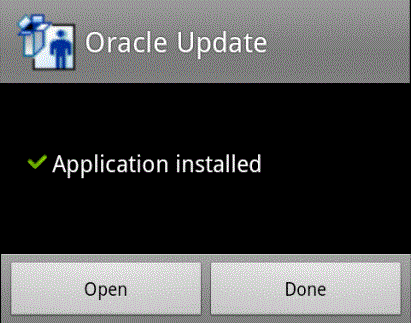
Figure 2-9 shows Oracle Update application installed successfully. Click "Open" button to invoke the Oracle Update application.
-
The Oracle Update application will prompt you of any available software or application update. You can select to install or skip to install.
-
The Oracle Setup execution completes after downloading and installing Oracle DMAgent and Oracle Update applications.
-
The Oracle Mobile Sync application is not deployed on Android devices (unlike native clients) because of Android's data access per application restriction.
Thus, the instructions for installing the Oracle Mobile Sync application on Android devices is presented with an example of creating and downloading the Oracle Mobile Sync application on a Android device, which is provided in Chapter 4.
Note:
Android platforms require that any software downloaded to the device is digitally signed with a certificate whose private key is held by the application's developer.This means, that you cannot simply download and install the mobile client binaries unless they are downloaded within the context of a signed application.
2.3.3 Installing the Mobile Client for Win32, Windows Mobile or Linux
Before you install the mobile client on your device, make sure that there is 1 MB of space available to download the setup.exe.
Note:
Before installing the mobile client on a Linux platform, set MOBILE_CLIENT_HOME environment variable to the desired mobile client installation directory (default is: ~/mobileclient). Also, set environment variables PATH and LD_LIBRARY_PATH to include $MOBILE_CLIENT_HOME/bin.To install the mobile client software, perform the following tasks.
Note:
Any developer can modify how the client is installed before the installation with the INF file. For details on how to customize your Win32, Windows Mobile or Linux client, see Section 7.1, "Customize the Mobile Client Software Installation for Your Mobile Device" in the Oracle Database Mobile Server Administration and Deployment Guide.-
On the mobile client, open a browser to point to the mobile server using the following URL.
http://<mobile_server>:<port>/mobile/setupNote:
Substitutehttpsif using HTTP over SSL.Figure 2-10 displays the mobile client setup page, which contains links to install mobile client software for multiple platforms and languages.
-
Language: Select a language other than English on the Language pulldown. English is the default.
-
Platform: Choose to see all available platforms for the indicated language.
Client platforms are provided in the mobile client setup page. These client CAB files are optimized for size to minimize the footprint on your device.
Note:
Available clients may differ from what is shown above. -
-
Click the mobile client for your language and client platform.
-
The Save As dialog box appears. The file name field displays the setup executable file for the selected platform as a .exe file type on Windows and Windows Mobile platform and a batch file type on Linux platform. Save the executable file to a directory on the client machine.
Note:
For Windows Mobile, install any of the Oracle Database Mobile Server Windows Mobile platforms to ActiveSync. Then, when the device is put into the cradle, ActiveSync installs the Oracle Database Mobile Server on the device when it synchronizes. -
Install the mobile client. For all platforms, except installing Windows Mobile on ActiveSync, go to the directory where you saved the setup executable file. Double-click the file to execute it.
-
Enter the user name and password for the mobile user.
Note:
For the restrictions on creating the user name and password, see Section 4.3.1.2.1, "Define User Name and Password" in the Oracle Database Mobile Server Administration and Deployment Guide. -
You may be required to select the type of privilege under which to install the mobile client. This may already be designated by the administrator in the INF file before installation or the current user may have a privilege that defaults to a certain privilege for the installation.
-
All Users—The user installing this mobile client has administrator privileges and can install the mobile client.
-
Current User—Selecting this option designates that the user does not have administrator privileges, but can install and use the mobile client as a single user.
Note:
For details on how to designate the user privilege and for more information on user installation types, see Section 7.1, "Customize the Mobile Client Software Installation for Your Mobile Device" in the Oracle Database Mobile Server Administration and Deployment Guide.Figure 2-11 Select Installation Privileges
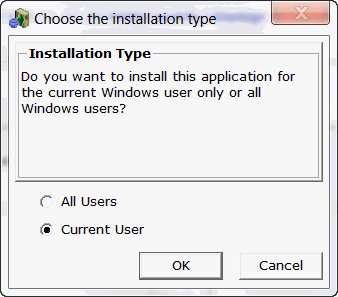
Description of "Figure 2-11 Select Installation Privileges"
-
-
Provide the client directory name where to install the mobile client.
-
Once installed, synchronize the mobile client for the first time. During the first synchronization, all applications and data for this user is brought down and installed on your mobile client.
-
Each platform has further steps. See Table 2-8 for a description of the steps for each platform.
Note:
See Section 2.5, "Configuring for Automatic Synchronization When Installing the Client" for directions on how to enable a default synchronization after any client installation on your device.
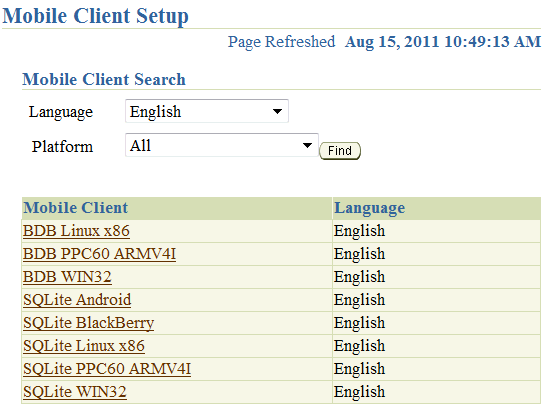
Table 2-8 Initializing the First Synchronization for Each Mobile Client Platform
| Mobile Client | Initial Synchronization Details |
|---|---|
|
Windows Mobile |
Perform the following steps.
The device is now registered with the mobile server and ready to be used. |
|
All other platforms |
Perform the following steps.
|
2.3.4 Installing the Mobile Client for Java SE
To install the mobile client for Java SE, perform the following:
Note:
Mobile client for Java SE does not include device management component. Therefore, applications cannot be deployed by the mobile client for Java SE.-
Open a browser to point to the mobile server setup page using the following URL:
http://<mobile_server>:<port>/mobile/setupFigure 2-10 displays the mobile client setup page, which contains links to install mobile client software for multiple languages.
Note:
The Java SE mobile client includes NLS resources for all supported locales in one jar archive. -
Click the Java Sync client platform and download osync_se.jar archive. This archive contains the pure Java synchronization client for BDB and SQLite jdbc drivers.
Note:
The jdbc drivers are not included with the client. They need to be installed and configured separately. Download the appropriate drivers supported on your particular platform.The synchronization APIs (refer to Section 3.1.1. "OSE Synchronization API for Applications on Mobile Clients" in the Developer's Guide, can be invoked from your own Java application, or you can use the included sync class:
oracle.opensync.tools.OSyncFor usage details, refer to Section 3.4, "Use oracle.opensync.tools.OSync to Initiate Synchronization".
2.3.5 Installing the Mobile Client for Java ME
The Java ME sync client is included with the MDK installation. It is located in:
<MOBILE_HOME>\Mobile\Sdk\j2me\ojec\osync_me.jar
Install this archive in your J2ME environment.
Note:
The sync client also needs JSR169 implementation on top of SQLite engine.If you are using Oracle Java Embeded Client (OJEC 1.1), JSR169 drivers for BDB are bundled with it; therefore in this case, no external JDBC drivers needed.
Note:
J2ME CDC 1.1 spec (based on JDK 1.4 JCE) does not include RSA Ciphers which are needed for the encryption support on the mobile client.You need to install a JCE provider with support for RSA cyphers. For example, you can use BouncyCastle JCE provider for JDK 1.4. In the case of OJEC 1.1, the JCE povider archive needs to be installed at the cvm lib\ext directory. Also, lib/security/java.security file needs to be modified to include the following line:
security.provider.[n]=org.bouncycastle.jce.provider.BouncyCastleProvider
Where n is a sequential number following the last number in the list of the existing providers already included in the file.
Once all the necessary archives are installed, the sync client can be invoked either from your application by using Java sync APIs (for information, see Chapter 4.1.1.1 of the dev guide) or by invoking a command line tool:
./bin/cvm -Xbootclasspath/a:./lib/sqlite.jar:./lib/jdbc.jar:./lib/jsr280.jar -Dsun.boot.library.path=./lib -classpath ./lib/osync_me.jar oracle.opensync.tools.OSync <USER_NAME> <PASSWORD> <SERVER_IP:SERVER_PORT e.g. 127.0.0.1:7001> -param OSE.FILES=YES
2.4 Configuring the Location of Mobile Client and Database Files
The location of the client database is determined by the DATA_DIRECTORY parameter in the OSE.INI file.
-
All client databases and temporary synchronization data are stored in the
DATA_DIRECTORY/sqlite_db/<user>directory, where<user>is the synchronization user id. These are named with the.dbextension, such asTERRY/mysqlite.db. These files are used to manage the change control for transactions and synchronization for the user. -
Internal settings and parameters for the mobile client is stored in the
MOBILE_CLIENT_HOME/bin/oseconfdirectory.
The following shows an example of configuring the client database directory on a Win32 platform:
SQLITE.DATA_DIRECTORY=C:\mobileclient\sqlite
For more details on this parameter, see Appendix A, "DATA_DIRECTORY".
2.5 Configuring for Automatic Synchronization When Installing the Client
In the default configuration, mobile clients do not automatically synchronize after you install the client. However, for Win32, Windows Mobile or Linux platforms, you can modify your configuration to automatically synchronize each client after it is installed, as follows:
-
Logon to the mobile server as an administrator and launch the Mobile Manager tool.
-
Click on Mobile Devices, followed by Administration.
-
Click on Command Management.
-
Edit the Command Device Info (Retrieve device information).
-
Insert 'Synchronize' as a Selected Command and click Apply to accept the changes.
See Section 7.5, "Sending Commands to Your Mobile Devices" in the Oracle Database Mobile Server Administration and Deployment Guide for more details on sending commands to your mobile device.
2.6 Uninstalling the Mobile Client
The following sections provide directions for the mobile client uninstall:
2.6.1 Uninstalling the Native Mobile Client
When you want to uninstall the mobile client, execute the uninst executable that is located in the install directory for the mobile client
2.6.2 Uninstalling the Android Client
Follow below steps to uninstall mobile client on Android device:.
-
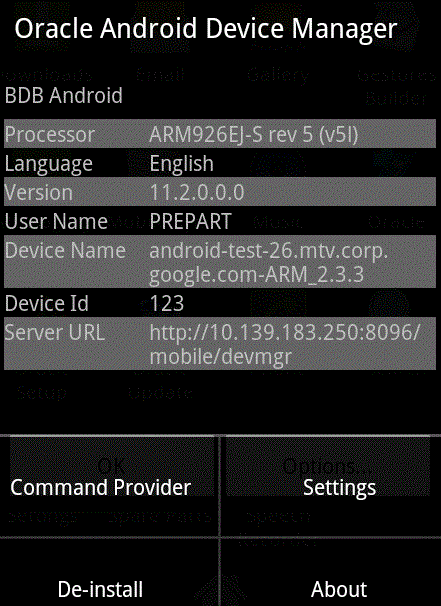
Select Oracle DMAgent, and click "Options..." button in Figure 2-12.
-
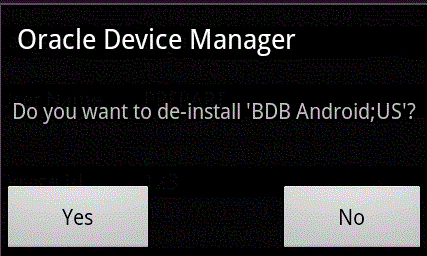
Click "De-install" button in Figure 2-13.
-
Select Yes" to question in Figure 2-14 and all following questions.