In this step, you work primarily with Interactive Reporting Studio to create the data: queries, tables, charts, pivots, and reports to be used in the dashboard. Names are given to each section, and filters are created.
If sections are imported from an Interactive Reporting document, and no sections are added or names changed, in Dashboard Studio Step 1, click  to move directly to the next step. If sections are imported, added, or names changed, complete these procedural steps.
 To create and name sections, and create filters in a dashboard:
From Select a Framework Template, select a template or ESM.
Step 1: Create Queries, Tables, Charts, Pivots, and Reports is displayed.
To display instructions, click
 .
.Minimize Dashboard Studio, and use the instructions to create Interactive Reporting Studio dashboard sections.
Create the filters for the dashboard:
From the Configuration drop-down list, select QIQ Filter Properties.
Follow the instructions provided in Using the QIQ Filter Properties Frame.
Optional: A table can be added to a report section to display the set filters when the report section is printed. See Displaying Filters in Reports.
Note:
Filter names that start with _sys (or with sys for pre-3.2 Release templates) are ignored by the filters feature of Dashboard Studio and are not altered in any way.
Filters that share a name and data type are treated as one filter, and sets of values are merged. That is, all values set for a filter are set for all results in which the filter occurs.
After the Interactive Reporting Studio sections are created, maximize Dashboard Studio.
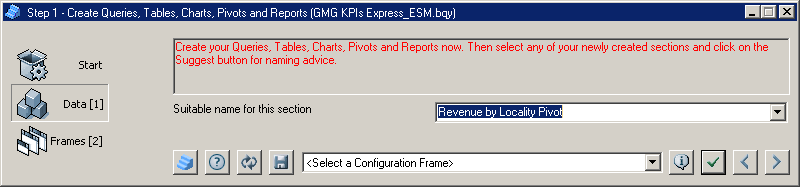
Use Dashboard Studio to generate names for pivots and charts.
In Interactive Reporting Studio, from Sections, select a pivot or chart.
In Dashboard Studio, click
to display a suggested section name.In Suitable name for this section, a name is generated based on the first column of each part of the Data Layout.
Note:
When using a localized release of Dashboard Studio, you must click
in Step 1 for each section to ensure that localized chart or pivot equivalents are appended to the section names. If is not clicked, clicking  in Step 2 to automatically create frames may fail, because the suffix is not recognized.
Optional: In Suitable name for this section, enter a name.
Optional: To display multiple charts in a frame, group charts by placing a prefix followed by a two–period ellipsis before the chart names (for example, Home..Revenue Type).
An option described in Step 7: Configure Properties, removes prefixes from chart names.
Optional: To display a chart or pivot in multiple frames, duplicate the chart or pivot (one for each frame).
Click
 to apply the selections and name the current section.
Repeat steps 6–9 to name the other sections.
Click
to move to the next step.Step 2: Add and Rename Frames is displayed.