Frame controls are selected by default, with the exception of the option to enable columns to be automatically sized. The controls are unavailable if the frame does not contain an embedded chart, pivot, or table. Only two controls are available on frames created from Lite frame prototypes, these are: Allow Printing of Frames and Allow Auto Size of Columns.
Allow Chart/Pivot Switching—Enables toggling from chart to pivot view or pivot to chart view within a frame (To view a chart and pivot simultaneously in a frame, clear Visible properties, this overrides the Design mode, Visible properties settings)
Allow 2D/3D Switching—Enables toggling a chart view from two-dimensional view to three-dimensional view and three-dimensional view to two-dimensional view within a frame
Allow Chart Type Switching—Enables changing the current chart type
Allow Legend Switching—Enables turning chart legends on and off and changing the legend axis
Allow Auto Size of Columns—Automatically resize pivot or table columns (For example, when a drill operation changes data or when number formats are explicitly set)
Allow first filter to be added to Z/Top Axis—Activates the Auto Z feature (Auto Z adds the first filter specified in the Dashboard Studio Filters step as a z-axis (depth) item to charts or a column label to pivots. The feature enables the comparison of measures. See Using Auto Z)
 To use the controls for frames:
In Step 4: Associate Frames with Charts, Pivots, or Tables from Frames and Embedded Objects, select a frame.
Frame Shows these Sections lists the objects associated with the selected frame. If the objects are not named, they are identified as Pivot1, Chart1, Table1, and so on.
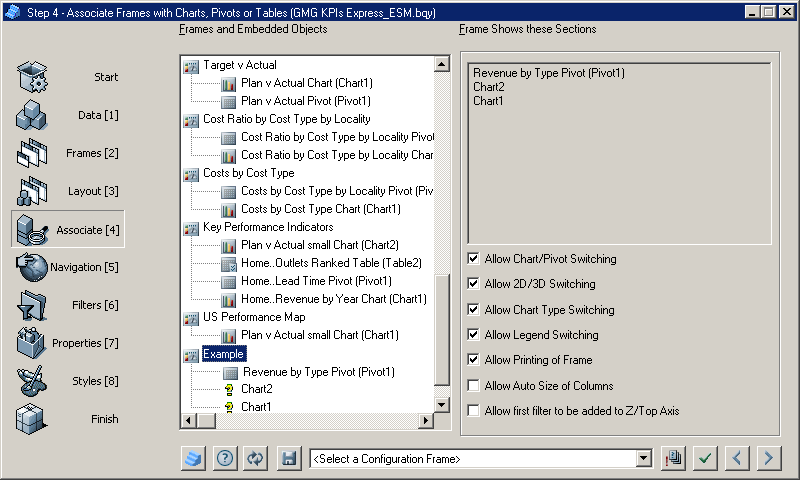
Select or clear individual frame control options.
Click
 to associate the sections with the frames.
After the controls are configured, click
 to apply the selections to the document.
Click
 to move to the next step.
Step 5: Configure Navigation is displayed.