During configuration, you can select the settings that force EPM System components to use SSL communication with the following SSL-enabled components:
Database
SMTP mail server
Application server
Web server
Selecting SSL settings in EPM System Configurator screens does not SSL-enable your deployment; it only sets a Shared Services Registry flag that forces the use of the secure protocol while communicating with the components for which you specified SSL settings. You must complete manual procedures to ensure that SSL communication is enabled between the components and EPM System.
Note: | You must enter or select information on all the configuration screens that EPM System Configurator displays. The following procedure discusses the screens on which SSL settings are specified. See the Oracle Hyperion Enterprise Performance Management System Installation and Configuration Guide. |
 To specify SSL settings for a full SSL deployment of EPM System:
Select deployment tasks for all the EPM System components to be deployed on this machine.
Enter database information for Shared Services database and Shared Services Registry:
Select the Advanced Options link.
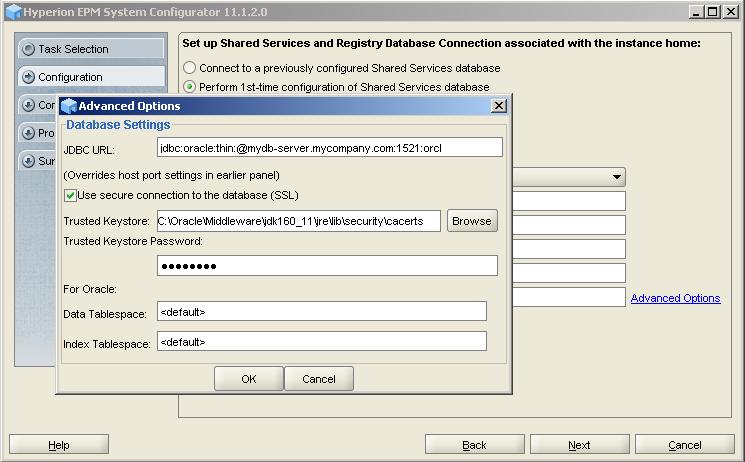
In the Advanced Options screen, specify the required database SSL configuration parameters through the JDBC URL that EPM System Configurator uses to communicate with the database. EPM System Configurator writes the URL into the Shared Services Registry for use during runtime.
Caution!
Before specifying SSL settings for the database, ensure that the database server is configured for SSL.
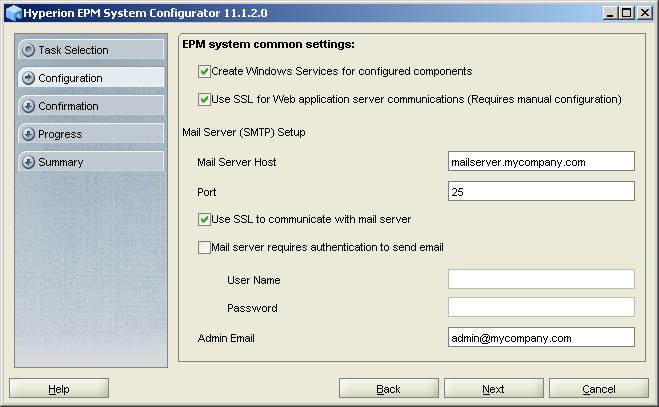
In the EPM System common settings screen, select settings:
Caution!
Before selecting the settings to use SSL to communicate with the e-mail server, ensure that the e-mail server is configured for SSL.
Select Use SSL for Web application server communication (Requires manual configuration) to specify that EPM System should use SSL for communication.
Optional: Enter information in Mail Server Host and Port. To support SSL communication, you must specify the secure port used by the SMTP mail server.
Optional: To support SSL communication with the SMTP mail server, select Use SSL to communicate with mail server.
The Database configuration screen for the other components you selected for deployment opens. Select an option:
Connect to a previously configured database to use the Shared Services database.
Perform 1st-time configuration of the database to use a new database for the components that you are deploying.
Optional: If you chose Perform 1st-time configuration of the database, enter database connection settings.
Select Advanced Options, and then select the required options. See step 6.
Click Next until the Application Server Deployment: Oracle WebLogic screen opens.
Note:
Ensure that you specify settings on each screen you encounter.
The Application Server Deployment: Oracle WebLogic screen lists the components that you selected to deploy, and the default WebLogic Server deployment settings. To support a full-SSL deployment, you must update the SSL port and host that the components use for server-to-server (internal) communication.
Perform this step for each component listed in Application Server Deployment: Oracle WebLogic screen.
From Advanced, select Set up.
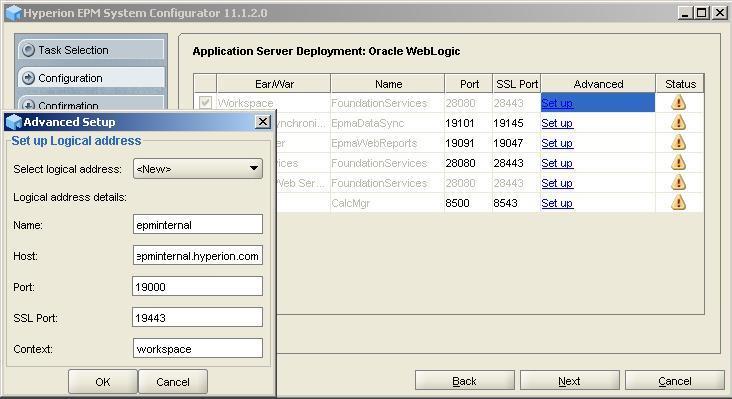
Modify the information in the following fields. See “Advanced Setup” in the Oracle Hyperion Enterprise Performance Management System Installation and Configuration Guide for a description of all the fields on this screen.
Table 10. Fields to Modify to Define Logical Addresses
Field Description Host The common name (a unique virtual host name, for example, epminternal.mycompany.com) that you used while generating the certificate request for obtaining the certificate for internal communication. This host name must be added as server aliases in the hosts file. See Adding Server Aliases. Port Specify the web server port, for example, 19000, that you plan to use for internal communication. SSL Port The web server SSL port, for example, 19443, that you plan to use for internal communication.
Repeat step 13 to create the logical address for each component listed in the screen.
Click Next until the screen for configuring web server for EPM System components that use IIS (for example, Financial Management) is displayed.
In Set up Logical address screen, modify the information as needed. See Table 10 for the information that you should change.