The data grid includes two tabs in the main grid:
Load Data/Write-back Load (POV)—Use this tab to import, view and verify and export data from source systems.
Query Data—Use this tab to display historical data based on the Period and Categories POVs. The Period and Category are specified in the in the Table Action. The Data Rule, Import, Export, Recalculate options in the table actions bar are not available in the Query Data tab. The Query Data tab is not available for the Data Write-Back Workbench.
Note: | The information in this section is based on the Load Data tab. If you are using the Query Data tab and need specific information on a feature or field, refer to the documentation for the Load Data tab. |
You perform tasks on the data grid by selecting options on the Table Action including:
The following View drop-down options provides multiple ways to view data.
Table 20. View Options and Descriptions
| View Option | Description |
|---|---|
 | Customizes views. Options include:
|
You can resize the width of a column either by the number pixel characters or a percentage. You can also wrap text for each cell automatically when text exceeds the column width.
 To resize the width of a column:
You can select the type of data to display in the data grid including:
Valid Data—Data that was mapped properly and is exported to the target application.
Invalid Data—One or more dimensions that was not mapped correctly and as a result, the data is not exported to target.
Ignored Data—User defined explicit IGNORE maps to ignore while exporting to target. IGNORE maps are defined in the member mapping by assigning a special target member of IGNORE.
All Data—Shows all valid, invalid and ignored data.
The Import from Source feature enables the Oracle Data Integrator to import the data from the source system, performs the necessary transformation, such as import, map and validate the data. The Import from Source features also allows you to import the source either online (immediate processing) or offline (runs in background).
Select this feature only if:
You are running a data load rule for the first time.
Your data in the source system changed. For example, if you reviewed the data in the staging table after the export, and it was necessary to modify data in the source system.
In many cases, source system data may not change after you import the data from the source the first time. Therefore, it is not necessary to keep importing the data if it has not changed.
To submit the data load rule:
From the table action bar, select the Data Rule drop down, and choose the data load rule.
The Execution Mode Option screen is displayed.
From the Execution Mode drop down, select the mode of importing the source.
Execution modes include:
online—ODI processes the data in sync mode (immediate processing).
offline—ODI processes the data in async mode (runs in background).
Click on the Import or Export hyperlink in the status region to navigate to the Process Detail page to monitor the ODI job progress.
After you run a data rule, check the status of the import on the POV bar.
 .
.Use the Export to Target feature to export data to a target application. Select this option after you have reviewed the data in the data grid and are sure you want to export it to the target application.
When exporting data for Planning and Oracle Essbase, you can store, add, and subtract data, For Planning only, you can override all data. For Oracle Hyperion Financial Management, Fusion Edition, you can merge, accumulate and replace data.
To submit the data load rule:
From the table action bar, select the Data Rule drop down, and choose the data load rule.
The Execution Mode Option screen is displayed.
From the Execution Mode drop down, select the mode of exporting to the target.
Execution modes include:
online—ODI processes the data in sync mode (immediate processing).
offline—ODI processes the data in async mode (runs in background).
After you run a data rule, you can check the status of the export on the POV bar.
 .
.You can view a log of the data load or write back execution. Logs show the processes and errors that are created when source files are imported, or when the data is exported to the target application. For example, the log shows the status for each process step. You can troubleshoot a problem by viewing at which point a process failed.
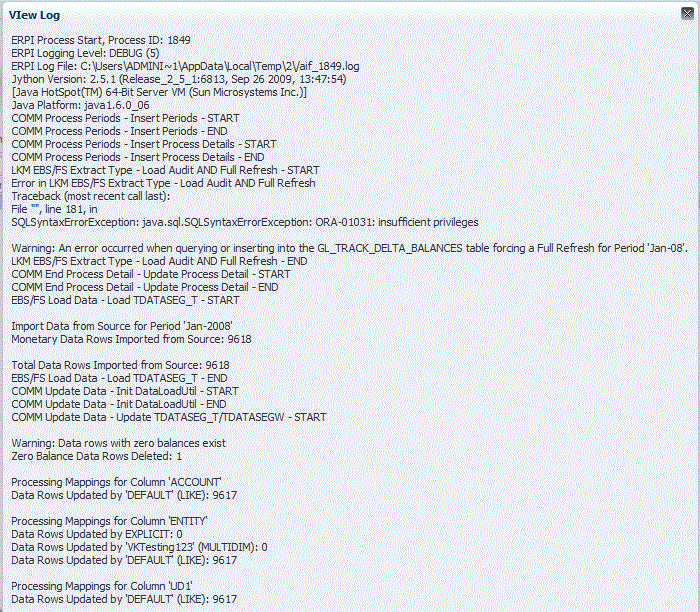
 .
.When reviewing data in the workbench, users can drill down from the amount to ERP source system. In the source system the data is displayed in the granularity with which it was loaded.
You can open the data load rules for a source system application in Microsoft Excel and review how the data is defined.
 .
.Use the Query by Example feature to filter rows that display for a specific column. You can enter text to filter on, if available, for a specific column, and then press [Enter]. To clear a filter, remove the text to filter by in the text box, then press [Enter]. All text you enter is case sensitive.
To query by example:
From the table action bar, click
 to enable the filter row.
The filter row must appear above the columns to use this feature.
Enter the text by which to filter the values in the column and press [Enter].
Note:
When entering text to filter, the text or partial text you enter is case sensitive. The case must match exactly. For example, to find all target applications prefixed with “HR,” you cannot enter “Hr” or “hr.”
Use the Freeze feature to lock a column in place and keeps it visible when you scroll the data grid.
 .
.Use the Detach feature to detach column from the data grid, When you detach the grid, columns display in their own window. To return to the default view, select View, and then click Attach or click the Close button
 .
. .
.