In This Section:
Process for Creating Partitions
Setting up the Data Source and the Data Target
Setting the User Name and Password
Process for Maintaining Partitions
Populating or Updating Replicated Partitions
When you build a partition, each database in the partition uses a partition definition file to record all information about the partition, such as its data source, data target, and the areas to share. Partition creation requires Database Manager permissions or higher.
After you have created a partition, load and calculate the database that contains the partition. Loading and calculating the partition may require you to change existing rules files and calculation scripts. See Understanding Data Loading and Dimension Building and Calculating Essbase Databases.
Decide which type of partition to create:
See Partition Types.
Define the data source and data target, including specifying the source application and database, the target application and database, and the location of each. For a list of supported block and aggregate storage data source and data target combinations for each partition type, see Data Sources and Data Targets.
 To set up the data source and the data target:
Specify the names of the application and database for the data source and data target.
See “Specifying Connection Information for Partitions” in the Oracle Essbase Administration Services Online Help.
Specify the locations of the Essbase Servers on which the data source and data target reside.
See “Specifying Connection Information for Partitions” in the Oracle Essbase Administration Services Online Help.
If you want to use network aliases for the data source or data target names, ensure that the aliases are propagated to all computers on your system. Otherwise, use the full server name.
To propagate an alias to all the computers on your system, edit the hosts file (you need root or administrative privileges) for the operating system you are using:
Windows: %WINDIR%/system32/drivers/etc/hosts
UNIX: /etc/hosts
In the hosts file, add an entry using the following syntax:
IP_address hostname.domainname alias [alias]
The following example specifies one alias:
172.234.23.1 myhost.mydomain abcdefg.hijk.123
Optional: Enter a note to describe the data source or data target.
See “Specifying Connection Information for Partitions” in the Oracle Essbase Administration Services Online Help.
Optional: Specify the outline to which you can make changes.
By default, all changes made on the data source outline overwrite the data target outline when you synchronize the outlines. You can, however, specify that changes made to the data target outline overwrite the data source outline when you synchronize the outlines.
You must specify a user name and password for Essbase to use when it communicates between the data source and the data target. The user name and password must be identical on the data source and the data target. Essbase uses this user name and password to:
You can define or edit the areas of the data source to share with the data target in a partition. An area is a subcube within a database and a partition comprises one or more areas. For example, an area could be all Measures at the lowest level for Actual data in the Eastern region.
When you define a replicated area, ensure that the data source and data target contain the same number of cells. The shape of the two partitions must match. For example, if the area in the data source covers 18 cells, the data target should contain an area covering 18 cells into which to put those values. The cell count does not include the cells of attribute dimensions.
You can use substitution variables in a partition area definition, which provides flexibility in sharing different data at different times. See Substitution Variables in Partition Definitions.
To create a partition, Essbase must be able to map all shared data source members to data target members. Oracle recommends that data source member names and data target member names are the same to reduce maintenance requirements for the partition, especially when the partition is based on member attributes.
If the data source and data target contain the same number of members and use the same member names, Essbase automatically maps the members. You need only validate, save, and test the partitions. If Essbase cannot map automatically, you must map manually.
Map data source members to data target members in any of the following ways:
You can use substitution variables for member names in mapping specifications. See Substitution Variables in Partition Definitions. |
To map members, see “Defining Global Mappings in Partitions” in the Oracle Essbase Administration Services Online Help.
If the data source outline and data target outline contain different members, or if the members have different names in each outline, you must map the data source members to the data target members. In the following example, the first two member names are identical, but the third member name is different:
Source       Target
Product      Product
   Cola         Cola
Year         Year
   1998         1998
Market       Market
   East         East_Region
Because you know that East in the data source corresponds to East_Region in the data target, map East to East_Region. Then, all references to East_Region in the data target point to East in the data source. For example, if the data value for Cola, 1998, East is 15 in the data source, the data value for Cola, 1998, East_Region is 15 in the data target.
The number of dimensions in the data source and data target may vary. The following example illustrates a case where there are more dimensions in the data source outline than in the data target outline:
Source       Target
Product      Product
   Cola         Cola
Market       Market
   East         East
Year
   1999
   1998
   1997
You can map member 1997 of the Year dimension to Void in the data target. First, define the areas of the data source to share with the data target:
Source                        Target
@DESCENDANTS(Market), 1997    @DESCENDANTS(Market)
Then, map the data source member to Void in the data target:
Source       Target
1997         Void
“Void” is displayed automatically; manually entering “Void” may cause errors.
If you do not include at least one member from the extra dimension in the area definition, you will receive an error message when you attempt to validate the partition.
When you map a member from an extra dimension, the partition results reflect data only for the mapped member. In the above example, the Year dimension contains three members: 1999, 1998, and 1997. If you map member 1997 from the data source to the data target, the partition results reflect Product and Market data only for 1997. Product and Market data for 1998 and 1999 will not be extracted. |
The following example illustrates a case where the data target includes more dimensions than the data source:
Source       Target
Product      Product
   Cola         Cola
             Market
                East
Year         Year
   1997         1997
In such cases, first define the shared areas of the data source and the data target:
Source                   Target
@IDESCENDANTS(Product)   @IDESCENDANTS(Product), East
You can then map member East from the Market dimension of the data target to Void in the data source:
Source       Target
Void         East
If member East from the Market dimension in the data target is not included in the target areas definition, you will receive an error message when you attempt to validate the partition.
When you create a replicated or transparent partition using a shared member, use the actual member names in the mapping. Essbase maps the actual member from the data source.
You can import member mappings from a text file. Mapping files must have the .txt extension. A sample member file must contain all of the following (except extra columns):
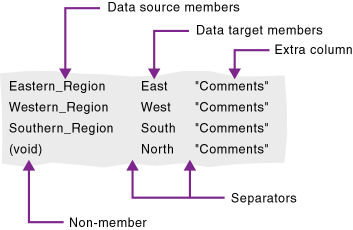
Data source members column (left)—lists the member names in the data source. Member names containing spaces must be in quotation marks.
Data target members column (center)—lists the member names in the data target. Member names containing spaces must be in quotes.
Non-member column (left)—missing members. Use it to map an extra member in the data source to Void in the data target or to map an extra member in the data target to Void in the data source.
Separators (between the columns)—tabs or spaces to separate columns.
Extra column (right)—the file can contain extra columns that do not contain member names.
You must accurately map attribute dimensions and members from the data source to the data target to ensure that the partition is valid.
You cannot map members of attributes dimension in replicated partitions (see Rules for Replicated Partitions). You can, however, map attributes in transparent and linked partitions (see Attributes in Partitions). |
In the following example, the outline for the data source contains a Product dimension with a member 100 (Cola). Children 100-10 and 100-20 are associated with member TRUE of the Caffeinated attribute dimension, and child 100-30 is associated with member FALSE of the Caffeinated attribute dimension.
The data target outline has a Product dimension with a member 200 (Cola). Children 200-10 and 200-20 are associated with member Yes of the With_Caffeine attribute dimension, and child 200-30 is associated with No of the With_Caffeine attribute dimension.
First define the areas to be shared from the data source to the data target:
Source               Target
@DESCENDANTS(100)    @DESCENDANTS(200)
@DESCENDANTS(East)   @DESCENDANTS(East)
Source               Target
100–10               200–10
100–20               200–20
100–30               200–30
Caffeinated          With Caffeine
Caffeinated_True     With_Caffeine_True
Caffeinated_False    With_Caffeine_False
If you map attribute Caffeinated_True to attribute With_Caffeine_No, you receive an error message during validation. You must associate caffeinated cola from the data source to caffeinated cola in the data target.
An attribute dimension or an attribute member can exist in the outline of the data source but not in the outline of the data target, or in the outline of the data target but not in the outline for the data source. For example:
Source         Target
Caffeinated
   True
   False
In such cases, you have the following choices:
For a comprehensive discussion of attributes, see Working with Attributes. For a general discussion of attributes in partitions, see Attributes in Partitions.
If you can map all of the members in your data source to their counterparts in the data target using standard member mapping, you need not perform advanced area-specific mapping.
If, however, you need to control how Essbase maps members at a more granular level, you may need to use area-specific mapping, which maps members in one area to members in another area only in the context of a particular area map.
Use area-to-area mapping to do the following:
Because Essbase cannot determine how to map multiple members in the data source to a single member in the data target, you must logically determine how to divide your data until you can apply one mapping rule to that subset of the data. Then use that rule in the context of area-specific mapping to map the members.
To create area-specific mappings, see “Defining Area-Specific Member Mappings in Partitions (Optional)” in the Oracle Essbase Administration Services Online Help.
Example 1: Advanced Area-Specific Mapping
The data source and data target contain the following dimensions and members:
Source       Target
Product      Product
   Cola         Cola
Market       Market
   East         East
Year         Year
   1998         1998
   1999         1999
             Scenario
                Actual
                Budget
The data source does not have a Scenario dimension. Instead, it assumes that past data is actual data and future data is forecast, or budget, data.
You know that 1998 in the data source should correspond to 1998, Actual in the data target and 1999 in the data source should correspond to 1999, Budget in the data target. So, for example, if the data value for Cola, East, 1998 in the data source is 15, the data value for Cola, East, 1998, Actual in the data target should be 15.
Because mapping works on members, not member combinations, you cannot simply map 1998 to 1998, Actual. Define the area (1998 and 1998, Actual) and then create area-specific mapping rules for that area.
Because the data source does not have Actual and Budget members, you also must map these members to Void in the data target.
Example 2: Advanced Area-Specific Mapping
You also can use advanced area-specific mapping if the data source and data target are structured very differently but contain the same kind of information.
This strategy works, for example, if your data source and data target contain the following dimensions and members:
Source       Target
Market       Customer_Planning
   NY             NY_Actual
   CA            NY_Budget
                 CA_Actual
                 CA_Budget
Scenario
   Actual
   Budget
You know that NY and Actual in the data source should correspond to NY_Actual in the data target and NY and Budget in the data source should correspond to NY_Budget in the data target. So, for example, if the data value for NY, Budget in the data source is 28, the data value for NY_Budget in the data target should be 28.
Because mapping works on members, not member combinations, you cannot simply map NY, Actual to NY_Actual. Define the area (NY and Actual, and NY_Actual) and then create area-specific mapping rules for that area.
Because the data target does not have NY and CA members, you must also map these members to Void in the data target so that the dimensionality is complete when going from the data source to the data target.
When you create a partition, validate it to ensure its accuracy before you use it. Database Manager permissions or higher are required. After you validate, save the partition definition. If necessary, you can edit an existing partition.
When Essbase validates a partition definition, it checks on the Essbase Server for the data source and the data target to ensure that:
The specified data source members are valid and map to valid members in the data target.
All connection information is correct; that is, the server names, database names, application names, user names, and password information.
For linked partitions, the default user name and password that you provide are correct.
For replicated and transparent partitions, a replication target does not overlap with a replication target; a replication target does not overlap with a transparent target; and a transparent target does not overlap with a transparent target.
For replicated and transparent partitions, the cell count for the partition is the same on the data source and the data target.
For replicated and transparent partitions, the area dimensionality matches the data source and the data target.
You must validate a transparent partition that is based on attribute values to ensure that the results are complete. Essbase does not display an error message when results are incomplete.
After you validate, save the partition; the partition definition is saved to two .ddb files, on the data source server and the data target server.
After you validate the partition definition, you can save the partition definition to any of the following locations:
Note: | Although you can save a partition with mapping errors, operations using that partition will fail until the mapping errors are fixed. |
When you partition a database, Essbase must be able to map each dimension and member in the data source outline to the appropriate dimension and member in the data target outline. After you map the two outlines to each other, Essbase can make the data in the data source available from the data target, as long as the outlines are synchronized and the partition definitions are up-to-date.
If you make changes to one outline, the two outlines are no longer synchronized. Although Essbase makes whatever changes it can to replicated and transparent partitions when the outlines are not synchronized, Essbase may not be able to make the data in the data source available in the data target.
Essbase tracks changes that you make to block storage outlines and provides tools to keep your block storage outlines synchronized.
Note: | Essbase does not enable automatic synchronization of aggregate storage outlines. You must manually make the same changes to the source and target outlines. |
Before you can synchronize block storage outlines, you must determine which outline is the source outline and which is the target outline.
By default, the source outline is from the same database as the data source; that is, outline and data changes flow in the same direction. For example, if the East database is the data source and the Company database is the data target, the default source outline is East.
You can also use the data target outline as the source outline. Consider this method if the structure of the outline (its dimensions, members, and properties) is maintained centrally at a corporate level, while the data values in the outline are maintained at the regional level (for example, East). Administrators can make changes in the Company outline and apply those changes to each regional outline when the outline is synchronized.
If you make changes to the shared area in the source outline, you can propagate them to the target outline when you synchronize the outlines.
If you make changes to the target outline, those changes cannot be propagated back to the source outline when you synchronize the outlines. To move these changes up to the source outline, make those changes in Outline Editor. See Creating and Changing Database Outlines.
Essbase updates as many changes as possible to the target outline. If Essbase cannot apply all changes, a warning message prompts you to see the application log for details. Messages that pertain to outline synchronization are prefixed with OUTLINE SYNC. See Viewing the Essbase Server and Application Logs.
To set the source outline, see Setting up the Data Source and the Data Target.
This topic describes the process for changing the source outline and synchronizing the target outline with the source outline.
When you make changes to the source outline, Essbase takes the following actions:
Records the changes in a change log named essxxxx.chg, where xxxxx is the number of the partition. If you have multiple partitions on a source outline, Essbase creates a change log for each partition.
Creates or updates the outline change timestamp for that partition in the partition definition (.ddb) file. Each partition defined against the source outline has a separate timestamp in the .ddb file.
When you pull changes from the outline source, Essbase takes the following actions:
Compares the last updated timestamp in the target outline .ddb file to the last updated timestamp in the source outline backup (.dbb) file. Essbase updates the target timestamp when it finishes synchronizing the outlines using the last updated time on the source outline, even if the two outlines are on servers in different time zones.
If the source outline has changed since the last synchronization, Essbase retrieves those changes from the source outline change log and places them in the target outline change log. The change logs may have different names on the source outline and the target outline.
When you select the changes to apply to the target outline, Essbase takes the following actions:
Applies the changes to the target outline.
Updates the timestamp in the target outline’s .ddb file, using the time from the source outline.
An actual member and its shared members in the source outline are propagated to the target outline if at least one actual or shared member is defined in the partition area. As illustrated in Figure 60, Shared Members and Outline Synchronization, the partition definition is @IDESC(“Diet”). The parent 100 and its children (100-10, 100-20, 100-30) are not defined in the partition area. The parent Diet and its children (100-10, 100-20, 100-30) are defined in the partition area. The children of Diet are shared members of the actual members.
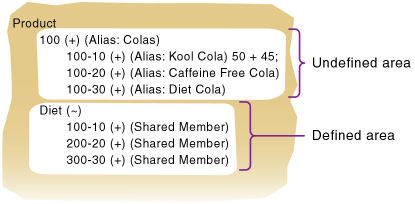
If you make a change to an actual member in the undefined partition area, such as adding an alias to the 100-10 actual member, that change is propagated to the target outline because it is associated with a shared member in the defined partition area.
The reverse is also true. If a shared member is not in the partition area and its actual member is, a change to the shared member in the undefined area is propagated to the target outline.
Any change made to a member that does not have at least one actual member (or shared member) in the defined partition area is not propagated to the target outline. For example, in Figure 60, Shared Members and Outline Synchronization, a change to the parent 100 is not propagated to the target outline because it is in the undefined partition area and does not have an associated shared member in the defined partition area.
If a shared member is included in the partition area, it is recommended to include its parent. In the above example, the parent Diet is included in the outline because its children are shared members and in the defined partition area.
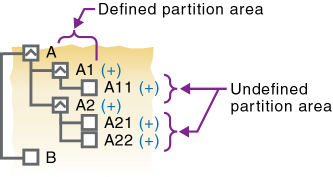
Implied shared members are treated the same as shared members during outline synchronization. Actual members and their implied shared members in the source outline are propagated to the target outline if at least one actual or implied shared member is defined in the partition definition.
Using the partition definition as @CHILD(“A”) in the example in Figure 61, Implied Shared Members and Outline Synchronization, A1 and A2 are in the defined partition area, and A11, A21, and A22 are in the undefined partition area. Although A11 (implied shared member) is in the undefined partition area, a change to A11 is propagated to the target outline because its parent, A1, is in the defined partition area. The change to the children A21 and A22 is not propagated to the target outline because these members are not defined in the partition area and are not associated with a member that is in the defined partition area.
The reverse is true again. If A1 is not defined in the partition area and its implied shared member is, any change to A1 is propagated to the target outline.
The administrator should regularly update data in a replicated partition. How frequently you update replicated partitions depends on user requirements for up-to-the-minute data. Essbase keeps track of when the data source was last changed and when the data target was last updated so that you can determine when to update replicated partitions. This information is saved at the data source. The administrator of either the data source site or data target site can be responsible for replicating data.
Essbase also tracks which cells in a partition are changed:
Follow these guidelines:
Unless you update all cells, replication does not update target data when the source data has not changed since the last replication.
By default, Essbase replicates #MISSING cells. If you do not want to replicate #MISSING cells, you can use the DISABLEREPLMISSINGDATA configuration setting in the essbase.cfg file. See the Oracle Essbase Technical Reference.
If you deleted data blocks on the data source, Essbase updates all data cells at the data target, even if you choose to update only changed cells. You can delete data blocks at the data source using any of these methods:
Using the CLEARDATA command in a calculation script
Using “Clear combinations” in your rules file during a data load
Issuing CLEAR UPPER, CLEAR INPUT or RESETDB commands in Administration Services;
Restructuring the database keeping only level 0 or input data
Deleting sparse members
All data targets connected to a data source.
For example, if you replicate all data targets connected to the Sampeast.East database, Essbase updates the Budget, Actual, Variance, and Variance % members in the Samppart.Company database:
From all data sources connected to a data target.
For example, if you replicate from all data sources connected to the Samppart.Company database, Essbase pulls the Budget, Actual, Variance, and Variance % members from the Sampeast.East database and updates them in the Samppart.Company database.
When you edit a partition, you use the same interface as for creating the partition.
When you delete a partition, Essbase deletes the partition definition from the .ddb file on the data source and data target servers.
The following considerations apply when partitioning in secure (SSL) mode:
The partition source and target must have the same security protocol; for example, both or neither use SSL.
To enable Essbase to use SSL connectivity, you must set ENABLESECUREMODE to TRUE.
Consider setting CLIENTPREFERREDMODE to SECURE.
If CLIENTPREFERREDMODE is not set, or is set to FALSE, but ENABLESECUREMODE is set to TRUE, you can securely create and refresh partitions in MaxL by adding :secure to the HOST-NAME string. For example,
login esbuser esbpassword on “localhost:6423:secure”;
The following table lists common problems that you may encounter when using partitions.
Table 37. Troubleshooting Problems with Partitions