Stages represent the network of allocations within your organization. The calculations flow forward from initial allocations to the delivery or resolution. Backward flows are not permitted.
The calculation sequence is critical to obtaining correct results. Calculation order is determined by dimension and stage order, as displayed in the Stages window. In the following example, the model calculation follows the specified sequence, and the results of each stage are carried forward to the next stage:
Stage 1
Dimension 1
Dimension 2
Dimension 3
Stage 2
Dimension 1
Dimension 2
Dimension 3
Stage 3, and so on.
Each stage requires a name and a stage prefix.
 To add model stages:
From Task Areas, select Manage Model, then Stages.
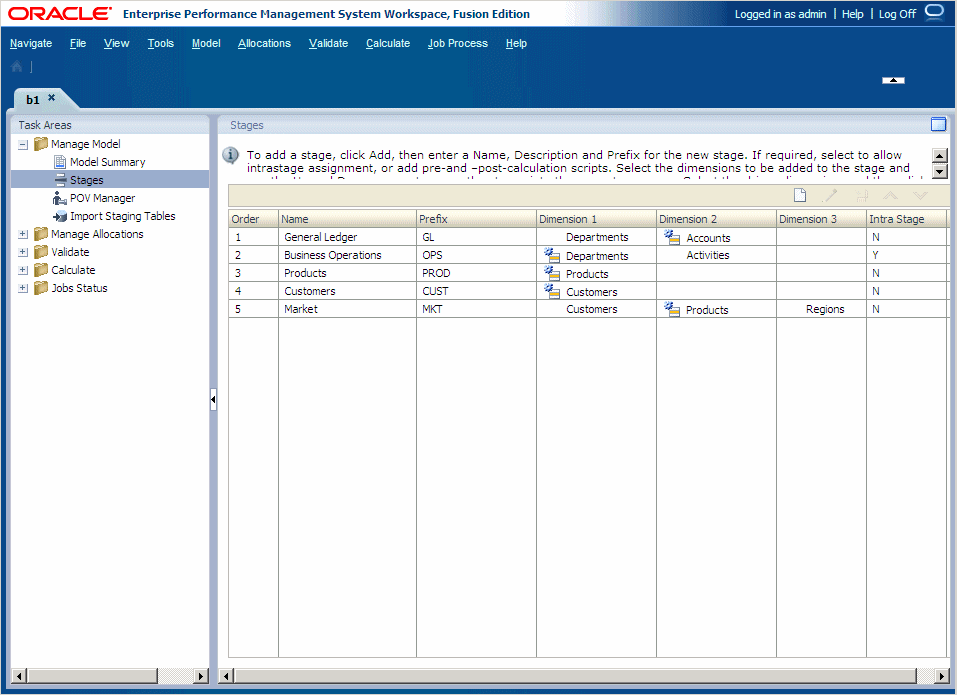
The Stages window provides the following information about the selected stage:
Order displays the number of the sequential position of the stage within the model.
Name shows the name of the stage and usually identifies the business function or process of the stage, such as General Ledger or Operating Activities.
Alphanumeric Prefix assigned to stage
Dimensions included in the stage. The driver dimension for the stage is indicated by the driver icon
 .
. The Intra Stage field displays whether intrastage assignments are allowed for the stage (Y or N).
From Stages, click the Add button
 .
.
For Name, enter a unique, descriptive name for the stage, to a maximum of 50 characters.
The name should identify the business function or process of the stage, such as General Ledger or Operating Activities.
Optional: Under Description, enter a brief explanation of the type of information that is included in the stage.
Under Prefix, enter a unique alphanumeric prefix for the selected stage.
Stage prefixes are used to distinguish the dimension-stage combination. For example, if the dimension “Department” is used in two stages, the prefix “General Ledger” might be applied to one, and “Process” to the other. The resulting reports display the dimensions as “General Ledger-Department” and “Process-Department.”
Optional: If you require allocations within the same stage, select Allow Intrastage Assignments to mark the stage for intrastage allocations.
Optional: If manually created calculation scripts are available, under Scripts, enter a Precalculation or a Postcalculation script name.
Optional pre- and post-calculation scripts are manually created in script editors in the EAS console for execution from Profitability and Cost Management. The scripts, which are stored in Essbase, enable users to initialize Essbase cells to the correct values.
Based on the type of script selected for a stage, they are run to prepare the stages for allocations or reporting, as follows:
Pre-calculation scripts are run before the stage calculation scripts.
Post-calculation scripts are run after the stage calculation scripts.
On the Stage Dimensions toolbar, click Add
.A line is added to the list of Dimensions, showing the next sequential number in the Order. The Dimension list is populated with all dimensions available in the model.
Under Dimensions, select a dimension that applies to the new stage.

Optional: Repeat step 8 and step 9 to add up to three dimensions for each stage.
Optional: Under Order, select a dimension, and use the Up
 or Down
  buttons to move the dimension to the correct location in the calculation sequence.
 Optional: Select a stage from the Stages table, , and use the Up
or Down buttons to move each stage to the correct location in the calculation sequence.