After installation, the Custom Dimension names in the Oracle Financial Management Analytics repository files are displayed as placeholders, such as Custom1, Custom2, Custom3, and Custom4.
You must rename these placeholder values to accurately reflect the custom dimensions in your Financial Management application. For example, the placeholder custom dimensions might be renamed to alias names such as “Products, ”“Customers, ”“Sales Channels,” and so on.
 To rename custom dimensions:
From the main menu, select Start, then All Programs, then Oracle Business Intelligence, and then BI Administration.
From the Oracle BI Administration Tool, select File, then Open, and then Online.
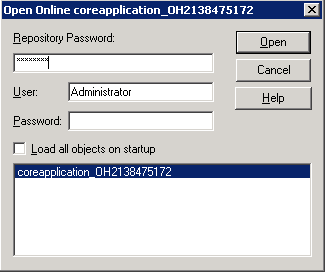
On the Open Online dialog box, complete the following fields, and then click Open:
Enter the Repository Password.
Enter the User Name and Password.
Optional: Select Load all objects on startup.
Select the required application
The selected repository file is displayed.
On the Oracle BI Administration Tool, under the Physical column, select HFM, then HFM Application, and then double-click Custom1.
The Physical Dimension dialog box is displayed.
In Name, enter the name of the associated custom dimension in the selected Financial Management application.
In Default Member, enter a valid member value corresponding to your application, and then click OK.
Expand the Custom1 dimension to display all members in the hierarchy.
Under Physical, double-click the first level Custom1 dimension.
The Physical Hierarchy dialog box is displayed.

On the Levels tab, under Name, enter the associated custom dimension name from the Financial Management application, and then click OK.
In the expanded Custom1 dimension list, select the first column in the database hierarchy.

The Physical Cube Column dialog box is displayed.

In the Name field, modify the database column name to reflect the name of the column in the associated Financial Management application.
For example, change Custom1 ClassType to Channel ClassType.
Repeat step 10 to step 12 for each column in the custom dimension.
When all dimensions under the custom dimension hierarchy are renamed, repeat step 4 to step 13 for each additional custom dimension, for example, Custom2, Custom3, and Custom4.
When all custom dimensions are renamed, select File, and then Save to save the selection.
Restart Oracle BI EE to update all changes. See Restarting Oracle BI EE Manually.