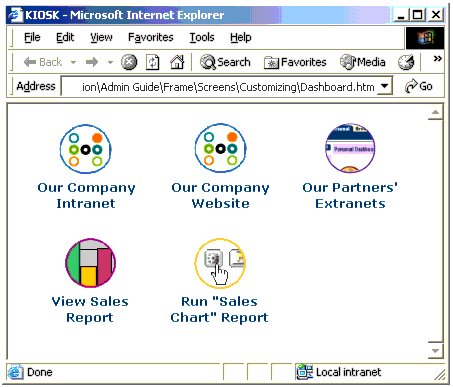
Using SmartCuts, you can integrate EPM Workspace into your intranet, your home page, or Web-based applications, as the example in this section illustrates. One click from your intranet (or home page) takes you to EPM Workspace information.
This example creates a “dashboard” or “kiosk” with several buttons that access Web and EPM Workspace content. The example shows how you can create a central starting point for accessing all one’s electronically available information. The buttons of the example “kiosk” page go to:
The two lower buttons access EPM Workspace content using SmartCuts that differ:
 To create the example, follow these steps:
Find or create the graphics you want to use for the kiosk buttons, and save the graphics files in the wsmedia/personalize subdirectory of your Web application deployment directory (/workspace by default).
In Notepad (or any editor that does not change the code), enter the code below.
If you are viewing this documentation in Adobe Acrobat Reader 4.0 or above, you can copy the text using the Text Select Tool, and paste it into your editor.
The code shown is kiosk0.htm, with the SmartCut names shown in boldface. Text you should replace (in step 3) is shown in bold italics:
<HTML> <HEAD> <TITLE>KIOSK</TITLE> </HEAD> <BODY> <TABLE> <TR> <TD> <A HREF="http://intranet"><IMG border=0 src="Install Home/workspace/wsmedia/personalize/graphic1"></A></TD> <TD>         </TD> <TD><A HREF="http://website"><IMG border=0 src="Install Home/workspace/wsmedia/personalize/graphic2"></A></TD> <TD>         </TD> <TD><A HREF="http://extranetsList.htm"><IMG border=0 src="Install Home/workspace/wsmedia/personalize/graphic3"></A></TD> <TD> </TD> </TR> <TR VALIGN="TOP"> <TD ALIGN="CENTER"> <FONT FACE="Arial" COLOR="saddlebrown" SIZE=+0><B>Our Company<BR>Intranet </B></FONT></TD> <TD> </TD> <TD ALIGN="CENTER"> <FONT FACE="Arial" COLOR="saddlebrown" SIZE=+0><B>Our Company<BR>Website</B></FONT></TD> <TD> </TD> <TD ALIGN="center"> <FONT FACE="Arial" COLOR="saddlebrown" SIZE=+0> <B>Our Partners'<BR>Extranets</B></FONT></TD> </TR> <TR> <TD> <BR> </TD> <TD> </TD> <TD> </TD> </TR> <TR> <TD> </TDTR> <TD><A HREF="http://servletsHost:servletsPort/root/browse/get/SampleContent/Production/Inventory_Information/Central_Facility_Report?sso_username=username&sso_password=password"><IMG border=0 src="Install Home/workspace/wsmedia/personalize/graphic5"></A><?TD> <TD> </TD> <TD><A HREF="http://servletsHost:servletsPort/root/browse/run/SampleContent/Sales/Sales%20Charts?sso_username=username&sso_password=password"><IMG border=0 src="Install Home/workspace/wsmedia/personalize/graphic6"></A></TD> </<TR VALIGN="TOP"> <TD> </TD> <TD ALIGN="center"> <FONT FACE="Arial" COLOR="saddlebrown" SIZE=+0><B>View<BR>Sales Report</B></FONT></TD> <TD> </TD> <TD ALIGN="center"> <FONT FACE="Arial" COLOR="saddlebrown" SIZE=+0><B>Run "Sales <BR>Chart" Report</B></FONT></TD> </TR> </TABLE> </BODY> </HTML>
Make these substitutions in the code:
Replace Install Home with the name of your installation directory, which is the directory containing the servlets directory.
Replace root/browse with the Web application deployment directory name or alias, if it is set differently in your Web server software.
Replace graphic1, graphic2, and so on. with file names of your button images.
Replace website with the URL for your company’s public Web site.
Replace extranetsList.htm with the URL for a page containing links to your partners’ extranets.
Replace servletsHost with the name of the host on which the servlets are installed.
Replace servletsPort with the port number for the Browse servlet.
Replace the path of the example “Central Facility Report” with that of your report output artifact.
Replace the path of the example “Sales Charts” with that of your report program.
Incorporate kiosk.htm into your Web-based application or make it the home page in your browser.
