The goal of this roadmap is to install and configure Oracle ATG Web Commerce Search in an integrated environment with Oracle ATG Web Knowledge Manager and Oracle ATG Web Knowledge Manager Self Service.
You will need at least three servers for this product combination:
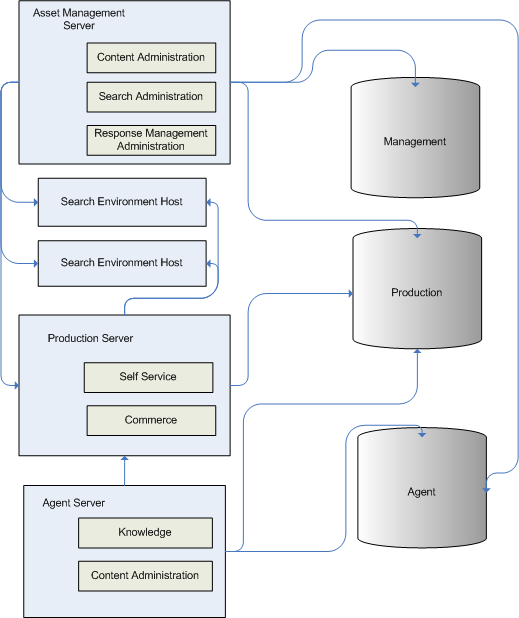
One runs Search Administration and ATG Content Administration; this is referred to as the asset management server in this roadmap.
Another runs the Service Administration application and Oracle ATG Web Knowledge Manager, and is called the agent server.
A third server runs Oracle ATG Web Knowledge Manager Self Service, and is referred to as the production server.
The servers can be set up on separate machines, or can run as separate instances on one machine if it has plenty of memory (the latter option is not recommended for live sites, but you may use such a configuration for evaluation or testing purposes). You may also want to dedicate resources for additional search engines.
Architecture Diagram
This section provides a visual explanation of the pieces involved in an Oracle ATG Web Commerce Search installation with Oracle ATG Web Knowledge Manager. In addition to the three servers, the diagram includes the following databases:
Management—Versioned data for ATG Content Administration, Search Administration, and other non-catalog information.
Production—Catalog and other deployed asset information for your sites. Use the switching database feature described in the ATG Content Administration Programming Guide. If you are using switching, the production database becomes in actuality three databases, two containing switched data and a third containing information that does not benefit from switching, such as user profiles.
Agent—Versioned and non-versioned repositories including user profiles, internal and external user segments, solutions, content groups, Search Routing, ATG Ticketing, and topics.
If you are using Oracle ATG Web Commerce Business Intelligence, you will also have a data warehouse, not included in this diagram. See the ATG Business Intelligence Installation and Configuration Guide for an overview.
Search with Knowledge Manager
Basic Installation
This section covers the actual installation of the components and database configuration.
Install your application server on all machines that will be used for Oracle ATG Web Commerce instances. See the ATG Installation and Configuration Guide for information on configuring your application server for ATG products.
Note: If you are using standalone search engines, those machines do not need to have an application server.
Download and install Oracle ATG Web Commerce products.
Oracle ATG Web Commerce platform; select all components when installing.
Oracle ATG Web Commerce Search; select the Full Search Install option. Install the HTML and PDF components if needed (see Installing HTMLFilter and Installing PDF Extract in this guide).
ATG Service; select ATG Service Administration and Oracle ATG Web Knowledge Manager.
If using standalone search engines, see Adding Search Engines.
Configure databases and data sources for all applications. Note that the documentation referenced is extensive; review it carefully before proceeding.
Oracle ATG Web Commerce Platform. See Configuring Databases and Database Access in the ATG Installation and Configuration Guide.
Oracle ATG Web Commerce Search. See Creating the Oracle ATG Web Commerce Search Database Tables and Configuring Data Sources for Oracle ATG Web Commerce Search in this guide.
Oracle ATG Web Knowledge Manager. See Configuring Databases for ATG Service and Configuring the ATG Service Servers in the ATG Service Installation and Configuration Guide.
Create your administration, agent, and production ATG servers. See Configuring Search with CIM, or see the ATG Platform Programming Guide for manual server creation information.
Configure lock management. See Configuring Search with CIM, or see Configuring the Lock Manager in this guide for manual lock management configuration.
Server Configuration Steps
Configure the administration server. This server runs Search Administration and ATG Content Administration.
Configure the
/atg/search/serviceproperties for the administration server. See Configuring SearchSQLRepository Components in this guide.Run the
create-atgservice-searchprojectscript against your ATG Search database as described in the Configuring Search Environment section in the ATG Service Installation and Configuration Guide.Set up your asset management server. See the Setting Up an Asset Management Server chapter of the ATG Content Administration Programming Guide.
Create your client application, which runs on the production server.
Configure the agent server. Search Routing runs on this server. See Configuring the Agent Server in the ATG Service Installation and Configuration Guide.
Build and Deploy Applications
See Configuring Search with CIM, or see the Developing and Assembling Nucleus Applications chapter of the ATG Platform Programming Guide for manual application assembly information. If you are assembling manually, include the following modules:
Administration server EAR file
DafEar.AdminSearchAdmin.AdminUIPubPortletService.ExternalUsers
Note: If you are going to run Search Administration as part of a standalone EAR, you must do the following:
Run the Oracle ATG Web Commerce Search installer and install a standalone search engine on the machine to which you are going to deploy your EAR. See Adding Search Engines in this guide.
Set the
engineDirproperty of the/atg/search/routing/Configurationcomponent to the new search engine’s<Searchdir>\SearchEnginedirectory. For example:engineDir=c:\\ATG\\ATG10.1.2\\Search10.1.2\\SearchEngine
Production server EAR file
DafEar.AdminARF.BaseService.SelfService
Agent server EAR file
DafEar.AdminARF.BaseARF.WSCPService.KnowledgeService.adminService.SampleCRMClientService.CRMIntegration
Post-Deployment Configuration
The following tasks are performed in your running Oracle ATG Web Commerce applications.
Use ATG Content Administration to create your deployment topology, and initialize your deployment targets by doing a full deployment. See the ATG Content Administration Programming Guide.
Use the Oracle ATG Web Business Control Center to access Search Administration. See Accessing Search Administration in this guide.
In Search Administration, add content to your project as described in the Configuring Search Environment section in the ATG Service Installation and Configuration Guide.
