| Oracle® Fusion Applications Developer's Guide 11g Release 7 (11.1.7) Part Number E15524-08 |
|
|
PDF · Mobi · ePub |
| Oracle® Fusion Applications Developer's Guide 11g Release 7 (11.1.7) Part Number E15524-08 |
|
|
PDF · Mobi · ePub |
This chapter describes how to create, edit, and delete tree structures, trees, and tree versions, and how to develop applications using trees.
The chapter includes the following sections:
Section 19.2, "Configuring the Trees Application Launch Page"
Section 19.6, "Managing Labels in the Generic Label Data Source"
Section 19.7, "Using the Applications Hierarchy Component to Develop Applications"
Section 19.8, "Integrating Custom Task Flows into the Applications Hierarchy Component"
Section 19.9, "Using the fnd:hierarchy Property Inspector to Specify Tree Versions"
Section 19.11, "Embedding the Tree Picker Component in a User Interface"
Oracle Fusion tree management allows data in applications to be organized into a hierarchical fashion, and allows you to create tree hierarchies based on specific data.
Here are some of the advantages of how using tree hierarchies to develop applications can help you:
Reusable code that results in a one-time-only implementation of many tree-management features, and can be used immediately by every type of application hierarchy.
Open metadata that can be read by any application that needs to use tree-management hierarchies. This does the following:
Minimizes the number of application programming interfaces (APIs) that need to be written for accessing hierarchies
Allows the sharing and understanding of hierarchies across Oracle Fusion applications
Allows the sharing of hierarchies with Oracle Business Intelligence reporting and analytics systems
Tree structures that capture the business rules the data must adhere to.
ADF Business Components view objects that are used as data sources, eliminating the need to build new types of data sources.
Hierarchical relationships between entities that are external to the entity itself, allowing multiple hierarchical views to be implemented for the same set of entities. Each of these hierarchies can be used to implement a different business function.
Data flattening that improves query performance against the hierarchical data, especially for hierarchical queries such as roll-up queries.
Business events that can be consumed by any application requiring additional processing on specific tree operations.
Tree and node-level access control that eliminates the need for product teams to write their own access-control code.
Well-defined APIs available for metadata and data that make it easy for the Oracle Fusion Upgrade Office to write migration tools for existing hierarchies in E-Business Suite, PeopleSoft, and Siebel.
As a developer, you will work mostly with tree structures. The task of working with trees and tree versions normally will fall to customers. However, since you probably also will be required to work with trees and tree versions, both types of tasks are described in this chapter.
A tree structure is a way of describing a hierarchy. A tree is an instance of this hierarchy. Every tree structure contains a tree. Trees may have one or more versions. Each tree version contains at least one root node; that is, a member that has no superior. (Occasionally, a tree version may have more than one root node.) The lines connecting elements in a tree structure are branches; the elements themselves are nodes.
The names of relationships are modeled after family relations:
A node is a parent of another node if it is one step higher in the hierarchy and closer to the root node.
Sibling nodes share the same parent node.
For example, in Figure 19-1, XYZ Corp. is the parent of Marketing and Finance, which are its children. Accounts Receivable and Accounts Payable are siblings, and are the children of Finance.
In Oracle Fusion tree management, a tree structure defines a group of common business rules for a family of trees, for example, Department, Account, or Project, and allows an application to select and enable a subset of trees to fulfill a specific purpose in that application.
A tree contains data that is organized in a hierarchy, allowing the creation of groupings and rollups of information that already exist within an organization. A tree can have one or more tree versions. Typically, when changes are made to an existing tree, a new version is created and published.
A tree structure data source supplies the data for a tree through its nodes. Multiple data sources can be associated with a tree structure and can have well-defined relationships among them. Using the example in Figure 19-1, the Accounts Receivable data source is a child of the Finance data source. Data sources also support business rules that define how the data from a data source participates in a tree.
Table 19-1 lists other commonly used tree terms and their descriptions.
Table 19-1 Common Tree Terminology
| Term | Description |
|---|---|
|
Depth |
The depth of a node is the length of the path from the root to the node. The root node is at depth zero. |
|
Label |
Allows for a storage of "tags" that can be used on each tree node in a tree. There are three labeling schemes:
Labels can be stored in any table and the label data source is registered with the tree structure. |
|
Tree label |
When a labeling scheme is used for trees, the selected labels are stored in the tree label entity and each tree node references a tree label. See "Label." |
|
Node |
A logical term that refers to the actual data, whatever that may be. Technically, the node may be stored either in a product-specific table or in an entity that has been established by the Tree Management solution as the default storage mechanism. However, since all data in Oracle Applications usually already has a storage home, only customers should store the node in an entity. |
|
Tree node |
A node that is included in a tree. |
|
Tree node type |
A tree node has a node type. Node types can be any one of the following:
|
|
Tree levels |
Provide a way to organize tree nodes. In most trees, all nodes at the same level represent the same kind of information. For example, in a tree that reflects the organizational hierarchy, all division nodes appear on one level and all department nodes on another. Similarly, in a tree that organizes a user's product catalog, the nodes representing individual products might appear on one level and the nodes representing product lines on the next higher level. When levels are not used, the nodes in the tree have no real hierarchy or reporting structure but do form a logical summarization structure. Strictly enforced levels mean that the named levels describe each node's position in the tree. This is natural for most hierarchies. Loosely enforced levels mean that the nodes at the same visual level of indentation do not all represent the same kind of information, or nodes representing the same kind of information appear at multiple levels. With loosely enforced levels, users assign a level to each node individually; the level is not tied to a particular visual position. |
|
Tree structure access |
The set of rules that control access to a tree structure. |
|
Tree access |
The set of rules that control access to a tree. |
|
Tree node access |
The set of rules that control access to a particular node (and its subtree) within a given tree version. |
|
Effective dates |
Enable users to specify new objects, departments, reporting relationships, or organizational structures in advance and have them take effect automatically. Users also can use trees with past, present, or future effective dates when reporting on current or historic data. |
|
Reference data set determinant (external) |
A value that determines which reference data set will be used for each reference data object. Business units, regulatory regions, and reference data sets all can determine which reference data sets are valid for the creation of a transaction or reference data object. |
|
Audit |
A process that runs a series of tests against tree metadata and tree data to validate its integrity. |
Before you can manage tree structures, trees, and tree versions using the web-browser-based trees application, you must create the application launch page in Oracle JDeveloper. The launch page contains links to the Tree Structures, Trees and Tree Versions, and Manage Labels applications, which contain the management task flows you will use.
You also will need to perform additional steps that are required to schedule the concurrent processes that the trees application uses for audit and flattening.
Before you begin:
Create an application initialized for use with Oracle Middleware Extensions for Applications. For more information, see Chapter 2, "Setting Up Your Development Environment."
To create the launch page:
Configure a UIShell launcher page for your ViewController project using the procedure described in Section 13.2, "Populating a UI Shell."
Add a taskflow entry in the ADF menu as a node with the following properties:
focusViewId - /<jspx file>
id - tree_<jspx file>
Label - Trees and Tree Versions
Task Type - dynamicMain taskFlowId -/WEB-INF/oracle/apps/fnd/applcore/trees/ui/taskflow/TreeStructureSummary.xml#TreeStructureSummary
Repeat Steps 1 and 2 to create a second itemNode with the following properties:
focusViewId - /<jspx file>
id - tree_<jspx file>
label - Trees and Tree Versions
Task Type - dynamicMain
taskFlowId - /WEB-INF/oracle/apps/fnd/applcore/trees/ui/taskflow/TreeSummary.xml#TreeSummary
Repeat Steps 1 and 2 to create a third itemNode with the following properties:
focusViewId - /<jspx file>
id - tree_<jspx file>
label - Manage Labels
Task Type - dynamicMain
taskFlowId - /WEB-INF/oracle/apps/fnd/applcore/trees/ui/taskflow/FndLabelSummary.xml#FndLabelSummary
Ensure you have an itemNode for defaultRegional. If you do not, define one with the following properties:
focusViewId - /<jspx file>
id - __<jspx file>_itemNode__FndTasksList
Note:
Use double underscores where indicated.
label - #{applcoreBundle.TASKS}
Task Type - defaultRegional
taskFlowId - /WEB-INF/oracle/apps/fnd/applcore/patterns/uishell/ui/publicFlow/TasksList.xml#TasksList
Disclosed - true
Click OK in the Set Run Configuration window.
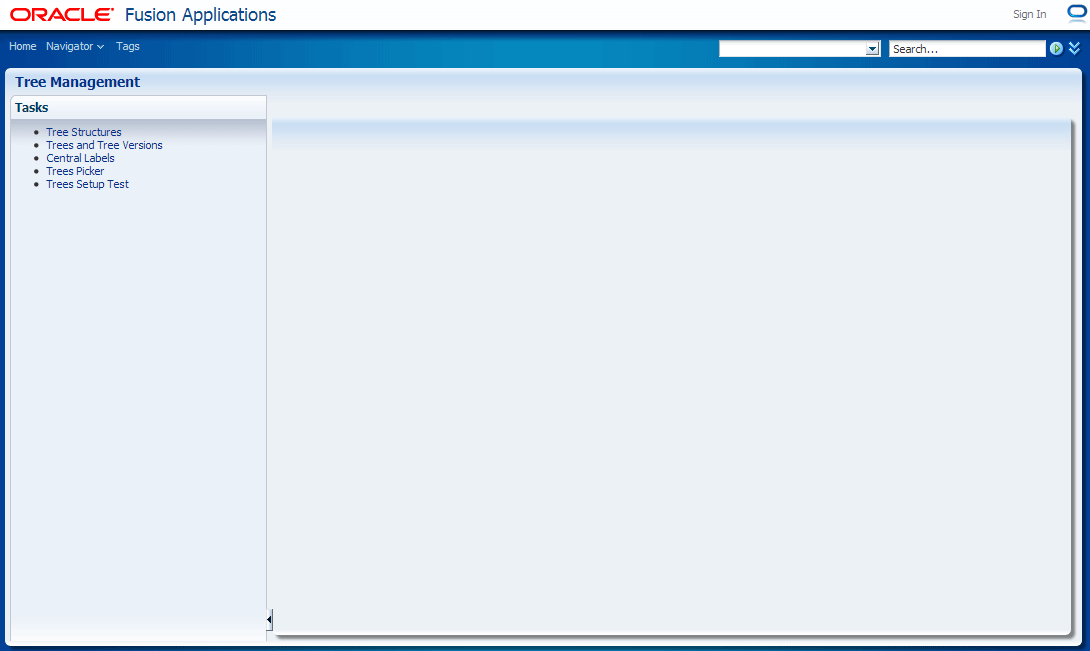
The trees application launch page opens in a browser window, as shown in Figure 19-2.
Figure 19-2 Trees Application Launch Page
Do one of the following:
Click the Tree Structures link to open the Tree Structure summary page.
Click the Trees and Tree Versions link to open the Trees summary page.
Click the Central Labels link to open the Central Labels summary page.
Click the Trees Picker link to open the Trees Picker application.
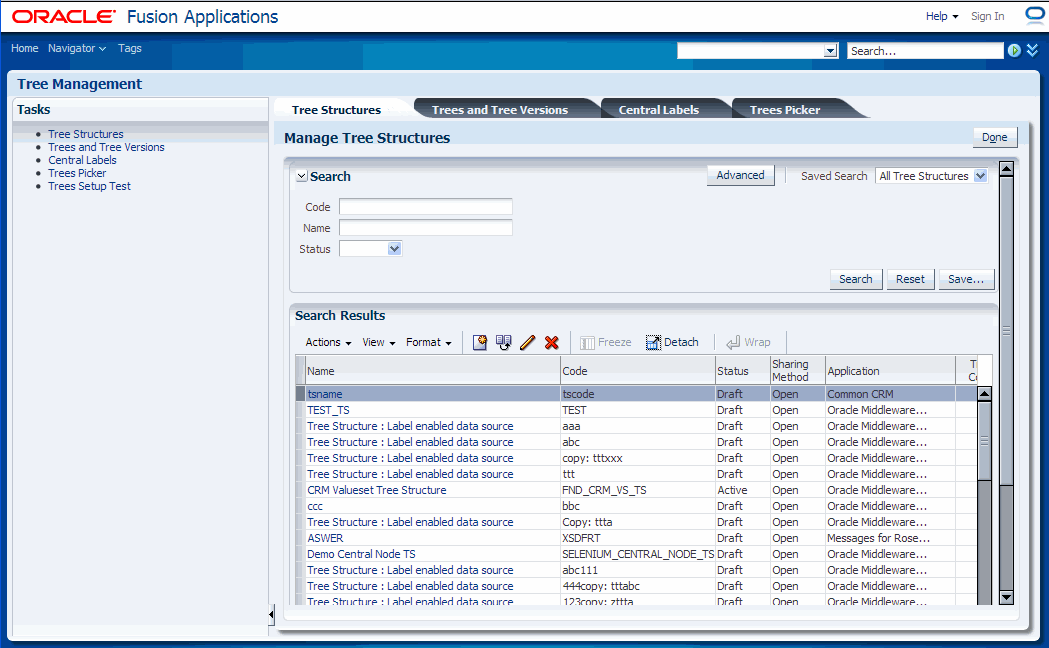
Figure 19-3 shows the launch page with all applications open, and the Tree Structure application's summary page displayed.
Figure 19-3 Trees Application Launch Page with Applications Open
Working with tree structures includes the following tasks:
Managing tree structure data sources
Specifying data source parameters
Searching for, creating, duplicating, editing, or deleting tree structures
Setting tree structure status
Auditing tree structures
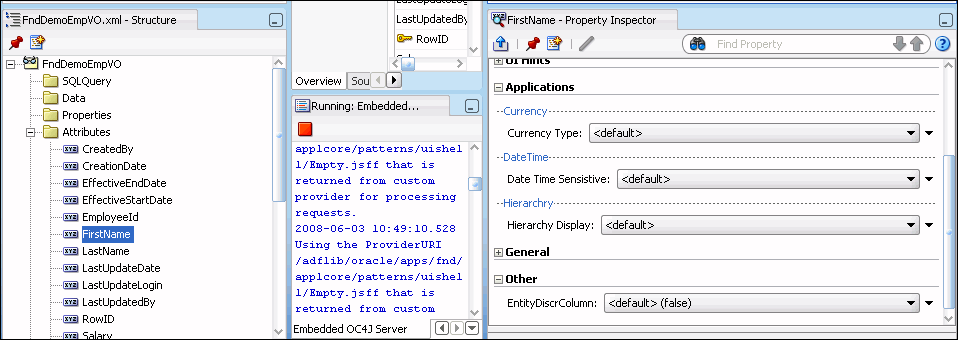
Tree structure data sources provide the data items for a hierarchy. In the tree-management infrastructure, these are ADF Business Components view objects. You should define view objects for all the intended data sources before setting up a tree structure. For each view object attribute that is to be displayed in the hierarchy column of an ADF Faces Tree or ADF Faces TreeTable, the Application property HierarchyDisplay is set to true, as shown in Figure 19-4.
Figure 19-4 View Object Attributes: HierarchyDisplay Property
Tree management provides a generic data source for holding nodes: oracle.apps.fnd.applcore.trees.model.view.FndNodeVO. This data source may be used for tree-only nodes, that is, nodes that do not exist in any other entity in the system. Likewise, a generic label data source has also been provided: oracle.apps.fnd.applcore.trees.model.view.FndLabelVO.
Tree data sources have optional data source parameters with defined view criteria and associated bind variables. You can specify view criteria as a data source parameter when creating a tree structure, and edit the parameters when creating a tree.
Note:
Parameter values customized at the tree level will override the default values specified at the tree-structure level.
The parameters will be applied when performing node operations, and the display of the nodes in the hierarchy, for any tree version under that data source. Data source parameters also provide an additional level of filtering for different tree structures.
Tree management supports three data source parameter types:
VIEW_CRITERIA - Used to capture the view criteria name, which will be applied to the data source view object
BOUND_VALUE - Used to capture any bound value, which will be used as part of the view criteria condition
VARIABLE - Used to capture and bind variable that is being used by the data source view object, particularly for WHERE clause support
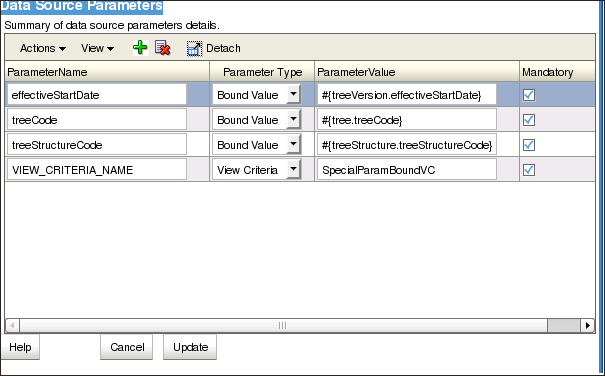
In addition to parameter values provided by the customer, tree management provides support for those special parameters whose values for any bind variable are seeded at runtime by tree management.
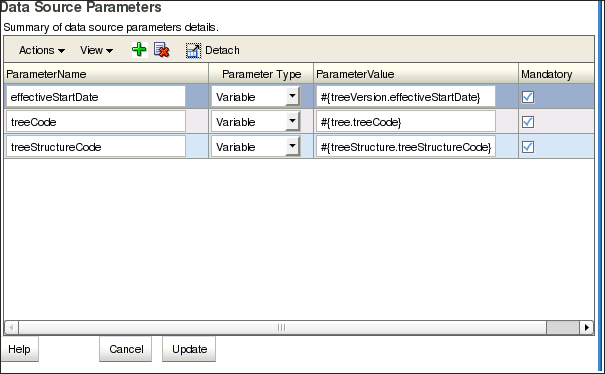
For example, to use the effectiveStartDate attribute of a tree version that a data source uses as one of the bind variables from which the value for the effectiveStartDate bind variable will be retrieved from the trees effective start date, you can specify a data source parameter effectiveStartDate with the value #{treeVersion.effectiveStartDate}. You would then need to expose an effectiveStartDate bind variable for the data source view object either in view criteria or a WHERE clause.
You can specify parameters using the syntax for value and name shown in Table 19-2.
Table 19-2 Parameter Syntax
| Attribute | Syntax |
|---|---|
|
Tree Structure |
#{treeStructure.ATTR_NAME_WITH FIRSTCHAR_IN_LOWER CASE} For example, |
|
Tree |
#{tree.ATTR_NAME_WITH FIRSTCHAR_IN_LOWER CASE} For example, |
|
Tree Version |
#{treeVersion.ATTR_NAME_WITH FIRSTCHAR_IN_LOWER CASE} For example, |
Notes:
Binding parameters are supported for String, Number, and Date data types only.
In 11gR1, tree management does not support View Criteria and Variable when used in combination, or multiple View Criteria as data source parameters.
This section includes an example use case and discusses basic use cases and their settings.
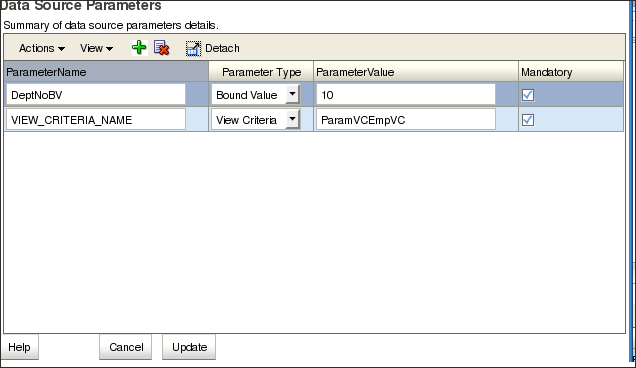
The data source DemoEmpVO has the view criteria DemoEmpVC1, which is based on the bound values DemoEmpBV1 and DemoEmpBV2. These are to be applied to the data source view object for tree versions under the DEMO_EMP_TS tree structure, with varying bound values DemoEmpBV1 and DemoEmpBV2 for trees under this tree structure.
When creating the tree structure FND_DEMO_EMP_TS, the following parameters must be added to the tree structure data source that corresponds to DemoEmpVO:
Parameter name: VIEW_CRITERIA_NAME
Parameter type: View Criteria
Parameter value: <name of the view criteria to be applied>, in this case DemoEmpVC1
The following two bindings also must be added:
Parameter names: DemoEmpBV1 and DemoEmpBV2
Parameter type: Bound Value
Parameter value: <actual value, which can be overridden at tree level>
Note:
Binding parameters are supported for String and Number data types only.
The following are examples of use cases and settings that you can implement using the parameter infrastructure for tree structure data sources.
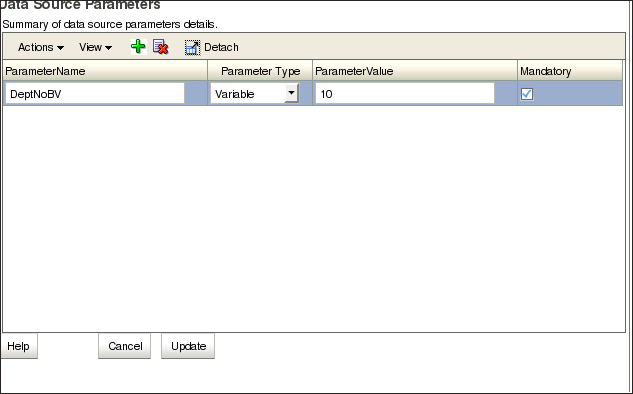
Data source having a view criteria defined with a bind variable:
Figure 19-6 Parameters in Data Source Parameter UI
Data source has a WHERE clause using a bind variable:
Figure 19-8 Parameters in Data Source Parameter UI
Data source has a view criteria defined with a bind variable for special parameters:
Figure 19-9 View Object Setup Wizard (View Criteria)
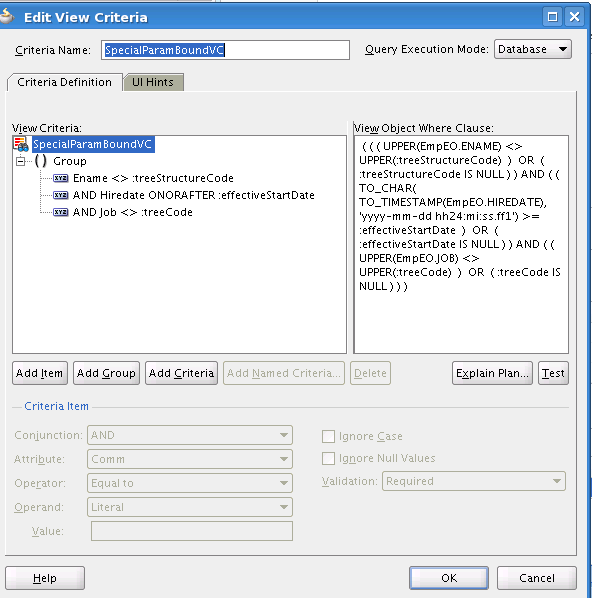
Figure 19-10 Parameters in Data Source Parameter UI
Data source has a WHERE clause using a bind variable for special parameters:
Figure 19-11 View Object Setup Wizard (WHERE Clause)
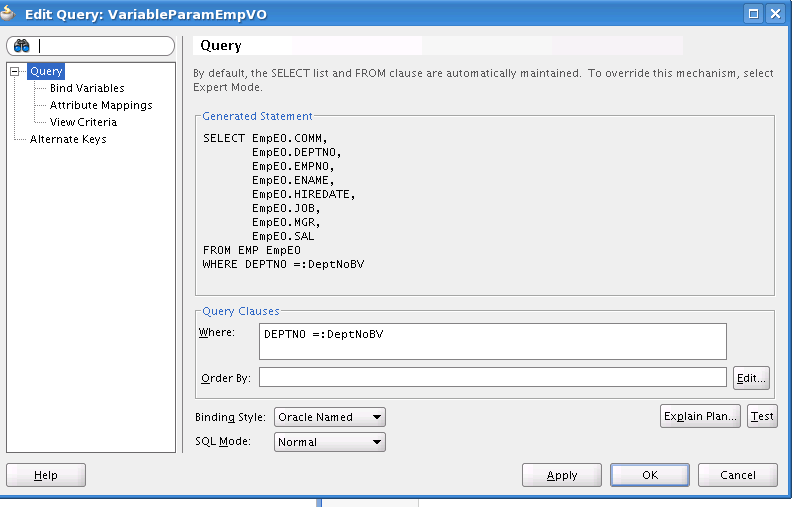
Figure 19-12 Parameters in Data Source Parameter UI
If you wish to duplicate, edit, or delete an existing tree structure and it is not currently visible in the results list, you can search for it using the following procedure. The procedure assumes that the Tree Structure summary page is open in your web browser.
To search for an existing tree structure:
In the Search area of the page, construct a search using any or all of the following search criteria:
Code
Name
Status
Click Search.
All tree structures matching your search criteria appear in the Results area of the page.
Click Advanced to perform an advanced search by specifying additional options for search. You also can save your search criteria for future use.
Throughout the trees application you will see a search field located to the right of many field names, as shown in Figure 19-13.
Click the down arrow to display a dropdown list that contains the available values for that field. You can select from the list, or search for other values. For example, Figure 19-14 shows the dropdown list that displays when you click the down arrow associated with the Application search field found on the Create Tree Structure: Specify Definition page.
From each search field dropdown list, you can do one of the following:
Select a value from the list that displays.
Click the Search link to search for a value that does not exist in the list.
If you select a value from the list, the dropdown list closes and that value appears in the search field.
If you click the Search link, a search-and-select window similar to the one shown in Figure 19-15 opens:
You now can search for a value and then click OK to select it.
The following procedure explains how to create a new tree structure. The procedure assumes that the Tree Structure summary page is open in your web browser.
To create a tree structure:
Click the Create icon, or choose Create from the Actions dropdown menu.
The Create Tree Structure: Specify Definition page, shown in Figure 19-16, opens.
Figure 19-16 Create Tree Structure: Specify Definition Page (1)
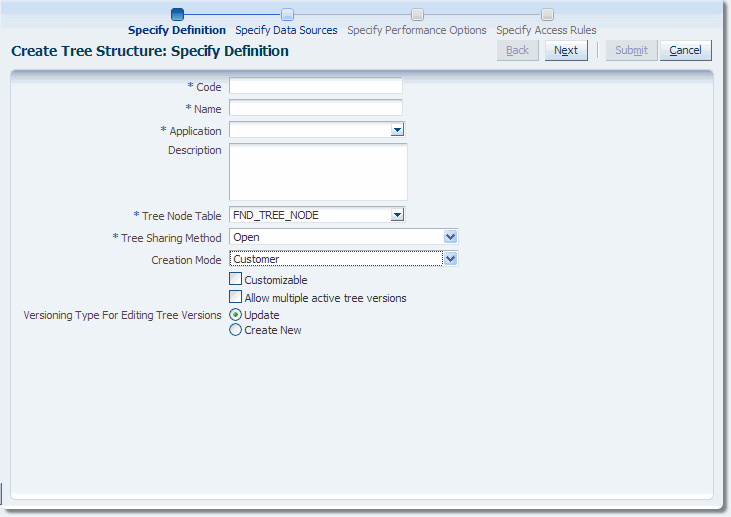
Enter a code for the tree structure.
The code can be any combination of alphanumeric characters, but cannot contain more than 30 characters. Codes are used in APIs to work with trees, and uniquely identify the tree structure metadata.
Enter a name for the tree structure.
The name is a user-friendly name for a tree structure. It appears only in graphical user interfaces (GUIs), and cannot contain more than 80 characters
Enter the name of an appropriate application, or click the down arrow to select or search for one.
Enter a description.
Enter the name of an appropriate tree node table, or click the down arrow to select or search for one.
If you enter the name of a custom tree node table or select a tree node table other than the FND_TREE_NODE default, the page re-displays with a new (optional) field asking you to enter a view object definition name for that custom tree node table. This field is shown in Figure 19-18.
Figure 19-17 Create Tree Structure: Specify Definition Page (2)
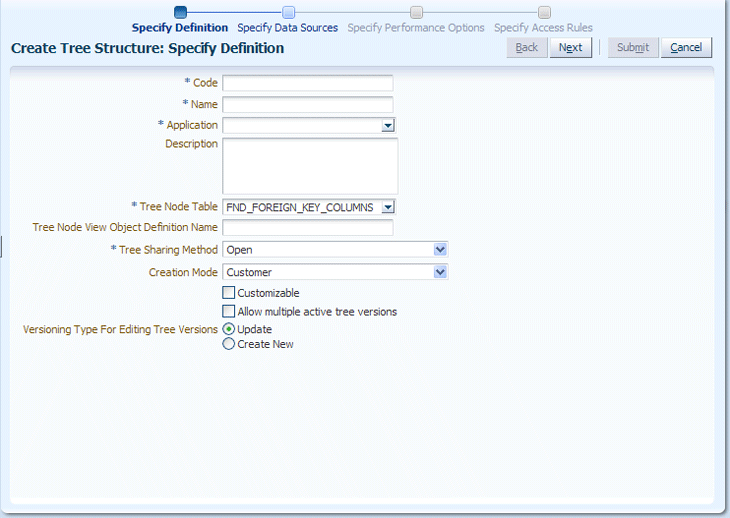
Select a tree-sharing method.
Open - indicates that the tree will be associated with all Set IDs
Set ID - indicates that the tree will be associated with a specific Set ID.
Select a creation mode:
Customer - indicates that the customer is creating the tree structure
Oracle - indicates that an Oracle developer is creating the tree structure.
Select Customizable if the tree structure can be customized by the customer.
Select Allow Multiple Active Tree Versions to allow two or more tree versions to be in an ACTIVE state for the same date range.
Select a versioning type for editing tree versions to specify whether the user is allowed to edit an active tree version or must create a new one.
Click Next.
The Create Tree Structure: Data Sources page, shown in Figure 19-18, opens.
Figure 19-18 Create Tree Structure: Specify Data Sources Page
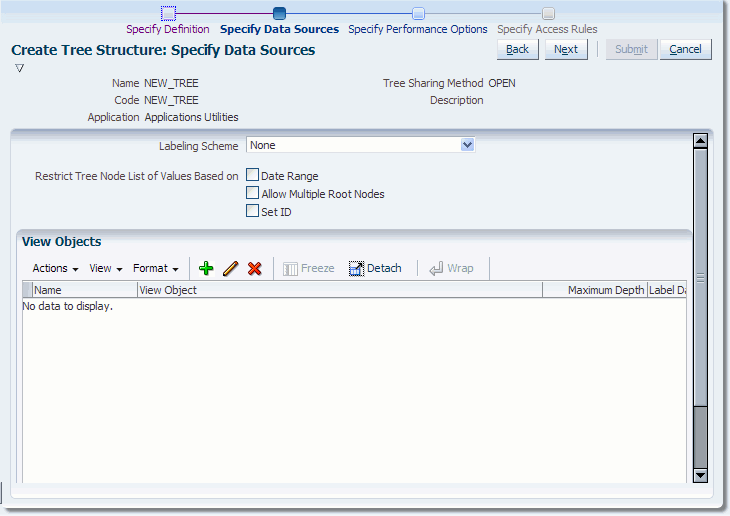
Select a labeling scheme:
None - Specifies that no labeling scheme will be used.
Level based - Specifies a label that points to a specific data source.
Group based - Specifies a label that the user can assign arbitrarily.
Depth based - Specifies a label that the depth-from-top parent decides to display. No manual assignment is performed.
If you choose a level-based, depth-based, or group-based labeling scheme, the Labeling Scheme area of the page changes, displaying additional options, as shown in Figure 19-19.
Figure 19-19 Additional Labeling Scheme Options

Select any or all of the following:
Date Range - Specifies whether a selection of nodes should be restricted to the same date range as the tree version.
Allow Multiple Root Nodes - Allows you to add multiple root nodes when creating a tree version.
Set ID - Specifies whether a selection of nodes should be restricted to the same set as the tree. (All versions belong to the same set.)
Allow Ragged Nodes (for Labeling Schemes Level based, Depth based, or Group based only) - Specifies whether a hierarchy can be unbalanced; that is, if it can contain nodes that are not leaf nodes and contain no children. In Figure 19-20, "ICs" does not have any children, making its rooted path shorter than all the others in the hierarchy.
Figure 19-20 Example of a Ragged Hierarchy

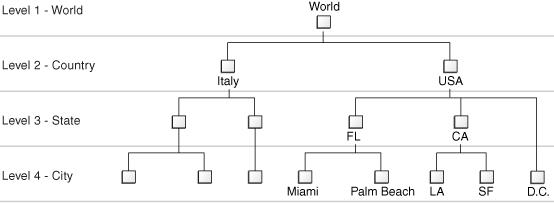
Allow Skip-Level Nodes (for Labeling Schemes Level based, Depth based, or Group based only) - Specifies whether a hierarchy can have two nodes at the same level with parent nodes at different levels. In Figure 19-21, Washington, DC, does not have a node at the State level.
Figure 19-21 Example of a Skip-Level Hierarchy
Optional Label Enforcement - Specifies whether label is enforced in the audit of the tree structure. By default, this option is not selected and specifying a label data source is enforced while adding a data source for the tree structure. Alternatively, if this option is selected, Label Data Source in the Add Data Source page is not an optional field.
Click the Add icon.
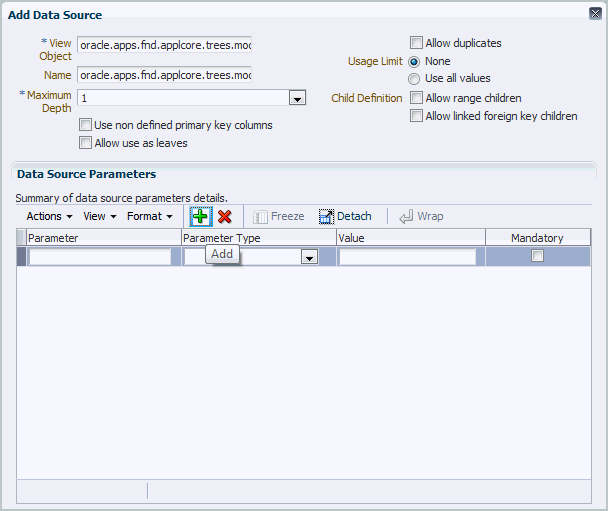
The Add Data Source window, shown in Figure 19-22, opens.
If you chose a level-based, depth-based, or group-based labeling scheme, the top portion of the page changes, displaying an additional Label Data Source field, as shown in Figure 19-23. The Label Data Source will be optional if Optional Label Enforcement option is selected, else this is a mandatory field.
Figure 19-23 Additional Add Data Source Field

Enter the name of the view object.
Optionally, enter a name.
If you do not enter a name, the same name as that of the view object is copied to this field and is used.
Select a maximum depth value from the dropdown list.
Maximum depth specifies how many levels are allowed. For example, in Project[max depth=2] > Task[max depth=infinite], one project, one sub-project, and an infinite number of tasks are allowed.
Enter the name of the label data source (for Level based, Depth based, or Group based labeling schemes only).
The view object oracle.apps.fnd.applcore.trees.model.view.FndLabelVO can be used as an ad-hoc label data source. For more information about label data sources, see Section 19.6, "Managing Labels in the Generic Label Data Source."
Select any or all of the following:
Use non defined primary key columns - indicates that you can specify other attributes as primary key columns. If not selected, existing primary keys defined as primary key columns for a data source view object will be used.
If selected, the additional fields shown in Figure 19-24 display.
Allow use as leaves - indicates that data from the data source can form a leaf
Allow duplicates - indicates that a data item can exist multiple times in the same hierarchy. For example, in an "Item" hierarchy for an automobile, a particular bolt may appear multiple times in the hierarchy.
Use as free node - indicates that this node can be used as a free node.
Select a Usage Limit:
None - Specifies that there are no restrictions.
Use all values - Specifies that all available nodes must be included in the tree version.
Select a Child Definition:
Allow range children - indicates that the hierarchy supports nodes that are a range of values.
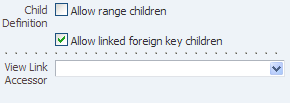
Allow linked foreign key children - indicates that the relationship is external to Tree Management.
If you select this option, you also can select a View Link Accessor value from the dropdown list that displays, as shown in Figure 19-25.
Figure 19-25 View Link Accessor Dropdown List
Click Add under Data Source Parameters.
The window now displays data source parameters text-entry fields, as shown in Figure 19-26.
Figure 19-26 Data Source Parameters Text-Entry Fields
Enter a parameter, select a parameter type, and enter a value.
When specified, a parameter applies to every version under that tree. Parameter values also can be overridden at the tree level. For more information, see Section 19.3.2, "How to Specify Data Source Parameters."
Select Mandatory if the parameter is to be required.
Click OK.
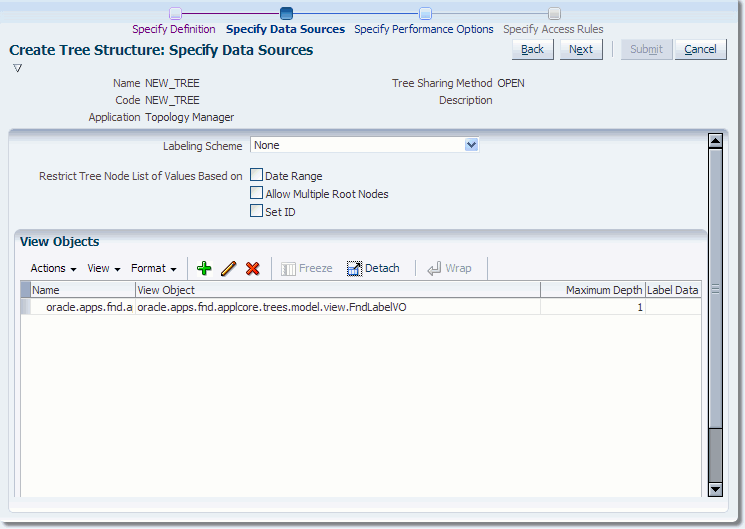
The Create Tree Structure: Specify Data Sources page refreshes, displaying the view object, as shown in Figure 19-27.
Figure 19-27 Create Tree Structure: Specify Data Sources Page with View Object
Click Next.
The Create Tree Structure: Specify Performance Options page opens, as shown in Figure 19-28.
Figure 19-28 Create Tree Structure: Specify Performance Options Page
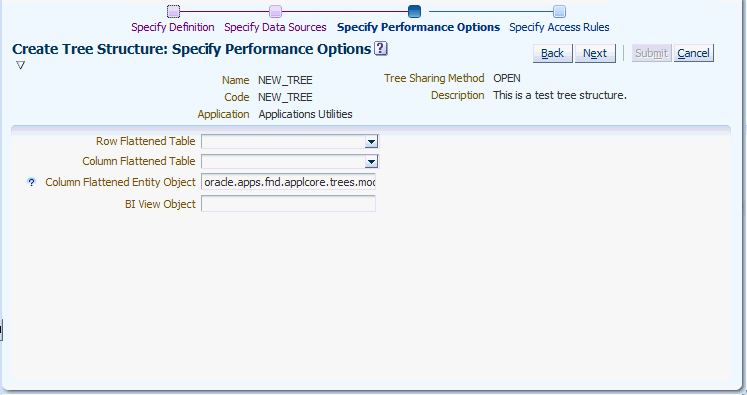
Enter the name of an appropriate row-flattened table or click the down arrow to select or search for one.
Enter the name of an appropriate column-flattened table or click the down arrow to select or search for one.
Enter the name of an appropriate column-flattened entity object if the field does not already contain one.
Enter the name of an appropriate BI View Object.
Click Next.
The Create Tree Structure: Specify Access Rules page opens.
Note:
The Create Tree Structure: Specify Access Rules page is not yet implemented.
Click Submit.
Click OK to close the Confirmation window.
The Create Tree Structure Confirmation Window opens, as shown in Figure 19-29.
Figure 19-29 Create Tree Structure Confirmation Window

Duplicating a tree structure simply copies the metadata definition from an existing tree structure to the duplicate. This operation does not copy the underlying tree and tree versions defined for the source tree structure.
To duplicate a tree structure:
Select the tree structure you want to duplicate.
See Section 19.3.3, "How to Search for a Tree Structure," if the tree structure you want to duplicate is not in the current Results list.
Click the Duplicate icon, or choose Duplicate from the Actions dropdown menu.
The Create Tree Structure window opens, as shown in Figure 19-30:
Figure 19-30 Create Tree Structure Window
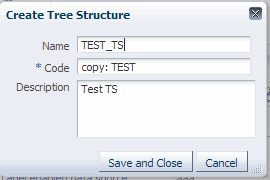
Enter a new name for the duplicate tree structure if you want to replace the name that already displays in the field.
Enter a duplicate tree structure code if you want to replace the code that already displays in the field.
Click Save and Close to create the duplicate.
When you edit an existing tree structure, you simply step through many of the same pages you used to create a tree structure.
To edit an existing tree structure:
Select the tree structure you want to edit.
See Section 19.3.3, "How to Search for a Tree Structure," if the tree structure you want to duplicate is not in the current Results list.
Do one of the following:
Click the Edit icon.
Choose Edit from the Actions dropdown menu.
Click the tree-structure name.
Edit the appropriate data on the Edit Tree Structure: Specify Definition page.
Click Next.
Do any of the following:
Edit the data on the Edit Tree Structure: Specify Data Sources page.
Click Add to add another view object.
Select an existing view object and click Edit to edit it.
Select an existing view object and click the Delete icon to delete it.
Click Next.
Edit the appropriate data on the Edit Tree Structure: Specify Performance Options page.
Click Next.
The Edit Tree Structure: Specify Access Rules page opens.
Note:
The Edit Tree Structure: Specify Access Rules page is not yet implemented.
Click Submit.
Click OK to close the Confirmation window.
Deleting a tree structure also deletes all associated tree and tree versions defined under that specific tree structure.
To delete a tree structure:
Select the tree structure you want to delete.
See Section 19.3.3, "How to Search for a Tree Structure," if the tree structure you want to delete is not in the current Results list.
Click Delete, or choose Delete from the Actions dropdown menu.
The Delete Tree Structure warning window opens, as shown in Figure 19-31:
Figure 19-31 Delete Tree Structure Warning Window
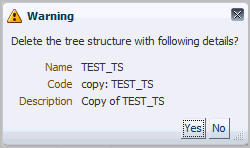
Do one of the following:
Click No to cancel the operation.
Click Yes to delete the tree structure.
Changing the status of a tree structure also changes the status of the trees and tree versions contained in that tree structure. You can set the status of a tree structure to any one of the following:
Draft
Active
Inactive
Setting a tree structure's status to Active automatically triggers an audit of that tree structure. See Section 19.3.10, "How to Audit a Tree Structure," for more information about auditing.
To set the status of a tree structure:
Select a tree structure.
See Section 19.3.3, "How to Search for a Tree Structure," if the tree structure is not in the current Results list.
Choose the appropriate status option from the Actions > Set Status dropdown menu.
Click OK to close the Warning window. The Warning window appears only when you want to set the status as Draft or Inactive.
Click OK to close the Confirmation window.
Auditing tree-structure metadata verifies that it conforms to all rules and ensures data integrity. Running an audit allows you to view audit details and messages, and to correct any validation errors that the audit detects.
Setting a tree structure's status to Active automatically triggers an audit of that tree structure. You also can audit a tree structure manually.
Table 19-3 describes what each validator checks for, as well as possible reasons why each validator might fail.
Table 19-3 Validator Descriptions
| Validator | Checks for... | Validation may have failed because... | To correct... |
|---|---|---|---|
|
Restrict by SetID Validator |
If the tree structure has Restrict Tree Node List of Values Based on SetID flag set to This restriction does not apply when the flag is set to |
The tree structure has Restrict Tree Node List of Values Based on SetID flag = |
Consult the owning developer. If SetID restriction is desired for this tree structure, ensure your developer has included a SetID attribute on all data sources. If SetID restriction is not desired, ensure your developer sets the flag to |
|
Row Flattened Table Name Validator |
A valid "Row Flattened Table" should be specified for the tree structure on the "Specify Performance Options" page. It can be the standard row flattened table |
|
Consult the owning developer to correct the row flattened table definition. |
|
Available Label Data Sources Validator |
If the tree structure has a Labeling Scheme specified, the label data source view object specified for each data source must be accessible and the primary keys must be valid. This restriction does not apply when the Labeling Scheme has been set to |
|
|
|
Available Data Sources Validator |
Each data source view object specified for the tree structure must be accessible and all its primary key attributes should be valid. |
|
|
|
Column Flattened Table Name Validator |
A valid "Column Flattened Table" should be specified for the tree structure on the "Specify Performance Options" page. It can be the standard row flattened table |
|
Consult the owning developer to correct the column flattened table definition. |
|
Restrict by Date Validator |
If the tree structure has Restrict Tree Node List of Values Based on Date flag set to This restriction does not apply when the flag is set to |
The tree structure has |
Consult the owning developer. If the date restriction is desired for this tree structure, ensure your developer has included an EffectiveStartDate and EffectiveEndDate attribute on all data sources. If the date restriction is not desired, ensure your developer sets the flag to |
|
Tree Node Table Name Validator |
A valid "Tree Node Table" should be specified for the tree structure on the "Specify Performance Options" page. It can be the standard row flattened table |
|
Consult the owning developer to correct the tree node table definition. |
|
Allow Node Level Security Validator |
If "Allow Node Level Security" flag is set to |
"Allow Node Level Security" flag is set as |
Consult the owning developer to correct the "Allow Node Level Security" flags in the tree structure and/or its data sources. |
To audit a tree structure manually:
Select a tree structure.
See Section 19.3.3, "How to Search for a Tree Structure," if the tree structure is not in the current Results list.
Choose Audit from the Actions dropdown menu.
The Tree Structure Audit Result page opens, as shown in Figure 19-32. The table displays a list of validations run against the selected tree structure.
Figure 19-32 Tree Structure Audit Result Page

The audit table contains the following columns:
Validator Name - Displays the name of the validator
Validation Result - Displays either a green check mark (success) or a red "X" (failure)
Validation Message - When clicked, displays a validation message and a description
Execute Validator - When clicked, reruns the selected validator.
Corrective Action - When clicked, opens the Edit Tree Structure: Specify Definition page, allowing you to fix a validation error
Click Done to return to the Tree Structure summary page.
When you work with trees, you can do any of the following:
Search
Create
Duplicate
Edit
Delete
You also can audit trees. For more information, see Section 19.5.9, "How to Audit Trees and Tree Versions."
If you wish to duplicate, edit, or delete an existing tree and it is not currently visible in the results list, you can search for it using the following procedure. The procedure assumes that the Tree summary page is open in your web browser.
To search for an existing tree:
In the Search area of the page, construct a search using any or all of the following search criteria:
Tree Structure Code
Tree Code
Tree Name
Click Search.
All trees matching your search criteria appear in the Results area of the page.
Click Advanced to perform an advanced search by specifying additional options for search. You also can save your search criteria for future use.
The following procedure explains how to create a tree. You will also need to create a tree version with a root node. For more information, see Section 19.5.1, "How to Create a Tree Version."
To create a tree:
Click Create, or choose Create Tree from the Actions dropdown menu.
The Create Tree: Specify Definition page opens, as shown in Figure 19-33.
Figure 19-33 Create Tree: Specify Definition Page
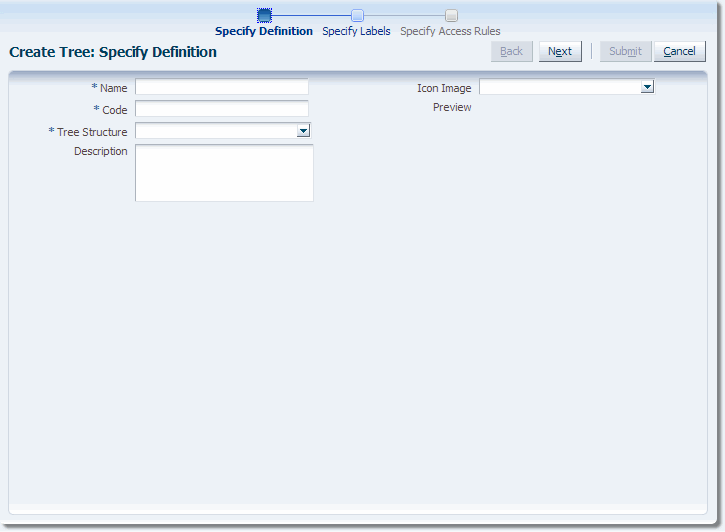
Enter a name for the tree.
Enter a code for the tree.
Enter a tree-structure name or click the down arrow to select or search for one.
If the tree structure has data sources and parameters defined for it, the Data Source Parameters area also displays, allowing you to edit the parameter values at the tree level.
Note:
Parameter values customized at the tree level will override the default values specified at the tree-structure level.
Enter a description of the tree.
Enter an image name or click the down arrow to select or search for one.
The image appears in the Preview area.
Click Next.
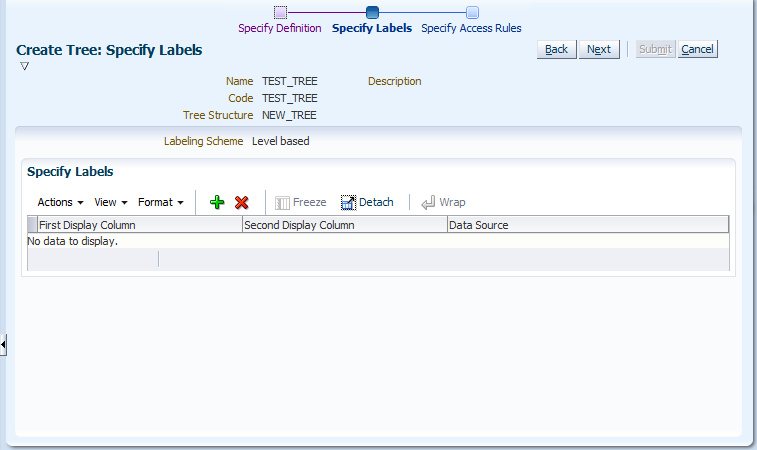
The Create Tree: Specify Labels page displays. The information that appears on the page depends on whether or not a labeling scheme has been selected previously. Figure 19-34 and Figure 19-35 show examples of both pages.
Figure 19-34 Create Tree: Specify Labels - No Labeling Scheme
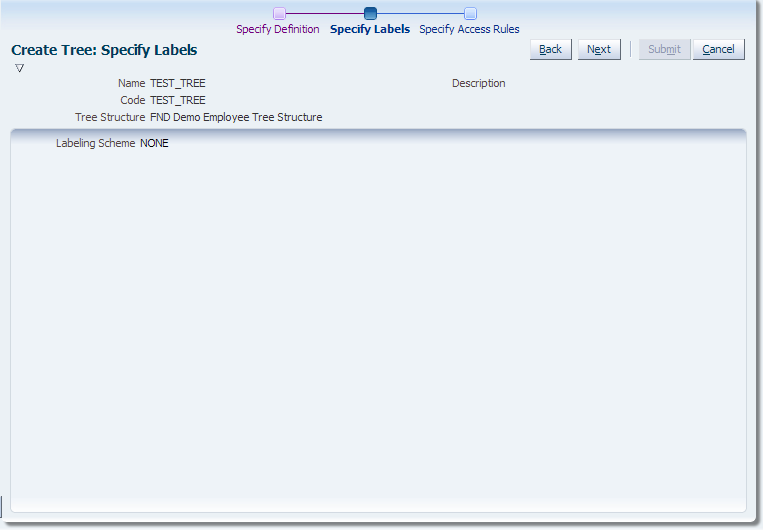
Figure 19-35 Create Tree: Specify Labels - Labeling Scheme Selected
If the page shown in Figure 19-34 opens, click Next and skip to Step 11.
If the page shown in Figure 19-35 opens, click Add in the Specify Labels area.
The Select and Add: Labels window opens, as shown in Figure 19-36.
Figure 19-36 Select and Add: Labels Window
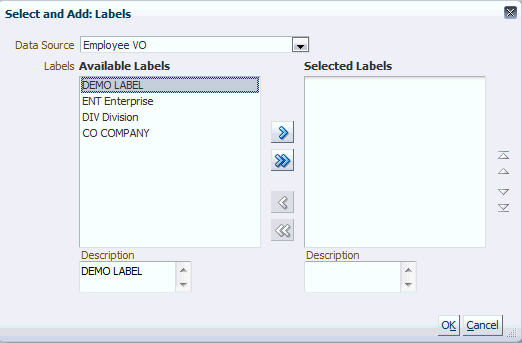
Choose a data source from the dropdown list.
Select the appropriate available labels and use the arrows to move them back and forth between the Available Labels and Selected Labels areas.
Click OK to accept your selections and close the window.
Do one of the following:
Click Cancel to abort the operation and return to the top-level Manage Trees and Tree Versions page.
Click Back to return to the previous page.
Click Next to continue to the Create Tree: Specify Access Rules page.
Note:
The Create Tree: Specify Access Rules page is not yet implemented.
Do one of the following:
Click Cancel to abort the operation and return to the Manage Trees and Tree Versions page.
Click Back to return to the previous page.
Click Submit to save the tree without creating a tree version and return to the top-level Manage Trees and Tree Versions page.
Click the down arrow next to Submit and select Submit and Add Version to save the tree and begin creating a tree version. For more information, see Section 19.5.1, "How to Create a Tree Version."
Duplicating a tree copies only the selected tree. The operation does not copy any of the underlying tree versions.
To duplicate a tree:
Select the tree you wish to duplicate.
See Section 19.4.1, "How to Search for a Tree," if the tree you want to duplicate is not in the current Results list.
Click Duplicate, or choose Duplicate from the Actions dropdown menu.
The Duplicate Tree window opens, as shown in Figure 19-37.
Enter a duplicate tree code.
Do one of the following:
Click Cancel to cancel the operation.
Click Save and Close to create the duplicate.
Click OK to close the Confirmation window.
When you edit an existing tree, you step through many of the same pages you used to create a tree.
To edit a tree:
Select the tree you wish to edit.
See Section 19.4.1, "How to Search for a Tree," if the tree you want to edit is not in the current Results list.
Click Edit, or choose Edit from the Actions dropdown menu.
The Edit Tree: Specify Definition page opens.
Do any of the following:
Edit the name of the tree.
Edit the description
Choose another icon image
Edit data-source-parameter values, if this option is available
Note:
If you change any parameter values, ensure that you click Actions > Save before clicking Next.
Click Next.
The Edit Tree: Specify Labels page opens. The page that displays depends on whether or not the tree structure used while creating the tree has a labeling scheme associated with it.
Note:
This procedure assumes that a labeling scheme is present. Skip to Step 6 if the tree you are editing has no labeling scheme associated with it.
Do either of the following:
Click Add to open the Select and Add: Labels window and add a new label.
For more information, see Section 19.4.2, "How to Create a Tree."
Select a label and click Delete to delete it.
Click Next.
The Edit Tree: Specify Access Rules page opens.
Note:
The Edit Tree: Access Rules page is not yet implemented.
Review the data and then do one of the following:
Click Submit and then click OK to close the Confirmation window.
Click the arrow to the right of Submit and select Submit and Add Version from the dropdown list to display the Create Tree Version: Specify Definition page.
Follow the steps in Section 19.5.1, "How to Create a Tree Version," to create a new tree version.
When you delete a tree, you also delete the tree versions the tree contains.
To delete a tree:
Select the tree you wish to delete.
See Section 19.4.1, "How to Search for a Tree," if the tree you want to delete is not in the current Results list.
Click Delete, or choose Delete from the Actions dropdown menu.
Click Yes to confirm the deletion.
When you work with tree versions, you can do any of the following:
Search
Create
Add nodes to a tree version
Edit existing nodes
Drag and drop nodes to move them
Perform CRUD Operations on Tree Nodes using APIs
Perform Sub-tree Node Operations using PL/SQL APIs
Create a new record for a data source
Duplicate
Edit
Delete
Set tree version status
Audit tree versions
Trees require tree versions. You can create a tree with no tree version, but you must add at least one tree version to the tree after it has been created. You either can create the tree version during the tree-creation process, or by editing an existing tree.
To create a tree version:
This procedure assumes you are editing an existing tree.
Select the tree to which you want to add a tree version from the list of trees that appears in the Results list.
See Section 19.4.1, "How to Search for a Tree" if the tree is not in the current Results list.
Do one of the following:
Select Actions > Create Tree Version.
Choose Create Tree Version from the Create dropdown list
The Create Tree Version: Specify Definition page, shown in Figure 19-38, opens.
Figure 19-38 Create Tree Version: Specify Definition Page
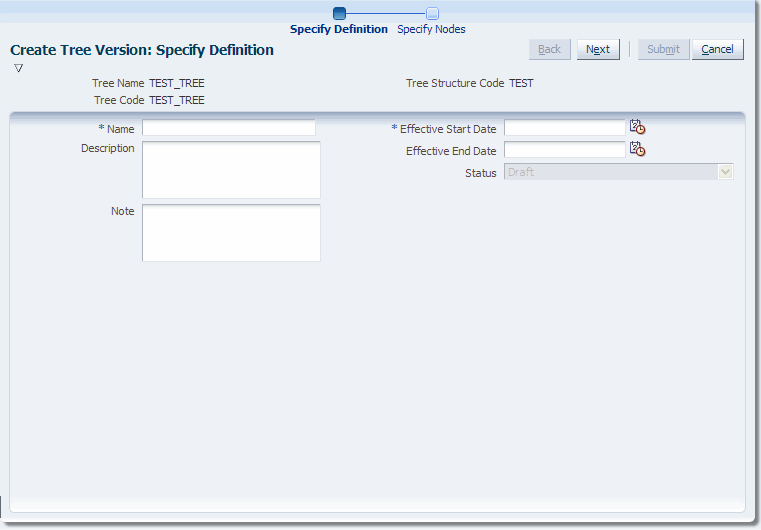
Enter a name for the tree version.
Enter a description of the tree version.
Enter a note, if you have one.
Enter an effective start date or click on the calendar icon to select one.
Enter an effective end date or click on the calendar icon to select one.
Note:
Since tree versions are time based, you must select a start date. Selecting an end date is optional.
Click Next.
A tree version with no nodes is created automatically at this point. Procedures for adding nodes to the tree version are described in Section 19.5.2, "How to Add Tree Nodes to a Tree Version".
Click OK to close the Confirmation window.
The Create Tree Version: Specify Nodes page displays, as shown in Figure 19-39.
Figure 19-39 Create Tree Version: Specify Nodes Page
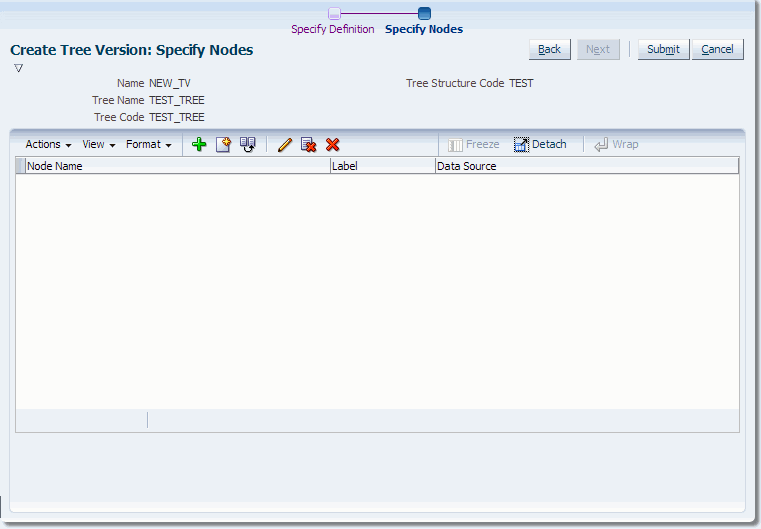
Do one of the following:
Click Add to add a tree node.
Click Create to create a new node in the data source and add it to the hierarchy. For more information, see Section 19.5.3, "How to Create a Record for a Data Source."
The Add Tree Node window opens, as shown in Figure 19-40.
Figure 19-40 Add Tree Node: Specific Values
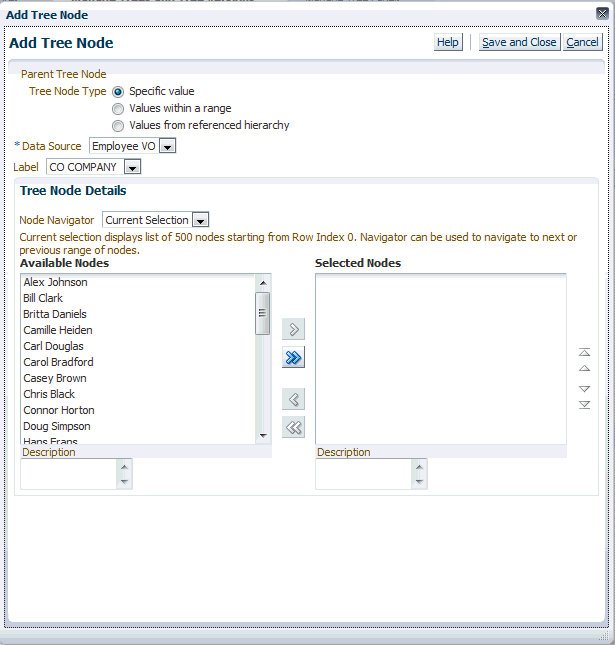
Note:
This is the default window that appears while adding a node.
Select a node type:
Specific Value - Indicates that a data source and label will be specified for the node. A data source is required for all labeling schemes. A label is required only if the labeling scheme is set to something other than None. If the labeling scheme is None, a label is not required.
To configure this page's options, see Section 19.5.2.1, "How to Configure the Add Tree Node: Specific Values."
Values within a range - Indicates that the node represents a range of values.
Note:
This option appears only if Children Definition: Allow range children has been selected on the Choose Data Source and Parameters window.
If you are adding a root node that you want to specify as range-based node, make sure you have selected Allow Multiple Root Nodes for the underlying tree structure on the Create Tree Structure: Data Sources page.
If you select this option, the window shown in Figure 19-41 replaces the default Add Tree Node window.
Figure 19-41 Add Tree Node: Values Within a Range
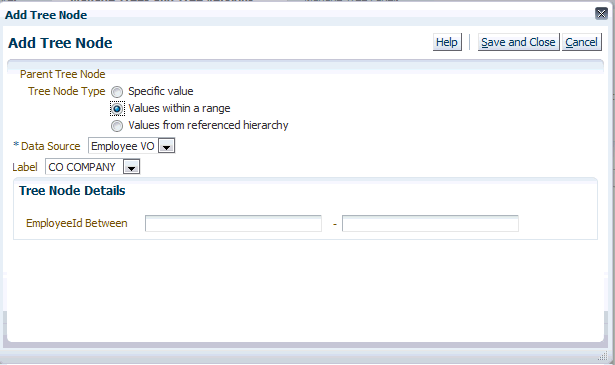
To configure this page's options, see Section 19.5.2.2, "How to Configure the Add Tree Node: Values Within a Range."
Values from referenced hierarchy - Indicates that the node is a referenced tree node. This option creates a pointer to a tree and node that already exist. Referenced tree nodes do not require a data source and do not allow labeling.
If you select this option, the window shown in Figure 19-42 replaces the default Add Tree Node window.
Figure 19-42 Add Tree Node: Referenced Hierarchy
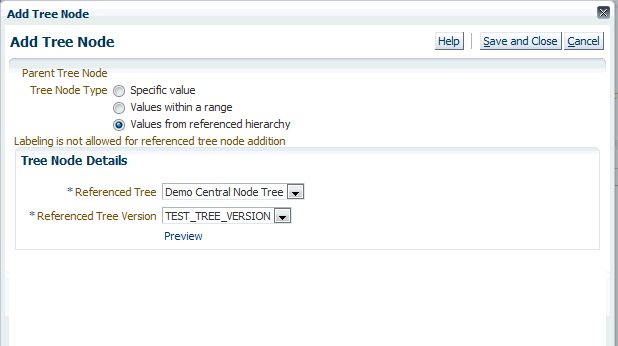
To configure referenced-tree options, see Section 19.5.2.3, "How to Configure the Add Tree Node: Referenced Hierarchy."
Click Save and Close to add the node(s).
Click Submit to add the new tree version.
Tree nodes are elements in a tree structure. A tree version must contain at least one root node. If specified, a tree version also can contain multiple root nodes. A node can be the parent of another node if it is one step higher in the hierarchy and closer to the root node.
There are three types of tree nodes:
Those with specific values
Those that have a range of values
Those that have values from a referenced tree
Each type of node has its own configuration options. In addition, you can add tree nodes using a custom Search UI, use drag-and-drop to move nodes once they have been added, and edit existing nodes.
The procedures used to perform these tasks are described in the sections that follow.
The following procedure explains how to configure the Add Tree Node options when the Specific Value node type has been selected.
To configure specific values:
This procedure assumes that the Add Tree Node window shown in Figure 19-40 is open.
Select a data source.
If applicable, select a label.
Select an option from the Node Navigator. The navigator enables you to access other available nodes.
Select a root node from the Available Nodes list.
Click the single Move arrow to move the node to the Selected Nodes area.
Note:
If the tree structure allows multiple root nodes to be selected, use the single or double Move arrows to move additional nodes.
Click Save and Close.
The Add Tree Node window closes.
Figure 19-43 shows the root node that has been created.
Optionally, do one of the following:
Highlight the root node and click Add to add a child node, using the same steps listed in this section.
Click Create to create a new node in the data source. For more information, see Section 19.5.3, "How to Create a Record for a Data Source."
Review the data and click Submit.
Click OK to close the Confirmation window.
The following procedure explains how to configure the Add Tree Node options when the Values within a range node type has been selected.
To configure values within a range:
This procedure assumes that the Add Tree Node window shown in Figure 19-41 is open.
Select a data source.
Enter a range of values.
Click Save and Close.
The Add Tree Node window closes.
Figure 19-44 shows data based on a range of values.
Review the data and click Submit.
Click OK to close the Confirmation window.
The following procedure explains how to configure the Add Tree Node options when the Values from a referenced hierarchy node type has been selected.
To configure values from a referenced hierarchy:
This procedure assumes that the Add Tree Node window shown in Figure 19-42 is open.
Select a referenced tree.
Select a referenced tree version.
Note:
The referenced tree and tree version must belong to the same tree structure.
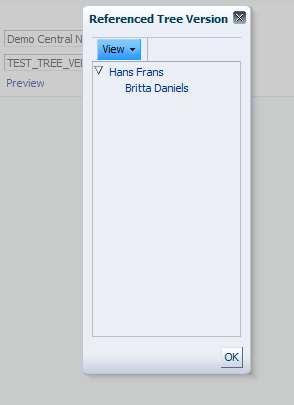
Optionally, click the Preview link to ensure you have specified the correct referenced tree version for the selected referenced tree. Figure 19-45 shows the window that displays. Confirm the data and click OK to close the window.
Figure 19-45 Preview Referenced Tree Version
Click Save and Close.
The Add Tree Node window closes and the Create Tree Version: Specify Nodes page refreshes with the referenced-node data, as shown in Figure 19-46.
Review the data and click Submit.
Click OK to close the Confirmation window.
Once you have added value-based nodes to a tree version, you can move these nodes around simply by dragging and dropping them.
You can move individual nodes, an entire range of nodes, or an entire referenced node. You cannot, however, move a single node in a range of nodes or a single node in a referenced node.
If the Search UI is not registered for a data source, the default behavior for all nodes displayed in the Add Tree Node window will be used. However, if you register your own Search UI, it will be used to add and select value nodes instead of the default Search UI.
To add a node using a custom Search UI:
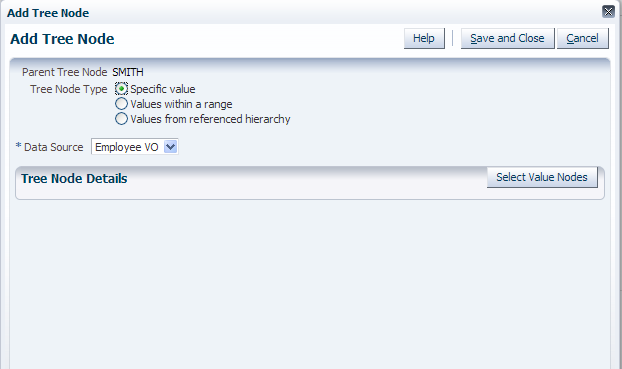
The procedures for adding a node using a custom Search UI are the same as those found in Section 19.5.2, "How to Add Tree Nodes to a Tree Version." However, the Add Tree Node window that displays will be the registered custom Search UI rather than the default UI. An example of such a UI is shown in Figure 19-47. Note that Select Value Nodes has replaced the default Node Navigator, Available Nodes, and Selected Nodes options.
Figure 19-47 Custom Search UI: Specific Values
You can edit any existing tree node's details.
To edit a tree node:
This procedure assumes that the Manage Trees and Tree Versions page is open.
Select a tree version and do one of the following:
Click Edit.
Choose Edit from the Actions dropdown list.
Click Next on the Edit Tree Version: Specify Definition page to skip to the Edit Tree Version: Specify Nodes page.
Highlight the node you wish to edit and click Edit. The Edit Tree Node window, shown in Figure 19-48, opens.
Note:
The window opens with the default Specific value tree node type selected. You also can edit the node using the other tree node types. For more information, see Section 19.5.2, "How to Add Tree Nodes to a Tree Version."
Figure 19-48 Edit Tree Node: Specific Value
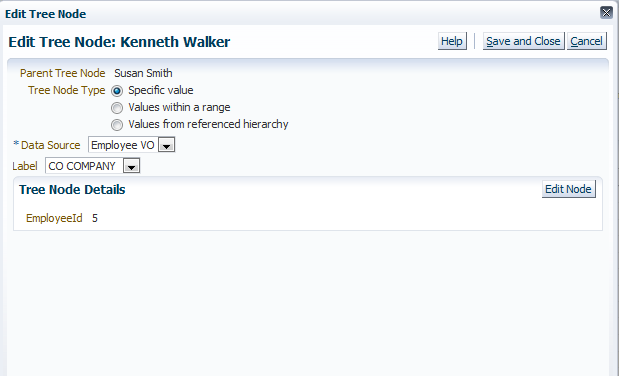
Select a data source and click Edit Node. The Edit Node window, shown in Figure 19-49, opens.
Note:
The actual name of the window depends on the node being edited.
Edit the appropriate details and click Submit.
You can create a record for a data source "on the fly" and add it to the hierarchy. Doing so calls the custom UI you registered with the data source.
You can create a record either when creating a tree version or when editing an existing one.
To create a new data-source record:
This procedure assumes the following:
You are editing an existing tree version
The tree version does not allow multiple root nodes
Select the tree version for which you want to create the record and click Edit.
Click Next to access the Edit Tree Version: Specify Nodes window.
Highlight an existing node and click Create. The Create Tree Node window displays, as shown in Figure 19-50.
Select a data source and click Continue. The Create New Record window, shown in Figure 19-51, opens.
Note:
The actual name of the window depends on the node being created.
Figure 19-51 Create New Record for Data Source
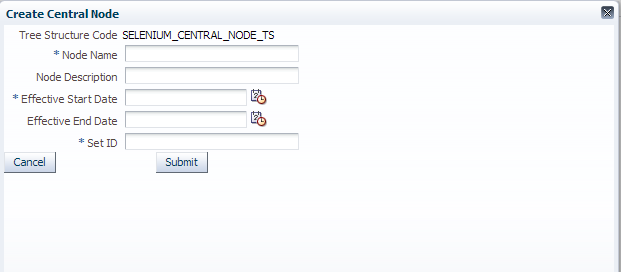
Enter the appropriate information and click Submit.
The Create Tree Node confirmation window, shown in Figure 19-52, displays.
Figure 19-52 Create Tree Node Confirmation
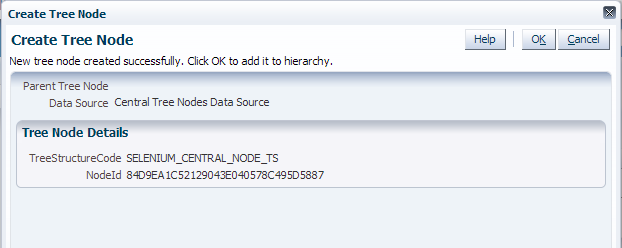
Click OK to close the window.
The following procedure explains how to duplicate a tree version.
To duplicate a tree version:
Select a tree version.
Click Duplicate, or choose Duplicate from the Actions dropdown menu.
The Duplicate Tree Version window, shown in Figure 19-53, opens.
Figure 19-53 Duplicate Tree Version Window
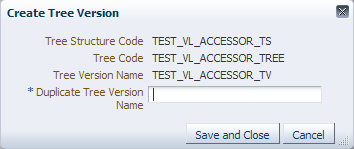
Enter a duplicate tree version name.
Do one of the following:
Click Cancel to cancel the operation.
Click Save and Close to duplicate the tree version.
Click OK to close the Confirmation window.
The following procedure explains how to edit a tree version.
To edit a tree version:
Select a tree version.
Click Edit, or choose Edit from the Actions dropdown menu.
The Edit Tree Version: Specify Definition page, shown in Figure 19-54, opens:
Figure 19-54 Edit Tree Version: Specify Definition Page
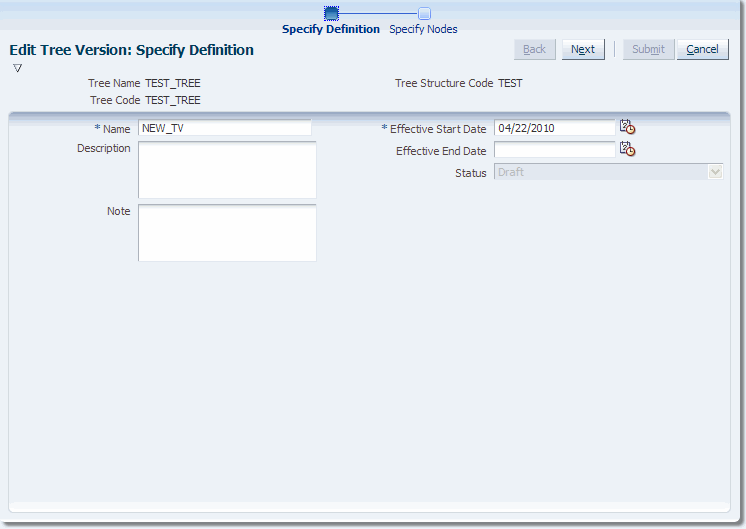
Use the steps in Section 19.5.1, "How to Create a Tree Version" as a guide to editing the tree version.
This section describes the APIs that allow you to perform Create, Read, Update, and Delete (CRUD) operations on the Tree Nodes. These APIs do not commit for each CRUD operation, but give you the control to decide whether to commit or not.
The APIs are listed below:
add_value_tree_node
This API allows you to add a primary key value based tree node.
Table 19-4 add_value_tree_node API Parameters
| Parameter | Description | Datatype | Mandatory/Optional |
|---|---|---|---|
|
p_tree_structure_code |
Code of the tree structure |
VARCHAR2 |
Mandatory |
|
p_tree_code |
Code of the tree |
VARCHAR2 |
Mandatory |
|
p_tree_version_id |
ID of the tree version |
VARCHAR2 |
Mandatory |
|
p_parent_tree_node_id |
ID of the parent tree node |
VARCHAR2 |
Mandatory |
|
p_data_source_id |
ID of the data source |
VARCHAR2 |
Mandatory |
|
p_pk1_value |
Value of PK1 |
VARCHAR2 |
Mandatory |
|
p_pk2_value |
Value of PK2 |
VARCHAR2 |
Mandatory |
|
p_pk3_value |
Value of PK3 |
VARCHAR2 |
Mandatory |
|
p_pk4_value |
Value of PK4 |
VARCHAR2 |
Mandatory |
|
p_pk5_value |
Value of PK5 |
VARCHAR2 |
Mandatory |
|
p_tree_label_id |
ID of the tree label |
VARCHAR2 |
Mandatory |
|
p_commit_flag |
Commit flag |
VARCHAR2 |
Optional Default value is Yes. If commit flag is passed as "N", the control to commit is handed over to the API call. |
|
x_tree_node_id |
ID of the tree node |
VARCHAR2 |
Optional |
add_range_tree_node
This API allows you to add a primary key range based tree node.
Table 19-5 add_range_tree_node API Parameters
| Parameter | Description | Datatype | Mandatory/Optional |
|---|---|---|---|
|
p_tree_structure_code |
Code of the tree structure |
VARCHAR2 |
Mandatory |
|
p_tree_code |
Code of the tree |
VARCHAR2 |
Mandatory |
|
p_tree_version_id |
ID of the tree version |
VARCHAR2 |
Mandatory |
|
p_parent_tree_node_id |
ID of the parent tree node |
VARCHAR2 |
Mandatory |
|
p_data_source_id |
ID of the data source |
VARCHAR2 |
Mandatory |
|
p_pk1_start_value |
Start value of PK1 |
VARCHAR2 |
Mandatory |
|
p_pk2_start_value |
Start value of PK2 |
VARCHAR2 |
Mandatory |
|
p_pk3_start_value |
Start value of PK3 |
VARCHAR2 |
Mandatory |
|
p_pk4_start_value |
Start value of PK4 |
VARCHAR2 |
Mandatory |
|
p_pk5_start_value |
Start value of PK5 |
VARCHAR2 |
Mandatory |
|
p_pk1_end_value |
End value of PK1 |
VARCHAR2 |
Mandatory |
|
p_pk2_end_value |
End value of PK2 |
VARCHAR2 |
Mandatory |
|
p_pk3_end_value |
End value of PK3 |
VARCHAR2 |
Mandatory |
|
p_pk4_end_value |
End value of PK4 |
VARCHAR2 |
Mandatory |
|
p_pk5_end_value |
End value of PK5 |
VARCHAR2 |
Mandatory |
|
p_tree_label_id |
ID of the tree label |
VARCHAR2 |
Mandatory |
|
p_commit_flag |
Commit flag |
VARCHAR2 |
Optional Default value is Yes. If commit flag is passed as "N", the control to commit is handed over to the API call. |
|
x_tree_node_id |
ID of the tree node |
VARCHAR2 |
Optional |
add_tree_tree_node
This API allows you to add a reference tree-based tree node.
Table 19-6 add_tree_tree_node API Parameters
| Parameter | Description | Datatype | Mandatory/Optional |
|---|---|---|---|
|
p_tree_structure_code |
Code of the tree structure |
VARCHAR2 |
Mandatory |
|
p_tree_code |
Code of the tree |
VARCHAR2 |
Mandatory |
|
p_tree_version_id |
ID of the tree version |
VARCHAR2 |
Mandatory |
|
p_parent_tree_node_id |
ID of the parent tree node |
VARCHAR2 |
Mandatory |
|
p_reference_tree_code |
Code of the reference tree |
VARCHAR2 |
Mandatory |
|
p_reference_tree_version_id |
ID of the reference tree version |
VARCHAR2 |
Mandatory |
|
p_tree_label_id |
ID of the tree label |
VARCHAR2 |
Mandatory |
|
p_commit_flag |
Commit flag |
VARCHAR2 |
Optional Default value is Yes. If commit flag is passed as "N", the control to commit is handed over to the API call. |
|
x_tree_node_id |
ID of the tree node |
VARCHAR2 |
Optional |
delete_tree_node
This API allows you to delete a node. All children of the node that is being deleted are promoted as children of its parents node.
Table 19-7 delete_tree_node API Parameters
| Parameter | Description | Datatype | Mandatory/Optional |
|---|---|---|---|
|
p_tree_structure_code |
Code of the tree structure |
VARCHAR2 |
Mandatory |
|
p_tree_code |
Code of the tree |
VARCHAR2 |
Mandatory |
|
p_tree_version_id |
ID of the tree version |
VARCHAR2 |
Mandatory |
|
p_tree_node_id |
ID of the tree node |
VARCHAR2 |
Mandatory |
|
p_commit_flag |
Commit flag |
VARCHAR2 |
Optional Default value is Yes. If commit flag is passed as "N", the control to commit is handed over to the API call. |
update_tree_node
This API allows you to update a tree node.
Table 19-8 update_tree_node API Parameters
| Parameter | Description | Datatype | Mandatory/Optional |
|---|---|---|---|
|
p_tree_structure_code |
Code of the tree structure |
VARCHAR2 |
Mandatory |
|
p_tree_code |
Code of the tree |
VARCHAR2 |
Mandatory |
|
p_tree_version_id |
ID of the tree version |
VARCHAR2 |
Mandatory |
|
p_tree_node_id |
ID of the tree node |
VARCHAR2 |
Mandatory |
|
p_parent_tree_node_id |
ID of the parent tree node. As of now, this API does not allow you to change the parent node. Hence, this parameter is ignored. |
VARCHAR2 |
Mandatory |
|
p_data_source_id |
ID of the data source |
VARCHAR2 |
Mandatory |
|
p_pk1_start_value |
Start value of PK1 |
VARCHAR2 |
Mandatory |
|
p_pk2_start_value |
Start value of PK2 |
VARCHAR2 |
Mandatory |
|
p_pk3_start_value |
Start value of PK3 |
VARCHAR2 |
Mandatory |
|
p_pk4_start_value |
Start value of PK4 |
VARCHAR2 |
Mandatory |
|
p_pk5_start_value |
Start value of PK5 |
VARCHAR2 |
Mandatory |
|
p_pk1_end_value |
End value of PK1 |
VARCHAR2 |
Mandatory |
|
p_pk2_end_value |
End value of PK2 |
VARCHAR2 |
Mandatory |
|
p_pk3_end_value |
End value of PK3 |
VARCHAR2 |
Mandatory |
|
p_pk4_end_value |
End value of PK4 |
VARCHAR2 |
Mandatory |
|
p_pk5_end_value |
End value of PK5 |
VARCHAR2 |
Mandatory |
|
p_reference_tree_code |
Code of the reference tree |
VARCHAR2 |
Mandatory |
|
p_reference_tree_version_id |
ID of the reference tree version |
VARCHAR2 |
Mandatory |
|
p_tree_label_id |
ID of the tree label |
VARCHAR2 |
Mandatory |
|
p_commit_flag |
Commit flag |
VARCHAR2 |
Optional Default value is Yes. If commit flag is passed as "N", the control to commit is handed over to the API call. |
move_tree_node
This API allows you to move a tree node under a new parent.
Table 19-9 move_tree_node API Parameters
| Parameter | Description | Datatype | Mandatory/Optional |
|---|---|---|---|
|
p_tree_structure_code |
Code of the tree structure |
VARCHAR2 |
Mandatory |
|
p_tree_code |
Code of the tree |
VARCHAR2 |
Mandatory |
|
p_tree_version_id |
ID of the tree version |
VARCHAR2 |
Mandatory |
|
p_tree_node_id |
ID of the tree node |
VARCHAR2 |
Mandatory |
|
p_dest_parent_tree_node_id |
ID of the destination parent tree node |
VARCHAR2 |
Mandatory |
|
p_commit_flag |
Commit flag |
VARCHAR2 |
Optional Default value is Yes. If commit flag is passed as "N", the control to commit is handed over to the API call. |
PL/SQL APIs allow you to move, copy, and remove sub-tree nodes. The following are the PL/SQL APIs that allow you to perform the operations:
move_sub_tree_node
This API allows you to move a given node along with its descendants from one hierarchy version to another hierarchy or within the same hierarchy tree version. The destination hierarchy can belong to same tree code or a different tree code belonging to same tree structure. When move_sub_tree_node operation happens across the hierarchy or within the same hierarchy, flattening logs will be reset to ensure that next run of flattening generates accurate flattening data. A tree node id pointing to details of new subtree in destination hierarchy will be returned.
Table 19-10 move_sub_tree_node API Parameters
| Parameter | Description | Datatype | Mandatory/Optional |
|---|---|---|---|
|
p_tree_structure_code |
Code of the tree structure |
VARCHAR2 |
Mandatory |
|
p_tree_code |
Code of the tree |
VARCHAR2 |
Mandatory |
|
p_tree_version_id |
ID of the tree version |
VARCHAR2 |
Mandatory |
|
p_tree_node_id |
ID of the tree node |
VARCHAR2 |
Mandatory |
|
p_dest_parent_tree_node_id |
ID of the destination parent tree node |
VARCHAR2 |
Mandatory |
|
p_dest_tree_version_id |
ID of the destination parent tree version |
VARCHAR2 |
Mandatory |
|
p_dest_tree_code |
Destination tree code |
VARCHAR2 |
Mandatory |
|
p_commit_flag |
Commit flag |
VARCHAR2 |
Optional Default value is Yes. If commit flag is passed as "N", the control to commit is handed over to the API call. |
|
x_tree_node_id |
ID of the tree node |
VARCHAR2 |
Optional |
copy_sub_tree_node
This API allows you to copy a given node along with its descendants within the same hierarchy tree version. The tree version must allow duplicates for the copy operation to be successful. The destination hierarchy can belong to same tree code or a different tree code belonging to same tree structure. When copy_sub_tree_node operation happens, flattening logs will be reset to ensure that next run of flattening generates accurate flattening data. A tree node id pointing to details of new subtree in destination hierarchy will be returned.
Table 19-11 copy_sub_tree_node API Parameters
| Parameter | Description | Datatype | Mandatory/Optional |
|---|---|---|---|
|
p_tree_structure_code |
Code of the tree structure |
VARCHAR2 |
Mandatory |
|
p_tree_code |
Code of the tree |
VARCHAR2 |
Mandatory |
|
p_tree_version_id |
ID of the tree version |
VARCHAR2 |
Mandatory |
|
p_tree_node_id |
ID of the tree node |
VARCHAR2 |
Mandatory |
|
p_dest_parent_tree_node_id |
ID of the destination parent tree node |
VARCHAR2 |
Mandatory |
|
p_dest_tree_version_id |
ID of the destination parent tree version |
VARCHAR2 |
Mandatory |
|
p_dest_tree_code |
Destination tree code |
VARCHAR2 |
Mandatory |
|
p_commit_flag |
Commit flag |
VARCHAR2 |
Optional Default value is Yes. If commit flag is passed as "N", the control to commit is handed over to the API call. |
|
x_tree_node_id |
ID of the tree node |
VARCHAR2 |
Optional |
remove_sub_tree_node
This API allows you to remove a given node along with its descendants from any hierarchy. When remove_sub_tree_node operation happens, all the descendants will be deleted.
Table 19-12 remove_sub_tree_node API Parameters
| Parameter | Description | Datatype | Mandatory/Optional |
|---|---|---|---|
|
p_tree_structure_code |
Code of the tree structure |
VARCHAR2 |
Mandatory |
|
p_tree_code |
Code of the tree |
VARCHAR2 |
Mandatory |
|
p_tree_version_id |
ID of the tree version |
VARCHAR2 |
Mandatory |
|
p_tree_node_id |
ID of the tree node |
VARCHAR2 |
Mandatory |
|
p_commit_flag |
Commit flag |
VARCHAR2 |
Optional Default value is Yes. If commit flag is passed as "N", the control to commit is handed over to the API call. |
Although trees do not have status, tree versions do. You can set tree version status to any one of the following:
Draft
Active
Inactive
To activate a tree version, the tree version's tree structure must already be in Active status.
Setting a tree version's status to Active automatically triggers an audit of that tree structure. For more information, see Section 19.5.9, "How to Audit Trees and Tree Versions."
To set the status of a tree version:
Select a tree version.
Choose the appropriate status option from the Actions > Set Status dropdown menu.
Click OK to close the Confirmation window.
Auditing tree and tree version data verifies that it conforms to all rules and ensures data integrity. Running audits allow you to view audit details and messages, and to correct any validation errors that the audit detects. There are three ways to run an audit:
Run an immediate audit
Schedule an audit
Trigger an audit through a service API
Table 19-13 describes what each validator checks for, as well as possible reasons why each validator might fail.
Table 19-13 Validator Descriptions
| Validator | Checks for... | Validation may have failed because... | To correct... |
|---|---|---|---|
|
Effective Date Validator |
The effective start and end dates of the tree version should be valid. |
Effective end date is set to a value that is not greater than effective start date. |
Modify the effective start and/or end dates so that effective start date falls before effective end date. |
|
Root Node Validator |
If Allow Multiple Root Nodes flag on the tree structure has been set to If the flag has been set to |
Allow Multiple Root Nodes flag has been set to |
Modify the tree version so that there is exactly one root node. |
|
Data Source Max Depth Validator |
For each data source in the tree structure, if the data source is depth-limited, the data in the tree version must adhere to the specified depth limit. This restriction does not apply to data sources that have no depth restriction (depth = -1 means unlimited depth). |
Tree version has data at a depth greater than the specified depth limit on one or more data sources. |
Modify the tree version so that all nodes are at a depth that complies with the data source depth limit. |
|
Duplicate Node Validator |
If Allow Duplicate Nodes flag on the data source has been set to If the flag has been set to |
Your tree version contains duplicate nodes with the same primary key. |
Remove any duplicate nodes from the tree version. |
|
Available Node Validator |
All the nodes in the tree version should be valid and available in the underlying data source. |
|
|
|
Node Relationship Validator |
All nodes should adhere to the relationships mandated by the data sources registered in the tree structure. |
The tree structure has data sources arranged in a parent-child relationship, but the nodes in the tree do not adhere to the same parent-child relationship. For example, if the tree structure has a Project data source with a Task data source as its child, Task nodes should always be under Project nodes in the tree version. This validator will fail if there are instances where a Project node. has been added as a child of a Task node. |
Modify the tree version so that the nodes adhere to the same parent-child relationships as the data sources. |
|
SetID Restricted Node Validator |
For each data source that has Restrict Tree Node List of Values Based on SetID flag set to This restriction does not apply when the flag is set to |
The data source has Restrict Tree Node List of Values Based on SetID flag set to |
Modify the tree version so that all nodes in the tree have data sources with SetID matching that of the tree. |
|
Label Enabled Node Validator |
If the tree structure has a Labeling Scheme specified, all nodes should have labels. This restriction does not apply when the Labeling Scheme is set to |
The tree structure has a labeling scheme but the tree version has nodes without labels. |
Assign labels to any nodes that do not have labels. |
|
Date Restricted Node Validator |
If Restrict Tree Node List of Values Based on Date Range flag on the tree structure has been set to If the flag is set to |
Restrict Tree Node List of Values Based on Date Range flag has been set to For example, if the tree version is effective from Jan-01-2012 to Dec-31-2012, all nodes in the tree version must be effective from Jan-01-2012 to Dec-31-2012 at a minimum. It is acceptable for the nodes to be effective for a date range that exceeds the tree version's effective date range (for example, the node data source value is effective from Dec-01-2011 to Mar-31-2012). It is not acceptable if the nodes are effective for none or only part of the tree version's effective date range (for example, the node data source value are only effective from Jan-01-2012 to June-30-2012). |
Ensure that for all nodes in the tree version, they have date effectivity at least for the effective date range for the tree version. |
|
Multiple Active Tree Version Validator |
If Allow Multiple Active Tree Versions Flag on the tree structure has been set to If Allow Multiple Active Tree Versions is set to |
Allow Multiple Active Tree Versions has been set to |
Make no more than one tree version Active within the same date range and set the others to Inactive or Draft. |
|
Range Based Node Validator |
If Allow Range Children on the data source has been set to If the flag is set to |
There are range-based nodes from a data source that has Allow Range Children set to |
Ensure that any range nodes in your tree version are from a data source that has Allow Range Children set to |
|
Terminal Node Validator |
If Allow Usage as Leaves flag is set to If Allow Usage as Leaves flag is set to |
There are leaf nodes (terminal nodes) whose values come from a data source marked with Allow Usage as Leaves flag set to |
Modify the tree version so that all terminal nodes come from data sources with Allow Usage as Leaves set to |
|
Usage Limit Validator |
If Usage Limit is set to If Usage Limit is set to |
The data source has Usage Limit set to |
Add nodes to the tree version for each data source value that is not yet present. |
To run an immediate audit:
The following procedure assumes the Manage Trees and Tree Versions page is open.
Select the tree or tree version you wish to audit.
Selecting a tree runs an audit on all tree versions in that tree. Selecting a specific tree version runs an audit only on that tree version.
Choose Audit from the Actions dropdown menu.
The audit runs and the Trees Audit Result page, shown in Figure 19-55, opens.
The page contains two sections:
Audit Results - displays a list of all previously run audits
Validation Details - displays validation results and messages and allows you correct validation errors
The Audit Results section contains the following columns:
Audit Request - displays the audit request ID number
Tree Version Name - displays the name of the tree version
Audit Result - displays either a green check mark (success) or a red "X" (failure)
Tree Structure Code - displays the tree structure code
Tree Code - displays the tree code
Start Time - displays the date and time the audit began
End Time - displays the date and time the audit was completed
The Validation Details section contains the following columns:
Name - displays the names of the tree or tree version and the audit validators
Validation Result - displays either a green check mark (success) or a red "X" (failure)
Validation Message - when clicked, displays a validation message and a description
Corrective Action - when clicked, opens the appropriate trees application task flow page, allowing you to fix a validation error
To schedule an audit:
Click Schedule Audit.
The Schedule Audit window, shown in Figure 19-56, opens.
Do any of the following:
Configure the basic options.
Click Process Options to configure language, territory, timezone, and other options.
Click Advanced to configure detailed schedule, output, and notification options.
Click Submit and then click OK to close the confirmation dialog.
To trigger an audit through a service API:
Use the service API shown in Example 19-1.
Example 19-1 Audit Service API
/**
   * Processes the audit scheduled for any tree or tree version.
   * @param requestId Request ID for scheduled audit (for online can be
       defaulted as -1)
   * @param auditType Auditing mode wheere audit invoked for tree/tree
       version(pass as TREE_AUDIT for tree and
   *  TREE_VERSION_AUDIT for tree version.
   * @param tsCode Tree Structure Code
   * @param treeCode Tree Code
   * @param treeVersionId Tree Version Id
   */
  public void processAudit(Long requestId, String auditType, String tsCode,
    String treeCode, String treeVersionId)
The tree-flattening process filters an implicit tree structure into a simple sequence of leaves. It coalesces nodes so that each sub-tree has a single cache list representing all of its children at one transformed level. Figure 19-57 shows an example of a flattened tree structure.
Figure 19-57 Example of a Flattened Tree Structure

Tables that store flattened data are either row or column flattened. By eliminating recursive queries, row flattening is particularly useful for efficiently performing operations across an entire sub-tree.
Understanding Row Flattening
Row flattening is a technique where parent-child information is optimized for run-time performance by storing additional rows in a table (as compared to just normalized parent-child rows) to instantly find all descendants to a parent value, without initiating a Connect By SQL statement.
Normalized data, for example, might be the following:
Corporation - Sales Division
Sales Division - Region
In a row flattened table, the above rows are still stored but one additional row is added:
Corporation - Region
In addition, additional columns are added to store the "depth" from top parent.
Understanding Column Flattening
Column flattening is a technique where parent-child information is optimized for run-time performance by storing additional column in a table for all parents of a child.
Normalized data, for example, might be the following:
Corporation - Sales Division
Sales Division - Region
Sales Division
In a column-flattened table, the above data is converted to rows and columns, as shown in Table 19-14.
Table 19-14 Rows and Columns in a Column-Flattened Table
| Column 1 | Column 2 | Column 3 |
|---|---|---|
|
Region |
Sales Division |
Corporation |
Usually, the number of levels (possible parents) are pre-defined to a maximum number and may also have additional "dummy" values on levels where real values are missing.
To flatten a row or column:
The following procedure assumes the Manage Trees and Tree Versions page is open.
Select the tree version you want to flatten.
Choose Column Flattening or Row Flattening from the Actions dropdown menu.
The Flattening page, shown in Figure 19-58, opens.
Click Schedule Flattening.
The Schedule Flattening page opens. Configure the options and click Submit.
Click Online Flattening or Force Flattening. Either of these actions will flatten the row.
Click OK to close the confirmation window, shown in Figure 19-59.
Click Done to return to the Manage Trees and Tree Versions page.
When a label is chosen for a tree structure, the label data source can be either of the following:
A custom, product-team-owned label data source
The generic data label source.
This section describes how to use the Central Labels tab of the trees application launch page to create, edit, and delete values in the generic label data source.
All procedures assume that the Manage Labels summary page is open in your web browser.
If you wish to edit or delete an existing label and it is not currently visible in the results list, you can search for it using the following procedure.
To search for a label:
In the Search area of the page, construct a search using any or all of the following search criteria:
Tree Structure Code
Name
Short Name
Click Search.
All labels matching your search criteria appear in the Results area of the page.
Click Advanced to perform an advanced search by specifying additional options. You also can save your search criteria for future use.
The following procedure explains how to create a new label.
To create a label:
From the Manage Labels summary page, click Create, or choose Create Label from the Actions dropdown menu.
The Create Label page displays, as shown in Figure 19-60. An additional field Set Name will appear if it is used by the selected tree structure.
Enter a tree structure code or click the down arrow to select or search for one.
The page refreshes and the Data Source field populates with an appropriate value.
Enter a short name for the label.
Enter a name for the label.
If you wish, enter a description.
If you wish, enter an icon name.
Enter an effective start date, or click the calendar icon to select one.
Enter an effective end date, or click the calendar icon to select one.
Enter a Set Name or click the down arrow to select or search one.
Click Save and Close to create the label.
Click OK to close the Confirmation window.
The Manage Labels summary page displays showing the new label in the Results list.
The following procedure explains how to edit an existing label.
To edit a label:
Select the label you want to edit.
See Section 19.6.1, "How to Search for a Label," if the label is not in the current Results list.
From the Manage Labels summary page, click Edit, or choose Edit from the Actions dropdown menu.
The Edit Label page displays as shown in Figure 19-61.
Edit the appropriate data.
Do one of the following:
Click Save and Close to save your changes and exit the editing session.
Click Cancel to cancel the operation.
The following procedure explains how to delete an existing label.
To delete a label:
Select the label you want to delete.
See Section 19.6.1, "How to Search for a Label," if the label is not in the current Results list.
From the Manage Labels summary page, click Delete, or choose Delete from the Actions dropdown menu.
The warning page shown in Figure 19-62 displays.
Do one of the following:
Click No to cancel the operation.
Click Yes to delete the label.
Now that you have worked with tree structures, trees, and tree versions, you can start developing applications in JDeveloper using the Applications Hierarchy component.
The Applications Hierarchy component is denoted by the fnd:hierarchy tag and contains two facets: hierarchy and toolbar. The hierarchy facet holds the af:tree or af:treeTable; the toolbar facet can hold action buttons used with items within the tree or treeTable.
Figure 19-63 shows an example of the Applications Hierarchy component in JDeveloper.
Figure 19-63 Applications Hierarchy Component
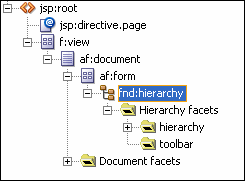
You can add any JSF or ADF Faces component to these facets, even with the generated af:tree or af:treeTable. The fnd:hierarchy tag supports the TreeCode and TreeVersionId properties to display specific trees or tree versions.
You can create two types of Hierarchy applications: Tree and Tree Table.
The following section explains how to create a tree application using the Applications Hierarchy component.
Before you begin:
Create an application initialized for use with Oracle Middleware Extensions for Applications. For more information, see Chapter 2, "Setting Up Your Development Environment."
To create a Tree application:
Create a new JSF/JSPX page.
From the ADF Faces page in the Component Palette, select Applications.
From the Applications page in the Component Palette, select Hierarchy and drag it to your.jspx file's visual editor.
The Initialize Applications Connection window opens, as shown in Figure 19-64:
Figure 19-64 Initialize Applications Connection Window (1)
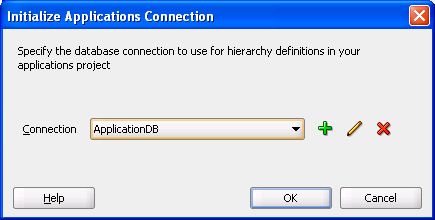
Choose a connection from the dropdown menu and click OK.
If there is no existing connection, click Add to create a new one.
A second Initialize Applications Connection window, shown in Figure 19-65, opens.
Figure 19-65 Initialize Applications Connection Window (2)
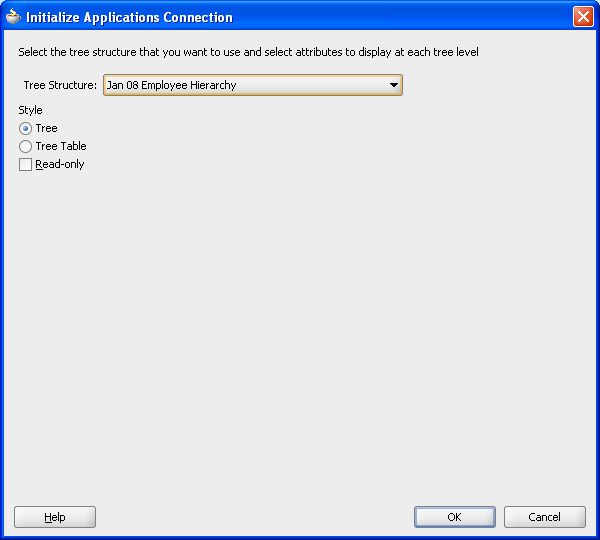
Choose a tree structure from the dropdown list.
Select Tree.
Select Read-only if you want the application to be read only.
Click OK.
The tree appears in the visual editor, as shown in Figure 19-66.
Do one of the following:
Run the .jspx file from the Application Navigator.
Run the .jspx file from the visual editor.
A browser window opens and the application runs. Figure 19-67 shows an example of a tree application.
Figure 19-67 Example of Tree Application Style

The following section explains how to create a tree table application using the applications Hierarchy component.
Before you begin:
Create an application initialized for use with Oracle Middleware Extensions for Applications. For more information, see Chapter 2, "Setting Up Your Development Environment."
To create a Tree Table application:
Follow Steps 1 through 5 in Section 19.7.1, "How to Create a Tree Application."
Select Tree Table.
The Initialize Applications Connection window redisplays with additional fields, as shown in Figure 19-68.
Figure 19-68 Initialize Applications Connection Window (3)
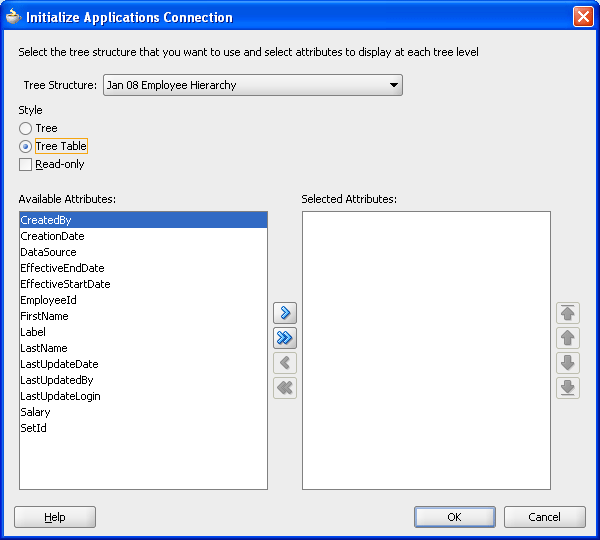
Select Read-only if you want the application to be read only.
Select the available attributes to display at each tree level.
Click OK.
The tree table appears in the visual editor, as shown in Figure 19-69.
Figure 19-69 Visual Editor with Tree Table
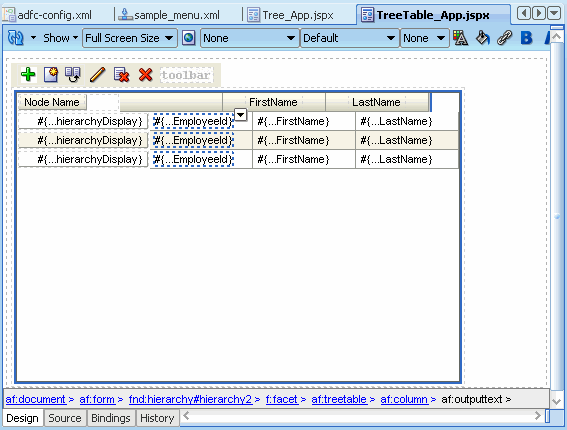
Run the .jspx from either the Application Navigator or the visual editor.
A browser window opens and the application runs. Figure 19-70 shows an example of a tree table application.
Figure 19-70 Example of Tree Table Application Style

The Applications Hierarchy component supports six node operations – Add, Create, Duplicate, Edit, Remove, and Delete – which are performed in a standard popup window in the user interface. Since all nodes in a tree come from their data sources, you must create a custom task flow for each operation that requires one, and register it in your data source before you can use it.
Node operations that only manage data in the tree table do not require custom task flows. For example, adding a node affects only the data in the tree table. However, searching for a node requires access to the data source. Subsequently, you must create and register a custom task flow that will enable node searches.
In addition, since removing a node affects only the data in the tree table, you do not need to create and register a custom task flow for this operation.
For more information about task flows, see "Getting Started with ADF Task Flows" in Oracle Fusion Middleware Fusion Developer's Guide for Oracle Application Development Framework.
You use the Property Inspector in Oracle JDeveloper to register custom task flows, as shown in Figure 19-71.
The full code used to register each custom task flow in the data-source view object is shown in the examples that follow.
Example 19-2 Search Task Flow for the Add Node Operation
<Properties>
  <SchemaBasedProperties>
    <fnd:SEARCH_PAGE Value="/WEB-INF/EmpSearch.xml#EmpSearchTF"/>
...
...
Example 19-3 Create Task Flow
<Properties>
  <SchemaBasedProperties>
    <fnd:CREATE_PAGE Value="/WEB-INF/CreateEmpNode.xml#CreateEmpNode"/>
...
...
Example 19-4 Duplicate Task Flow
<Properties>
  <SchemaBasedProperties>
    <fnd:DUPLICATE_PAGE Value="/WEB-INF/DupEmpNode.xml#DupEmpNode"/>
...
...
This section discusses how to create custom task flows for the Search, Create, Duplicate, Edit, and Delete node operations.
The Search task flow provides a shortcut to select nodes. In the task flow, you specify the Search page fragment, task-flow parameters, back-end Java bean, and task-flow activities.
To create the Search task flow:
Define a task-flow parameter, searchHierParamBean, to pass values between the Hierarchy component and the registered Search task flow in pageFlowScope.
<input-parameter-definition>
  <name>searchHierParam</name>
  <value>#{pageFlowScope.searchHierParam}</value>
  <class>oracle.apps.fnd.applcore.trees.ui.managed.HierParamBean</class>
</input-parameter-definition>
Define Search task-flow return activities and use them as the ends of the task flow. For example, to define the Submit and Cancel task-flow return activities:
<task-flow-return id="Submit">
  <outcome>
    <name>Submit</name>
  </outcome>
</task-flow-return/>

<task-flow-return id="Cancel">
  <outcome>
    <name>Cancel</name>
  </outcome>
</task-flow-return/>
Normally, Cancel is a free event. However, you must pass values back when Submit is triggered. Therefore, you can have a submit() actionListener mapping to it.
In your back-end bean, use the following code to get the task-flow parameter:
import oracle.apps.fnd.applcore.trees.ui.managed.HierParamBean;
...

HierParamBean searchParam = (HierParamBean)AdfFacesContext.getCurrentInstance().getPageFlowScope().get
("searchHierParam");
...
For the Search task flow, you do not need any input parameters from the Hierarchy component. The only thing this task flow does is to return the search results. Therefore, after looking up tree nodes in Search task flow, you must pass back the primary keys of the selected nodes by calling the HierParamBean method setSelectedNodes(List) when the Submit return activity is invoked:
public void submit(ActionEvent event)
{
// The inner list is the list of primary keys for each node. Trees supports
// up to five primary keys.
// The outer list is the list of selected nodes
  List<List<String>> nodes = ...
  ...
  searchParam.setSelectedNodes(nodes);
}
In the page definition file of the page using the Hierarchy component, add the following task-flow entry in the "executables" section:
<taskflow id="searchTaskflow"
          taskFlowId="#{backingBeanScope.AddNodeBean.searchTaskflow}"
          activation="deferred"
          Refresh="ifNeeded"
          xmlns="http://xmlns.oracle.com/adf/controller/binding">
  <parameters>
    <parameter id="searchHierParam" xmlns="http://xmlns.oracle.com/adfm/uimodel"
          value="#{pageFlowScope.searchHierParam}"/>
  <parameters>
</taskflow>
The Create task flow is used to create a new node in the data-source table. In the task flow, you specify the Create page fragment, task-flow parameters, back-end Java bean, and task-flow activities.
To create the Create task flow:
Define a task-flow parameter, createHierParamBean, to pass values between the Hierarchy component and the registered Create task flow in pageFlowScope.
<input-parameter-definition>
  <name>createHierParam</name>
  <value>#{pageFlowScope.createHierParam}</value>
  <class>oracle.apps.fnd.applcore.trees.ui.managed.HierParamBean</class>
</input-parameter-definition>
To capture the event of dismissing the Create popup window, define Create task-flow return activities and use them as the ends of the task flow. For example, to define the Submit and Cancel task-flow return activities:
<task-flow-return id="Submit">
  <outcome>
    <name>Submit</name>
  </outcome>
</task-flow-return/>

<task-flow-return id="Cancel">
  <outcome>
    <name>Cancel</name>
  </outcome>
</task-flow-return/>
Normally, Cancel is a free event. However, you must pass values back when Submit is triggered. Therefore, you can have a submit() actionListener mapping to it.
In your back-end bean, use the following code to get the task-flow parameter:
import oracle.apps.fnd.applcore.trees.ui.managed.HierParamBean;
...

HierParamBean createParam = (HierParamBean)AdfFacesContext.getCurrentInstance().getPageFlowScope().get
("createHierParam");
...
For the Create task flow, you do not need any input parameters from the Hierarchy component. The only thing this task flow does is to return the new node. Therefore, you must pass back its primary keys by calling the HierParamBean method setNewPkValue() after creating the node. The Hierarchy component will get the new node's primary keys after the Create task-flow is dismissed. For example, in the submit() actionListener that maps to the Submit return activity, you pass new primary keys back:
public void submit(ActionEvent event)
{
  List<String> newPk = ...
  ...
  createParam.setNewPkValue(newPk);
}
In the page definition file of the page using the Hierarchy component, add the following task-flow entry in the "executables" section:
<taskFlow id="createTaskflow"
              taskFlowId="#{backingBeanScope.CreateNodeBean.createTaskflow}"
              activation="deferred"
              Refresh="ifNeeded"
              xmlns="http://xmlns.oracle.com/adf/controller/binding">
    <parameters>
      <parameter id="createHierParam" xmlns="http://xmlns.oracle.com/adfm/uimodel"
              value="#{pageFlowScope.createHierParam}"/>
    </parameters>
</taskFlow>
The Duplicate task flow is used to duplicate a node in the data-source table. In the task flow, you specify the Duplicate page fragment, task-flow parameters, back-end Java bean, and task-flow activities.
To create the Duplicate task flow:
Define a task-flow parameter, dupHierParamBean, to pass values between the Hierarchy component and the registered Duplicate task flow in pageFlowScope.
<input-parameter-definition>
  <name>dupHierParam</name>
  <value>#{pageFlowScope.dupHierParam}</value>
  <class>oracle.apps.fnd.applcore.trees.ui.managed.HierParamBean</class>
</input-parameter-definition>
To capture the event of dismissing the Duplicate popup window, define Duplicate task-flow return activities and use them as the ends of the task flow. For example, to define the Submit and Cancel task-flow return activities:
<task-flow-return id="Submit">
  <outcome>
    <name>Submit</name>
  </outcome>
</task-flow-return/>

<task-flow-return id="Cancel">
  <outcome>
    <name>Cancel</name>
  </outcome>
</task-flow-return/>
Normally, Cancel is a free event. However, you must pass values back when Submit is triggered. Therefore, you can have a submit() actionListener mapping to it.
In your back-end bean, using the following code to get the task-flow parameter:
import oracle.apps.fnd.applcore.trees.ui.managed.HierParamBean;
...

HierParamBean dupParam = (HierParamBean)AdfFacesContext.getCurrentInstance().getPageFlowScope().get
("dupHierParam");
...
For the Duplicate task flow, you need to know the selected node from the Hierarchy component. In the Duplicate popup window, the selected node's attributes are shown by default so that users can create another tree node. After creating a new node, you pass back its primary key. You can perform all of these tasks by calling HierParamBean methods.
For example, in the task-flow initializer, you can use the following code to get the primary keys of the selected node:
List<String> pkValue = dupParam.getPkValue();
In the submit() actionListener that maps to the Submit return activity, you pass the new primary keys back:
public void submit(ActionEvent event)
{
  List<String> newPk = ...
  ...
  dupParam.setNewPkValue(newPk);
}
In the page definition file of the page using the Hierarchy component, add the following task-flow entry in the "executables" section:
<taskflow id="dupTaskflow"
          taskFlowId="#{backingBeanScope.DupNodeBean.dupTaskflow}"
          activation="deferred"
          Refresh="ifNeeded"
          xmlns="http://xmlns.oracle.com/adf/controller/binding">
  <parameters>
    <parameter id="dupHierParam" xmlns="http://xmlns.oracle.com/adfm/uimodel"
                value="#{pageFlowScope.dupHierParam}"/>
  <parameters>
</taskflow>
The Edit task flow is used to edit an existing node in the data-source table. In the task flow, you specify the Edit page fragment, task-flow parameters, back-end Java bean, and task-flow activities.
To create the Edit task flow:
Define a task-flow parameter, editHierParamBean, to pass values between the Hierarchy component and the registered Edit task flow in pageFlowScope.
<input-parameter-definition>
  <name>editHierParam</name>
  <value>#{pageFlowScope.editHierParam}</value>
  <class>oracle.apps.fnd.applcore.trees.ui.managed.HierParamBean</class>
</input-parameter-definition>
To capture the event of dismissing the Edit popup window, define Edit task-flow return activities and use them as the ends of the task flow. For example, to define the Submit and Cancel task-flow return activities:
<task-flow-return id="Submit">
  <outcome>
    <name>Submit</name>
  </outcome>
</task-flow-return/>

<task-flow-return id="Cancel">
  <outcome>
    <name>Cancel</name>
  </outcome>
</task-flow-return/>
Normally, Cancel is a free event. However, you must pass values back when Submit is triggered. Therefore, you can have a submit() actionListener mapping to it.
In your back-end bean, using the following code to get the task-flow parameter:
import oracle.apps.fnd.applcore.trees.ui.managed.HierParamBean;
...

HierParamBean editParam = (HierParamBean)AdfFacesContext.getCurrentInstance().getPageFlowScope().get
("editHierParam");
...
For the Edit task flow, you need to know the current node from the Hierarchy component. In the Edit popup window, the current node's attributes are shown by default so that users can update the tree node. After updating the node, you must indicate whether or not the update was successful. You can perform all of these tasks by calling HierParamBean methods.
For example, in the task-flow initializer, you can use the following code to get the primary keys of the selected node:
List<String> pkValue = editParam.getPkValue();
In the submit() actionListener that maps to the Submit return activity, you specify the result:
public void submit(ActionEvent event)
{
  ...
  editParam.setUpdated(true);
}
In the page definition file of the page using the Hierarchy component, add the following task-flow entry in the "executables" section:
<taskflow id="editTaskflow"
          taskFlowId="#{backingBeanScope.EditNodeBean.editTaskflow}"
          activation="deferred"
          Refresh="ifNeeded"
          xmlns="http://xmlns.oracle.com/adf/controller/binding">
  <parameters>
    <parameter id="dupHierParam" xmlns="http://xmlns.oracle.com/adfm/uimodel"
                value="#{pageFlowScope.editHierParam}"/>
  <parameters>
</taskflow>
The Delete task flow is used to delete an existing node in the data-source table. In the task flow, you specify the Delete page fragment, task-flow parameters, back-end Java bean, and task-flow activities.
To create the Delete task flow:
Define a task-flow parameter, delHierParamBean, to pass values between the Hierarchy component and the registered Delete task flow in pageFlowScope.
<input-parameter-definition>
  <name>delHierParam</name>
  <value>#{pageFlowScope.delHierParam}</value>
  <class>oracle.apps.fnd.applcore.trees.ui.managed.HierParamBean</class>
</input-parameter-definition>
To capture the event of dismissing the Delete popup window, define Edit task-flow return activities and use them as the ends of the task flow. For example, to define the Submit and Cancel task-flow return activities:
<task-flow-return id="Submit">
  <outcome>
    <name>Submit</name>
  </outcome>
</task-flow-return/>

<task-flow-return id="Cancel">
  <outcome>
    <name>Cancel</name>
  </outcome>
</task-flow-return/>
Normally, Cancel is a free event. However, you must pass values back when Submit is triggered. Therefore, you can have a submit() actionListener mapping to it.
In your back-end bean, using the following code to get the task-flow parameter:
import oracle.apps.fnd.applcore.trees.ui.managed.HierParamBean;
...

HierParamBean delParam = (HierParamBean)AdfFacesContext.getCurrentInstance().getPageFlowScope().get
("delHierParam");
...
For the Delete task flow, you need to know the selected node from the Hierarchy component. In the Delete popup window, delete the node and confirm the deletion. After deleting the node, you must indicate whether or not the deletion was successful. You can perform all of these tasks by calling HierParamBean methods.
For example, in the task-flow initializer, you can use the following code to get the primary keys of the selected node:
List<String> pkValue = delParam.getPkValue();
In the submit() actionListener that maps to the Submit return activity, you specify the result:
public void submit(ActionEvent event)
{
  ...
  delParam.setDeleted(true);
}
In the page definition file of the page using the Hierarchy component, add the following task-flow entry in the "executables" section:
<taskFlow id="delTaskflow"
              taskFlowId="#{backingBeanScope.DelNodeBean.delTaskflow}"
              activation="deferred"
              Refresh="ifNeeded"
              xmlns="http://xmlns.oracle.com/adf/controller/binding">
  <parameters>
    <parameter id="delHierParam" xmlns="http://xmlns.oracle.com/adfm/uimodel"
               value="#{pageFlowScope.delHierParam}"/>
  </parameters>
</taskFlow>
Using the Hierarchy component to develop applications in JDeveloper requires you to specify a tree structure in the Property Inspector.
To access the Hierarchy-Property Inspector, highlight fnd:hierarchy in the Structure window and select the Hierarchy-Property Inspector tab. Figure 19-72 shows the Hierarchy-Property Inspector.
Figure 19-72 Hierarchy-Property Inspector
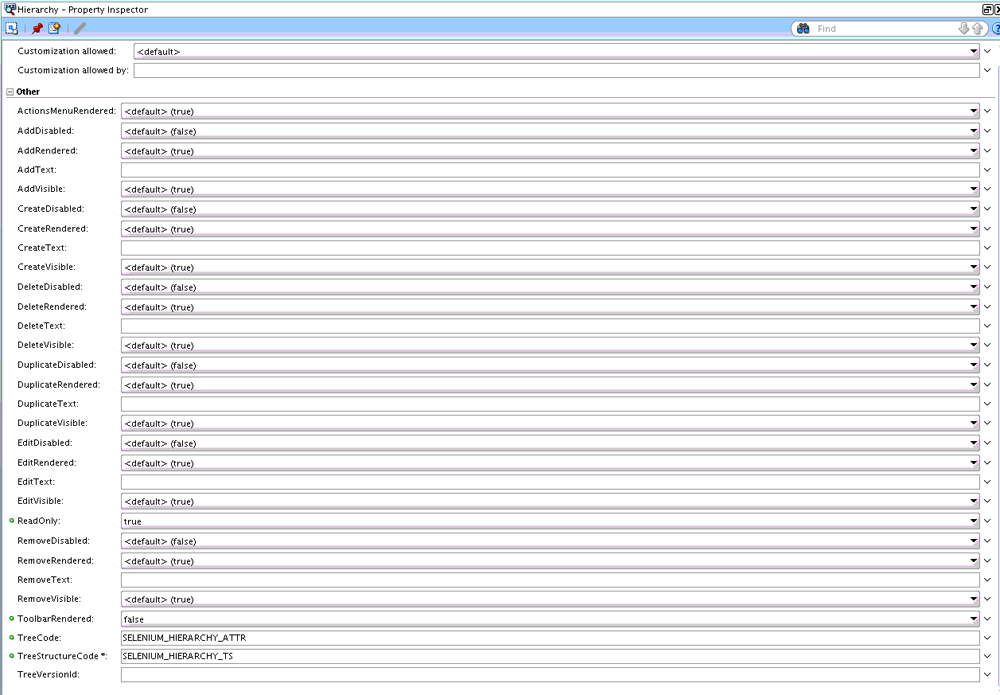
The Hierarchy component has facets and properties, which are listed in Table 19-15 and Table 19-16.
Table 19-15 Hierarchy Facets
| Facet | Description | Values |
|---|---|---|
|
hierarchy |
Holds ADF Tree or TreeTable |
af:tree or af:treeTable |
|
toolbar |
Additional toolbar buttons to be added for custom use |
ADF command toolbar buttons under an ADF toolbar |
Table 19-16 Hierarchy Properties
| Property | Description | Values |
|---|---|---|
|
id |
Unique identification number for hierarchy |
string |
|
rendered |
Indicates if the hierarchy is rendered |
boolean |
|
readOnly |
Indicates if the hierarchy will render in read-only mode |
boolean |
|
treeStructureCode |
Code for the tree structure to be used for the hierarchy |
string |
|
tree Code |
Code for the tree to be used for the hierarchy |
string |
|
treeVersionId |
ID for the tree version to be used for the hierarchy |
string |
|
actionsMenuRendered |
Controls if action menu needs to be rendered |
boolean |
|
toolbarRendered |
Controls if toolbar needs to be rendered |
boolean |
|
addVisible |
Controls if add action is visible |
boolean |
|
addRendered |
Controls if add action is rendered |
boolean |
|
addDisabled |
Controls if add action is disabled |
boolean |
|
addText |
Custom text to be used for add action |
string |
|
createVisible |
Controls if create action is visible |
boolean |
|
createRendered |
Controls if create action is rendered |
boolean |
|
createDisabled |
Controls if create action is disabled |
boolean |
|
createText |
Custom text to be used for create action |
string |
|
duplicateVisible |
Controls if duplicate action is visible |
boolean |
|
duplicateRendered |
Controls if duplicate action is rendered |
boolean |
|
duplicateDisabled |
Controls if duplicate action is disabled |
boolean |
|
duplicateText |
Custom text to be used for duplicate action |
string |
|
editVisible |
Controls if edit action is visible |
boolean |
|
editRendered |
Controls if edit action is rendered |
boolean |
|
editDisabled |
Controls if edit action is disabled |
boolean |
|
editText |
Custom text to be used for edit action |
string |
|
removeVisible |
Controls if remove action is visible |
boolean |
|
removeRendered |
Controls if remove action is rendered |
boolean |
|
removeDisabled |
Controls if remove action is disabled |
boolean |
|
removeText |
Custom text to be used for remove action |
string |
|
deleteVisible |
Controls if delete action is visible |
boolean |
|
deleteRendered |
Controls if delete action is rendered |
boolean |
|
deleteDisabled |
Controls if delete action is disabled |
boolean |
|
deleteText |
Custom text to be used for delete action |
string |
|
registerTaskflow |
Specifies whether to use task flow ( For example: <fnd:hierarchy registerTaskflow="true" ... </fnd:hierarchy> |
boolean |
Note:
Since only customers create tree versions, you must use service APIs to generate lists of tree versions or active tree versions.
The data that displays in your application depends on the tree structure you specify in the Property Inspector. The tree structure automatically determines the following at run time:
The tree available under this particular tree structure. If there are multiple trees, the first one is chosen.
The active tree version (for the current date) available under the tree. If there are multiple tree versions, the first one is chosen.
You also can use the Expression Builder to bind some of the properties mentioned in Section 19.9. They are the following:
TreeCode
TreeStructureCode
TreeVersionId
Use the following expressions:
TreeCode expression:
#{HierarchyHandler.treeModelsList[hierarchyId].treeCode}
TreeStructureCode expression:
#{HierarchyHandler.treeModelsList[hierarchyId].treeStructureCode}
TreeVersionId expression:
#{HierarchyHandler.treeModelsList[hierarchyId].treeVersionId}
Note:
The hierarchyId variable is the ID of the Hierarchy component.
Tree Picker is a reusable Oracle ADF task flow, similar to a date picker, that enables you to select tree data from a list of values. It is found in the Trees-View.jar section of the Component Palette.
To add a Tree Picker component to your user interface:
On the page from which the Tree Picker will be launched, create an icon or button with Action set to launch.
Drag and drop the Tree Picker from Component Palette > Trees-View.jar onto your task flow.
Connect the launch page to the Tree Picker using an appropriate Control Flow Case with from-outcome set to launch and run-as-dialog set to true.
In the Property Inspector > Parameters section for the task flow, enter the appropriate parameters for the following:
treeStructureCode (required) - The code assigned to the tree structure. For example, FND_DEMO_EMP_TS.
treeCode (optional) - The code assigned to the tree. For example, FND_DEMO_EMP_T.
treeVersionId (optional) - String representation of an automatically generated binary value (Raw) identifier. You cannot hard code a TreeVersionId.
selectMode (optional) - A parameter to control the row selection behavior of tree table on a user interface page. Acceptable values are single and multiple. The default is single.
The Tree Picker returns a list of TreeNodes:
If the Tree Picker is launched as a popup window, the return value can be obtained in the returnListener of the icon or button using:
List<TreeNode> = selectedTreeNodes(List<TreeNode>)event.getReturnValue();
If the Tree Picker is launched in place, the return value can be obtained from the pageFlowScope using:
Map pageFlow = AdfFacesContext.getCurrentInstance().getPageFlowScope();List<TreeNode> selectedNodes = (List<TreeNode>) pageFlow.get("returnTreeNodes");
Figure 19-73 shows an example of a Tree Picker user interface.
Figure 19-74 shows the results window that displays when you enter a tree-structure-code value and click Select Tree Node.
Every data source requires a view object. If the data source view object has bind variables and view criteria that tree management needs to apply, you must set them manually in JDeveloper.
Use the following procedure to set bind variables and view criteria.
In JDeveloper, click on the appropriate data source view object. (Ensure that it is highlighted in the Structure window.)
Select the Query option from the Overview tab. Figure 19-75 shows the Bind Variables and View Criteria sections after the Query option is selected.
Figure 19-75 Bind Variables and View Criteria Settings
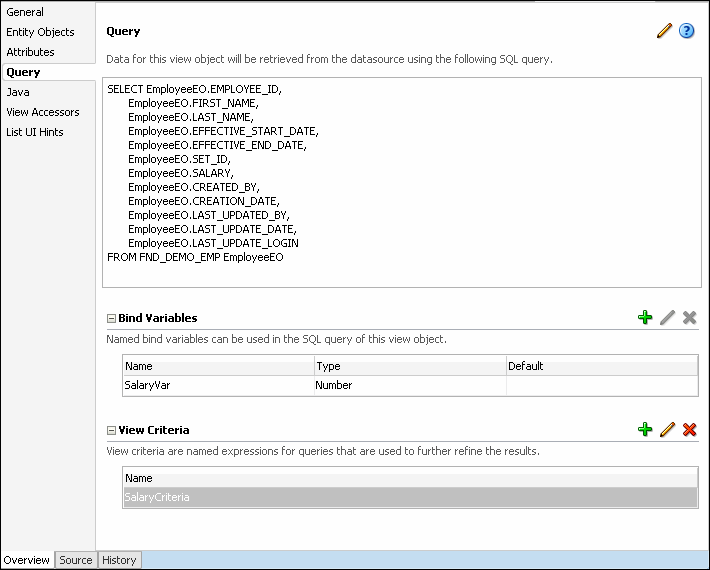
Do any of the following:
Click the Bind Variables Add icon to add any necessary bind variables.
Click the View Criteria Add icon to add any necessary view criteria.
An application programming interface, or API, is a source code interface that a library provides to support requests for services to be made of it by computer programs. In other words, APIs provide the building blocks that make it easier to develop these programs. Although an API specifies an interface and the behavior of the identifiers specified in that interface, it does not specify how the behavior might be implemented.
There are three service application modules that you can use to interact with the tree management infrastructure:
TreeStructureService
TreeService
TreeNodeService.
Note:
No Service Data Objects (SDOs) are provided and these application modules must be instantiated and invoked in a co-located mode.
The TreeStructureService application module is defined in oracle.apps.fnd.applcore.trees.service.applicationModule.TreeStructureService and allows access to tree structure metadata. This application module exposes the TreeStructureVO under the name "TreeStructure" as well as the hierarchy of ADF Business Components objects accessible through the TreeStructureVO. This application module does not include any of the tree or tree version entities. The Javadoc for the available APIs is included with JDeveloper. To access the Javadoc in JDeveloper, do the following:
Choose the Go to Java Class... option from the Navigate dropdown menu.
The Go to Java Class window opens.
Enter TreeStructureService in the Name: field.
Choose Go to: > Javadoc and click OK.
This application module is considered a public API to work with tree structure metadata and exposes the APIs shown in Table 19-17.
Table 19-17 TreeStructureService APIs
| API | Description |
|---|---|
|
getTreeStructure |
This API is used to retrieve the FndTreeStructureVORow corresponding to a particular tree structure code. |
|
getRootDataSourceRels |
This API gets a row iterator over FndTsDataSourceRelVORow rows representing the root data sources of the given tree structure. |
|
getAllTreeColumns |
This API returns a list of VO attributes that are available for use from the various data sources associated with the tree structure. This is a cumulative list across all the data sources. |
|
getAllDataSources |
Returns a row iterator over FndTsDataSourceVORow rows corresponding to all data sources for the given tree structure. |
|
getTreeNodeTable |
Returns the name of the tree node table in use by a given tree structure. |
|
duplicateTreeStructure |
This API is a Java front end to the PL/SQL API FND_TREE_UTILS.duplicate_tree_structure and is used to duplicate a tree structure. It does not duplicate any underlying trees or tree versions associated with the tree structure. |
|
deleteTreeStructure |
This API is a Java front end to the PL/SQL API FND_TREE_UTILS.delete_tree_structure and is used to delete a tree structure. This deletes all underlying trees and tree versions associated with this tree structure (including flattened data, if any). |
The TreeService application module is defined in oracle.apps.fnd.applcore.trees.service.applicationModule.TreeService and provides access to trees and tree versions. TreeService also provides flattening APIs. The Javadoc for the available APIs is included with JDeveloper.
To access the Java Doc:
Choose the Go to Java Class... option from the Navigate dropdown menu.
The Go to Java Class window opens.
Enter TreeService in the Name: field.
Choose Go to: > Javadoc and click OK.
This application module is considered a public API to work with trees and tree versions and exposes the APIs shown in Table 19-18.
Table 19-18 TreeService APIs
| API | Description | Optional Parameters |
|---|---|---|
|
getTreeRows |
This API returns all trees associated with a given tree structure. |
|
|
getTreeCodes |
This API returns a list of tree codes associated with a given tree structure. |
|
|
findTree |
This API is used to find a specific tree given its tree structure code and tree code. |
|
|
createTree |
This API is used to create a tree for a given tree structure.
This API is used to create a tree for a given tree structure. |
treeDescription |
|
updateTree |
This API is used to update details of a tree for a given tree structure. |
|
|
updateTreeDataSourceParamValues |
This API is used to update the value of the data source parameters for a given tree. The parameter values customized at the tree level will override the default values specified at the tree-structure level. |
|
|
duplicateTree |
This API duplicates a specific tree and assigns a specified tree code to the duplicate. It is a front end to the FND_TREE_UTILS.duplicate_tree PL/SQL API. |
|
|
deleteTree |
This API deletes a tree, all its associated tree versions, including flattened data. It is a front end to the FND_TREE_UTILS.delete_tree PL/SQL API. |
|
|
getAllTreeVersions |
This API returns a list of all tree versions associated with a given tree. |
|
|
getTreeVersions |
This API returns a list of tree versions associated with a given tree as of a particular date. |
|
|
getCurrentTreeVersions |
This API returns a list of tree versions associated with a given tree as of the current date. |
|
|
findTreeVersion |
This API is used to locate a specific tree version given its tree structure code, tree code and tree version ID. |
|
|
createTreeVersion |
This API creates a tree version and returns the ID of the created tree version. All parameters are mandatory.
This API creates a tree version and returns the ID of the created tree version. The default values for all these parameters is NULL. The default for the effectiveEndDate parameter is 31-DEC-4712. |
treeVersionDescription, effectiveEndDate, treeVersionNote |
|
updateTreeVersion |
This API updates the specified tree version and returns the ID of the updated tree version for a given tree structure and tree code. |
effectiveEndDate updatedTreeVersionName, updatedTreeVersionDescription, updatedEffectiveStartDate, updatedEffectiveEndDate, updatedTreeVersionNote |
|
duplicateTreeVersion |
This API is a front end to the PL/SQL API FND_TREE_UTILS.duplicate_tree_version and duplicates a specific tree version. The API returns the auto-generated ID of the duplicate tree version. |
|
|
deleteTreeVersion |
This API is a front end to the PL/SQL API FND_TREE_UTILS.delete_tree_version and deletes a tree version including its flattened data (if any). |
|
|
rowFlatten |
This API row-flattens a specific tree version. |
|
|
columnFlatten |
This API column-flattens a specific tree version. |
The TreeNodeService application module is defined in oracle.apps.fnd.applcore.trees.service.applicationModule.TreeNodeService and provides the core node operations such as adding and deleting nodes. The APIs support three types of nodes:
value nodes
range nodes
tree-in-tree nodes.
The Java APIs are covers to the PL/SQL APIs that are provided in the FND_TREE_UTILS PL/SQL package.
To access the Java Doc:
Choose the Go to Java Class... option from the Navigate dropdown menu.
The Go to Java Class window opens.
Enter TreeNodeService in the Name: field.
Choose Go to: > Javadoc and click OK.
This application module is considered a public API to work with tree nodes and exposes the APIs shown in Table 19-19.
Table 19-19 TreeNodeService APIs
| API | Description |
|---|---|
|
addValueTreeNode |
This API adds a value-based tree node to a specific tree version. It is a front end to the PL/SQL API FND_TREE_UTILS.add_value_tree_node. It returns the tree node ID of the newly added node. The API has two signatures - one that takes in a tree label to be associated with the tree node and one that does not. |
|
addRangeTreeNode |
This API adds a range-based tree node to a specific tree version. It is a front end to the PL/SQL API FND_TREE_UTILS.add_range_tree_node. It returns the tree node ID of the newly added node. The API has two signatures - one that takes in a tree label to be associated with the tree node and one that does not. |
|
addTreeTreeNode |
This API adds a tree node that references another tree version. It is a front end to the PL/SQL API FND_TREE_UTILS.add_tree_tree_node. It returns the tree node ID of the newly added node. The API has two signatures - one that takes in a tree label to be associated with the tree node and one that does not. |
|
deleteTreeNode |
This API is a front end to the PL/SQL API FND_TREE_UTILS.delete_tree_node and deletes a specific tree node. Any children of that node are automatically promoted up the hierarchy. |
|
updateTreeNode |
This API is a front end to the PL/SQL API FND_TREE_UTILS.update_tree_node and is used to update the data associated with a specific tree node. It cannot be used to move the tree node. |
|
moveTreeNode |
This API is used to move a tree node within the hierarchy. The entire sub-tree rooted at the node being moved is moved. This API is a front end to the PL/SQL API FND_TREE_UTILS.move_tree_node. |
|
moveSubTree |
This API moves a sub-tree under the specified parent tree node within the same tree or across trees and returns the ID of the tree node that has been moved. |
|
copySubTree |
This API copies a sub tree under specified parent Tree Node within the same tree or across trees and returns the ID of the tree node that has been copied. |
|
removeSubTree |
This API removes sub tree under the specified parent tree node. |
|
findValueTreeNodes |
This API is used to find all value tree nodes with the specified primary key. |
|
findRangeTreeNodes |
This API is used to find all range tree nodes with the specified range. |
|
findRefTreeNodes |
This API is used to find all tree nodes that reference the specified tree version. |
This section includes information about the following advanced topics:
Tree data model
PL/SQL APIs
Incremental flattening
Trees business events
WebLogic Scripting Tool (WLST) Commands for Flattening
The following are new or modified tables and views that are used by and relevant to the Tree Management infrastructure. They are set up in the FUSION schema.
Tables:
FND_TREE_STRUCTURE
FND_TREE_STRUCTURE_TL
FND_TS_DATA_SOURCE
FND_TS_DATA_SOURCE_REL
FND_TS_DATA_SOURCE_PARAMS
FND_LABEL
FND_LABEL_TL
FND_TREE
FND_TREE_TL
FND_TREE_DATA_SOURCE_PARAMS
FND_TREE_VERSION
FND_TREE_VERSION_TL
FND_NODE
FND_NODE_TL
FND_TREE_LABEL
FND_TREE_NODE
FND_TREE_NODE_RF
FND_TREE_NODE_CF
FND_TREE_AUDIT_JOB
FND_TREE_VERSION_AUDIT_RES
FND_TREE_VERSION_AUDIT_RES_TL
FND_TREE_LOG
FND_TREE_LOG_PARAMS
FND_TREE_FLATTENING_HISTORY
Views:
FND_TREE_STRUCTURE_VL
FND_LABEL_VL
FND_TREE_VL
FND_TREE_VERSION_VL
FND_NODE_VL
FND_TREE_VERSION_AUDIT_RES_VL
Tree Management provides public PL/SQL APIs to work with trees. You can find these APIs in the PL/SQL package FND_TREE_UTILS in the FUSION schema.
Note:
The PL/SQL package FND_TREE_UTILS_PVT contains private APIs for internal use with Oracle Fusion tree management. No other use of these APIs is supported.
Incremental flattening optimizes the process by starting with the results of a previous flattening instead of flattening the data from scratch, as shown in Figure 19-76.
To flatten incrementally, a delta of flattening operations that occurred between these two sets of start and end points is created, and information about what happened during those operations is stored in three tables:
FND_TREE_FLATTENING_HISTORY
FND_TREE_LOG
FND_TREE_LOG_PARAMS
These tables are described in the sections that follow.
This table records the flattening history for a specific tree version. For optimization, only the last process point is recorded. Process_Point records the time of the last tree-node operation that has been flattened.
Table 19-20 shows the contents of the FND_TREE_FLATENNING_HISTORY table.
Table 19-20 FND_TREE_FLATTENING_HISTORY
| Column | Data Type | Nullable? |
|---|---|---|
|
Tree_Structure_Code (Primary Key) |
Varchar2(30) |
No |
|
Tree_Code (Primary Key) |
Varchar2(30) |
No |
|
Tree_Version_ID (Primary Key) |
Varchar2(32) |
No |
|
Process_Point |
Timestamp(6) |
No |
|
Flattening_Type (Primary Key) |
Varchar2(32) |
No |
|
Created_By |
Varchar2(64) |
No |
|
Creation_Date |
Timestamp(6) |
No |
|
Last_Updated_By |
Varchar2(64) |
No |
|
Last_Update_Date |
Timestamp(6) |
No |
|
Last_Update_Login |
Varchar2(32) |
Yes |
FND_TREE_LOG is a log of all flattening operations for one tree version. The log enables database administrators (DBAs) to move data easily and efficiently to external systems such as a data warehouse, or from test to production systems.
FND_TREE_LOG stores tree-node operations. For each specific tree-version operation, a unique Log_Entry_ID is assigned and the operation type is logged.
There are three types of tree nodes:
value
range
tree node
There also are three types of tree-node operations:
add
move
delete
Subsequently, there are nine types of operations:
add value node
move value node
delete value node
add range node
move range node
delete range node
add tree node
move tree node
delete tree node
Table 19-21 shows the contents of the FND_TREE_LOG table.
Table 19-21 FND_TREE_LOG
| Column | Data Type | Nullable? |
|---|---|---|
|
Log_Entry_ID (Primary Key) |
Varchar2(32) |
No |
|
Tree_Structure_Code |
Varchar2(30) |
No |
|
Tree_Code |
Varchar2(30) |
No |
|
Tree_Version_ID |
Varchar2(32) |
No |
|
Operation_Type |
Varchar1(32) |
No |
|
Created_By |
Varchar2(64) |
No |
|
Creation_Date |
Timestamp(6) |
No |
|
Last_Updated_By |
Varchar2(64) |
No |
|
Last_Update_Date |
Timestamp(6) |
No |
|
Last_Update_Login |
Varchar2(32) |
Yes |
Since the FND_TREE_LOG table does not record parameters for each operation, the FND_TREE_LOG_PARAMS table is used to log them. The two tables are referenced by a foreign key, Log_Entry_ID. This design helps save space and clearly organizes the information.
Table 19-22 shows the contents of the FND_TREE_LOG_PARAMS table.
Table 19-22 FND_TREE_LOG_PARAMS
| Column | Data Type | Nullable? |
|---|---|---|
|
Log_Entry_ID (Primary Key) |
Varchar2(32) |
No |
|
Param_Name (Primary Key) |
Varchar2(64) |
No |
|
Param_Value |
Varchar2(100) |
No |
|
Created_By |
Varchar2(64) |
No |
|
Creation_Date |
Timestamp(6) |
No |
|
Last_Updated_By |
Varchar2(64) |
No |
|
Last_Udpate_Date |
Timestamp(6) |
No |
|
Last_Update_Login |
Varchar2(32) |
Yes |
Row-flattening results are stored in the table registered as the row-flattening table for the tree structure. If you register a custom row-flattening table for your tree structure, ensure it has the same schema as FND_TREE_NODE_RF.
IS_LEAF and DISTANCE are two important row-flattening-table columns. For more information, see Section 19.14.3.4.1 and Section 19.14.3.4.2.
This column provides information about whether or not a tree node is a leaf. In many instances, only a leaf contain meaningful information, while other nodes provide a structural purpose. IS_LEAF makes it easier to differentiate a leaf from other nodes, and makes it simpler to write simple queries and get faster responses. Valid values are Y (yes) and N (no).
This column indicates the distance between the node and its ancestor, which is specified in the row. For example, the distance between a node and its parent or children is 1, between a node and its grandparent or grandchildren is 2, and so on. DISTANCE, then, helps developers to get the entire path - from the root node to the intermediate leaf/node without having to perform any additional queries. A simple example is shown in Figure 19-77.
In the FND_TREE_NODE table, DISTANCE is stored in the form of an adjacency list, as shown in Table 19-23.
After flattening, DISTANCE is stored in the FND_TREE_NODE table, as shown in Table 19-24.
Note:
The node ancestor also includes itself.
Table 19-24 Flattened FND_TREE_NODE Table
| Node | Ancestor | Distance | IS_LEAF? |
|---|---|---|---|
|
A |
Null |
1 |
N |
|
A |
A |
0 |
N |
|
B |
Null |
2 |
Y |
|
B |
A |
1 |
Y |
|
B |
B |
0 |
Y |
|
C |
Null |
2 |
N |
|
C |
A |
1 |
N |
|
C |
C |
0 |
N |
|
D |
Null |
3 |
Y |
|
D |
A |
2 |
Y |
|
D |
C |
1 |
Y |
|
D |
D |
0 |
Y |
To find the path from the root of D, the query would be the following:
select *
from fnd_tree_node_rf
where tree_node_id = D order by distance
Column flattening generally applies only to level-based trees. In the case of a view object for Business Intelligence (BICVO), however, value-based trees also can be column-flattened. (For more information, see Chapter 60, "Designing and Securing View Objects for Oracle Business Intelligence Applications.")
For level-based trees, the maximum level of a tree version is 32. Subsequently, if a tree version is not level-based or if it has a tree-version level that exceeds 32, only row flattening can be performed.
Column-flattening results are stored in the table specified in the tree structure, which has the same schema as FND_TREE_NODE_CF.
Each row in the FND_TREE_NODE_CF table represents a path in a tree, and can hold a maximum of 32 nodes. The rows are arranged from leaf to root, as shown in Figure 19-78.
Table 19-25 shows the results after flattening.
Table 19-25 Column-Flattening Results
| Dep0 | Dep1 | Dep2 | Dep3 | Dep4 | ... | Dep31 |
|---|---|---|---|---|---|---|
|
LA |
CA |
USA |
North America |
Null |
... |
Null |
|
SF |
CA |
USA |
North America |
Null |
... |
Null |
|
DC |
Null |
USA |
North America |
Null |
... |
Null |
Note:
All fields not containing nodes will be filled with Null.
A business event typically is a one-way, fire-and-forget, asynchronous way to send a notification of a business occurrence. You can raise business events when a situation of interest occurs. The Tree Management infrastructure provides create, update, and delete business events on tree structures, trees and tree versions. The event definitions are available in $MW_HOME/jdeveloper/jdev/oaext/events/Trees-Model-Events.jar.
Table 19-26 includes details of the create, update, and delete events.
Table 19-26 Trees Business Events
| Entity | Event Name | Condition | Payload |
|---|---|---|---|
|
Tree Structure |
TreeStructureCreateEvent |
Create |
TreeStructureCode |
|
Tree Structure |
TreeStructureUpdateEvent |
Update |
TreeStructureCode |
|
Tree Structure |
TreeStructureDeleteEvent |
Delete |
TreeStructureCode |
|
Tree |
TreeCreateEvent |
Create |
TreeStructureCode, TreeCode |
|
Tree |
TreeUpdateEvent |
Update |
TreeStructureCode, TreeCode |
|
Tree |
TreeDeleteEvent |
Delete |
TreeStructureCode, TreeCode |
|
Tree Version |
TreeVersionCreateEvent |
Create |
TreeStructureCode, TreeCode, TreeVersionId |
|
Tree Version |
TreeVersionUpdateEvent |
Update |
TreeStructureCode, TreeCode, TreeVersionId |
|
Tree Version |
TreeVersionDeleteEvent |
Delete |
TreeStructureCode, TreeCode, TreeVersionId |
|
Tree Node |
TreeNode Created |
New node added to tree (includes value, range and referenced tree nodes) |
TreeStructureCode, TreeCode, TreeVersionId, TreeNodeId |
|
Tree Node |
TreeNode Deleted |
Node removed from tree (includes value, range and referenced tree nodes) |
TreeStructureCode, TreeCode, TreeVersionId, TreeNodeId |
|
Tree Node |
TreeNode Updated |
Node updated in tree (includes value, range and referenced tree nodes) |
TreeStructureCode, TreeCode, TreeVersionId, TreeNodeId |
|
Tree Node |
TreeNode Moved |
Node moved within tree (includes value, range and referenced tree nodes) |
TreeStructureCode, TreeCode, TreeVersionId, TreeNodeId |
For more information, see "Using Business Events and the Event Delivery Network" in Oracle Fusion Middleware Developer's Guide for Oracle SOA Suite.
WebLogic Scripting Tool (WLST) is a command line scripting interface that you can use to create, manage, and monitor WebLogic Server domains.
Tree management provides the data flattening feature that improves query performance against the hierarchical data. It supports two types of flattening: column flattening and row flattening. Column flattening optimizes the parent-child information for run-time performance by storing additional column in a table for all parents of a child. Row flattening optimizes parent-child information for run-time performance by storing additional rows in a table (as compared to just normalized parent-child rows) to instantly find all descendants to a parent value, without initiating a CONNECT BY SQL statement.
The treeManagement.py Python Script defines the WLST commands that can be executed at the WLST prompt. Each command corresponds to a method in the python script. The python script is available at $ADE_VIEW_ROOT/atgpf/applcore/etc/wlst/.
A new package oracle.apps.fnd.applcore.trees.mbean is added to the Trees ViewController Layer. This package includes the following files:
Table 19-27 Files in the oracle.apps.fnd.applcore.trees.mbean Package
| File | Description |
|---|---|
|
|
Manages registration and de-registration of Trees MBean |
|
|
Defines the signature and implements the java based code logic for all WLST commands |
|
|
Bean Data Structure for the object that stores flattening results for all individual Tree Versions |
|
|
Outlines the design and generates the output XML Report for the WLST commands |
|
|
Serves as the supporting utility and resource files |
The defined contextual parameter in TreeDeployMBeanLifeCycleCallBack.java and the class need to be registered as a listener in the web.xml file of the Fnd Setup application.
Contextual Parameter:
<context-param>
    <param-name>oracle.apps.fnd.internal.trees.mbean.ENABLED</param-name>
    <param-value>true</param-value>
</context-param>
Listener Class:
<listener>
    <listener-class>
    oracle.apps.fnd.applcore.trees.runtime.TreeFlatteningMBeanLifeCycleCallBack
    </listener-class>
</listener>
Ensure the following before you execute the WLST commands for flattening:
Integrated WebLogic Server is up and running.
Connection is established to the WebLogic Server.
Connection is established to the Trees MBean package.
Each WLST command is defined.
The MBean package exposes the following set of APIs:
flattenAll
flattenTreeStructure
flattenTree
flattenTreeVersion
forceFlattenTreeVersion
The flattening APIs exposed by the MBean package can be invoked in two ways:
by passing the required parameters.
Note:
You can pass the parameters in any order.
by passing the parameter name and the corresponding value.
Important:
The order in which you pass the parameter and its value must match with the signature of the API.
flattenAll APIThis API performs incremental flattening of all active Tree Versions under all the available Tree Structures in the application.
Note:
Only active Tree Versions are flattened.
The following table describes the parameters of this API:
Table 19-28 flattenAll API Parameters
| Parameter | Datatype | Description | Mandatory/Optional |
|---|---|---|---|
|
type |
String |
Type of flattening to be performed. It can be COLUMN or ROW flattening. By default, this API triggers both types of flattening |
Optional |
The following is an example of this API:
flattenTreeStructure APIThis API performs incremental flattening for all active hierarchies for a given Tree Structure.
Note:
Only active Tree Structures are flattened.
The following table describes the parameters of this API:
Table 19-29 flattenTreeStructure API Parameters
| Parameter | Datatype | Description | Mandatory/Optional |
|---|---|---|---|
|
treeStructureCode |
String |
Code of the tree structure on which flattening needs to be performed |
Mandatory |
|
type |
String |
Type of flattening to be performed. It can be COLUMN or ROW flattening. By default, this API triggers both types of flattening |
Optional |
The following is an example of this API:
flattenTree APIThis API performs incremental flattening for all active Tree Versions for the specified Tree Code.
Note:
Only active Tree Versions are flattened.
The following table describes the parameters of this API:
Table 19-30 flattenTree API Parameters
| Parameter | Datatype | Description | Mandatory/Optional |
|---|---|---|---|
|
treeStructureCode |
String |
Code of the tree structure on which flattening needs to be performed |
Mandatory |
|
treeCode |
String |
Code of the tree on which flattening needs to be performed |
Mandatory |
|
type |
String |
Type of flattening to be performed. It can be COLUMN or ROW flattening. By default, this API triggers both types of flattening |
Optional |
The following is an example of this API:
flattenTreeVersion APIThis API performs incremental flattening for the specified tree version.
Note:
Only the tree structures that are in active or draft state are flattened.
The following table describes the parameters of this API:
Table 19-31 flattenTreeVersion API Parameters
| Parameter | Datatype | Description | Mandatory/Optional |
|---|---|---|---|
|
treeStructureCode |
String |
Code of the tree structure on which flattening needs to be performed |
Mandatory |
|
treeCode |
String |
Code of the tree on which flattening needs to be performed |
Mandatory |
|
treeVersionName |
String |
Name of the tree version that needs to be flattened |
Mandatory |
|
type |
String |
Type of flattening to be performed. It can be COLUMN or ROW flattening. By default, this API triggers both types of flattening |
Optional |
The following is an example of this API:
forceFlattenTreeVersion APIThis API forces flattening on the specified tree version.
Note:
Only the tree versions that are in active or draft state are flattened.
The following table describes the parameters of this API:
Table 19-32 forceFlattenTreeVersion API Parameters
| Parameter | Datatype | Description | Mandatory/Optional |
|---|---|---|---|
|
treeStructureCode |
String |
Code of the tree structure on which flattening needs to be performed |
Mandatory |
|
treeCode |
String |
Code of the tree on which flattening needs to be performed |
|
|
treeVersionName |
String |
Name of the tree version that needs to be flattened |
Mandatory |
The following is an example of this API:
A WLST Command Report is generated and printed on the console when a WLST command is executed. The following details are displayed on the console:
WLST command that is executed
registration of the MBean
flattening call invoked
XML report
Note:
You can redirect the details printed on the console to a file, if required.
Example 19-12 WLST Command Report
wls:/DefaultDomain/serverConfig> flattenTree(treeStructureCode='TEST_VS_BICVO_TS',treeCode='TEST_VSBICVO_TREE')
<FLATTENING_INFO>Trees Flattening Mbean name:oracle.apps.fnd.applcore.trees.mbean:name=TreeFlatten,*
<SUCCESS> Connected to Weblogic Server
Location changed to domainRuntime tree. This is a read-only tree with DomainMBean as the root.
For more help, use help(domainRuntime)

<FLATTENING_INFO> Type of Flattening : BOTH
<SUCCESS> TreeFlatten MBean found : oracle.apps.fnd.applcore.trees.mbean:Location=DefaultServer,name=TreeFlatten,type=AppsRuntimeMBean,Application=FndSetup,ApplicationVersion=V2.0
<FLATTENING_INFO>Invoking Mbean : for operation flattenTree
<FLATTENING_INFO> parseXMLForError : returning {''}
XML report Start:
<?xml version = '1.0' encoding = 'UTF-8'?>
<TreesFlatteningReport status="SUCCESS">
<TreeStructure treeStructureCode="TEST_VS_BICVO_TS" treeCodeCount="1" success="1" error="0">
<TreeCode treeCode="TEST_VSBICVO_TREE" treeVersionCount="2" success="2" error="0">
<TreeVersion treeVersionName="TEST_VSBICVO_TV1" treeVersionId="ABA44835820F97B8E0404498A8F14DB6" flatteningType="ROW" time="7.0secs" status="SUCCESS"/>
<TreeVersion treeVersionName="TEST_VSBICVO_TV1" treeVersionId="ABA44835820F97B8E0404498A8F14DB6" flatteningType="COLUMN" time="2.0secs" status="SUCCESS"/>
<TreeVersion treeVersionName="TEST_VSBICVO_TV1_OLD_DATE" treeVersionId="ABA44835823A97B8E0404498A8F14DB6" flatteningType="ROW" time="0.0secs" status="SUCCESS"/>
<TreeVersion treeVersionName="TEST_VSBICVO_TV1_OLD_DATE" treeVersionId="ABA44835823A97B8E0404498A8F14DB6" flatteningType="COLUMN" time="1.0secs" status="SUCCESS"/>
</TreeCode>
</TreeStructure>
</TreesFlatteningReport>
XML Report Ends
<FLATTENING_INFO>Completed flattenTree.

wls:/DefaultDomain/serverConfig>
An XML Report is generated every time you execute a WLST command. The XML report contains all the results of the flattening APIs invoked. The following examples illustrate the XML report generated in various scenarios.
Example 19-13 Success Report
<?xml version = '1.0' encoding = 'UTF-8'?>
<TreesFlatteningReport status="SUCCESS">
<TreeStructure treeStructureCode="TEST_PLSQL_EXTN_TS" treeCodeCount="2" success="2" error="0">
<TreeCode treeCode="TEST_PLSQL_EXTN_TR1" treeVersionCount="3" success="3" error="0">
<TreeVersion treeVersionName="TEST_PLSQL_EXTN_TR1_V1" treeVersionId="B7598796828D8027E040449895F14B45" flatteningType="ROW" time="0.0secs" status="SUCCESS"/>
<TreeVersion treeVersionName="TEST_PLSQL_EXTN_TR1_V1" treeVersionId="B7598796828D8027E040449895F14B45" flatteningType="COLUMN" time="0.0secs" status="SUCCESS"/>
<TreeVersion treeVersionName="TEST_PLSQL_EXTN_TR1_V2" treeVersionId="B7598796829A8027E040449895F14B45" flatteningType="ROW" time="0.0secs" status="SUCCESS"/>
<TreeVersion treeVersionName="TEST_PLSQL_EXTN_TR1_V2" treeVersionId="B7598796829A8027E040449895F14B45" flatteningType="COLUMN" time="0.0secs" status="SUCCESS"/>
<TreeVersion treeVersionName="TEST_PLSQL_EXTN_TR1_V3" treeVersionId="B7598796829F8027E040449895F14B45" flatteningType="ROW" time="0.0secs" status="SUCCESS"/>
<TreeVersion treeVersionName="TEST_PLSQL_EXTN_TR1_V3" treeVersionId="B7598796829F8027E040449895F14B45" flatteningType="COLUMN" time="0.0secs" status="SUCCESS"/>
</TreeCode>
<TreeCode treeCode="TEST_PLSQL_EXTN_TR2" treeVersionCount="1" success="1" error="0">
<TreeVersion treeVersionName="TEST_PLSQL_EXTN_TR2_V1" treeVersionId="B759879682A48027E040449895F14B45" flatteningType="ROW" time="0.0secs" status="SUCCESS"/>
<TreeVersion treeVersionName="TEST_PLSQL_EXTN_TR2_V1" treeVersionId="B759879682A48027E040449895F14B45" flatteningType="COLUMN" time="0.0secs" status="SUCCESS"/>
</TreeCode>
</TreeStructure>
</TreesFlatteningReport>
Example 19-14 Error Report with Flattening Errors but no Exception
<?xml version = '1.0' encoding = 'UTF-8'?>
<TreesFlatteningReport status="ERROR">
<TreeStructure treeStructureCode="TEST_PLSQL_EXTN_TS" treeCodeCount="1" success="0" error="1">
<TreeCode treeCode="TEST_PLSQL_EXTN_TR1" treeVersionCount="3" success="2" error="1">
<TreeVersion treeVersionName="TEST_PLSQL_EXTN_TR1_V1" treeVersionId="B7598796828D8027E040449895F14B45" flatteningType="ROW" time="4.0secs" status="SUCCESS"/>
<TreeVersion treeVersionName="TEST_PLSQL_EXTN_TR1_V1" treeVersionId="B7598796828D8027E040449895F14B45" flatteningType="COLUMN" time="0.0secs" status="ERROR">
    ERROR:JBO-FTM-S-0045: Flattening cannot proceed due to the failure of auditing tree version TEST_PLSQL_EXTN_TS, TEST_PLSQL_EXTN_TR1, B7598796828D8027E040449895F14B45.
</TreeVersion>
<TreeVersion treeVersionName="TEST_PLSQL_EXTN_TR1_V2" treeVersionId="B7598796829A8027E040449895F14B45" flatteningType="ROW" time="0.0secs" status="SUCCESS"/>
<TreeVersion treeVersionName="TEST_PLSQL_EXTN_TR1_V2" treeVersionId="B7598796829A8027E040449895F14B45" flatteningType="COLUMN" time="1.0secs" status="SUCCESS"/>
<TreeVersion treeVersionName="TEST_PLSQL_EXTN_TR1_V3" treeVersionId="B7598796829F8027E040449895F14B45" flatteningType="ROW" time="0.0secs" status="SUCCESS"/>
<TreeVersion treeVersionName="TEST_PLSQL_EXTN_TR1_V3" treeVersionId="B7598796829F8027E040449895F14B45" flatteningType="COLUMN" time="1.0secs" status="SUCCESS"/>
</TreeCode>
</TreeStructure>
</TreesFlatteningReport>
Example 19-15 Error Report with Exception but no Flattening Errors
<?xml version = '1.0' encoding = 'UTF-8'?>
<TreesFlatteningReport status="ERROR">
<Exception>null releaseTreeService Exception: Cannot release TreeService Handle </Exception>
<TreeStructure treeStructureCode="FND_DEMO_EMP_TS" treeCodeCount="1" success="1" error="0">
<TreeCode treeCode="FND_DEMO_EMP_T" treeVersionCount="1" success="1" error="0">
<TreeVersion treeVersionName="FND Demo Employee Tree Version" treeVersionId="A43EE0B37975BF52E040449833F06958" flatteningType="ROW" time="0.0secs" status="SUCCESS"/>
<TreeVersion treeVersionName="FND Demo Employee Tree Version" treeVersionId="A43EE0B37975BF52E040449833F06958" flatteningType="COLUMN" time="0.0secs" status="SUCCESS"/>
</TreeCode>
</TreeStructure>
</TreesFlatteningReport>