11g Release 7 (11.1.7)
Part Number E20388-06
Home
Contents
Book
List
Contact
Us
|
Oracle® Fusion Applications CRM Extensibility Guide 11g Release 7 (11.1.7) Part Number E20388-06 |
Home |
Contents |
Book List |
Contact Us |
|
Previous |
Next |
This chapter contains the following:
Oracle Fusion Customer Center Extensibility : Overview
Customizing Oracle Fusion Customer Center Pages : Explained
Customizing Customer Center and Work Area Using Page Composer : Explained
Customizing Oracle Fusion Customer Center Using Page Composer : Worked Example
Extending Simplified Pages for Customers : Explained
Each Customer Center object, and how to extend those objects using Oracle Fusion CRM Application Composer
Which Oracle Fusion Common CRM objects are associated with Customer Center pages
How to customize Customer Center pages using Page Composer
In general, every top-level CRM object has a work area, which includes an overview page, a creation page, and a details page. When you make changes to the object, those changes can be reflected in the object's associated work area. Customer Center, however, is unique in that its user interface pages do not include the traditional work area combination of overview page, creation page, and details page. Instead, Customer Center has a series of tree nodes that, when selected, display user interface pages, and even a single page can be associated with multiple business objects.
This table lists Customer Center pages, and the related objects that you can access in Application Composer to customize those pages.
|
Customer Center Page |
Customer Center Region |
Application |
Underlying Business Object |
|---|---|---|---|
|
Consumer Profile |
Addresses region |
Common |
Trading Community Address |
|
Consumer Profile |
Consumer Basic Information region |
Common |
Trading Community Person Profile |
|
Consumer Profile |
Consumer Details region |
Common |
Trading Community Person Profile |
|
Consumer Profile |
Sales Account region |
Customer Center |
Sales Account |
|
Contact Profile |
Address region |
Common |
Trading Community Address |
|
Contact Profile |
Basic Information region |
Common |
Trading Community Org Contact |
|
Contact Profile |
Contact Details region |
Common |
Trading Community Org Contact |
|
Contact Profile |
Contacts region (also known as the Contacts List) |
Common |
Trading Community Org Contact |
|
Create Consumer page and also the Quick Create Consumer page |
New fields are added at the bottom of the page |
Customer Center |
Sales Account |
|
Create Consumer page and also the Quick Create Consumer page |
No specific region |
Common |
Trading Community Person Profile |
|
Create Contact page and also the Quick Create Contact page |
No specific region |
Common |
Trading Community Org Contact |
|
Create Customer page and also the Quick Create Customer page |
Contact Information region |
Common |
Trading Community Org Contact |
|
Create Customer page and also the Quick Create Customer page |
Customer Information region |
Common |
Trading Community Org Profile |
|
Create Customer page and also the Quick Create Customer page |
New fields are added at the bottom of the page. |
Customer Center |
Sales Account |
|
Customer Profile |
Addresses region |
Common |
Trading Community Address |
|
Customer Profile |
Basic Information region |
Common |
Trading Community Org Profile |
|
Customer Profile |
Customer Details region |
Common |
Trading Community Org Profile |
|
Customer Profile |
Sales Account region |
Customer Center |
Sales Account |
|
Edit Customer page |
Team Members region |
Customer Center |
Sales Account Resource (child object to the Sales Account) |
|
Overview > Summary tab |
Sales Accounts region (also known as the Sales Account List) |
Customer Center |
Sales Account |
|
Real-Time Search: Customers page |
Search region, by way of Advanced Search > Add Fields |
Customer Center |
Sales Account |
Note
To make only minor user interface changes to Customer Center pages without creating objects or fields, use Page Composer instead of Application Composer.
The Oracle Fusion Common CRM objects that are associated with Customer Center pages are:
Trading Community Org Profile
Trading Community Person Profile
Trading Community Address
Trading Community Org Contact
This table indicates which Common objects populate which Customer Center pages and regions, as well as Application Composer configuration pages where you can make user interface changes on those pages and regions.
|
Business Object |
Configuration Page in Application Composer |
Related Customer Center Page |
Related Customer Center Region |
|---|---|---|---|
|
Trading Community Org Profile |
Edit Customer Quick Creation Form |
Create Customer page and also the Quick Create Customer page |
Customer Information region |
|
Trading Community Org Profile |
Edit Read Only Form |
Customer Profile |
Basic Information region |
|
Trading Community Org Profile |
Edit Details Form |
Customer Profile |
Customer Details region |
|
Trading Community Person Profile |
Edit Contact/Consumer Quick Creation Form |
Create Consumer page and also the Quick Create Consumer page |
No specific region |
|
Trading Community Person Profile |
Edit Read Only Form |
Consumer Profile |
Consumer Basic Information region |
|
Trading Community Person Profile |
Edit Details Form |
Consumer Profile |
Consumer Details region |
|
Trading Community Address |
Edit Detail Form |
Customer Profile |
Addresses region |
|
Trading Community Address |
Edit Detail Form |
Contact Profile |
Addresses region |
|
Trading Community Address |
Edit Detail Form |
Consumer Profile |
Addresses region |
|
Trading Community Org Contact |
Edit Creation Form |
Create Customer page and also the Quick Create Customer page |
Contact Information region |
|
Trading Community Org Contact |
Edit Creation Form |
Create Contact page and also the Quick Create Contact page |
No specific region |
|
Trading Community Org Contact |
Edit Read Only Form |
Contact Profile |
Basic Information region |
|
Trading Community Org Contact |
Edit Contact Details Form |
Contact Profile |
Contact Details region |
|
Trading Community Org Contact |
Edit Summary Table |
Contact Profile |
Contacts region (also known as the Contacts List) |
The Oracle Fusion Customer Center objects that are associated with Customer Center pages are:
Sales Account
Sales Account Resource (child of the Sales Account)
This table indicates which Customer Center objects populate which Customer Center pages and regions, as well as Application Composer configuration pages where you can make user interface changes on those pages and regions.
|
Business Object |
Configuration Page in Application Composer |
Related Customer Center Page |
Related Customer Center Region |
|---|---|---|---|
|
Sales Account |
Edit Creation Form |
Create Customer page and also the Quick Create Customer page |
New fields are added at the bottom of the page. |
|
Sales Account |
Edit Creation Form |
Create Consumer page and also the Quick Create Consumer page |
New fields are added at the bottom of the page. |
|
Sales Account |
Edit Details Form |
Customer Profile |
Sales Account region |
|
Sales Account |
Edit Details Form |
Consumer Profile |
Sales Account region |
|
Sales Account |
Edit Summary Table |
Overview, then Summary tab |
Sales Accounts region (also known as the Sales Account List) |
|
Sales Account |
Not applicable. Custom fields are automatically available from the list of additional fields. |
Real-Time Search: Customers page |
Search region, by way of Advanced Search, then Add Fields |
|
Sales Account |
Edit Regional Panes |
Customer Work Area |
Panes in the regional area |
|
Sales Account Resource (child object to the Sales Account) |
Edit Summary Table |
Edit Customer: Sales Account Team page |
Team Members region |
To add custom fields to the Customer Center pages listed in the tables above, use Application Composer's various configuration pages. You access the configuration pages in Application Composer from each object's Pages Overview page. Before you access the configuration pages, you must have already created your custom fields using Application Composer.
To access the Pages Overview page:
Select either the Common or Customer Center application on the main Overview page.
In the object tree, select the object you want to customize.
Select the Pages node.
On the Pages Overview page, select the configuration page hyperlink related to the Customer Center page that you want to customize.
The customizations that you can make in Customer Center also include the creation of reports. This type of customization does not involve the creation of fields or objects within Application Composer. Instead, create a report using BI Answers, save the report to the Resource Catalog, and then use Page Composer to add the report to two pages: the Customer Snapshot and the Customer Overview, Analysis tab.
Note
The reports that you add to the Customer Snapshot are within the context of a single customer, because you view a single customer when viewing the Snapshot. The reports that you add to the Analysis tab on the Customer Overview provide context across multiple customers, because you are viewing multiple customers on the Analysis tab.
.
Navigate to the Customers work area.
Click the Administration global menu.
Select Customize Workarea Pages.
Note
To access Page Composer in Customer Center pages, you must have the Sales Administrator job role.
In the Customers work area and pages, you can perform customizations for the enabled components in the following modes:
Design mode
Direct Selection mode
In the Customers work area and pages, in Design mode for enabled components on the Site and Job Role layers, you can perform the following customization tasks:
Change the default saved search.
Edit saved searches.
Add or remove predefined content from the Customers Analytics subtab.
See "Adding Custom Reports" below.
Manage the Customers tree: hide or show nodes, change the default node, expand or collapse nodes, hide or show the Snapshot Details region.
Add or remove predefined content to or from the Add Content to the Customers Snapshot page.
See "Adding Custom Reports" below.
Customize list of values (LOV) default values, for example, in the Regional Search region.
In Direct Selection mode for enabled components, you can perform the following customization tasks:
Manage the Customers tree.
Hide or show fields.
Change field labels.
Make a field required.
Make a field read-only or updateable.
Reorder fields in a form.
Reorder table columns.
Hide or show table columns.
Set the width and minimum width for a table column in percent or pixels.
Enable or disable column sorting.
Edit fields within lists.
The customizations that you can make in Customer Center also include the creation of reports. Create a report using BI Answers, save the report to the Resource Catalog, and then use Page Composer to add the report to two pages: the Customer Snapshot and the Customer Overview, Analysis tab.
Note
The reports that you add to the Customer Snapshot are within the context of a single customer, because you view a single customer when viewing the Snapshot. The reports that you add to the Analysis tab on the Customer Overview provide context across multiple customers, because you are viewing multiple customers on the Analysis tab.
This example covers the following scenarios:
Making a Form Field Read-only for a Specific Role
Hiding a Table Column for All Users Using Design Mode
Removing a Table Column from the View Menu for All Users Using Direct Selection Mode
Changing the Column Label for All Users in Direct Selection Mode
Changing the Column Width for All Users in Direct Selection Mode
Customizing Customer Center Tree Nodes
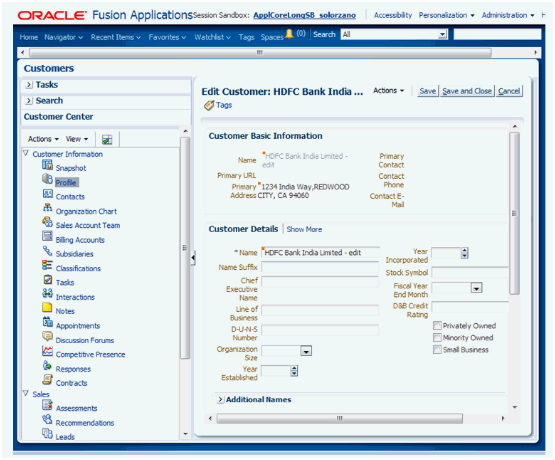
In the Customer Profile page, Customer Details region, make the customer Name field read-only for users with the Sales Representative job role.
Important
Before making changes using Page Composer, confirm that you are working in the correct sandbox. If not, create a sandbox before making your changes.
Page Composer opens in design mode.
The Direct Selection mode opens.
The field is outlined automatically with a light blue border.
The Edit property panel opens.
The Component Properties: Name dialog box opens.
Sign out of Oracle Applications.
Sign in to Oracle Applications as a sales representative.
Navigate to the Customers page and confirm your changes.
Hide the Sales Account Owner column in the Sales Account Search Results table in the Customers Summary page.
The Overview, Summary Page and the Sales Account Search region opens.
Important
Before making changes using Page Composer, confirm that you are working in the correct sandbox. If not, create a sandbox before making your changes.
The page opens in Page Composer design mode.
The Sales Account Owner column no longer appears in the Sales Account Search Results table.
Note
Individual users can optionally use the View menu to display this column for themselves through personalization.
Click Closeto sign out of the Page Composer.
Sign out of Oracle Applications.
Sign in to Oracle Applications with any job role.
Navigate to the Customers Summary page.
Confirm you changes.
The Sales Account Owner column no longer appears in the Sales Account Search Results table.
Remove the Registry ID column from the Sales Account Search Results table.
The Overview, Summary Page and the Sales Account Search region appear.
Important
Before making changes using Page Composer, confirm that you are working in the correct sandbox. If not, create a sandbox before making your changes.
The page opens in the Page Composer Design mode.
The column header is outlined automatically with a dark blue border and a window opens.
The table column parent component properties dialog box opens with options to hide and reorder the table columns.
The item is removed from the table View menu and from the table.
The following figure shows the Component Properties page.
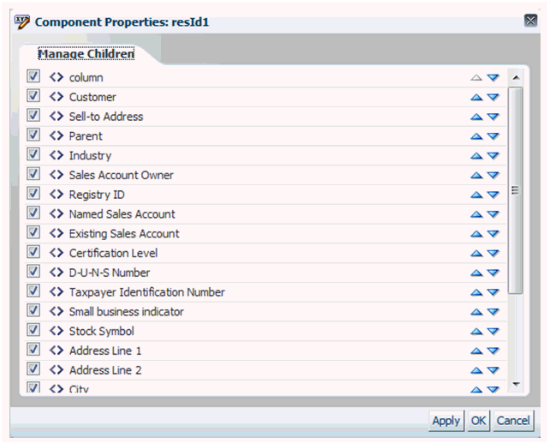
The Registry ID column no longer appears in the Sales Account Search Results table or in the View menu.
The following figure shows the Table View Menu without the Registry column.
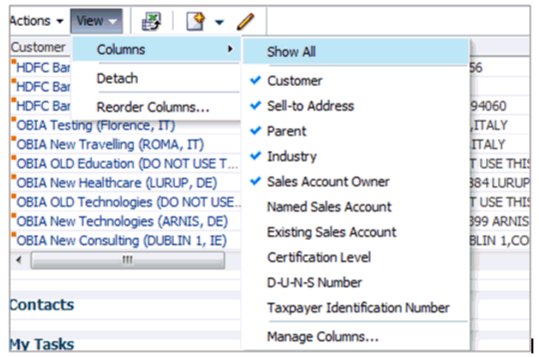
The Registry column is no longer available at run time. Users without access to Page Composer cannot restore the removed column to the View menu.
Click Closeto sign out of Page Composer.
Sign out of Oracle Applications.
Sign in to Oracle Applications with any job role.
Navigate to the Customers Summary page.
Confirm that the Registry ID column no longer appears in the View menu.
Change the label text for the Sell-to Address column in the Sales Account Search Results table in the Customers Summary page.
The Overview, Summary Page and the Sales Account Search region appear.
Important
Before making changes using Page Composer, confirm that you are working in the correct sandbox. If not, create a sandbox before making your changes.
The page opens in the Page Composer Design mode.
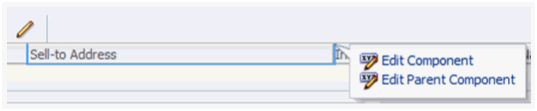
The column header is automatically outlined with a blue border.
The following figure shows the Sell-to Address link.

The following figure shows the Edit Component link.
The following figure shows the Override Menu item in the Change Property tab.
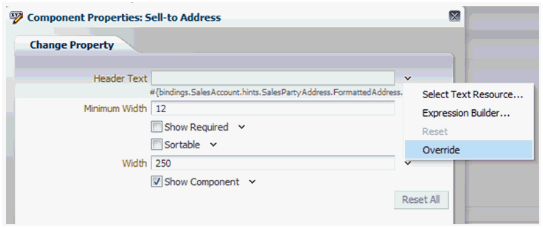
The blue dot to the right of the text field indicates that a value has been changed.
The table should now appear with the updated Address column label.
Click Close to sign out of Page Composer.
Sign out of Oracle Applications.
Sign in to Oracle Applications with any job role.
Navigate to the Customers Summary page.
Confirm that the column is now labeled "Address".
Tip
You can use the Reset option to restore the Header Text to the delivered message bundle string.
In the Sales Account Search Results table, Customers Summary page, change the width of the Named Sales Account column to 120.
The Overview, Summary Page and the Sales Account Search region appear.
Important
Before making changes using Page Composer, confirm that you are working in the correct sandbox. If not, create a sandbox before making your changes.
The page opens in the Page Composer Design mode.
The column header is outlined automatically with a blue border.
The following figure shows the Change Property tab in the Component Properties page.
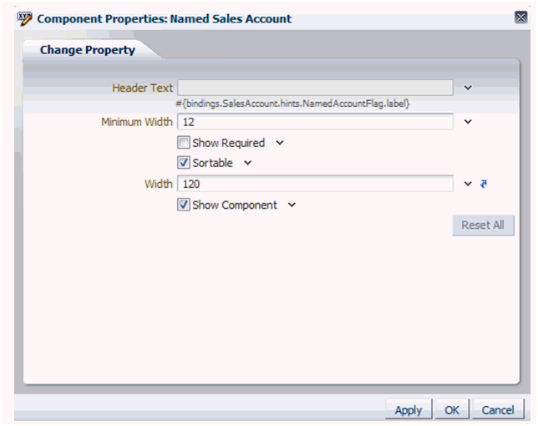
The table should now display with a wider Named Sales Account column.
Click Closeto sign out of Page Composer.
Sign out of Oracle Applications.
Sign in to Oracle Applications with any job role.
Navigate to the Customers Summary page.
Confirm the width of the Named Sales Account column.
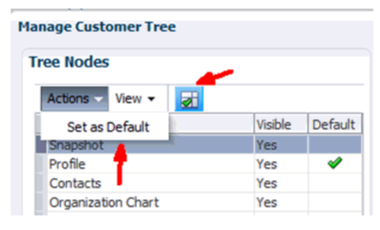
Make the Customer Snapshot page the default node in Customer Center for users with the Sales Representative job role.
The Overview, Summary page appears.
Important
Before making changes using Page Composer, confirm that you are working in the correct sandbox. If not, create a sandbox before making your changes.
The Edit Customer <Customer Name> Profile page appears by default.
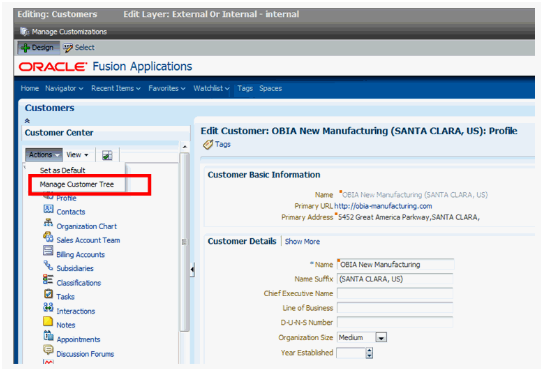
In the following figure the Profile node is selected and highlighted in the Customer Center Tree.
The page opens in the Page Composer Design mode.
The following figure shows the Edit Customer page with the Manage Customer Tree item selected in the Customer Center pane.
The Manage Customer Tree dialog box appears.
Tip
In the Manage Customer Tree dialog box, you can show or hide the nodes. In the View menu, you can expand and collapse the top level nodes.
The following figure shows the Manage Customer Tree Dialog box.
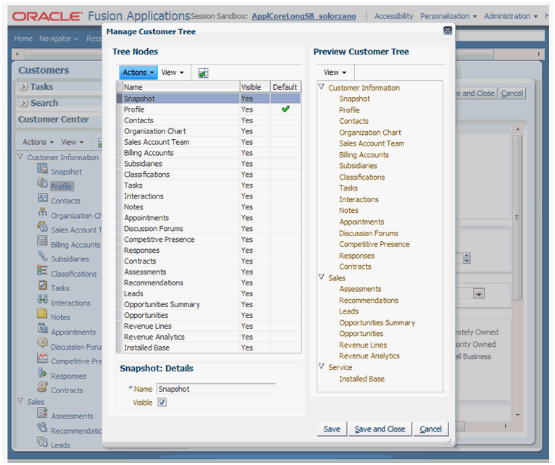
Select the Set as Default menu item in the table's Action menu.
Click the Set as Default icon in the table toolbar.
The following figure shows the Set as Default menu item in the Actions menu.
Click Closeto sign out of Page Composer.
Sign out of Oracle Applications.
Sign in to Oracle Applications with the Sales Manager role.
Navigate to the Edit Customer <Customer Name>Profile page.
Drill down into the customer record and confirm that the Snapshot page appears by default.
The pages that are available for extensibility using Application Composer are listed below, and are described in this topic.
Customers overview table
Create Customer page
Edit Customer page (Profile page)
Create Consumer page
Edit Consumer page (Profile page)
Note
To extend the simplified set of pages that are available for customers, use the Trading Community Person Profile and Trading Community Organization Profile objects in Application Composer, available with the Common application. You will also use the Sales Account object, which is available with the Customer Center application.
Note that these pages are not extensible:
Customer Overview page
Consumer Overview page
You can extend the following items in the Customers overview table:
Hide or show existing fields that belong to the Sales Account object.
Reorder columns.
Change column labels.
Add custom fields (all types), using the Sales Account object.

Note that you cannot make changes to these components on the page:
Show filter
Search
Actions menu (cannot add or hide and show)
Custom column widgets:
Custom font size for Name
Drilldown
Custom buttons and actions
You can extend the following items on the Create Customer page:
Hide or show existing fields that belong to the Trading Community Organization Profile and Sales Account objects.
Reorder fields.
Change field labels.
Add custom fields (all types).
Custom fields that you add to the Trading Community Organization Profile object appear on the Create Customer page, before the addresses set of fields.
Custom fields that you add to the Sales Account object appears at the bottom of the page.
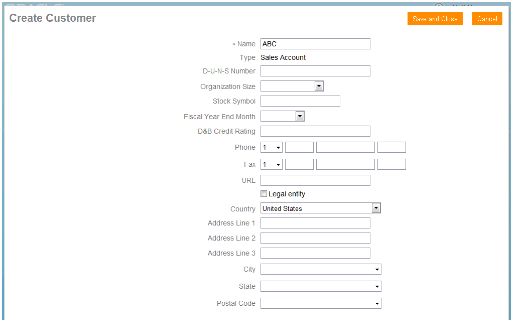
Note that you cannot add custom buttons and actions to this page.
These regions on the Edit Customer page (Profile page) are extensible:
Basic Information region
Use the Trading Community Organization Profile object in Application Composer to extend this region.
Sales Account region
Use the Sales Account object in Application Composer to extend this region.
Sales Account Team subtab
Use the Sales Account Resource object in Application Composer to extend this region. Then, navigate to the Pages node for the Sales Account object, and edit the Sales Account Team subtab in the Subtabs region.
You can extend the following items on the Edit Customer page (Profile page):
Hide or show existing fields.
Reorder fields.
Change display labels.
Add custom fields (all types).
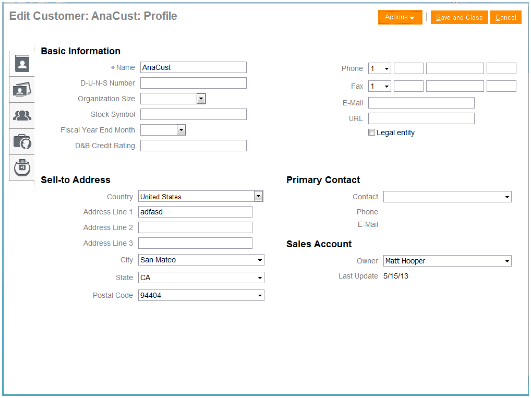
Note that you cannot make changes to these components on the page:
Subtab regions
Contacts
Opportunities
Leads
Actions button
Custom buttons and actions
You cannot create new subtabs.
You can extend the following items on the Create Consumer page:
Hide or show existing fields that belong to the Trading Community Person Profile and Sales Account objects.
Reorder fields.
Change field labels.
Add custom fields (all types).
Custom fields that you add to the Trading Community Person Profile object appear on the Create Consumer page, before the addresses set of fields.
Custom fields that you add to the Sales Account object appears at the bottom of the page.

Note that you cannot add custom buttons and actions to this page.
These regions on the Edit Consumer page (Profile page) are extensible:
Basic Information region
Use the Trading Community Person Profile object in Application Composer to extend this region.
Sales Account region
Use the Sales Account object in Application Composer to extend this region.
Sales Account Team subtab
Use the Sales Account Resource object in Application Composer to extend this region. Then, navigate to the Pages node for the Sales Account object, and edit the Sales Account Team subtab in the Subtabs region.
You can extend the following items on the Edit Consumer page (Profile page):
Hide or show existing fields.
Reorder fields.
Change display labels.
Add custom fields (all types).
Note that you cannot make changes to these components on the page:
Subtab regions
Opportunities
Leads
Actions button
Custom buttons and actions
You cannot create new subtabs.