11g Release 7 (11.1.7)
Part Number E20388-06
Home
Contents
Book
List
Contact
Us
|
Oracle® Fusion Applications CRM Extensibility Guide 11g Release 7 (11.1.7) Part Number E20388-06 |
Home |
Contents |
Book List |
Contact Us |
|
Previous |
Next |
This chapter contains the following:
Oracle Fusion Sales and Oracle Fusion Opportunity Management Extensibility : Overview
Customizing Sales Pages : Explained
Customizing Opportunity Pages : Explained
Customizing the Dashboard and Pages in Oracle Fusion Sales Using Page Composer : Explained
Customizing Oracle Fusion Sales Pages Using Page Composer : Worked Example
Customizing the Sales Dashboard Using Page Composer : Worked Example
Creating Opportunity Saved Searches by Job Role Using Page Composer : Worked Example
Extending Simplified Pages for Opportunities : Explained
Extending Simplified Pages for Opportunities using Page Composer : Worked Example
Each Oracle Fusion Sales and Oracle Fusion Opportunity Management object, and how to extend those objects using Oracle Fusion CRM Application Composer
How to customize Oracle Fusion Sales and Oracle Fusion Opportunity Management pages using Page Composer
To customize Sales Competitor and Sales Reference Customer pages, you need to know which pages and regions are extensible, and which objects to select in the Application Composer to customize those pages.
The Oracle Fusion Sales Competitor and Sales Reference Customer objects that are associated with Sales pages are:
Sales Competitor
Sales Reference Customer
The following table lists Sales Competitor and Sales Reference Customer pages and regions, and the related objects that you can access in the Application Composer to customize those pages. For example, the Edit Competitor page is extensible. To create custom fields that you can later add to the Edit Competitor page, you must select the Competitor object in the Application Composer and create your custom fields.
|
Sales Page |
Sales Region |
Application |
Underlying Business Object |
|---|---|---|---|
|
Competitors Overview page |
Competitors Summary (List View) |
Sales |
Sales Competitor |
|
Create Competitor page |
Default details region |
Sales |
Sales Competitor |
|
Edit Competitor page |
Default details region |
Sales |
Sales Competitor |
|
Sales References Overview page |
References Summary (list view) |
Sales |
Sales Reference Customer |
|
Edit Sales Reference page |
Default details region |
Sales |
Sales Reference Customer |
Next, expose those custom fields that you created by accessing the appropriate Application Composer configuration page, listed in the following section.
Note
To make only minor user interface changes to Sales Competitor and Sales Reference Customer pages without creating new objects or fields, use Page Composer instead of the Application Composer.
To add custom fields to the Sales Competitor and Sales Reference Customer regions listed in the table above, first create your custom fields using the Application Composer. Next, use the Application Composer's configuration pages to add those custom fields to the desired Sales Competitor and Sales Reference Customer regions. You access the configuration pages in the Application Composer from the Pages nodes under the following objects: Sales Competitor and Sales Reference Customer.
To access the Sales Competitor and Sales Reference Customer configuration pages:
Select the Sales application on the main Overview page.
In the object tree, select the object whose pages or regions you want to customize. For example, select the Sales Competitor object.
Next, select the select the Pages node for the object.
The following table indicates which Competitor and Sales Reference Customer objects populate which Sales Competitor and Sales Reference Customer pages and regions, as well as the Application Composer configuration pages where you can make user interface changes on those pages and regions.
|
Business Object |
Configuration Page in Application Composer |
Related Sales Page |
Related Sales Region |
|---|---|---|---|
|
Sales Competitor |
Competitors Summary (list view) in Overview page: Select Sales Competitor object, select Pages link, and then select the Edit Summary Table link. |
Competitors Overview page |
Competitors Summary (list view) region |
|
Sales Competitor |
Create Competitor page: Select Sales Competitor object, select Pages link, and then select the Edit Creation Page link. |
Create Competitor page |
Create Competitor page |
|
Sales Competitor |
Edit Competitor page, default details: Select Sales Competitor object, select Pages link, and then select the Edit Summary Form link. |
Edit Competitor page |
Edit Competitor page |
|
Sales Reference Customer |
References summary (list view) in Overview page: Select Sales Reference Customer object, select Pages link, and then select the Edit Summary Table link. |
References Overview page |
References summary (list view) |
|
Sales Reference Customer |
Edit Reference page: Select Sales Reference Customer object, select Pages link, and then select the Edit Summary Form link. |
Edit Reference page |
Edit Reference page |
Note that in the Sales area in the Application Composer screens, you can also make changes to the Oracle Fusion Base Sales pages, including the competitors and reference customer regions and fields. For more information on customizing these areas, see the topic, Customizing Sales Pages Using Application Composer: Explained.
To customize Opportunity Management pages, you need to know which pages and regions are extensible, and which objects to select in the Application Composer to customize those pages.
The Sales objects that are associated with opportunity pages are:
Opportunity
Opportunity Contact
Opportunity Revenue
Opportunity Team Member
The following table lists Opportunity Management pages and regions that you can access in the Application Composer to customize those pages. For example, in the Edit Opportunity page, both the summary portion and the details portion, are extensible. To create custom fields that you can later add to the Edit Opportunity page, you must select the Opportunity object in the Application Composer and create your custom fields.
|
Sales Page |
Sales Region |
Application |
Underlying Business Object |
|---|---|---|---|
|
Opportunity Overview page |
Opportunity summary (list view) table |
Opportunity Management |
Opportunity |
|
Create Opportunity page |
Create Opportunity page |
Opportunity Management |
Opportunity |
|
Edit Opportunity page |
Summary region (above the Detail region available by selecting the Show More option) |
Opportunity Management |
Opportunity |
|
Edit Opportunity page |
Detail region (expand the Show More option) |
Opportunity Management |
Opportunity |
|
Edit Opportunity page |
Revenue table |
Opportunity Management |
Opportunity |
|
Edit Opportunity page |
Revenue table detail stamp (the region uncovered when you expand the revenue item row) |
Opportunity Management |
Opportunity |
|
Edit Opportunity page |
Contacts summary table |
Opportunity Management |
Opportunity Contact (child object of opportunity) |
|
Edit Opportunity page |
Contacts summary table actions |
Opportunity Management |
Opportunity Contact (child object of opportunity) |
|
Edit Opportunity page |
Opportunity Team summary table |
Opportunity Management |
Opportunity Resource (child object of opportunity) |
|
Edit Opportunity page |
Opportunity Team summary table detail stamp (the region uncovered when you expand the team member row) |
Opportunity Management |
Opportunity Resource (child object of opportunity) |
Next, expose those custom fields on the opportunity page or region by accessing the appropriate Application Composer configuration page, listed in the following section.
Note
To make only minor user interface changes to Opportunity Management pages without creating new objects or fields, use Page Composer instead of the Application Composer.
To add custom fields to the Opportunity Management regions listed in the table above, first create your custom fields using the Application Composer. Next, use the Application Composer's configuration pages to add those custom fields to the desired Opportunity Management regions. You access the configuration pages in the Application Composer from the Pages nodes under the following objects: Opportunity, Opportunity Contact, Opportunity Revenue, and Opportunity Team Member.
To access the Opportunity Management configuration pages:
Select the Sales application on the main Overview page.
In the object tree, select the object whose pages or regions you want to customize. For example, select the Opportunity object.
Next, select the select the Pages node for the object. For a few objects, you can only customize fields, not pages or regions. For those objects, a Pages node will not be available.
The following table indicates which opportunity objects populate which Opportunity Management pages and regions, as well as the Application Composer configuration pages where you can make user interface changes on those pages and regions.
|
Business Object |
Configuration Page in Application Composer |
Related Opportunity Management Page |
Related Opportunity Management Region |
|---|---|---|---|
|
Opportunity |
Opportunity summary (list view) in Overview page: Select Opportunity object, select Pages link, and then select the Edit Summary Table link |
Overview page |
Opportunity summary (list view) |
|
Opportunity |
Create Opportunity page: Select Opportunity object, select Pages link, and then select the Edit Creation Page link. |
Create Opportunity page |
Create Opportunity page |
|
Opportunity |
Edit Opportunity page, Summary region, Default area (above the Show More area): Select Opportunity object, select Pages link, and then select the Edit Summary Form link. |
Edit Opportunity page |
Summary region, Default area |
|
Opportunity |
Edit Opportunity page, Summary region, Detailed area (available by expanding the Show More area): Select Opportunity object, select Pages link, and then select the Edit Summary Form link. |
Edit Opportunity page |
Summary region, Detailed area |
|
Opportunity |
Edit Opportunity page, Revenue Items table: Select Opportunity object, select Pages link, and then select the Edit Revenue Table link. |
Edit Opportunity page |
Revenue Items table |
|
Opportunity |
Edit Opportunity page, Revenue table, detail stamp: Select Opportunity object, select Pages link, and then select the Edit Revenue Table link. |
Edit Opportunity page |
Revenue Items table, detail stamp |
|
Opportunity |
Edit Opportunity page, Opportunity contact summary (list view) table: Select Opportunity object, select Pages link, then under Opportunity Detail Tab, select Opportunity Contact in the table and edit it using Actions menu. |
Edit Opportunity page |
Contacts tab, contacts summary (list view) table |
|
Opportunity |
Edit Opportunity page, Opportunity contact summary (list view) table actions: Select Opportunity object, select Pages link, then under Opportunity Detail Tab, select Opportunity Contact in the table and edit it using Actions menu. |
Edit Opportunity page |
Contacts tab, contacts summary (list view) table actions |
|
Opportunity |
Select Opportunity object, select Pages link, then under Opportunity Detail Tab, select Opportunity Team in the table and edit it using Actions menu. |
Edit Opportunity page |
Opportunity team summary (list view) table |
|
Opportunity |
Select Opportunity object, select Pages link, then under Opportunity Detail Tab, select Opportunity Team in the table and edit it using Actions menu. |
Edit Opportunity page |
Opportunity team summary (list view) table, detail stamp |
|
Opportunity Contact |
Opportunity Contact detail view fields: Select Opportunity Contact > Fields: Select Opportunity Contact object and then select Fields link. |
Edit Opportunity page |
Contact detail view (fields only) |
|
Opportunity Revenue |
Opportunity Revenue Items summary (list view) table columns: Select Opportunity Revenue object, select Pages link, and then select Edit Summary Table link. |
Edit Opportunity page |
Opportunity Revenue Items summary (list view) table |
|
Opportunity Team Member |
Opportunity Team member detail view fields: Select Opportunity Team Member object and then select Fields link. |
Edit Opportunity page |
Opportunity team member detail view (fields only) |
The Sales dashboard consists of a regional pane and a local pane. The local pane has two subtabs: Home and Pipeline. To customize the Sales dashboard, use the following steps:
Navigate to the dashboard page.
Select Customize Home Pages... from the Administration global menu.
In the Design Mode at the Site and Job Role layers, you can do the following customization tasks:
Change the local area layout. For example, you can change a two-column layout to a three-column layout. (Eight layouts are available.)
Add, rename, or remove Sales dashboard subtabs (except for the predefined Home tab).
Expand or collapse the dashboard Regional pane (or move the splitter location).
Add or remove panel boxes to or from the dashboard local area.
Add predefined content to the dashboard panel.
Edit the dashboard panel box properties: show or hide box, reorder child regions, display options, and style.
Add, edit, or remove from dashboards the ADF components, for example, regions, hyperlinks, images, text boxes, movable boxes, and web pages.
The Direct Selection Mode customizations are available at the Site and Job Role layers. You can do the following customization:
Change the order of links in the Tasks regional bin.
To customize Oracle Fusion Sales pages, you must have Sales Administrator privileges.
Navigate to the Sales work area.
Navigate to the page that you want to customize, for example, the Edit Opportunity and Revenue Item pages.
You can launch Page Composer in any of these pages by selecting Administration, Customize work area Pages.....
You can do the following customizations:
Hide or show a field.
Change a field label.
Make a field required or not.
Make a field read-only or updateable.
Reorder fields in a form.
Reorder table columns.
Hide or show table columns.
Set table column width and minimum width in percent or pixels.
Enable or disable column sorting.
Before you begin, consider the following setup requirements or prerequisites:
You will perform this task as a user with the Sales Administrator job role.
You will first make the custom changes in a Page Composer sandbox and then roll the changes out to all users with the Sales Representative job role by publishing the sandbox. Therefore, before you begin, familiarize yourself with your organization's process for creating and publishing Page Composer sandboxes.
First, invoke Page Composer's edit mode:
The edit page for the opportunity you selected opens.
The Customize Opportunities Pages dialog appears.
The page opens in Page Composer design mode. A bar appears across the top of the page along with the text, "Editing: Opportunities" and "Edit Layer: Job Role".
Direct Selection mode is now invoked, allowing you to make field-level changes.
To hide the Worst Case field and change the order of the Attachments and Partners fields, use the following steps:
A colored box appears around the field and its label.
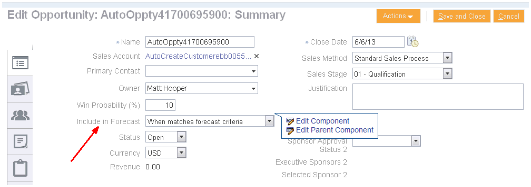
A dialog box opens with two options: Edit Component and Edit Parent Component.
The Component Properties: panelformlayout window opens.
The following figure shows the Component Properties dialog box with Worst Case selected.
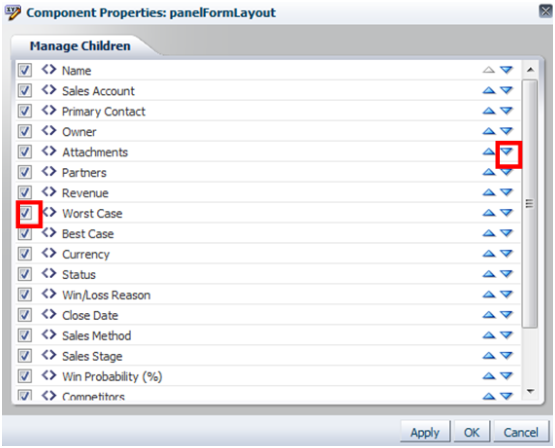
The order of the two fields changes.
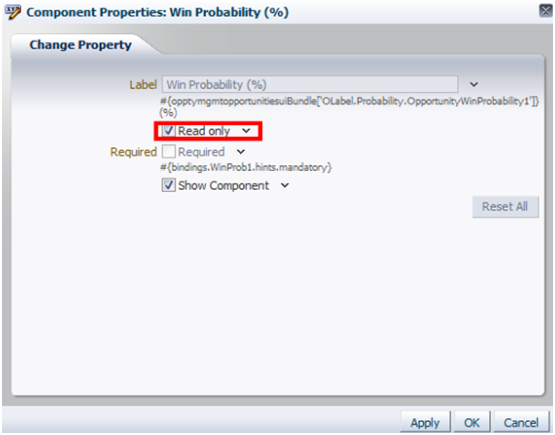
To make the Win Probability field read-only, use the following steps:
A dialog box opens with two options: Edit Component and Edit Parent Component.
The Component Properties: Win Probability (%) window opens.
The field becomes read-only, as shown in the following figure.
To make the Quantity column in the Revenue Items table required and not able to be sorted, use the following steps:
A dialog opens two options: Edit Component and Edit Parent Component.
The following figure shows the Change Property dialog box with the Show Required and Sortable check boxes.

When you are ready to commit your customization changes to the main line, perform these steps:
Verify your customizations by using the following steps:
The Additional Details region is expanded by default.
The Worst Case field is not visible.
The Win Probability (%) field is read-only.
The Attachments field is below the Partners field.
The Quantity column is marked as required with an asterisk, and it is not sortable.
Before you begin, consider the following setup requirements or prerequisites:
You will perform this task as a user with the Sales Administrator job role.
You will first make the custom changes in a Page Composer sandbox and then roll the changes out to all users with the Sales Representative job role by publishing the sandbox. Therefore, before you begin, familiarize yourself with your organization's process for creating and publishing Page Composer sandboxes.
You must invoke Page Composer's edit mode:
The Customize Opportunities Pages dialog appears.
The page opens in Page Composer design mode. A bar appears across the top of the page along with the text, "Editing: Sales" and "Edit Layer: Job Role".
Now, add a new, blank subtab (or page) to the dashboard:
The subtab now appears with the Quota name.
Next, add reports to the Quota subtab:
In the background, the report will be added to the page. The Add Content dialog will remain open.
In the background, the report will be added to the page. The Add Content dialog will remain open.
You now have reports on the page.
Optionally, you can change the layout of the page from the default three-column layout, following these steps:
When you are ready to commit your customization changes to the main line, perform these steps:
Finally, sign in to the applications as a salesperson and verify your changes:
Before you begin, consider the following setup requirements or prerequisites:
You will perform this task as a user with the Sales Administrator job role.
You will first make the custom changes in a Page Composer sandbox and then roll the changes out to all users with the Sales Representative job role by publishing the sandbox. Therefore, before you begin, familiarize yourself with your organization's process for creating and publishing Page Composer sandboxes.
Set the profile option, Require Additional Criteria for Opportunity Search Enabled (MOO_SRCH_ADDL_CRITERIA_REQD), according to your business requirements. Set it to Yes to require additional criteria in the search (for example, Opportunity Name or Opportunity Number) other than the required fields.
First, invoke Page Composer's edit mode:
The Customize Opportunities Pages dialog appears.
The page opens in Page Composer design mode. A bar appears across the top of the page along with the text, "Editing: Sales" and "Edit Layer: Job Role".
Next, create and run the custom search.
Before beginning this portion of the example, consider the following concepts:
Sales opportunities (and other CRM objects like leads) have the concept of record sets.
Record sets represent your data set, or the data you have access to.
A record represents a single opportunity and a record set represents multiple opportunities.
Opportunities have inherent data security on them that depends on your membership in the sales team and territory hierarchy.
In this example, you are creating a saved search based on:
Record sets where the salesperson is on the sales team;
Opportunity close dates that fall within the current and next quarters of the calendar; and
Opportunities in open status.
|
Criteria |
Value |
|---|---|
|
Record Set |
Records where I am on the team |
|
Close Period |
Equals: Current and Next Quarter |
|
Status |
Equals: Open |
Set as Default: This option makes the saved search the default in the drop-list of saved searches.
Run Automatically: This option makes the saved search run automatically when users navigate to the search panel in Opportunities work area.
When you are ready to commit your customization changes to the main line, perform these steps:
Finally, sign in to the applications as a salesperson and verify your changes:
The pages that are available for extensibility using Application Composer are listed below, and are described in this topic.
Opportunity overview table
Create Opportunity page
Edit Opportunity page
You can extend the following items in the Opportunity overview table:
Hide or show existing fields.
Reorder columns.
Change column labels.
Add custom fields (all types).
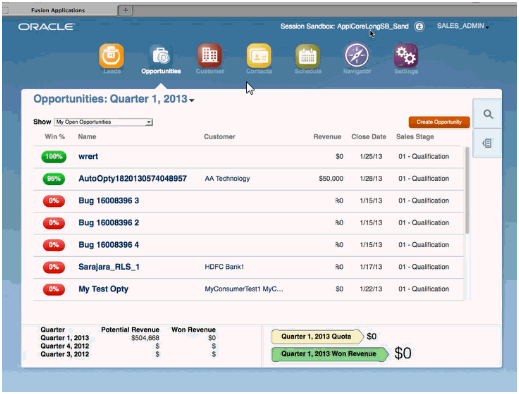
This figure shows the Opportunities overview page.
Note that you cannot make changes to these components on the page:
Show filter
Search
Actions menu (cannot add or hide and show)
Custom column widgets:
Win Probability
Custom font size for Name
Drilldown
Embedded analytics
Custom buttons and actions
You can extend the following items on the Create Opportunity page:
Hide or show existing fields.
Reorder fields.
Change field labels.
Add custom fields (all types).
Add custom fields to the Revenue Items table.
In Application Composer, add custom fields to the Opportunity Revenue object, and then use the Edit Revenue Table configuration page available for the Opportunity object, under the Pages node.
Note that you cannot add custom buttons and actions to this page.
These regions on the Edit Opportunity page are extensible:
Opportunity region
Revenue Items table
In Application Composer, add custom fields to the Opportunity Revenue object, and then use the Edit Revenue Table configuration page available for the Opportunity object, under the Pages node.
Opportunity Contacts subtab
In Application Composer, add custom fields to the Opportunity Contact object. Then, navigate to the Pages node for the Opportunity object, and edit the Contacts subtab in the Opportunity Detail Tab region.
Opportunity Team subtab
In Application Composer, add custom fields to the Opportunity Team object. Then, navigate to the Pages node for the Opportunity object, and edit the Team subtab in the Opportunity Detail Tab region.
Notes subtab
In Application Composer, the Note object is available under the Common application.
Interactions subtab
In Application Composer, the Interaction object is available under the Common application.
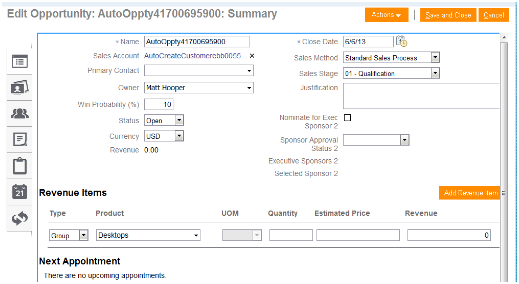
This figure shows the Edit Opportunity page.
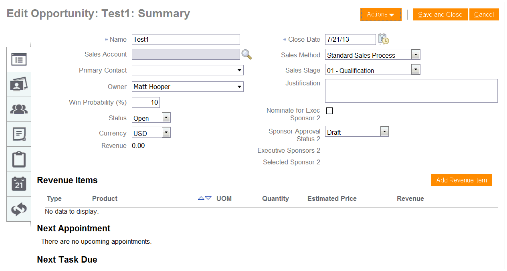
You can extend the following items on the Edit Opportunity page:
Hide or show existing fields.
Reorder fields.
Change display labels.
Add custom fields (all types).
Note that you cannot make changes to these components on the page:
Subtab regions
Notes overview page
Tasks
Appointments
Appointments/Task region on Profile page
Actions button
Custom buttons and actions
You cannot create new subtabs.
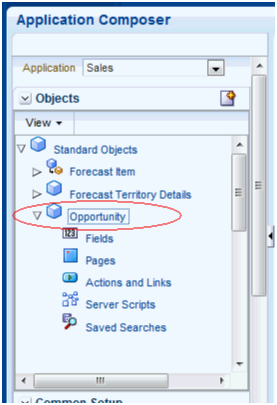
This figure shows the Objects tree with the Opportunity object selected.
This figure shows the simplified page for Opportunities

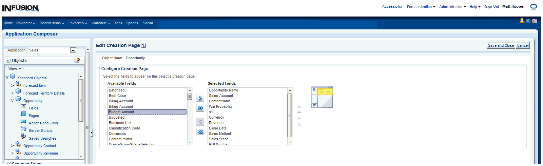
This figure shows the Configure Creation page.
Note
Changes that you make to a simplified page are not automatically replicated on the object's corresponding desktop page.
You can extend simplified pages using Page Composer. Perform the changes in sandbox to test it first.
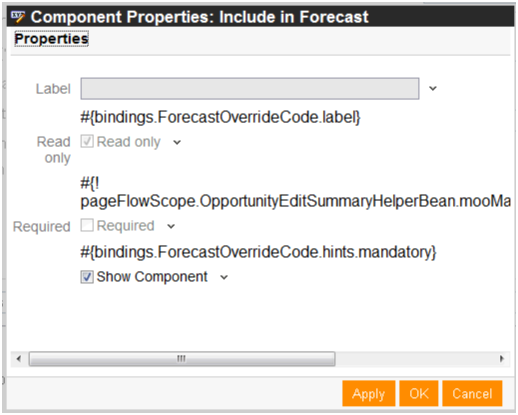
This example demonstrates how you can hide the Include in Forecast field for a sales representative in the Opportunities page and leave it available for the rest of the roles.
The steps to hide the Include in Forecast field for a sales representative are:
This figure shows the Simplified Page for the Opportunity page with the Customize User Interface option selected.

You can customize three layers:
Global
External/Internal
Job Role
This figure shows the Customize User Interface window.

The two buttons are:
Design: Represents design mode used to extend transactional pages.
Select: Allows you to select components in a page to edit.
This figure shows the Page Composer view in the Job Role layer.

This figure shows the Edit Opportunity page.
This figure shows the Component Properties window.
This figure shows the Edit Opportunity page for the sales representative role.