6 Generating Reports
Instructions for Generating and Customizing Reports
For descriptions of the Entitlement reports, see "Entitlement Report Descriptions".
About the Reports in Audit Vault and Database Firewall
The Oracle AVDF reports are automatically generated reports that reflect audit data collected from secured targets, as well as data monitored by any Database Firewalls you have configured. You can save or schedule reports in either PDF or Excel format. You can also view reports online and interactively adjust the online report view by filtering data. You can save these interactive views to see them online later.
The reports are organized into various categories, such as access reports and management reports. An alerts report allows you to view and respond to alerts. You can also create user-defined reports that focus on specific audit events or firewall data.
You can also produce Sarbanes-Oxley (SOX), Payment Card Industry (PCI), Data Protection Act (DPA), Gramm-Leach-Bliley Act (GLBA), and Health Insurance Portability and Accountability Act (HIPAA) reports. To specify which of these reports are required for a secured target database, you can add the secured target to the appropriate group (such as the SOX group) from the Secured Targets tab. See "Creating and Modifying Secured Target Groups".
Auditors can view data and modify reports for secured targets to which they have been granted access by a super auditor. However, an auditor can also send a report to other auditors for attestation regardless of the access rights of the other auditors.
You can specify email recipients for scheduled reports once they are generated, as well as create email templates for report notifications. See "Creating or Modifying an Email Template".
Related Event Data Appendices
For audit data, reports track the audit events described in the following Appendices:
Browsing the Built-In Reports
From the Built-in Reports section of the Reports tab, you can browse report data online, schedule reports, and link to previously scheduled and generated reports.
To generate or browse the built-in reports:
-
Log in to the Audit Vault Server console as an auditor, and then click the Reports tab.
-
Click a link under the Built-in Reports menu (for example, Compliance Reports), navigate to the report you want, and do one of the following:
-
Click the List generated reports icon to view a previously scheduled and generated report. See Downloading Generated Reports in PDF or XLS Format
-
Click the Browse report data icon to view and browse the report data online. Timestamps in reports when you browse them online are displayed in your local browser time.
-
Click the Schedule Report icon to schedule the report in PDF or XLS format. See "Scheduling and Generating PDF or XLS Reports". Timestamps in a PDF or XLS report are written in the Audit Vault Server time (based on the Timezone Offset setting specified by an administrator).
-
-
When browsing a report, click the Detail Page icon in the leftmost column for a row (an audit event) to view detailed information for that event.
See "Audit Record Fields" for a description of each field in an audit record.
Downloading a Report in HTML or CSV Format
You can download reports you are browsing online as CSV (for use in an Excel spreadsheet) or HTML files.
To download a report in HTML or CSV format:
-
Log in to the Audit Vault Server console as an auditor, and access the report that you want.
-
From the Actions menu, select Download.
-
Select CSV or HTML.
-
In the File Download dialog box, click Save.
-
Click Save As dialog, select a location and enter a name for the file.
-
Click Save.
Customizing the Built-in Reports
About Customizing Built-in Reports
You can create customized reports based on the built-in reports and then save the new report formats. Oracle AVDF provides tools to filter, group, and highlight data, and define columns displayed in the reports. You can also create a categories for your saved reports. Customized and saved reports are listed on the Interactive Reports page.
While you can schedule the default built-in reports to be generated in PDF format, saved custom reports cannot be scheduled or printed in PDF format, and therefore must be viewed online.
Filtering and Controlling the Display of Data in a Report
About Filtering and Display Settings in Reports
You can control the display of data in a report to focus on a particular set of data. Oracle AVDF automatically saves the report settings so that if you leave the page, the report settings are still in place when you return. Optionally, you can save the report as a custom report (see "Saving your Customized Reports").
Filtering Data in a Report
About Filtering Data in Reports
You can filter the report to show all rows based on a particular column, or a subset of rows, using an expression.
You can create multiple filters as needed. For example, if you want to filter all SYS users who are being audited for the SUPER USER LOGON event, you would create one filter to catch all SYS users, and then a second filter to catch all SUPER USER LOGON events. If two or more of the filters for a report are enabled, then the report uses both or all of them (as in an AND operation). You can toggle specific filters on or off, depending on the results that you want.
Filtering Column and Row Data Using the Search Bar
You can use the Search bar to search for row data in one or all columns in the report (for example, all rows that contain the letters SYS, such as SYS and SYSTEM, in all columns).
To search for row data in one or all columns:
-
Log in to the Audit Vault Server as an auditor, click the Reports tab, and access the report that you want.
-
If you want to focus the search on a specific column, in the Search bar, use the Search icon to select from the drop-down list of available columns.
By default, the search applies to all columns.
-
In the Search bar text area, enter all or part of the row text you want to search for.
-
Click Search.
Filtering All Rows Based on Data from a Selected Column
This filtering method lets you filter data in all rows based on a selected column (for example, all rows that contain SYS in the User column).
To filter all rows based on data from a selected column:
-
Log in to the Audit Vault Server as an auditor, click the Reports tab, and access the report that you want.
-
Click the Actions menu, and select Filter.
The Filter dialog box appears. The existing filter definitions for the current user session are shown below the Filter dialog box.
-
For Filter Type, select Column.
-
In the Column drop-down list, select the column on which you want to base the filter.
You can select from columns that are displayed in the report or other columns.
-
Click Apply.
The existing filter definitions for the current user session are shown above the report columns.
-
To enable or disable the display of the filtered data, select its corresponding check box. To remove a filter, click its Remove Filter icon.
Filtering Row Data Using an Expression
This method lets you select all rows that meet a WHERE condition, such as all users who are not user SYS. You can create the expression for all columns, even those that are not shown in the current report.
To filter row data using an expression:
-
Log in to the Audit Vault Server as an auditor, click the Reports tab, and access the report that you want.
-
From the Actions menu, select Filter.
The Filter dialog box appears. The existing filter definitions for the current user session are shown below the Filter dialog box.
-
For Filter Type, select Row.
The Filter Expression fields appears along with Columns and Function/Operators fields to help you build the expression
-
Use the Columns, Function/Operators, and Filter Expression fields to build your filter expression:
-
Columns: Select the name(s) of the column(s) from the list to use them in the expression. When you select a column, its abbreviation appears in the Filter Expression field.
-
Functions/Operators: Select function(s) and/or operator(s) from the list to build your expression.
-
Filter Expression: If you have built an expression from the available columns, functions and operators, enter any parameters needed to complete your expression. If you type the expression, remember that it is case-sensitive. In most cases, use uppercase letters.
-
-
Click Apply.
Oracle AVDF filters the display of row data based on the expression you created, and adds the filter definition above the report columns.
-
To enable or disable the display of the filtered data, select its corresponding check box. To remove a filter, click its Remove Filter icon.
Hiding or Showing Columns in a Report
When you hide or show columns in a report, you still can perform operations on hidden columns, such as filtering data based on a column that you have hidden.
To hide or show columns in a report:
-
Log in to the Audit Vault Server as an auditor, click the Reports tab, and access the report that you want.
-
From the Actions menu, click Select Columns.
The Select Columns dialog field appears.
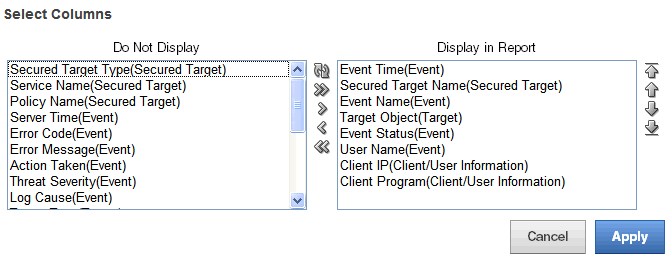
Description of the illustration ''report_select_column.gif''
-
Move column names under the Do Not Display or Display in Report boxes:
-
Select the column names to move and then click the left or right arrow between the column name boxes.
-
Move all columns left or right by using the >> and << buttons.
-
Use the top button (the arrows in a circle) to reset the columns to their original locations in the two boxes.
-
-
To set the order of displayed columns, in the Display in Report box, select the column name, then click the up or down arrow on the right side of the box to reorder the column's position in the list.
-
Click Apply.
Formatting Data in a Report
Sorting Row Data for All Columns
To sort row data for all columns:
-
Access the report that you want.
-
Select the Actions menu (gear) icon on the Search bar.
-
In the Actions Menu, select Sort.
The Sort dialog box appears under the Search bar.
-
Enter the following information:
-
Column: For up to six columns, select the columns to sort. By default, the first sort column is Event Time, which is sorted in descending order.
-
Direction: Select either Ascending or Descending.
-
Null Sorting: Select the Null sorting rule for each column (Default, Nulls Always Last, or Nulls Always First). The default is to not sort nulls.
-
-
Click Apply.
Highlighting Rows in a Report
You can highlight specific rows in a report by assigning them colors. This enables anyone viewing the report to quickly find areas that are of particular interest.
To highlight rows in the report:
-
Access the report that you want.
-
Select the Actions menu (gear) icon on the Search bar.
-
In the Actions menu, select Highlight.
The Highlight dialog box appears under the Search bar.
-
Enter the following information:
-
Name: Enter a name for this highlight instance. (Optional)
-
Sequence: Enter a sequence number to determine the order in which the highlight filter rules are to be applied when two or more highlight filter rules are in effect. The default value is 10.
-
Enabled: Select Yes to enable the highlight or select No to disable it.
-
Highlight Type: Select Row to highlight a row or select Cell to highlight a cell.
-
Background Color: Select a background color for the row or cell. Click a color to display color options, or click the colored icon to the right of the color selection field to display a color selection box from which to choose a different color. Alternatively, you can manually enter the HTML code for a color.
-
Text Color: Select a text color for the row or cell using the same method you used for the background color. (Optional)
-
Highlight Condition: Edit the highlight filter rule expression by identifying the column, the operator, and the expression for each of the three fields in the highlight condition.
-
Column: Select any column name, including hidden columns.
-
Operator: Select an operator from a list of standard Oracle Database operators, such as
=,!=,NOT IN, andBETWEEN. -
Expression: Enter the comparison expression (without quotation marks) based on a known value for that column name to complete the filter expression.
For example, entering the filter expression
EVENT=SUPER USER LOGONfilters for all values in the Event column that contain the valueSUPER USER LOGON.
-
-
-
Click Apply.
Charting Data in a Report
You can select from four chart styles to chart data in a report. After you create the chart, you can access it whenever you access the report.
To chart data in a report:
-
Access the report that you want.
-
Select the Actions menu (gear) icon on the Search bar, and then select Chart.
The Chart dialog box appears under the Search bar.
-
Enter the following information:
-
Chart style: Select from one of the four chart styles: Horizontal Column, Vertical Column, Pie, and Line.
-
Label: Select from the list of columns for this report. You can include hidden columns as well as displayed columns.
-
Value: Select from the list of columns for this report, including hidden columns. If you select Count from the Function list, then you do not need to select a value.
-
Function: Select an aggregate function (Sum, Average, Minimum, Maximum, or Count) on which to aggregate the data values.
-
Sort: Select ascending or descending sorting for values and labels.
-
Axis Title for Label: Enter a name for the axis title.
-
Axis Title for Value: Enter a name for the axis value.
-
-
Click Apply.
The chart appears, with the Edit Chart and View Report links under the Search bar.
Adding Control Breaks to a Report
You can create a break group based on selected column(s). This pulls the column(s) out of the report as a master record and groups all rows with the same value for the selected column under that master record. This is useful for filtering by multiple column values.
For example, you may have an Activity Overview report that displays several columns of data. If you want to see that data broken up by the Client IP Address and Secured Target Name columns, you would add control breaks for those columns. The resulting report would have data broken up into smaller tables for each unique combination of Client IP Address and Secured Target Name.
To add a control break in a column:
-
Access the report that you want.
-
From the Actions drop-down list, select Format, then select Control Break.
-
Select the column(s) to which you want to add a control break.
You can select up to six columns in the order that you want the data to be broken up.
-
Click Apply.
Using the Group By Function to Format a Report
The Group By dialog lets you group data by up to three columns in a report, and specify up to three functions to perform on any column, and display the resulting values as additional columns in the custom report.
For example, suppose you want to create a custom report to show the number of events of a certain status (for example SUCCESS or FAILURE) for each secured target and client IP address combination. Using Group By, you can create a custom report to group unique secured targets together in the first column, client IP addresses for each secured target together in the second column, and display Event Status in the third column. You then specify a function to count distinct values in the Event Status column for each secured target and client IP address combination.
The resulting custom report will contain four columns: Secured Target, Client IP, Event Status, and the final column will show the results of the function, for example, the number of events with SUCCESS status for that secured target and IP address.
To use the Group By feature:
-
Access the report you want.
-
From the Actions drop-down list, select Format, then select Group By.
The Group By dialog is displayed.
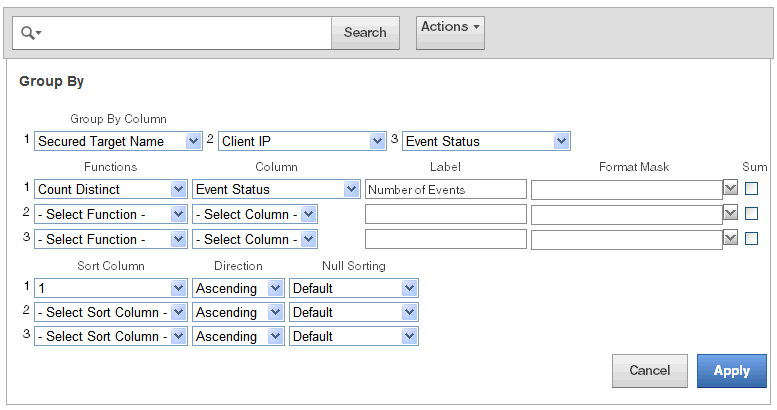
Description of the illustration ''report_group_by.gif''
-
In the Group By Column section, from the first drop-down list, select a data column for grouping data in column 1 of your custom report.
For example, if you select Secured Target Name, column 1 of your report will have secured targets grouped together. Optionally, select data groupings for columns 2 and 3 of your report.
-
Optionally, in the Functions section, specify up to three functions to operate on specific data columns:
-
Under Functions, select a function, such as Count Distinct.
-
Under Column, select any data column in the default report.
-
Optionally, under Label, enter a column heading for the new column created by the result of this function.
-
Optionally, under Format Mask, select the format of the data in the new column created by the result of this function.
-
Optionally, select the Sum check box if you want to add a Sum row at the bottom of your custom report to add the values in the new column.
-
-
Optionally, in the sorting section, define the sort order for your custom report columns.
-
Click Apply.
Saving your Customized Reports
When you customize a built-in report with your specified filters and display settings, you can save this customized report. Saved reports are listed in the Interactive Reports page in the Reports tab. The saved reports cannot be printed in PDF format, and therefore must be viewed online.
When you save a custom report, you can save it under a specific category that you select or create as you save the report. You can also make the custom report private or share it with other users as a public report.
To create and save a custom report starting from a built-in report:
-
Log in to the Audit Vault Server as an auditor, click the Reports tab, and access the report that you want.
-
Filter and design the display as needed.
See "Filtering and Controlling the Display of Data in a Report".
-
From the Actions menu, select Save Report.
-
Enter the following information in the Save Report dialog box:
-
Name: Enter a name for the report.
-
Public: Select this check box to make the report accessible to all users.
-
Category: Select from the list of available categories, or select New Category, then enter a name for the new category.
When you save the report, the category appears in the Category column of the saved reports list.
-
Description: Enter a brief description of the report.
-
-
Click Apply.
The custom report data is displayed, and the custom report is listed on the Interactive Reports page.
Accessing Your Saved Custom Reports
To access a saved custom report:
-
Log in to the Audit Vault Server as an auditor.
-
Click the Reports tab, and under Custom Reports, click Interactive Reports.
The Saved Reports page appears.
-
In the Report Name column, select the link for the report that you want to access.
The report appears. From here, you can:
-
Click the saved report name to edit it.
-
Click a filter to modify it
-
Enable or disable a filter by selecting or unselecting its check box
-
Remove a filter by clicking the Remove Filter icon (an "X")
-
Enable or disable a control break by selecting or unselecting its check box
-
Remove a control break by clicking the Remove Breaks icon (an "x")
For information on changing the report settings, or disabling and enabling the report filters, see "Filtering Data in a Report".
-
Scheduling and Generating PDF or XLS Reports
About Scheduling and Creating PDF or XLS Reports
You can schedule reports to be sent to other users in PDF or XLS format. You can run the report immediately, or you can create or select a schedule to run the report at a later time. You can specify a list of users who receive notifications of the report, or who need to attest to the report.
Note that interactive reports (saved reports you created by customizing built-in reports) cannot be scheduled.
Note:
The timestamp shown in scheduled reports is based on the Timezone Offset setting specified by the administrator in the Audit Vault Server. See Oracle Audit Vault and Database Firewall Administrator's Guide for more information.Creating a Report Schedule
To schedule and create a PDF or XLS report:
-
Log in to the Audit Vault console as an auditor, and click the Reports tab.
-
Find the report you want to schedule, and click the schedule icon for the report.

Description of the illustration ''report_schedule_icon.gif''
-
At the top of the Create/Edit Scheduled Job page, in the Schedule Report section, select the Report Format (PDF or XLS).
You can optionally change the Category Name and Report Name fields.
-
In the Report Filters section, enter or select:
-
Row Limit
-
Event Time
-
Secured Target Name (or All) - This appears if applicable to the report.
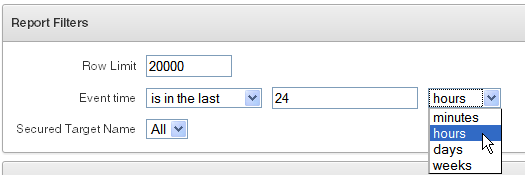
Description of the illustration ''report_schedule_filter.gif''
-
-
In the Schedule section, select how you want to schedule the report:
-
Immediately - Run the report immediately
-
Specify Schedule - Select a run time, timezone, run date, and how often to repeat the schedule.
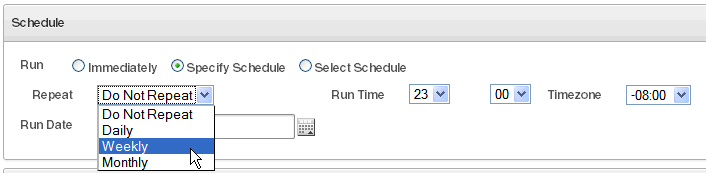
Description of the illustration ''report_schedule_schedule.gif''
-
Select Schedule - (See Note) Select an existing schedule for the report by selecting a Schema where the schedule is stored, and the name of the Schedule from the drop-down lists.
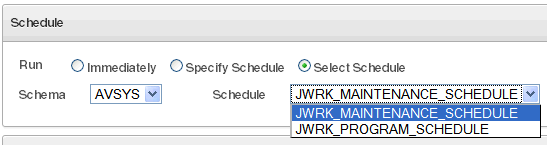
Description of the illustration ''report_schedule_select.gif''
Note: This options only appears if a database administrator creates these schedules in the embedded Oracle Database using the
DBMS_SCHEDULERPL/SQL package. The Schema list displays schemas that containDBMS_SCHEDULERschedules. The Schedule list displays all theDBMS_SCHEDULERschedules in that schema. By default, the Schema drop-down list contains theSYSschema, which owns theDBMS_SCHEDULERpackage.
-
-
In the Retention Policy section, if necessary, click Change to change the default archiving policy, and then click Save.
The archiving (or retention) policy is created by an Oracle AVDF administrator, and determines how long the generated PDF or XLS report is retained in the Audit Vault Server before it is archived. If you do not select one, the default retention policy will be used (12 months retention online and 12 months in archives before purging). See Oracle Audit Vault and Database Firewall Administrator's Guide for more information on archiving policies.
-
In the Notification section, optionally select users to notify about this report, and then click Add to List:
-
For the Send field, select either Notification to send an email with a link to the report, or Attachment to send an email with the report attached as an XLS or PDF file.
-
From the Template drop-down list, select a report notification template.
-
From the Distribution List drop-down list, if applicable, select a distribution list.
-
If you want to send the report to additional recipients, enter their email addresses in the To email and Cc fields. Enter full email addresses separated by commas.
See also "Creating or Modifying an Email Distribution List" and "Creating or Modifying an Email Distribution List".
-
-
Under Attestation, select one or more auditors who should attest to the report.
Optionally, you can set the order in which the auditors are listed in the Attestation area.
-
Click Schedule.
The PDF or XLS is stored in the database, and the report appears in the Report Schedules page in the Reports tab.
You can check the Jobs page in the Settings tab to see the status of report generation.
Viewing or Modifying Report Schedules
To view or modify report schedules, in the Report Workflow menu, click Report Schedules. To modify a report schedule, click the name of the report. See "Creating a Report Schedule" for details on report schedule fields.
Downloading Generated Reports in PDF or XLS Format
When scheduled reports are generated you can download them to your computer in PDF or XLS format (depending on the format you selected in your report schedule). You can also notify other users by sending a link to the report, or attaching the report in an email.
You can download an unscheduled report in HTML or CSV format, while browsing it online. See "Downloading a Report in HTML or CSV Format".
To list and download generated PDF or XLS reports you have scheduled:
-
Log in to the Audit Vault console as an auditor, and click the Reports tab.
-
Under Report Workflow, click Generated Reports.
A list of generated reports appears.
-
From here, you can do the following:
-
To see a list of pending reports, click Show Pending Reports.
-
To save the report to your computer, click the report name, and then save the file.
-
To notify another user of the report, select the report, and then click Notify. See Notifying Users About Generated PDF or XML Reports.
-
To attest and annotate the report, click the Details icon in the second column. See "Annotating and Attesting Reports" for instructions.
-
Notifying Users About Generated PDF or XML Reports
To send notifications to other users or distribution lists about a scheduled and generated report:
-
Log in to the Audit Vault console as an auditor, and click the Reports tab.
-
Under Report Workflow, click Generated Reports.
A list of generated reports appears.
-
Select the report you want and click the Notify.
-
Fill the fields as follows:
-
For the Send field, select either Notification to send an email with a link to the report, or Attachment to send an email with the report attached as an XLS or PDF file.
-
From the Template drop-down list, select a report notification template.
-
From the Distribution List drop-down list, if applicable, select a distribution list.
-
If you want to send the report to additional recipients, enter their email addresses in the To email and Cc fields. Enter full email addresses separated by commas.
-
-
Click Notify.
Annotating and Attesting Reports
After a report has been generated, auditors can annotate and attest to the report. This enables you to create a record of all notes and attestations for the report in one place, with the most recent note and attestation listed first. If you delete the report, its associated annotation and attestations are removed as well.
To annotate and attest to a report:
-
Log in to the Audit Vault Server console as an auditor.
The Dashboard page appears.
-
Access the list of reports to attest to by doing one of the following:
-
From the Home page, under Attestation Actions, select the report from the list.
-
Click the Reports tab, and under the Report Workflow menu, select Generated Reports secondary tab. Find the report that you want to annotate or attest and then click the report name. When you display the report, it appears in PDF format. Click the Details button to display the Details for Generated Report page.
You can quickly filter the reports if you want. See "Filtering Data in a Report" for more information.
-
-
In the New Note field, enter a note for the report.
-
Perform one of the following actions:
-
To save the note only, click the Save button. The note appears in the Previous Notes area.
-
To save the note and attest to the report, click the Save & Attest button. The note appears in the Previous Notes area and the Attestation area is updated with your user name and the time that you attested to the report.
-
To return to the report, click the View Report button.
-
-
Click Done when you are finished.
The Generated Reports page appears.
Creating and Uploading Your Own Custom Reports
You can add your own custom reports by using Oracle BI Publisher, or another report authoring tool from a third party. You will need a report definition file (XML format) and a report template (RTF format), which you can download from Oracle AVDF. This section describes how to download these files from an existing Oracle AVDF report and use them for your own report.
The audit event appendices in this guide contain data that may help you in creating your own reports. See "Related Event Data Appendices".
To add a report starting from an existing report definition and template file:
-
Log in to the Audit Vault Server console as an auditor.
-
Click the Reports tab, and under Custom Reports, click Uploaded Reports.
The Uploaded Reports page is displayed, listing any previously uploaded custom reports, and built-in reports in the Pre-configured Reports section.
-
Find a pre-configured report to use as a starting point for your new custom report.
-
Download the report definition and template files for the report you want:
-
Click the Download Report Template icon and save the RTF file.
-
Click the Download Report Definition icon and save the XML file.
-
-
Customize the report definition and template files using either Oracle BI Publisher or another tool, as necessary.
Refer to Oracle BI Publisher documentation available from this page:
http://www.oracle.com/technetwork/documentation/index.html. -
Click Upload.
-
In the Report Template file field, enter the name or browse for your customized report template (RTF) file.
-
In the Report Definition file field, enter the name or browse for your customized report definition (XML) file.
-
Click Save.
The new report is listed under Uploaded Reports.
Audit Report Descriptions
About the Audit Reports
You can access Audit Reports from the Reports tab by clicking Audit Reports. There are four groups of Audit Reports:
-
Activity Reports
-
Alert Reports
-
Entitlement Reports (see "Managing and Viewing Entitlement Data")
-
Stored Procedure Audit Reports
This section contains information about Activity, Alert, and Stored Procedure Reports.
Activity Reports
About the Activity Reports
You can access Activity Reports from the Reports tab by clicking Audit Reports.
The default activity reports track general database access activities such as audited SQL statements, application access activities, and user login activities. These reports display the following kinds of information: secured target name, secured target type, host name for the secured target, version of the secured target, IP address of the secured target, audit time, the event itself (such as LOGIN statements), current and previous values of the event, user and host client information, the event status (such as failure), and the time the event took place.
Activity Overview Report
The Activity Overview page displays information about all monitored and audited events. Events appear based on their audit event time in descending order (newest record first). This report can be very large, but you can create a user-defined version that filters specific audit data. By default, 15 audit records are displayed on each page.
If you suspect that the Oracle AVDF data warehouse is not being refreshed with the latest audit data, then check the Activity Overview Report. If you find that the audit data that you want is not listed in this report, then ask your Oracle AVDF administrator to check the server-side log files (alert and trace logs) for errors. If there are errors, then contact Oracle Support.
Data Access Report
The Data Access Report displays audited read access to data for a specified period of time.
See Also:
"Related Event Data Appendices" for related data access audit events in a specific secured target typeData Modification Report
The Data Modification Report displays the details of audited data modifications for a specified period of time.
Data Modification Before-After Values
The Data Modification Before-After Values Report displays details of audited data modifications for a specified period of time, showing before and after values.
Data for this report comes from the TRANSACTION LOG audit trails written by databases. Be sure that an Oracle AVDF administrator has configured and started a TRANSACTION LOG audit trail for the secured target you want to monitor. This report then pulls data from database transaction (redo) logs.
Database Schema Changes Report
The Database Schema Changes Report displays details of audited DDL activity for a specified period of time.
All Activity Report
The All Activity Report displays details of all captured audit events for a specified period of time.
Failed Logins Report
The Failed Logins Report displays details of audited failed user logins for a specified period of time.
User Login and Logout Report
The User Login and Logout Report displays details of audited successful user logins and logouts for a specified period of time.
Entitlements Changes Report
The Entitlements Changes Report displays details of audited entitlement related activity for a specified period of time.
Audit Settings Changes Report
The Audit Settings Changes Report displays details of observed user activity targeting audit settings for a specified period of time.
Secured Targets Startup/Shutdown Report
The Secured Targets Startup/Shutdown Report displays details of observed startup and shutdown events for a specified period of time.
Alert Reports
Alert reports are accessed from the Reports tab, by clicking Audit Reports.
The alert reports track critical and warning alerts. An alert is raised when data in audit records matches a predefined alert rule condition. Alerts are grouped by associated secured target, by event category, and by the severity level of the alert (either warning or critical).
There are three alert reports:
-
All Alerts Report - This report shows all alerts, both critical and warning alerts, issued within a specified period of time.
-
Critical Alerts Report - This report shows critical alerts issued within a specified period of time.
-
Warning Alerts Report - This report shows warning alerts issued within a specified period of time.
See Also:
-
"Creating and Configuring Alerts" for information about creating and configuring alerts
-
"Responding to an Alert" for information about responding to an alert
Stored Procedure Auditing Reports
You can access Stored Procedure Auditing reports from the Reports tab by clicking Audit Reports.
Stored procedure auditing reports allow you to audit changes to stored procedures on secured target databases. Oracle AVDF connects to the secured target database at scheduled intervals and discovers any changes or additions that have been made to stored procedures.
Table 6-1 lists the Stored Procedure Auditing reports.
Table 6-1 Stored Procedure Auditing Reports
| Report | Description |
|---|---|
|
Stored Procedure Activity Overview |
Digest of all audited operations on stored procedures for a specified period of time |
|
Stored Procedure Modification History |
Details of audited stored procedure modifications for a specified period of time |
|
Created Stored Procedures |
Stored procedures created within a specified period of time |
|
Deleted Stored Procedures |
Stored procedures deleted within a specified period of time |
|
New Stored Procedures |
Latest state of stored procedures created within a specified period of time |
Compliance Report Descriptions
About the Compliance Reports
The compliance reports provide out-of-the-box reports to help you meet regulations associated with credit card, financial, data protection, and health care related data. They track activities that are typically required to meet standard compliance regulations, such as changes to the database structure or its objects, failed logins, administrator activities, system events, and user logins or logoffs.
The following compliance report categories are available:
-
Payment Card Industry (PCI) Reports
-
Gramm-Leach-Bliley Act (GLBA) Reports
-
Health Insurance Portability and Accountability Act (HIPAA) Reports
-
Sarbanes-Oxley Act (SOX) Reports
-
Data Protection Act (DPA) Reports
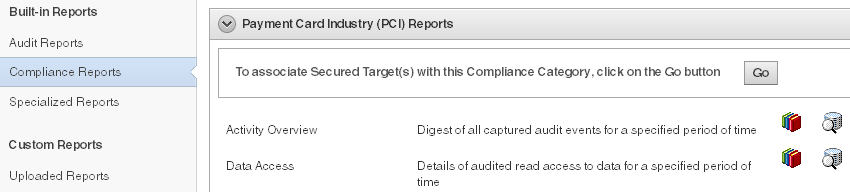
To access the compliance reports, click the Reports tab, then from the Built-in Reports menu, select Compliance Reports.
Associating Secured Targets with Compliance Report Categories
In order to generate compliance reports for a secured target, you must add it to a compliance report category.
To associate secured targets with compliance report categories from the Compliance Reports page, click the Go button for a compliance category, as shown in Figure 6-1.
Figure 6-1 Associating Secured Targets With Compliance Report Categories
Description of ''Figure 6-1 Associating Secured Targets With Compliance Report Categories''
This takes you to the Groups page under the Secured Targets tab, and allows you to add a secured target as a member of a compliance group in Oracle AVDF. See "Managing Compliance for Secured Target Databases" for detailed instructions on assigning secured targets to compliance groups.
Reports Included in Each Compliance Report Category
Table 6-2 lists the set of reports available for each compliance report category.
Table 6-2 Compliance Reports Included for each Compliance Category
| Report Name | Description |
|---|---|
|
Activity Overview |
Digest of all captured audit events for a specified period of time |
|
Data Access |
Details of audited read access to data for a specified period of time |
|
Data Modification |
Details of audited data modifications for a specified period of time |
|
Database Schema Changes |
Details of audited DDL activity for a specified period of time |
|
All Activity |
Details of all captured audit events for a specified period of time |
|
Failed Logins |
Details of audited failed user logins for a specified period of time |
|
User Login and Logout |
Details of audited successful user logins and logouts for a specified period of time |
|
Entitlements Changes |
Details of audited entitlement related activity for a specified period of time |
|
Audit Settings Changes |
Details of observed user activity targeting audit settings for a specified period of time |
|
Secured Target Startup/Shutdown |
Details of observed startup and shutdown events for a specified period of time |
|
Stored Procedure Activity Overview |
Digest of all audited operations on stored procedures for a specified period of time |
|
Stored Procedure Modification History |
Details of audited stored procedure modifications for a specified period of time |
|
Created Stored Procedures |
Stored procedures created within a specified period of time |
|
Deleted Stored Procedures |
Stored procedures deleted within a specified period of time |
|
New Stored Procedures |
Latest state of stored procedures created within a specified period of time |
Specialized Database Firewall Report Descriptions
About the Specialized Database Firewall Reports
Database Firewall reports contain data that is collected if a secured target is monitored by the Database Firewall according to a firewall policy, as well as data gathered if Oracle AVDF is integrated with BIG-IP ASM Web application firewall (WAF) from F5 Networks, Inc.
Data collected by the Database Firewall includes:
-
Database Firewall action and threat level
-
Database user name
-
OS user name
-
Statement type (data definition, procedural, data manipulation, etc.)
-
Client application name and IP address
-
SQL request ID
-
Database Firewall cluster ID
-
Comparison data between F5's WAF policy and the Database Firewall policy
To access these specialized reports, click the Reports tab, then from the Built-in Reports menu, select Specialized Reports.
Database Firewall Policy Reports
Table 6-3 lists the Database Firewall Policy reports.
Table 6-3 Database Firewall Policy Reports
| Report Name | Description |
|---|---|
|
Database traffic analysis by client IP detail |
Audit details for statements grouped by protected database and client IP address |
|
Database traffic analysis by OS user detail |
Audit details for statements grouped by protected database and OS user |
|
Database Traffic Analysis by User Blocked Statements |
Audit details for blocked statements grouped by protected database and OS user |
|
Database Traffic Analysis by User Warned Statements |
Audit details for warned statements grouped by protected database and OS user |
|
Database Traffic Analysis by User Invalid Statements |
Audit details for invalid statements grouped by protected database and OS user |
Database Firewall F5 Reports
Table 6-4 lists the specialized Database Firewall F5 reports.
Table 6-4 Database Firewall F5 Reports
| Report Name | Description |
|---|---|
|
F5 Confirmed Alert |
F5 alerts confirmed as Out of Policy by the Database Firewall policy |
|
F5 Incident Report |
F5 incidents by time |
|
F5 No WAF match |
Alerts from F5's Web Application Firewall (WAF) not matched by any SQL traffic |
|
F5 Policy Conflict by User |
F5 alerts raised, but confirmed as In Policy by the Database Firewall policy, for each user |
|
F5 Policy Conflict |
F5 alerts raised, but confirmed as In Policy by the Database Firewall policy |
|
F5 WAF Blocked Alert |
Alerts blocked by F5 |