6 Oracle Adaptive Access Manager Proxy
Oracle Adaptive Access Manager Universal Installation Option (UIO) reverse proxy deployment option offers login risk-based multifactor authentication to Web applications without requiring any change to the application code. The proxy's main function is to redirect user traffic from the application login flow to the Oracle Adaptive Access Manager login flow. The UIO Proxy is available for the Apache Web server. In this chapter the Oracle Adaptive Access Manager Proxy for Apache will be referred to as the UIO Apache Proxy.
This chapter provides information on the implementation and use of the UIO Apache Proxy. It contains the following sections:
For information on configuring OAAM Server, the client-facing multifactor authentication Web application specific to the UIO Proxy deployment, see Chapter 8, "Customizing OAAM Web Application Pages."
The intended audience is for integrators who configure the UIO Proxy to add multifactor authentication to Web applications. An understanding of HTTP request/response paradigm is required to understand the material presented in this document.
6.1 Introduction
The Introduction section of this chapter contains the following topics:
6.1.1 Important Terms
For your reference, important terms are defined in this section.
The Universal Installation Option is the Oracle Adaptive Access Manager integration strategy that does not require any code modification to the protected Web applications. The Universal Installation Option involves placing the UIO Proxy in front of the protected Web applications
A proxy is a server that services the requests of its clients by forwarding requests to other servers. This chapter is concerned with the Web proxy, where the proxy handles Web Protocols, mainly HTTP.
A forward proxy is an intermediate server that sits between the client and the origin server. To get content from the origin server, the client sends a request to the proxy naming the origin server as the target, and the proxy then requests the content from the origin server and returns it to the client. The client must be specially configured to use the forward proxy to access other sites.
A reverse proxy appears to the client just like an ordinary Web server. No special configuration on the client is necessary. The client makes ordinary requests for content in the name-space of the reverse proxy. The reverse proxy then decides where to send those requests and returns the content as if it were itself the origin.
OAAM Server is the Web application component of Oracle Adaptive Access Manager. The UIO Proxy redirects the client browser to OAAM Server for tracking and authentication purposes as defined by the UIO Proxy XML configuration.
6.1.2 Architecture
The following diagrams show a typical UIO Proxy deployment.
Figure 6-1 shows a Web application before the UIO Proxy is deployed to provide multifactor authentication.
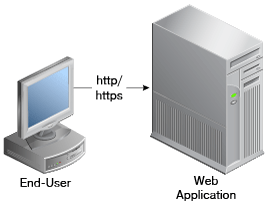
Figure 6-2 shows various components added after the UIO Proxy deployment.
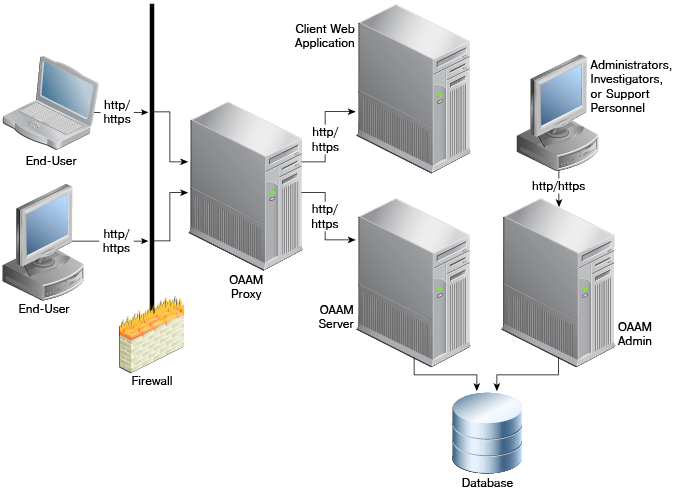
Your local machine running Apache HTTP server. The OAAM sample application is running on an application server on the company intranet. A deployment of OAAM is running on OAAM Server on the company intranet.
The UIO Proxy intercepts the HTTP traffic between the client (browser) and the server (Web application) and performs the appropriate actions, such as redirecting the traffic to OAAM Server, to provide multifactor authentication and authorization. OAAM Server, in turn, communicates with OAAM Admin to assess the risk, and then takes the appropriate actions, such as permitting the login, challenging the user, blocking the user, and other actions.
6.1.3 References
For more information about the Apache HTTP Server, see the Apache HTTP Server Version 2.2 Documentation website at
6.2 Installing UIO Apache Proxy
To install the UIO Apache Proxy, a new Apache Hypertext Transfer Protocol Daemon (httpd) has to be installed into which the UIO Apache Proxy is installed. This Apache httpd uses the mod_proxy, a module that implements the proxy/gateway/cache, to reverse-proxy (proxy on behalf of the back-end application that has to be protected).
The Installation section contains information for installing the UIO Apache Proxy for Windows and Linux platforms.
The installation procedure involves:
-
Ensuring that the Apache
httpdrequirements are metSee Section 6.2.2, "Downloading or Building the Apache httpd."
-
Copying the UIO Proxy
dllsand supporteddllsto specific directories in ApacheSee Section 6.2.3, "Copying the UIO Apache Proxy and Supported Files to Apache."
-
Configuring
memcache(for Linux only) -
Editing the httpd.conf to activate the UIO Proxy
See Section 6.2.5, "Configuring httpd.conf."
As part of this section, information is also provide on optionally installing the
mod_proxy_html, which is needed to rewrite the HTML links in a proxy situation, to ensure that links work for the users outside the proxy -
Modifying the settings of the UIO Proxy using application configuration XML files
See Section 6.2.6, "Modifying the UIO Apache Proxy Settings."
The post installation procedures involve:
-
Setting Up Rules and User Groups
Creating a new user to run the UIO Apache Proxy process (on Linux only)
After following the installation instructions for OAAM UIO Proxy, the following Apache configuration settings will be set:
-
The UIO Module
-
The Apache Reverse Proxy Module
-
A virtual host entry
-
Location mappings for OAAM and the application with ProxyPass and ProxyPassReverse targets for each
-
SSL certificate location if required
6.2.1 Before You Begin - UIO Proxy Files for Windows and Linux
For your reference, the UIO Proxy files are summarized in the following tables.
Note:
The UIO Apache Proxy binaries for Windows and Linux are different. Since the UIO Proxy is in C/C++, the same binary do not work on different platforms (unlike Java)The files are in $ORACLE_HOME/oaam/oaam_proxyplatform_specific_file.
6.2.1.1 Windows
The Windows UIO Proxy binary files are listed in Table 6-1.
Table 6-1 Windows Binary Files
| Name | Description |
|---|---|
|
mod_uio.so |
UIO Apache Proxy module |
|
log4cxx.dll |
Apache Log4cxx library |
|
libxml2.dll |
XML/HTML Parser |
|
apr_memcache.dll |
APR Memcache client library. |
The Windows UIO Proxy data files are listed in Table 6-2.
| Name | Description |
|---|---|
|
UIO_Settings.xml |
UIO Apache Proxy Settings XML file |
|
UIO_log4j.xml |
UIO Apache Proxy Log4j (log4cxx) configuration XML file |
|
TestConfig.xml |
UIO Apache Proxy Sample application configuration file |
|
UIO_Settings.rng |
Relax NG grammar for UIO_Settings.xml |
|
UIO_Config.rng |
Relax NG grammar for application configuration XML files |
6.2.1.2 Linux
The Linux UIO Proxy binary files are listed in Table 6-3.
| Name | Description |
|---|---|
|
mod_uio.so |
UIO Apache Proxy module |
|
liblog4cxx.so.0.10.0.0 |
Apache Log4cxx library |
|
libxml2.so.2.6.32 |
XML/HTML parser |
|
libapr_memcache.so.0.0.1 |
APR Memcache client library. |
The Linux UIO Proxy data files are listed in Table 6-4.
| Name | Description |
|---|---|
|
UIO_Settings.xml |
UIO Apache Proxy Settings XML file |
|
UIO_log4j.xml |
UIO Apache Proxy Sample Log4j (log4cxx) configuration XML file |
|
TestConfig.xml |
UIO Apache Proxy Sample application configuration files |
|
UIO_Settings.rng |
Relax NG grammar for UIO_Settings.xml |
|
UIO_Config.rng |
Relax NG grammar for application configuration XML files |
6.2.2 Downloading or Building the Apache httpd
The pre-installation steps for downloading or building the Apache httpd depend on the platform, Windows or Linux, and on whether certain requirements are met.
6.2.2.1 Windows
Download the latest Apache httpd (2.2.8) build for Windows from the Apache website. Check that the following requirements are met:
-
The Apache
httpd(2.2.8) build is version 2.2.8 -
The
mod_proxysupport is enabled (the standard installation contains themod_proxy) -
The
mod_sslsupport is enabled
6.2.2.2 Linux
Build the Apache httpd following the instructions on the Apache website. When you build Apache, check that the following requirements are met:
-
The Apache
httpd(2.2.8) build is version 2.2.8 -
The
mod_sois enabled (for dynamically loading modules) -
The
mod_proxyis enabled -
The
mod_sslsupport is enabled
6.2.3 Copying the UIO Apache Proxy and Supported Files to Apache
Copy the UIO Apache Proxy and support files to specific directories in Apache for both Windows and Linux platforms.
6.2.3.1 Windows
Table 6-5 provides information on the following:
-
The directories you must copy the UIO Apache Proxy files to after installation
-
The tree structure of the UIO Apache Proxy libraries and configuration files, if you installed the files in
C:\Apache2.2 -
The directories the UIO Apache Proxy binary files go into are listed in Table 6-5.
Table 6-5 Directories for Windows UIO Proxy Binary Files
| Directories | File Descriptions |
|---|---|
|
C:\Apache2.2\modules\mod_uio.so |
UIO Apache Proxy module |
|
C:\Apache2.2\bin\log4cxx.dll |
Apache Log4cxx library |
|
C:\Apache2.2\bin\libxml2.dll |
XML/HTML Parser |
|
C:\Apache2.2\bin\apr_memcache.dll |
APR Memcache library. |
Move the data files into the directories listed in Table 6-6.
Table 6-6 Directories for Windows UIO Proxy Data Files
| Directories | File Descriptions |
|---|---|
|
C:\OAAMUIO\UIO_Settings.xml |
UIO Apache Proxy settings XML file |
|
C:\OAAMUIO\UIO_log4j.xml |
UIO Apache Proxy Log4j (log4cxx) configuration XML file |
|
C:\OAAMUIO\TestConfig.xml |
UIO Apache Proxy application configuration files (any number) |
|
C:\OAAMUIO\UIO_Settings.rng |
Relax NG grammar for UIO_Settings.xml |
|
C:\OAAMUIO\UIO_Config.rng |
Relax NG grammar for application configuration XML files |
|
C:\OAAMUIO\logs\uio.log |
UIO Apache Proxy log |
To change the location of the various configuration files, see Section 6.2.5, "Configuring httpd.conf."
6.2.3.2 Linux
After the installation of the Apache httpd, perform the following steps:
-
Copy the UIO Apache Proxy binary files into (assuming Apache
httpdis installed in/usr/local/apache2) the directories shown in Table 6-7.Table 6-7 Directories for Linux UIO Proxy Binary Files
Directories Description /usr/local/apache2/modules/mod_uio.so
UIO Apache Proxy Module
/usr/local/apache2/lib/liblog4cxx.so.0.10.0.0
Apache Log4cxx Library
/usr/local/apache2/lib/libxml2.so.2.6.32
XML/HTML Parser
/usr/local/apache2/lib/libapr_memcache.so.0.0.1
APR Memcache client library.
-
Then, create soft links to the libraries as follows:
cd /usr/local/apache2/lib
ln -s liblog4cxx.so.10.0.0 liblog4cxx.so.10
ln -s libxml2.so.2.6.32 libxml2.so.2
ln -s libapr_memcache.so.0.0.1 libapr_memcache.so.0
-
Ensure that the binary files have executable permission.
-
Apache
httpdis typically run asrootso that it creates a parent process that listens on port 80, and it spawns handler processes that run as the user given in the User directive inhttpd.conf.For this reason, create a user called
oaamuiothat is the checkpoint user for the UIO Apache Proxy. The proxy configuration and log files are accessible by this user. Ensure that only this user can access the log files. Assuming/home/oaamuiois the home directory for this user, the directory structure looks like the one presented in Table 6-8. (The UIO Apache Proxy data files should follow the directory structure shown in Table 6-8.)Table 6-8 Directories for Linux UIO Proxy Data Files
Directories Description /home/oaamuio/uio/UIO_Settings.xml
UIO Apache Proxy settings XML file
/home/oaamuio/uio/UIO_log4j.xml
UIO Apache Proxy Log4j (log4cxx) configuration XML file
/home/oaamuio/uio/TestConfig.xml
UIO Apache Proxy application configuration files (any number)
/home/oaamuio/uio/UIO_Settings.rng
Relax NG grammar for UIO_Settings.xml
/home/oaamuio/uio/UIO_Config.rng
Relax NG grammar for application configuration XML files
/home/oaamuio/uio/logs/uio.log
UIO Apache Proxy log
To change the location of the various configuration files, see Section 6.2.5, "Configuring httpd.conf."
The run-time user of httpd should have the appropriate permissions to access all these files.
6.2.4 Configuring Memcache (for Linux only)
This configuration is an optional one that may be needed for Linux deployment of UIO Apache Proxy.
The UIO Apache Proxy maintains a session for the user where it keeps local state such as session level variables for the user.
-
On Windows, there is always a single process for the Apache httpd server running and so this session information is local to the process.
-
On Linux, you could have multiple Apache httpd server processes running which means the session information cannot be kept local to the process but must be centralized. In this case, you can use memcached to store the session information.
The following description is to identify when you must use memcached to hold the UIO Apache Proxy session information.
Apache httpd ships with a selection of Multi-Processing Modules (MPMs) which are responsible for binding to network ports on the machine, accepting requests, and dispatching children to handle the requests. On Linux: httpd can run with two different MPMs: httpd with prefork MPM (single-threaded) or with worker MPM (multithreaded). The MPM is built into the httpd and is not a run-time option.
Configure UIO Apache Proxy to Use Memcached for Prefork MPM
With prefork MPM, httpd maintains a pool of single-threaded processes, where each request is handled by a single process. In this case, you must configure UIO Apache Proxy to use memcached.
Configure Apache httpd to Launch a Single Process for Worker MPM
With worker MPM, httpd maintains a pool of multithreaded processes, where every process could be handling multiple requests at a time. In this case, you can configure Apache httpd to launch a single process and avoid using memcached. However, the default configuration launches multiple processes and to keep that unchanged, then you must configure UIO Apache Proxy to use memcached. An example of an httpd.conf that you can use to configure a worker MPM to launch a single process is shown below.
# Following forces worker MPM to run 1 process (make sure mod_cgid is
# not loaded, otherwise it starts one more httpd process).
# Basically ThreadLimit=MinSpareThreads=MaxSpareThreads=MaxClients=ThreadsPerChild
# and StartServers=1. Setting MaxRequestsPerChild to 0 ensures that the process is not
# bounced.

<IfModule mpm_worker_module>

ThreadLimit 150
StartServers 1
MinSpareThreads 150
MaxSpareThreads 150
MaxClients 150
ThreadsPerChild 150
MaxRequestsPerChild 0

</IfModule>
On Windows, httpd MPM is always in multi-threading mode with a single process.
On Linux, in the case where the httpd runs multiple process (irrespective of single or multithreaded), the UIO Apache Proxy session data must be maintained in a common store (database or cache) so that multiple processes can access the session data. The UIO Proxy uses memcache (a memory based very fast cache) to store the session data.
At startup, the UIO Proxy autodetects whether httpd is running with a single process or multiple processes. If httpd is running with multiple processes (which is the case with prefork or worker mpm on Linux), it tries to connect to the memcache daemon using default connection parameters (that are defined in Section 6.2.6.1, "UIO_Settings.xml"). On Windows, by default, the UIO Proxy uses local sessions. It does not connect to the memcache daemon; however it can also be configured to maintain session data in the memcache daemon (explained in Section 6.2.6.1, "UIO_Settings.xml").
Install memcache for Scenarios in which the UIO Apache Proxy Connects to memcache daemon
For the scenarios where the UIO Apache Proxy is connecting to memcache daemon, you must install memcache on your system using the instructions from the memcache website and run the memcache daemon(s) before running the Apache httpd.
Install memcache using instructions at:
http://www.danga.com/memcached
You may already have a binary installation available from your Linux distribution. The UIO Apache Proxy has been tested with version 1.2.5 of memcache.
6.2.5 Configuring httpd.conf
Edit the httpd.conf file to activate the UIO Apache Proxy. The httpd.conf file is the main configuration file used by the Apache HTTP Server.
6.2.5.1 Basic Configuration without SSL
In the sample installation, the Apache httpd has been installed in c:\ProgramFiles\Apache2.2 or /usr/local/apache2.
To ensure that http.conf is correctly set up in your environment, follow these steps:
-
Ensure that the following lines are uncommented to enable
mod_proxy.LoadModule proxy_module modules/mod_proxy.so LoadModule proxy_http_module modules/mod_proxy_http.so
-
Add the following line to the end of the
LoadModulegroup of lines to activate the UIO Apache Proxy.LoadModule uio_module modules/mod_uio.so
-
Add a line to point to the
UIO_Settings.xmlfile that has the settings for the UIO Apache Proxy.Note:
The setting must be the absolute path to theUIO_Settings.xmlfile.On Windows (all paths should be with forward slashes),
UioProxySettingsFile c:/OAAMUIO/UIO_Settings.xml
On Linux,
UioProxySettingsFile /home/oaamuio/uio/UIO_Settings.xml
-
Disable
mod_proxy's forward-proxying capability since it is not needed.ProxyRequests Off <Proxy *> Order deny,allow Allow from all </Proxy> -
Enable the
mod_proxyconfiguration to reverse-proxy tooaam_serverand the target application is being protected by OAAM.ProxyPass /oaam_server/ http://FQDN_oaam_server:oaam_server_port/oaam_server/ ProxyPassReverse /oaam_server/ http://FQDN_oaam_server:oaam_server_port/oaam_server/ ProxyPass /target_app/ http://FQDN_target_app:target_app_port//target_appl ProxyPassReverse /target_app/ http://<QDN_target_app:target_app_port/target_app
-
Set the user/group of
httpdusing User and Group directives tooaamuio.
The actual settings for steps 4 and 5 are installation-specific and are only examples of the settings you must set. Information on setting details can be found in your Apache documentation.
With the changes described and by properly setting up UIO_Settings.xml, you should be able to access OAAM Server (oaam_server) and target application and run Phase One scenarios. The URL for the target application is:
http://apache-host:apache-port/target_application
So far in this chapter, the configuration to the proxy has been performed without using SSL.
6.2.5.2 Configuration with SSL
To enable SSL, refer to the Apache website for Tomcat and your Apache documentation.
The UIO Apache Proxy requires mod_ssl to be part of httpd. Having the mod_ssl as part of httpd ensures that the OpenSSL library is linked in and is properly configured for the UIO Apache Proxy to generate session ids. You must ensure that mod_ssl is loaded and you do not need to perform any configuration if you are not using SSL.
mod_proxy_html module (optional)
Optionally, you may need to install the mod_proxy_html (http://apache.webthing.com/mod_proxy_html/) Apache module. This module is needed only if the protected application has Web pages that have hard-coded URL links to itself. If the application has relative URLs, you do not need this module.
From their website, the executive summary of this module is as follows:
mod_proxy_html is an output filter to rewrite HTML links in a proxy situation, to ensure that links work for users outside the proxy. It serves the same purpose as Apache's ProxyPassReverse directive does for HTTP headers, and is an essential component of a reverse proxy.
For example, if a company has an application server at appserver.example.com that is only visible from within the company's internal network, and a public Web server www.example.com, they may want to provide a gateway to the application server at http://www.example.com/appserver/. When the application server links to itself, those links need to be rewritten to work through the gateway. mod_proxy_html serves to rewrite <a href="http://appserver.example.com/foo/bar.html">foobar</a> to <a href="http://www.example.com/appserver/foo/bar.html">foobar</a> making it accessible from outside.
6.2.6 Modifying the UIO Apache Proxy Settings
Modify the UIO Apache Proxy Settings by following the subsequent examples.
6.2.6.1 UIO_Settings.xml
<UIO_ProxySettings xmlns="http://example.com/">


 <!-- Log4jProperties location="/home/oaamuio/uio/UIO_log4j.xml"/ -->
       <Log4jProperties location="f:/oaamuio/uio/UIO_log4j.xml"/>
       <Memcache ipaddress="127.0.0.1" port="11211" maxconn="10"/>

       <GlobalVariable name='one" value="value"/>

       <ConfigFile location="/home/oaamuio/uio/TestConfig1.xml" enabled="true"/>
       <ConfigFile location="/home/oaamuio/uio/TestConfig2.xml" enabled="false"/>

       <ConfigFile location="f:/oaamuio/uio/TestConfig1.xml" enabled="false"/>

       <Setting name="GarbageCollectorInterval_ms" value="60000"/>
       <Setting name="MaxSessionInactiveInterval_sec" value="1200"/>
       <Setting name="CachedConfigExpiry_sec" value="120"/>
       <Setting name="SessionIdCookieName_str" value="SessionId"/>

       <Setting name="SessionCookie_ExpiryInMinutes" value="0"/>
       <Setting name="SessionCookie_IsHttpOnly" value="0"/>
       <Setting name="SessionCookie_IsSecure" value="1"/>

       <Setting name="Profiling" value="0"/>
       <Setting name="IgnoreUrlMappings" value="0"/>
       <Setting name="CaptureTraffic" value="0"/>


<!-- Enable AutoLoadConfig for Windows or Single-process Linux.
 Do not use for Multiple-process Linux when in production.
-->
<Setting name="AutoLoadConfig" value="1"/>

<!-- Setting name="UseMemcache" value="1"/ -->

       </UIO_ProxySettings>
Set the location of log4j.xml file that defines the logging configuration for the UIO Apache Proxy. The location should be an absolute path; it cannot be ServerRoot relative. On Linux, you must ensure that the httpd process can access the directory.
When using httpd in a multiprocessing mode, do not use FileAppender; use SocketAppender instead to log the logs from the different processes. For information on setting the location for log4j, see your log4j documentation. Log4j is a logging framework (APIs) written in Java.
GlobalVariable is a global variable that is used in the application configuration. You can have any number of such name-value pairs.
ConfigFile is the absolute path to an application configuration. You can have any number of such configurations. Again, You must ensure, on Linux, that the httpd process has the permissions to access these files. For information on configuring an application, see Section 6.5, "Configuring the UIO Proxy."
Memcache has the IP address and port of a memcache server. You can have multiple Memcache elements in the settings file if you have multiple memcache servers running. If you have a single local memcache running, you do not need to have this element at all. By default, the UIO Apache Proxy tries to connect to memcache on IP address 127.0.0.1 and port 11211.
These are flags to control the behavior of the UIO Apache Proxy. Various settings are listed in Table 6-9.
Table 6-9 OAAM UIO Proxy Settings.
| Flags | Description |
|---|---|
|
MaxSessionInactiveInterval_sec |
UIO Apache Proxy maintains a session for every user passes through the proxy. This setting sets the expiry time of this session after the user becomes inactive. It is in seconds (default is 30 minutes) For example, |
|
GarbageCollectorInterval_ms |
Interval for running session expiry thread (default = 5 minutes) For example, |
|
FileWatcherInterval_ms |
Interval for checking if the settings or any config file has changed (default = 1minute) For example, (After modifying the configuration XML file, even though the proxy updates the configuration as needed, it is advisable to restart the httpd server.) |
|
SessionIdCookieName_str |
Name of the cookie used by UIO Apache Proxy to maintain its session (default = OAAM_UIOProxy_SessionId For example, |
|
SessionCookie_DomainLevelCount |
Domain level for the UIO Apache Proxy session cookie. Does not affect any other cookie. For example, |
|
SessionCookie_ExpiryInMinutes |
The value of this setting is used to compute the expiry time that is put in the expires attribute of the |
|
SessionCookie_IsHttpOnly |
If set to 1, the UIO Apache Proxy session cookie is marked as HTTP only in the On a supported browser, a |
|
SessionCookie_IsSecure |
If set to 1, UIO Apache Proxy session cookie is marked as secure in the Set-Cookie header. It does not affect any other cookie. The default is not to mark the cookie as secure. A secure cookie is only used when a browser is visiting a server through HTTPS, that will ensure that the cookie is always encrypted when transmitting from client to server, and therefore less likely to be exposed to cookie theft through eavesdropping. |
|
IgnoreUrlMappings |
Ignore the application configuration XML files; the proxy behaves as a flow-through proxy For example, The value of 1 will make the proxy act as flow-through and the value of 0 will enable the configuration XML interceptors. |
|
CaptureTraffic |
Capture the HTTP traffic - headers and content in the log files. This mode is for debugging purpose. It captures the headers and contents as is and could contain customer's personal data. Use this mode with caution and only for debugging/test. For example, |
|
MaxReqBodyBytes |
Maximum request body that can be processed by the proxy and request body bigger than this value will be truncated. The requirement is necessary when the application has POSTs with big files getting uploaded. For example, |
|
UseMemcache |
Force the use of memcache even when httpd is running in single process mode. Has no effect when running in multiple process mode. Applies at startup and requires restarting httpd for change to apply. For example, |
|
CachedConfigExpiry_sec |
Expiry time for unused config XML data in memory, if multiple config XML configurations have been loaded into memory. Expiry time for unused configuration data in memory occurs when config XML files are automatically loaded when they are modified. (Default = 60 minutes). For example, |
|
AutoLoadConfig |
Set to 1 to enable auto-loading of config XML files when they are modified by user. Set to 0 to turn this feature off. You can enable this feature when using single-process mode of httpd. Do not enable this feature for multiple process mode of httpd for production use, since individual processes could have different versions of the config XML files. For example, |
|
Setting name |
Enables internal profiling for various operations such according to interception phase and prints that out in the logs in microseconds. It is necessary only for debugging and profiling in non-production environments as this may impact performance. The logs appear at |
6.2.6.2 UIO_log4j.xml
For actual log4j format details, see your log4j documentation. Apache::log4cxx is a C++ implementation of the log4j framework and the XML file format is common to log4cxx and log4j.
Available UIO Apache Proxy Log4j loggers are listed in Table 6-10.
Table 6-10 UIO Apache Proxy Log4j Loggers
| Loggers | Description |
|---|---|
|
config.reader |
The UIO_Config XML file loading related classes use this logger. |
|
settings.reader |
The UIO_Settings XML file loading classes use this logger. |
|
config.datastore |
The UIO_Config XML file loading related classes use this logger. |
|
config |
The UIO_Config XML file loading related classes use this logger. |
|
config.reader.populator |
The UIO_Config XML file loading related classes use this logger. |
|
condition |
All conditions defined in UIO_Config.xml use this logger. |
|
filter |
All filters defined in UIO_Config.xml use this logger. |
|
action |
All actions defined in UIO_Config.xml use this logger. |
|
interceptor |
All actions defined in UIO_Config.xml use this logger. |
|
requestcontext |
HTTP request processing is performed by classes that use this logger. |
|
proxy |
HTTP request processing is performed by classes that use this logger. |
|
htmlpage |
HTML page related processing is performed by classes that use this logger. |
|
httpreqimpl |
HTTP request processing is performed by classes that use this logger. |
|
container |
HTTP request processing is performed by classes that use this logger. |
|
sessions |
UIO Proxy session management related classes use this logger. |
|
http |
Logger used to log all HTTP traffic when CaptureTraffic setting is turned on. |
|
distsessions |
UIO Proxy session management related classes use this logger. |
Note:
The logger documentation is provided for completeness and to enable the deployment engineer to make better sense of the logs. Typically for a debugging scenario turn on the log level toDEBUG and do not try to filter by any loggers.6.3 Setting Up Rules and User Groups
For information on setting up rules and user groups, see Oracle Fusion Middleware Administrator's Guide for Oracle Adaptive Access Manager.
6.4 Setting Up Policies
To set up policies for the UIO Proxy, import the out-of-the-box policies. Information about importing policies is available in the Oracle Fusion Middleware Administrator's Guide for Oracle Adaptive Access Manager.
6.5 Configuring the UIO Proxy
The proxy intercepts all HTTP traffic between the client browser and the Web application and performs actions specified in the configuration files. The UIO Apache Proxy uses the XML Relax NG definition which is in the UIO_Config.rng file in the proxy distribution.
6.5.1 Elements of the UIO Proxy Configuration File
The following sections describe various elements of the proxy configuration file.
6.5.1.1 Components of Interceptors
Interceptors are the most important elements in the proxy configuration. Authoring the proxy configuration file deals mostly with defining interceptors.
There are two types of interceptors: request interceptors and response interceptors. As the names suggest, request interceptors are used when the proxy receives HTTP requests from the client browser and response interceptors are used when the proxy receives HTTP response from the server, for example, Web application or OAAM Server.
There are four components to an interceptor and all of them are optional.
-
List of URLs - the interceptor will be evaluated if the interceptor URL list contains the current request URL or if the URL list is empty. The URLs must be an exact match; there is no support for regular expressions. For a request interceptor, this is the set of URLs for which the request interceptor will be executed in the request portion of the HTTP request, for example, on the way from the client to the server. For a response interceptor, the URL is that of the HTTP request; the response interceptor will be executed in the response portion of the HTTP request, for example, while getting the response from the server to the client. If the URL has query parameters, then they should not be listed. You can use conditions to check for any query parameters.
-
List of conditions - conditions can inspect the request/response contents, such as checking for the presence of an HTTP header/parameter/cookie, and so on, or testing whether a header/parameter/cookie has a specific value or not. Filters and action defined in the interceptor will be executed only if all the conditions specified are met or if no condition is specified.
-
List of filters - filters perform an action that might modify the request/response contents or modify some state information in the proxy. For example, a filter can add/remove HTTP headers, save HTTP header/parameter/cookie value in a proxy variable, and so on.
-
Action - after executing the filters the interceptor will perform the action, if one is specified. Actions can be one of the following:
-
a redirect the client to a different URL
-
send a saved response to the client
-
perform a HTTP get on server
-
perform a HTTP post on server
-
send a saved request to the server
-
Table 6-11 Components of Interceptors
| Interceptor | Attributes | Description |
|---|---|---|
|
RequestInterceptor |
id, desc, post-exec-action, isGlobal, enabled |
|
|
ResponseInterceptor |
id, desc, post-exec-action, isGlobal, enabled |
|
6.5.1.2 Conditions
Conditions are used in the proxy to inspect HTTP request/response or the state information saved in the proxy (variables). Each condition evaluates to either true or false. Conditions are evaluated in the order they are listed in the configuration file until a condition evaluates to false or all conditions are evaluated. Table 6-12 lists conditions that can be defined in an interceptor.
Table 6-12 Conditions Defined in an Interceptor
| Condition name | Attributes | Description |
|---|---|---|
|
HeaderPresent |
enabled, name |
Checks the presence of the specified header in request/response. The header name should be terminated by a colon (" Example:
|
|
ParamPresent |
enabled, name |
Checks the presence of the specified parameter in the request. Example:
|
|
QueryParamPresent |
enabled, name |
Checks the presence of the specified query parameter in the URL. Example:
|
|
VariablePresent |
enabled, name |
Checks whether the specified proxy variable has been set. Example:
|
|
RequestCookiePresent |
enabled, name |
Checks the presence of the specified cookie in the request Example:
|
|
ResponseCookiePresent |
enabled, name |
Checks the presence of the specified cookie in the response Example:
|
|
HeaderValue |
enabled, name, value, mode, ignore-case |
Checks whether the specified request/response header value matches the given value. The header name should be terminated by a colon (" Example:
|
|
ParamValue |
enabled, name, value, mode, ignore-case |
Checks whether the specified request parameter value matches the given value. Example:
|
|
QueryParamValue |
enabled, name, value, mode, ignore-case |
Checks whether the specified URL query parameter value matches the given value. Example:
|
|
VariableValue |
enabled, name, value, mode, ignore-case |
Checks whether the specified proxy variable value matches the given value. Example:
|
|
RequestCookieValue |
enabled, name, value, mode, ignore-case |
Checks whether the specified request cookie value matches the given value. Example:
|
|
ResponseCookieValue |
enabled, name, value, mode, ignore-case |
Checks whether the specified response cookie value matches the given value. Example:
|
|
HttpStatus |
enabled, status |
Checks whether the status code of the response matches the given value. Example:
|
|
HtmlElementPresent |
enabled, name, attrib-name1, attrib-value1, attrib-name2, attrib-value2, … attrib-name9, attrib-value9, |
Checks presence of a html element to match the specified conditions:
Example:
|
|
PageContainsText |
enabled, text |
Checks whether the response contains the given text. Example:
|
|
NotVariableValue |
enabled, name, value, mode, ignore-case |
Checks whether the specified proxy variable value does not match the given value. Example:
|
|
And |
enabled |
Evaluates to Example:
|
|
Or |
enabled |
Evaluates to Example:
|
|
Not |
enabled |
Reverses the result of the child condition(s). Example:
|
Attribute id is optional and is used only in trace messages. If no value is specified, the condition name (like HeaderPresent) will be used.
Attribute enabled is optional and the default value is true. You can use this attribute to enable/disable a condition. The value of this attribute can be set to the name of a global variable; in such case, the condition will be enabled or disabled according to the value of the global variable.
Attribute value can be set to the name of a proxy variable. In such a case, the proxy will evaluate the variable at checkpoint and use that value in the condition.
Attribute mode can be set to one of the following: begins-with, ends-with, contains.
Attribute ignore-case can be set to one of the following: true, false.
6.5.1.3 Filters
Filters are used in the proxy to modify HTTP request/response contents or modify the state information saved in the proxy (variables). Filters are executed in the order they are listed in the configuration file. Table 6-13 lists filters that can be defined in an interceptor.
Table 6-13 Filters Defined in an Interceptor
| Filter name | Attributes | Description |
|---|---|---|
|
AddHeader |
enabled, name, value |
Adds the specified header with a given value to request/response. The header name should be terminated by a colon (" Example:
|
|
SaveHeader |
enabled, name, variable |
Saves the specified request/response header value in the given proxy variable. The header name should be terminated by a colon (" Example:
|
|
RemoveHeader |
enabled, name |
Removes the specified header from request/response. The header name should be terminated by a colon (" Example:
|
|
AddParam |
enabled, name, value |
Adds a request parameter with a specified name and value. Example:
|
|
SaveParam |
enabled, name, variable |
Saves the specified request parameter value in to the given proxy variable. Example:
|
|
AddRequestCookie |
enabled, name, value |
Adds the specified cookie with a given value to request Example:
|
|
SaveRequestCookie |
enabled, name |
Saves the specified request cookie value in the given proxy variable |
|
AddResponseCookie |
enabled, name |
Adds the specified cookie with a given value to response Example:
|
|
SaveResponseCookie |
enabled, name |
Saves the specified response cookie value in the given proxy variable. Example:
|
|
SaveHiddenFields |
enabled, form, variable, save-submit-fields |
Saves all the hidden, submit fields value, in the given form if the form name is specified to the given proxy variable. To not save submit fields, set save-submit-fields attribute to false. Example:
|
|
AddHiddenFieldsParams |
enabled, variable |
Adds request parameters for each hidden field saved in the variable. Example:
|
|
SetVariable |
enabled, name, value |
Sets the proxy variable with the given name to the specified value. Example:
|
|
UnsetVariable |
enabled, name |
Removes the proxy variable with the given name. Example:
|
|
ClearSession |
enabled, name |
Removes all session variables in the current session. Example:
|
|
SaveQueryParam |
enabled, name, variable |
Saves the specified query parameter in the given proxy variable. Example:
"search" variable="$search"/> |
|
SaveRequest |
enabled, variable |
Saves the entire request content in the given proxy variable. This includes all headers and the body, if present. Example:
|
|
SaveResponse |
enabled, variable |
Saves the entire response content in the given proxy variable. This includes all headers and body, if present. Example:
|
|
ReplaceText |
enabled, find, replace |
Updates the response by replacing the text specified in Example:
|
|
ProcessString |
enabled, source, find, action, count, search-str, start-tag, end-tag, ignore-case, replace, encoding |
You can use this filter to extract a sub-string from a string (such as request, response contents) and save it to a proxy variable. This filter can also be used to dynamically format strings. The |
|
FormatString |
enabled, variable, format-str, encoder, param-0, param-1, …, param-n |
This filter provides functionality similar to the FormatString is not supported in the UIO Apache Proxy. As it ProcessString provides all the required functionality. |
6.5.1.4 Filter Examples - ProcessString
Find the sub-string between the given start-tag and end-tag in the source string, extract the sub-string found and save extracted sub-string in the given variable. The action of 'extract' will extract the first matching start-tag and end-tag pair.
<ProcessString source="%RESPONSE_CONTENT"
    find="sub-string"
    start-tag="var traceID = '" end-tag="';"
    action="extract"
    variable="$TRACE_ID"/>
Find the given search-string in the source string, replace it with the replace string and save the updated string in the given variable. You can also use the count attribute to specify behavior in case there are multiple matches. The attribute 'count' can take values all, once or a number.
<ProcessString
      source="/bfb/accounts/accounts.asp?TraceID=$TRACE_ID"
      find="string" search-str="$TRACE_ID"
      action="replace"
      replace="$TRACE_ID"
      variable="%POST_URL"/>
Find the sub-string between the given start-tag and end-tag in the source string, replace it (including the start and end tags) with the evaluated value of the sub string found and save the updated string in the given variable. You can use the attribute count to specify the behavior in case of multiple matches. This attribute can take the value of 'all', 'once' or a number.
<ProcessString
         source="/cgi-bin/mcw055.cgi?TRANEXIT[$UrlSuffix]"
         find="sub-string" start-tag="[" end-tag="]"
         action="eval"
         variable="%LogoffUrl"/>
You can specify the attribute ignore-case as true or false and it can be applied to any of the prior examples and accordingly the search operation will be case sensitive or not. You can specify encoding attribute optionally and it will encode the resulting string before storing in to the variable. This attribute can take only base64 value. If you do not specify this attribute then the resulting string is stored as is.
The encoding attribute is supported only on UIO Apache Proxy. On
6.5.1.5 ProcessString Encoding/Decoding Schemes for Special Characters URL Encoded in OAAM Change Password
When using OAAM UIO Proxy to call OAAM change password if the password value contains special characters they are URL encoded when passed to OAAM.
Four encoding/decoding schemes are provided for the ProcessString filter so that the UIO Proxy can use URL-encoding or the same encoding schemes that the OAAM Server uses.
ProcessString Encoding/Decoding Schemes
The encoding/decoding schemes that can be used in the ProcessString filter in the OAAM UIO Proxy are:
Table 6-14 ProcessString Encoding/Decoding Schemes
| Encoding/Decoding Schemes | Details |
|---|---|
|
asadecode: |
Decodes the OAAM Server encoded strings |
|
asaencode |
Encodes the string value using the same schema that the OAAM server uses |
|
urldecode |
Decodes the string value that is URL-encoded |
|
urlencode |
Performs URL encoding for the given string |
The 11g OAAM Server performs UTF8 encoding for the credentials post to it. In response headers of oaam_server/changePassword.do, headers of newPassword and confirmPassword will be encoded. In this case, if the protected application does not accept such encoded credentials, the following interceptor could be used as an example to decode the encoded values of those credentials and save them to UIOProxy variables. The UIO Proxy can then perform actions with these variables, such as post their values to the protected application.
<ResponseInterceptor id="EncodingDecodingSchemes"
desc="ProcessString eval with encoding/decoding tags" enabled="true">
<ResponseUrl url="/oaam_server/changePassword.do"/>
<Conditions>
<VariableValue name="%REQUEST_METHOD" value="POST"/>
<HeaderPresent name="password:"/>
<HeaderPresent name="newpassword:"/>
<HeaderPresent name="confirmpassword:"/>
</Conditions>
<Filters>
<SaveHeader name="newpassword:" variable="%newpassword"/>
<ProcessString source="[%newpassword]" variable="%newpassword1"
action="eval" find="sub-string" encoding="asadecode"/>
<AddHeader name="newpasswordASADecoded:" value="%newpassword1"/>
<ProcessString source="[%newpassword1]" variable="%newpassword2"
action="eval" find="sub-string" encoding="asaencode"/>
<AddHeader name="newpasswordASAEncoded:" value="%newpassword2"/>
<ProcessString source="[%newpassword1]" variable="%newpassword3"
action="eval" find="sub-string" encoding="urlencode"/>
<AddHeader name="newpasswordUrlEncoded:" value="%newpassword3"/>
<ProcessString source="[%newpassword3]" variable="%newpassword4"
action="eval" find="sub-string" encoding="urldecode"/>
<AddHeader name="newpasswordURLDecoded:" value="%newpassword4"/>
</Filters>
</ResponseInterceptor>
6.5.1.6 Filter Examples - FormatString
An example is presented below on how to create an HTTP Basic Authentication response header in variable $AuthHeaderValue, using the user name and password in variables %userid and %password:
<FormatString variable="%UsernamePassword"
              format-str="{0}:{1}"
              param-0="%userid"
              param-1="%password"
              encoder="Base64"/>

<FormatString variable="$AuthHeaderValue"
              format-str="Basic {0}"
              param-0="%UsernamePassword"/>
6.5.1.7 Actions
An interceptor can optionally perform one of the following actions after executing all the filters. No further interceptors will be attempted after executing an action.
Often the proxy would need to redirect the client to load another URL; redirect-client is the action to use in such cases. The proxy will send a 302 HTTP response to request the client to load the specified URL. It takes has 2 attributes: url which contains the URL to which the proxy should re-direct the user and display-url which is optional.
If the display-url attribute is specified in the interceptor, the proxy will send a HTTP 302 response to the browser to load the URL specified in display-url attribute. When the proxy receives this request, it will perform a HTTP-GET on the server to get the URL specified in the url attribute.
Often a response from the server would have to be saved in the proxy and sent to the client later after performing a few other HTTP requests; send-to-client is the action to use in such cases. The proxy will send the client the contents of specified variable. It has two attributes: html which contains the variable that has the saved content that you want send back to the user and optional attribute display-url.
If the display-url attribute is specified in the interceptor, the proxy will send a HTTP 302 response to the browser to load the URL specified in display-url attribute. When the proxy receives this request, it will send the response specified in the interceptor.
Sometimes the proxy would need to get a URL from the server; get-server is the action to use in such cases. The proxy will send a HTTP-GET request for the specified URL to the server. It has two attributes: url which is the URL to perform the get on and the display-url which is optional.
If the display-url attribute is specified in the interceptor or if this action is specified in a response interceptor, the proxy will send a HTTP 302 response to the browser. When the proxy receives this request it will perform a HTTP-GET on the server to get the URL specified in the url attribute.
Sometimes the proxy would need to post to a URL in the server; post-server is the action to use in such cases. The proxy will send a HTTP-POST request for the specified URL to the server. It has two attributes: url that has the URL to which the post must be sent and optional display-url.
If display-url attribute is specified in the interceptor or if this action is specified in a response interceptor, the proxy will send a HTTP 302 response to the browser. When the proxy receives this request it will perform a HTTP-POST to the server to the URL specified in the url attribute.
In certain situations the request from the client must be saved in the proxy and sent to the server later after performing a few other HTTP requests; send-to-server is the action to use in such cases. The proxy will send the contents of the specified variable to the server. It has two attributes: html which contains the variable that has the saved content and the optional display-url attribute.
If the display-url attribute is specified in the interceptor, then the proxy will send out a HTTP 302 redirect response to the browser. This will cause the browser to request for the display-url and then the proxy will send out the saved request to the server. If you use this action in a response interceptor, then display-url is mandatory; without this, the action will fail.
6.5.1.8 Variables
The proxy variables can store string data in the proxy memory. You can use variables in conditions, filters and actions. For example, you can use the SaveHeader filter to save the value of a specific header in the given proxy variable. This variable value could later be used, for example, to add a parameter to the request. Variables can also be used in conditions to determine whether to execute an interceptor or not.
The proxy variables are of 3 types, depending upon the life span of the variable. The type of variable is determined by the first letter of the variable name, which can be one of: %, $, @.
All types of variables can be set using filters like SetVariable, SaveHeader, SaveParam, SaveResponse, and other filters.
All types of variables can be unset/deleted by the UnsetVariable filter. You can use the ClearSession filter to remove all session variables.
Request variables: these variable names start with %. These variables are associated with the current request and are deleted at the completion of the current request. Request variables are used where the value is not needed across requests.
Session variables: these variable names start with $. These variables are associated with the current proxy session and are deleted when the proxy session is cleaned up. Session variables are used where the value should be preserved across requests from a client.
Global variables: these variable names start with @. These variables are associated with the current proxy configuration and are deleted when the proxy configuration is unloaded. Global variables are used where the value must be preserved across requests and across clients.
Global variables can be set at the proxy configuration load time using SetGlobal in the configuration file.
The UIO Proxy supports the following pre-defined request variables:
Table 6-15 Pre-defined Variables Supported by the UIO Proxy
| Variable name | Description |
|---|---|
|
%RESPONSE_CONTENT |
This variable contains the contents of the entire response from the Web server for the current request. For the UIO Apache Proxy, |
|
%REQUEST_CONTENT |
This variable contains the contents of the entire request from the client. For the UIO Apache Proxy, |
|
%QUERY_STRING |
This variable contains the query string, starting with |
|
%REQUEST_METHOD |
HTTP method verb for the request: |
|
%REMOTE_HOST |
Host name of the client or agent of the client. (For the UIO Apache Proxy, you must enable the host name lookup by using the Apache directive ' |
|
%REMOTE_ADDR |
IP address of the client or agent of the client. |
|
%HTTP_HOST |
The content of HTTP Host header |
|
%URL |
URL for the current request |
6.5.1.9 Application
You can use a single proxy installation to provide multifactor authentication for multiple Web application that run in one or more Web servers. In the UIO Proxy configuration, an application is a grouping of interceptors defined for a single Web application.
Request and response interceptors can be defined outside of an application in the proxy configuration file. These interceptors are called "global" interceptors and will be evaluated and executed before the interceptors defined in the applications.
6.5.2 Interception Process
An HTTP messages consist of requests from the client to server and responses from the server to client. HTTP is transaction oriented. A request from client to server will have a single response from the server to client. The request has a set of headers followed by, optionally, a request body. Similarly the response has headers and, optionally, a body. Since the proxy is sitting in between the client and the target application, it can modify the request headers, body and response headers and body of any HTTP request, using the configuration XML. A response could be a normal 200 OK response or it could be a redirect response 302 or any other HTTP status response. In all these cases, the response is for that request and will trigger the response interceptors for the same request. An example, if the request is for the URL /doLogin.do, and the response is a redirect (302) with the location of /loginPage.jsp then all the request and response interceptors will be triggered for the URL /doLogin.do. The next HTTP request is a HTTP GET on /loginPage.jsp and this will cause all the request and response interceptors for /loginPage.jsp to be triggered.
When a request arrives, the proxy evaluates request interceptors defined for the URL in the order they are defined in the configuration file. Similarly when on receiving response from the Web server, the proxy evaluates response interceptors defined for the URL of the HTTP request in the order defined in the configuration file.
If the conditions in an interceptor evaluate to true, the proxy will execute that interceptor. For example, execute the filters and action. After executing an interceptor, the proxy will continue with the next interceptor only if the following conditions are met:
-
no action is specified for the current interceptor
-
post-exec-actionattribute for the current interceptor iscontinue
It is highly recommended that the post-exec-action attribute be specified for interceptors that do not define an action. For global interceptors (for example, the interceptors defined outside of any application), the default value of post-exec-action attribute is continue. The stop-phase-intercept value of post-exec-action on a request interceptor stops the request interception but continues with response interception while stop-intercept stops the interception completely for that request. For non-global interceptors, the default value is continue if no action is specified and stop-phase-intercept if an action is specified.
As mentioned earlier the proxy configuration can contain multiple applications. While finding the list of interceptors to evaluate for a URL, only the following interceptors are considered:
-
global interceptors that are defined outside of any application
-
interceptors defined in the application associated with the current session
Each session will be associated with at most one application. If no application is associated with the current session (yet) when the proxy finds an interceptor in an application for the URL, it will associate the application with the current session.
If the current session already has an application associated, and if no interceptor is found in that application for the URL, the proxy will then look for intercepts in other applications. If an interceptor is found in another application for the URL, a new session will be created and the request will be associated with the new session.
6.5.3 Configuring Redirection to the Oracle Adaptive Access Manager Server Interface
The UIO Proxy redirects the user to OAAM Server pages at appropriate times, for example to collect the password using OAAM Server, to run risk rules. HTTP protocol uses HTTP headers to exchange data between the UIO Proxy and OAAM Server. Table 6-16 lists OAAM Server pages referenced in the proxy configuration along with the details of HTTP headers used to pass data. It also lists the expected action to be taken by the proxy on the given conditions.
Table 6-16 OAAM Server Interface
| URL | Condition | Action |
|---|---|---|
|
Any request to OAAM Server page |
On receiving request |
Set header " |
|
loginPage.jsp or login.do |
On receiving request to application login page |
Redirect to this URL to use the Oracle Adaptive Access Manager login page instead of the application's login page. |
|
password.do |
Response contains headers userid, password (could be more depending upon the application) |
Save the credentials from the response headers and post to the application To put an URL with an " |
|
login.do |
Phase-1 only: After validating the credentials entered by the user. |
Redirect to this URL to update the status in Oracle Adaptive Access Manager and run appropriate risk rules. |
|
login.do |
Phase-1 only: On receiving the request. |
Set " Set " Set the " A " Setting "
|
|
updateLoginStatus.do |
Phase-2 only: After validating the credentials entered by the user. |
Redirect to this URL to update the status in Oracle Adaptive Access Manager and run appropriate risk rules |
|
updateLoginStatus.do |
Phase-2 only: On receiving request |
Set " Setting "
|
|
updateLoginStatus.do challengeUser.do registerQuestions.do userPreferencesDone.do |
Response header "Rules-Result" has value "allow" |
The Oracle Adaptive Access Manager rules evaluated to permit the login. The proxy can permit access to the protected application URLs after this point. |
|
registerQuestions.do |
Response header "Rules-Result" has value "block" |
Either the application did not accept the login credentials or the Oracle Adaptive Access Manager rules evaluated to block the login. The proxy should log off the session in the application, if login was successful. Then a Login Blocked message should be sent to the browser. |
|
changePassword.do |
Response contains headers "password", "newpassword" and "confirmpassword" |
Save the passwords from the response headers and post to the application |
|
loginFail.do |
To display error message in OAAM Server page, like to display login blocked message |
Redirect to this URL with appropriate " In most cases control is not given to the proxy through a response header in a block situation. Instead, the user is taken to the following URL with a query parameter "
Alternatively it is possible to get the same result with the following URLs.
|
|
logout.do |
On completion of application session logout |
Redirect to this URL to log out the OAAM Server session |
|
logout.do |
On receiving response |
Redirect to application logout URL to log off the application session, if it is not already off |
|
resetPassword.do |
Response contains headers "newpassword" and "confirmpassword" |
Save the passwords from the response headers and post to the application |
|
getUserInput.do |
Response contains headers "BH_UserInput" |
Save the user input and take appropriate action (like post to application, and others.) |
|
changeUserId.do |
On receiving request |
Add " |
|
changeUserId.do |
On receiving response |
Redirect to the appropriate application page or send back the saved application response |
|
updateForgotPasswordStatus.do |
Phase-2 only: After validating the forgot- password-credentials entered by the user. |
Redirect to this URL to update the status in Oracle Adaptive Access Manager and run appropriate risk rules. |
|
updateForgotPasswordStatus.do |
Phase-2 only: On receiving request |
Set " |
|
updateForgotPasswordStatus.do challengeForgotPasswordUser.do |
Response header "BH_FP-Rules-Result" has value "allow" |
The Oracle Adaptive Access Manager rules evaluated to permit the forgot-password flow. The proxy can permit continuation to the forgot-password flow to reset the password or allow the user login, depending on the application. |
|
updateForgotPasswordStatus.do challengeForgotPasswordUser.do |
Response header "BH_FP-Rules-Result" has value "block" |
Either the application did not accept the forgot-password credentials or the Oracle Adaptive Access Manager rules evaluated to block the forgot-password flow. A login blocked message should be sent to the browser. |
|
Any request to OAAM Server page |
If the proxy needs to get a property value from OAAM Server. On receiving request |
" OAAM Server will return the values in multiple response headers, one for each property. The return response header names will be of format: " |
6.6 Application Discovery
Two flags in the settings are used for application discovery. One flag instructs the proxy to ignore its configuration XML and act as a reverse-proxy only. The other flag instructs the proxy to capture all the HTTP traffic and print it to the logs. The first flag is used for application discovery to capture the HTTP traffic and analyze it. The second flag would be kept on during the configuration XML development phase to debug the configuration XML itself.
Application discovery is the process of studying an existing Web application to author the proxy configuration to add multifactor authentication using the UIO Proxy. A few logins attempts to the application would be made through the proxy to capture the HTTP traffic in each attempt. The captured HTTP traffic would then be analyzed to author the proxy configuration. The UIO Proxy should be set up to dump all the HTTP traffic to a file. Then a few logins/login attempts to the application should be made through the proxy. The captured HTTP traffic should then be analyzed to author the proxy configuration.
6.6.1 Application Information
For the application discovery process it is preferable to work with the Web application in the customer's test environment, rather than the production application being used by users. If the test environment is not available, you can use the live application.
The following information is needed from the client for the application discovery process:
-
URL to log in to the application.
-
Test user account credentials, including the data required in the forgot password scenario. It will be best to get as many test accounts as possible, preferably at least five accounts, for uninterrupted discovery and testing. During the discovery process some accounts could become disabled, due to multiple invalid login attempts.
-
Contact (phone, email) to enable/reset test accounts
6.6.2 Setting Up the UIO Apache Proxy
For application discovery, the HTTP traffic must be captured through the proxy.
Table 6-17 shows the settings (in UIO_Settings.xml) to enable this mode of operation.
The IgnoreUrlMappings setting is used to disable URL interception of the HTTP traffic through the proxy.
The CaptureTraffic setting captures the HTTP traffic through the logger name HTTP set to log level of info.
It might be useful to capture the HTTP traffic for each scenario (like successful login attempt, wrong password, wrong user name, disabled user, and so on) in separate files. The log file name setting should be updated to the desired file name before the start of the scenario.
After application discovery is performed, the proxy settings should be set, as shown in Table 6-18, to restore the default UIO Apache Proxy behavior.
6.6.3 Scenarios
Collect information for the following scenarios during the discovery process.
You must create interceptors in the TestConfig.xml file that look for certain URLs and conditions in the HTTP traffic. The proxy listens to the HTTP traffic and when it sees a URL that matches a URL in its TestConfig.xml file, it evaluates the interceptors that have a URL match and it evaluates the conditions block in the interceptor. If they match, the UIO Proxy executes the filter block and condition block.
-
URL that starts the login process
-
URL that contains the login form
-
Names of the input fields like user name, password used to submit the credentials
-
URL to which the login form submits the credentials
-
Identifying successful login. The HTTP traffic dump must be studied carefully to derive this information. A few ways applications respond on successful login are the following:
-
by setting a specific cookie in the credential submit response
-
by redirecting to a specific URL (like account summary, Welcome page, and so on)
-
by responding with specific text
-
-
Identifying failure login with the reason for failure. This would often be derived by looking for certain text in the response to credential submit request.
-
URL that starts the logout process
-
URL that completes the logout process. In most cases the logout completes on receiving the response to the logout start URL.
-
URL that starts the change password process
-
URL that contains the change password form
-
Names of the input fields like password, new-password, confirm-password used to submit the change password request
-
URL to which the change password form submits the passwords
-
Identifying the status (success/failure) of the change password request. This would often be derived by looking for certain text in the response.
Follows the same process as Change password.
-
URL to which the
login-idchange is posted to the application -
Names of the input fields like
new-loginused to submit the change password request. -
Identifying the status (
success/failure) of the changelogin-idrequest. On successful changelogin-idrequest, thechangeUserId.dopage in OAAM Server should be called to update thelogin-idin the Oracle Adaptive Access Manager database.
Forgot-password options provided by the application must be reviewed for understanding. Most applications ask for alternate ways to identity the user (account number/PIN, SSN/PIN, question/answer, and other ways); some applications provide more than one option. Some applications let the user reset the password after successfully entering alternate credentials; others send a new password to the user by mail/email; and some other applications would require the user to call customer care. For each of the supported scenarios, the following data should be captured:
-
URL that starts the forgot-password process
-
URL that contains the forgot-password form
-
Names of the input fields and URLs to submit the forgot-password request
-
Identifying the status (success/failure) of the forgot-password request.
6.7 OAAM Sample Application
The proxy configuration to add multifactor authentication to the BigBank Web application is shown in this section. The BigBank web application is an OAAM sample application which shows a login flow. The example will demonstrate the integration of the UIO Proxy into the login flow of an application.
For Apache proxy use:
<?xml version="1.0" encoding="utf-8"?>
<BharosaProxyConfig xmlns="http://example.com/">

  <RequestInterceptor id="AddAppIdToOAAMServerRequests-BigBank"
                      desc="Add BharosaAppId header to each request to
                         oaam_server"
                      post-exec-action="continue">
    <Conditions>
      <VariableValue name="%URL"
                     value="/oaam_server/"
                     mode="begins-with"
                     ignore-case="true"/>
    </Conditions>

    <Filters>
      <AddHeader name="BharosaAppId:" value="BigBank"/>
    </Filters>
  </RequestInterceptor>

    <SetGlobal name="@Phase1Enabled" value="false"/>
    <SetGlobal name="@Phase2Only"    value="true"/>

  <Application id="BigBank">

    <!-- In phase one, you use BigBank's login form to collect username and
           password -->
    <!-- In phase two, you use oaam_server login forms to collect username and
           password -->

    <!-- Disable this interceptor after phase one is retired -->
    <RequestInterceptor id="Phase1BigBankLoginPostRequest"
                        desc="get the loginid from the post parameters"
                        post-exec-action="continue" enabled="@Phase1Enabled">
      <RequestUrl url="/bigbank/login.do"/>

      <Conditions>
        <VariableValue name="%REQUEST_METHOD" value="POST"/>
      </Conditions>

      <Filters>
        <ClearSession/>
        <SetVariable name="$WebUIOPhase" value="one"/>
        <SaveParam   name="userid"       variable="$userid"/>
      </Filters>
    </RequestInterceptor>

    <!-- Enable this interceptor after phase one is retired -->
    <RequestInterceptor id="Phase2RedirectBigBankLoginPageRequest"
                        desc="Redirect BigBank login page requests to login page"
                        enabled="@Phase2Only">
      <RequestUrl url="/bigbank"/>
      <RequestUrl url="/bigbank/"/>
      <RequestUrl url="/bigbank/loginPage.jsp"/>

      <Target action="redirect-client" url="/oaam_server/login.do"/>
    </RequestInterceptor>

    <RequestInterceptor id="Phase2BharosaLoginPageRequest"
                        desc="Phase-2 loginid post request"
                        post-exec-action="continue">
      <RequestUrl url="/oaam_server/login.do"/>

      <Conditions>
        <VariableValue name="%REQUEST_METHOD" value="POST"/>
        <ParamPresent  name="userid"/>
        <Not>
          <ParamPresent name="password"/>
        </Not>
      </Conditions>

      <Filters>
        <ClearSession/>
        <SetVariable name="$WebUIOPhase" value="two"/>
      </Filters>
    </RequestInterceptor>

    <ResponseInterceptor id="Phase2PasswordPageResponse"
                         desc="Save the userid, decoded password from
                               Password Page response">
      <ResponseUrl url="/oaam_server/password.do"/>

      <Conditions>
        <HeaderPresent name="userid:"/>
        <HeaderPresent name="password:"/>
      </Conditions>

      <Filters>
        <SaveHeader name="userid:"   variable="$userid"/>
        <SaveHeader name="password:" variable="$password"/>
      </Filters>

      <Target action="redirect-client"
              url="/bigbank/loginPage.jsp"
              display-url="/bigbank/GetLoginPage"/>
    </ResponseInterceptor>

    <ResponseInterceptor id="GetBigBankLoginPageResponse"
                         desc="Save values of all hidden fields;
                               then post login crdentials">
      <ResponseUrl url="/bigbank/GetLoginPage"/>

      <Filters>
        <SaveHiddenFields variable="%LoginPageHiddenParams"/>

        <AddHiddenFieldsParams variable="%LoginPageHiddenParams"/>
        <AddParam              name="userid"   value="$userid"/>
        <AddParam              name="password" value="$password"/>
      </Filters>

      <Target action="post-server" url="/bigbank/login.do"/>
    </ResponseInterceptor>

    <ResponseInterceptor id="InvalidLoginResponse"
                         desc="Invalid login response from BigBank">
      <ResponseUrl url="/bigbank/login.do"/>

      <Conditions>
        <PageContainsText text="You have entered an invalid Login Id"/>
      </Conditions>

      <Filters>
        <SetVariable  name="$Login-Credentials-Status" value="invalid_user"/>
        <SetVariable  name="$Login-Continue-Url"       value="%URL"/>
        <SaveResponse variable="$Submit-Credentials-Response"/>
      </Filters>

      <Target action="redirect-client" url="/oaam_server/UpdateLoginStatusPage"/>
    </ResponseInterceptor>

    <ResponseInterceptor id="WrongPasswordResponse"
                         desc="Invalid login response from BigBank">
      <ResponseUrl url="/bigbank/login.do"/>

      <Conditions>
        <PageContainsText text="We do not recognize your password"/>
      </Conditions>

      <Filters>
        <SetVariable name="$Login-Credentials-Status" value="wrong_password"/>
        <SetVariable name="$Login-Continue-Url"       value="%URL"/>
        <SaveResponse variable="$Submit-Credentials-Response"/>
      </Filters>

      <Target action="redirect-client" url="/oaam_server/UpdateLoginStatusPage"/>
    </ResponseInterceptor>

    <ResponseInterceptor id="LoginSuccessResponse"
                         desc="Login success response from BigBank">
      <ResponseUrl url="/bigbank/activity.do"/>
      <!-- ResponseUrl url="/bigbank/login.do"/ -->

      <Conditions>
        <NotVariableValue name="$Login-Status" value="In-Session"/>
        <PageContainsText text="/bigbank/images/success.gif"/>
      </Conditions>

      <Filters>
        <SetVariable name="$Login-Credentials-Status" value="success"/>
        <SetVariable name="$Login-Continue-Url"       value="%URL"/>
        <SaveResponse variable="$Submit-Credentials-Response"/>
        <AddHeader name="Login-Status:" value="$Login-Credentials-Status"/>
      </Filters>

      <!-- Target action="redirect-client" url=
"/oaam_server/UpdateLoginStatusPage"/ -->
      <Target action="get-server" url="/oaam_server/updateLoginStatus.do"/>
    </ResponseInterceptor>

    <RequestInterceptor id="Phase1UpdateLoginStatusPageRequest"
                        desc="Update OAAM Server with the login status">
      <RequestUrl url="/oaam_server/UpdateLoginStatusPage"/>

      <Conditions>
        <VariableValue name="$WebUIOPhase" value="one"/>
      </Conditions>

      <Filters>
        <AddHeader name="WebUIOPhase:"  value="$WebUIOPhase"/>
        <AddHeader name="userid:"       value="$userid"/>
        <AddHeader name="Login-Status:" value="$Login-Credentials-Status"/>
      </Filters>

      <!-- Any interceptors for /bigbank/login.do
        will not run because we are doing get-server. -->
      <Target action="get-server" url="/oaam_server/login.do"/>
    </RequestInterceptor>

    <RequestInterceptor id="Phase2UpdateLoginStatusPageRequest"
                        desc="Update OAAM Server with the login status">
 <!--post-exec-action="continue" -->
      <RequestUrl url="/oaam_server/UpdateLoginStatusPage"/>

      <Filters>
        <AddHeader name="Login-Status:" value="$Login-Credentials-Status"/>
      </Filters>

      <Target action="get-server" url="/oaam_server/updateLoginStatus.do"/>
    </RequestInterceptor>

    <ResponseInterceptor id="AllowLoginResponse"
                         desc="Tracker returned 'allow' - continue with login">
      <ResponseUrl url="/oaam_server/UpdateLoginStatusPage"/>
      <ResponseUrl url="/oaam_server/updateLoginStatus.do"/>
      <ResponseUrl url="/oaam_server/challengeUser.do"/>
      <ResponseUrl url="/oaam_server/registerQuestions.do"/>
      <ResponseUrl url="/oaam_server/userPreferencesDone.do"/>

      <Conditions>
        <HeaderValue name="Rules-Result:" value="allow"/>
      </Conditions>

      <Filters>
        <SetVariable name="$Login-Status" value="In-Session"/>
      </Filters>

      <Target action="send-to-client" html="$Submit-Credentials-Response"
              display-url="$Login-Continue-Url"/>
    </ResponseInterceptor>

    <ResponseInterceptor id="Phase1FailLoginResponse" desc=
              "BigBank failed the login">
      <ResponseUrl url="/oaam_server/UpdateLoginStatusPage"/>
      <ResponseUrl url="/oaam_server/updateLoginStatus.do"/>
      <ResponseUrl url="/oaam_server/challengeUser.do"/>
      <ResponseUrl url="/oaam_server/registerQuestions.do"/>
      <ResponseUrl url="/oaam_server/userPreferencesDone.do"/>

      <Conditions>
        <VariableValue    name="$WebUIOPhase"              value="one"/>
        <NotVariableValue name="$Login-Credentials-Status" value="success"/>
        <HeaderValue      name="Rules-Result:"             value="block"/>
      </Conditions>

      <Filters>
        <UnsetVariable name="$Login-Status"/>
      </Filters>

      <Target action="send-to-client" html="$Submit-Credentials-Response"
              display-url="$Login-Continue-Url"/>
    </ResponseInterceptor>

    <ResponseInterceptor id="FailLoginResponse" desc="BigBank failed the login">
      <ResponseUrl url="/oaam_server/UpdateLoginStatusPage"/>
      <ResponseUrl url="/oaam_server/updateLoginStatus.do"/>
      <ResponseUrl url="/oaam_server/challengeUser.do"/>
      <ResponseUrl url="/oaam_server/registerQuestions.do"/>
      <ResponseUrl url="/oaam_server/userPreferencesDone.do"/>

      <Conditions>
        <HeaderValue      name="Rules-Result:"             value="block"/>
        <NotVariableValue name="$Login-Credentials-Status" value="success"/>
      </Conditions>

      <Filters>
        <UnsetVariable name="$Login-Status"/>
      </Filters>

      <Target action="redirect-client" url=
           "/oaam_server/loginPage.jsp?action=invalid_user"/>
    </ResponseInterceptor>

    <ResponseInterceptor id="BlockLoginResponse"
                         desc="BigBank passed login but tracker returned 'block' -
                                       fail the login">
      <ResponseUrl url="/oaam_server/UpdateLoginStatusPage"/>
      <ResponseUrl url="/oaam_server/updateLoginStatus.do"/>
      <ResponseUrl url="/oaam_server/challengeUser.do"/>
      <ResponseUrl url="/oaam_server/registerQuestions.do"/>
      <ResponseUrl url="/oaam_server/userPreferencesDone.do"/>

      <Conditions>
        <HeaderValue name="Rules-Result:" value="block"/>
      </Conditions>

      <Filters>
        <UnsetVariable name="$Login-Status"/>
      </Filters>

      <!-- /bigbank/LoginBlockedPage is not a real page. The request will be
            intercepted and redirected. -->
      <Target action="redirect-client" url="/bigbank/LoginBlockedPage"/>
    </ResponseInterceptor>

    <RequestInterceptor id="LoginBlockedPageRequest"
                        desc="logoff the session in BigBank">
    <RequestUrl url="/bigbank/LoginBlockedPage"/>

      <Target action="get-server" url="/bigbank/logout.do"/>
    </RequestInterceptor>

    <ResponseInterceptor id="Phase1LoginBlockedPageResponse"
                         desc="BigBank approved login; but OAAM blocked the login"

                         post-exec-action="stop-intercept">
      <ResponseUrl url="/bigbank/LoginBlockedPage"/>

      <Conditions>
        <VariableValue name="$WebUIOPhase" value="one"/>
      </Conditions>

      <Filters>
        <ClearSession/>
      </Filters>

      <Target action="redirect-client" url=
          "/oaam_server/loginFail.do?action=block"/>
    </ResponseInterceptor>

    <ResponseInterceptor id="Phase2LoginBlockedPageResponse"
                         desc="BigBank approved the login;
                               but OAAM blocked the login">
      <ResponseUrl url="/bigbank/LoginBlockedPage"/>

      <Filters>
        <ClearSession/>
      </Filters>

      <Target action="redirect-client" url=
                     "/oaam_server/loginPage.jsp?action=block"/>
    </ResponseInterceptor>

    <ResponseInterceptor id="LogoutPageResponse"
                         desc="OAAM logout selected;
                    logoff the session in BigBank">
      <ResponseUrl url="/oaam_server/logout.do"/>

      <Target action="redirect-client" url="/bigbank/logout.do"/>
    </ResponseInterceptor>

    <ResponseInterceptor id="Phase1LogoffPageResponse"
                         desc="Logoff - clear OAAM proxy session"
                         post-exec-action="stop-intercept">
      <ResponseUrl url="/bigbank/logout.do"/>

      <Conditions>
        <VariableValue name="$WebUIOPhase" value="one"/>
      </Conditions>

      <Filters>
        <ClearSession/>
      </Filters>
    </ResponseInterceptor>

    <ResponseInterceptor id="Phase2LogoffPageResponse"
                         desc="Logoff - clear OAAM proxy session">
      <ResponseUrl url="/bigbank/logout.do"/>

      <Filters>
        <ClearSession/>
      </Filters>

      <!-- Target action="redirect-client" url="/oaam_server/loginPage.jsp"/ -->
    </ResponseInterceptor>

  </Application>
</BharosaProxyConfig>
6.7.1 Descriptions for Interceptors
Descriptions of the various interceptors that are defined in the sample configuration are summarized in Table 6-19.
Table 6-19 Sample Configuration Interceptors
| Interceptor ID | Type | Explanation |
|---|---|---|
|
AddAppIdTobharosauioRequests-BigBank |
Request |
Set headers for all requests for OAAM Server. Invoked by any request to OAAM Server. |
|
Phase1BigBankLoginPostRequest |
Request |
Get login ID from post parameters, set Phase One, save user ID. Invoked by request for |
|
Phase2RedirectBigBankLoginPageRequest |
Request |
Redirect login page from application to OAAM Server. Invoked when Phase Two is enabled and application login page is requested |
|
Phase2BharosaLoginPageRequest |
Request |
Set Phase Two and save variables. Invoked by request for OAAM Server |
|
Phase2PasswordPageResponse |
Response |
Save ID/Password in header, redirect client to BigBank login page. Invoked by response from OAAM Server's |
|
GetBigBankLoginPageResponse |
Response |
Save all hidden fields values, then post login credential to BigBank. Invoked by response from |
|
InvalidLoginResponse |
Response |
Actions to take when getting invalid login response from BigBank. |
|
WrongPasswordResponse |
Response |
Actions to take when getting wrong password response from BigBank. |
|
LoginSuccessResponse |
Response |
Actions to take when getting login success response from BigBank. |
|
Phase1UpdateLoginStatusPageRequest |
Request |
Set Phase One and add headers. Invoked by request for OAAM Server to update status after getting login response from BigBank. |
|
Phase2UpdateLoginStatusPageRequest |
Request |
Add header and update OAAM Server with login status. Invoked by request for |
|
AllowLoginResponse |
Response |
Set variables and direct client to the next page to continue with the login. Invoked when receiving login success response from OAAM Server. |
|
Phase1FailLoginResponse |
Response |
Set login status and direct client to next page. Invoked in Phase One when BigBank failed the login and the response sent back from OAAM Server. |
|
FailLoginResponse |
Response |
Set login status and redirect client to the OAAM login block page. Invoked when BigBank failed the login and Phase One is not enabled. |
|
BlockLoginResponse |
Response |
Set |
|
LoginBlockedPageRequest |
Request |
Redirect client to BigBank logout page. Invoked by request for BigBank Login Blocked page. |
|
Phase1LoginBlockedPageResponse |
Response |
Clear session and redirect client to the OAAM Login Blocked page, then stop intercept. Used in Phase One, invoked by response from BigBank Login Blocked page. |
|
Phase2LoginBlockedPageResponse |
Response |
Clear session and redirect client to OAAM Login Blocked page. Used when Phase One is not enabled, invoked by response from BigBank Login Blocked page. |
|
LogoutPageResponse |
Response |
Redirect client to BigBank logout page. Invoked by response from OAAM logout page. |
|
Phase1LogoffPageResponse |
Response |
Clear session when getting response from BigBank logout page. Used when Phase One enabled. |
|
Phase2LogoffPageResponse |
Response |
Clear session when getting response from BigBank logout page. Used when Phase Two enabled. |
6.7.2 Flow for BigBank without UIO Proxy
The following is the flow of the BigBank application without the UIO Proxy for login and logout.
6.7.3 Flow for First-time User to Log In and Log Out of BigBank with UIO Proxy
This section provides details for the flows for first time users who log in to the BigBank application through the UIO Proxy. The regular flow, including the login phase, registration phase/skip registration phase, and logout phase, and the deviation flow (block login) are covered. Interceptors defined in Configure xml that are used in each step in the flow will be listed.
Note: For the proxy, the only messages shown are ones when the interceptors match request/response. Normal messages that the proxy passes between the client and Oracle Adaptive Access Manager/application are skipped to simplify the scenario.
The regular flow (four phases) consists of the login, registration, skip registration, and logout phases.
Figure 6-5 shows the flow for Getting the Login Page (Login phase).
-
Client requests Login page for the application (
http://proxyhost:port/bigbank). -
The proxy intercepts the request, and sets the headers. Then, the proxy redirects the client to
oaam_server/login.do.The request is intercepted by two interceptors:
AddAppIdTobharosauioRequests-BigBankandPhase2RedirectBigBankLoginPageRequest.Note:
AddAppIdTobharosauioRequests-BigBanksets the HTTP headers and variables. It will intercept any request for the OAAM Server and the proxy will try other interceptors to see if there are more matches after this interceptor.Phase2RedirectBigBankLoginPageRequestredirects the client from the BigBank Login page tooaam_server/login.do. -
The client requests to get
login.doat the OAAM Server (http://proxyhost:port/oaam_server/login.do). -
OAAM Server redirects to Jump page to fingerprint the client device.
-
OAAM Server gets fingerprinting from the client browser.
-
OAAM Server responds after getting the fingerprint with the Login page, as shown in Figure 6-6.
-
The client posts the user name to the OAAM Server (
http://proxyhost:port/oaam_server/login.do).Other than the
AddAppIdTobharosauioRequests-BigBankinterceptor, the request is intercepted at the proxy by thePhase2BharosaLoginPageRequestinterceptor. The proxy setsWebUIOPhaseto two. -
The OAAM Server responds.
-
The OAAM Server gets fingerprints.
-
The OAAM Server responds after getting fingerprints with the Password Collection page which has a strong authentication device, as shown in Figure 6-7.
-
The client submits the password to the OAAM Server (
http://proxyhost:port/oaam_server/password.do) -
The OAAM Server responds.
The response is intercepted by
Phase2PasswordPageResponse. The proxy saves the headers which contain the Login ID and the password that have been collected by the OAAM Server so far and redirects the client to/bigbank/GetLoginPage. -
The proxy redirects the client to
GetLoginPage. -
The client sends a request to BigBank for
GetLoginPage(http://proxyhost:port/bigbank/GetLoginPage). -
BigBank sends back a response.
The response is intercepted at the proxy by
GetBigBankLoginPageResponse. The proxy saves the parameters and performs aPost-serveraction for/bigbank/login.do. This is the normal authentication flow for the BigBank application. -
The proxy queues the interceptor and redirects client to
bigbank/login.do. -
The client requests for
login.do(http://proxyhost:port/bigbank/login.do). -
The request is intercepted by the proxy. The proxy executes the queued interceptor (
GetBigBankLoginPageResponse) and changes the request method fromGETtoPOST. -
BigBank responds, redirect the client to
activity.do. This is the normal authentication flow for the BigBank application. -
The client requests for
activity.do(http://proxyhost:port/bigbank/activity.do). -
BigBank sends a login success response.
The response is intercepted at the proxy by
LoginSuccessResponse. The proxy sets the login status tosuccessand performs aget serveraction for/oaam_server/updateLoginStatus.do -
The proxy redirects the client to
updateLoginStatus.do. -
The client sends a request to OAAM Server to update the status
http://proxyhost:port/oaam_server/updateLoginStatus.do). -
OAAM Server does a post authentication check and returns the result.
The response is intercepted at the proxy by
AllowLoginResponse. -
The proxy takes the
send-to-clientaction. It sets thedisplay-urlvariable so that the client will request this URL after receiving the response. -
The client sends a request to OAAM Server for the first-time user to get the Registration page (
http://proxyhost:port/oaam_server/registerQuestions.do). -
The Response page has two options for the users: skip and register.
Then registration flow where the client chooses to register is shown in Figure 6-8.
-
The client chooses to register (
Posttohttp://proxyhost:port/oaam_server/registerQuestions.do). -
OAAM Server responds with instructions.
-
The client clicks Continue on the instruction page. (
http://proxyhost:port/oaam_server/registerQuestions.do). -
OAAM Server responds with the Question page.
-
The client selects Questions/Answers and submits them to the OAAM Server (
http://proxyhost:port/oaam_server/registerQuestions.do). -
OAAM Server updates the information and responds.
-
The proxy performs a
send-to-clientto the Next page.The response is intercepted at the proxy by the
AllowLoginResponseinterceptor. The proxy takes thesends to Clientaction by specifying the Next page after successful authentication. The client will then be redirected to the application page on the next step. -
The client requests the Next page through the proxy (
http://proxyhost:port/bigbank/activity.do). -
The application page (
activity.do) is sent back to the client through the proxy. This is where the login process ends.The Logout Phase is shown in Figure 6-9.
-
The client clicks Log out (
http://proxyhost:port/bigbank/logout.do). -
The application sends back a response and redirects the client to
bigbank/loginPage.jsp.The response is intercepted by P
hase2LogoffPageResponse, which clears the session variables. -
The client requests for the BigBank Login page (
http://proxyhost:port/bigbank/loginPage.jsp). -
The proxy intercepts the request and redirects the client to OAAM Server.
-
The client makes a request to OAAM Server for
login.do(http://proxyhost:port/oaam_server/login.do). -
OAAM Server redirects to the Jump page to fingerprint the client device.
-
OAAM Server fingerprints the client browser.
-
OAAM Server responds after fingerprinting with the Login page.
Figure 6-10 shows the Skip Registration phase where the client chooses to skip the registration of questions. This phase occurs after the Login phase in regular flow.
-
The client chooses to skip the registration (Post to
http://proxyhost:port/oaam_server/registerQuestions.do). -
OAAM Server responds.
-
The proxy intercepts the response and redirects the client.
The response is intercepted by
AllowLoginResponse. The proxy usessend-to-clientto specify the next step for the client. -
The client requests for the page specified by the proxy (
http://proxyhost:port/bigbank/activity.do). -
The BigBank application sends back a response.
Figure 6-11 shows the Deviation flow - Block login, which occurs when OAAM Server decides to block the client after the post authentication check. This flow replaces step 15-19 in login phase of regular flow.
-
OAAM Server decides to block the user after post authentication check.
The response is an interceptor by the
BlockLoginResponseinterceptor. This interceptor redirects the client to the application Block page:/bigbank/BlockLoginPage -
The proxy redirects the client to
loginBlockPageof BigBank. -
The client requests for BigBank
BlockLoginPage(http://proxyhost:port/bigbank/loginPage.jsp?action=block). -
The request is intercepted by
LoginBlockedPageRequestby the proxy. The proxy accepts theget-serveraction for the Logout page:/bigbank/logout.do. This action ends the session at BigBank. -
The application responds.
The response is intercepted by
Phase2LoginBlockedPageResponse. The proxy clears the session and redirects the client to the OAAM Login Block page. -
The proxy redirects the client to the OAAM Login Block page.
-
The client requests the Block page from OAAM Server (
http://proxyhost:port/oaam_server/loginPage.jsp?action=block). -
OAAM Server responds with Blocked page.
6.8 Upgrading the UIO Apache Proxy
Oracle Adaptive Access Manager patches may contain updates for the UIO Apache Proxy for Microsoft Windows and Linux (rhel4). Follow the instructions in this chapter to replace the mod_uio.so and related .dlls (on MS Windows) and .so (on Linux) libraries with those released as part of this patch release.
6.8.1 UIO Apache Proxy Patch Installation Instructions
Installation of a patch is similar to installing the UIO Proxy package. A patch will contain only the modified files. It is good practice to back up all your existing files since the patch will overwrite some or all of the files.
A patch contains only the modified files; so if a file is not available in the patch, skip that step. The steps are to be performed manually by the patch installer.
For both MS Windows and Linux:
-
Shut down the instance of Apache that you are updating
Note:
Ensure that you are usingApache httpd, version 2.2.8 withmod_ssl. -
Back up existing files:
binary, .rngand.xmlfiles -
Unzip
patch_oaam_win_apache_uio.zip(for Windows) orpatch_oaam_rhel4_apache_uio.zip(for Linux), which are located in theoaam_uiodirectory. -
Copy the binary files from the patch (additionally on Linux, you must set soft-links to
.sofiles appropriately). -
Copy
UIO_Settings.rngandUIO_Config.rngfiles from the patch. -
Compare your existing
UIO_Settings.xmlandUIO_log4j.xmlfiles with those given in the patch and verify that you have the correct settings. Refer to the sections that apply to this patch and ensure that you have the correct settings. The same also applies to your configurationXMLfiles. -
Start Apache and run your sanity tests
-
For Windows,
-
The binary files are:
mod_uio.so,log4cxx.dll,libxml2.dll,apr_memcache.dll(apr_memcache.dllwas introduced in 10.1.4.5.bp1) -
The configuration files are:
UIO_Settings.rng,UIO_Config.rng,UIO_Settings.xml,UIO_log4j.xmland application configurationXMLfiles
-
-
For Linux,
-
The binary files are:
mod_uio.so,liblog4cxx.so.0.10.0.0,libxml2.so.2.6.32,libapr_memcache.so.0.0.1 -
The binary configuration files are:
UIO_Settings.rng,UIO_Config.rng,UIO_Settings.xml,UIO_log4j.xmland application configurationXMLfiles
-
-