Configuring the metric boxes for a Metrics Bar

After you select the metrics to display for the Metrics Bar, you then configure how to display each metric.

On the edit view of the Metrics Bar component, each metric to display is represented by a metric box. When you first add the metrics:
  • The metric boxes are grey.
  • Each box label is based on the EQL query.
  • There are no alerts associated with the metrics.
Metric Bar component edit view with metric boxes using the default color

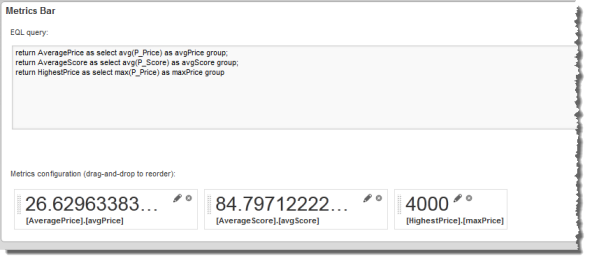
To configure the order in which to display the metrics, drag and drop the metric boxes.

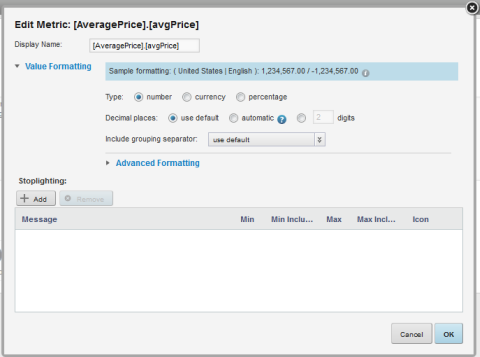
For each metric, to configure how the value and box are displayed:

  1. On the metric box, click the edit icon.

    The Edit Metric dialog is displayed.

    Edit Metric dialog displayed from the Metric Bar component edit view with no stoplighting
  2. In the Display Name field, type the display name for the metric.

    This is the label that displays at the top of the metric box.

    By default, the display name is based on the EQL query.

  3. Use the Value Formatting fields to configure the format of the displayed metric values.

    For details on formatting values, see Configuring the format of values displayed on a component.

  4. For numeric values (integer, currency, and decimal values), you can configure specific formatting and messages based on the current value of the metric. String values do not support this formatting.

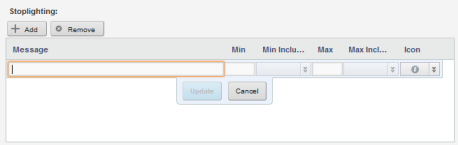
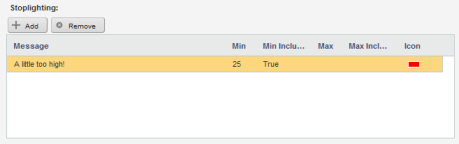
    In the Stoplighting section, to configure the stoplighting rules:

    1. To add a stoplighting rule, click Add.

      The next row of fields is enabled.

      Spotlighting section of the Edit Metric Bar dialog with blank fields for a new spotlighting entry
    2. To configure the value and formatting:
      Field Description
      Message In the Message field, type the text of the message associated with the rule.
      Min In the Min field, type the minimum metric value for which to apply the formatting and display the message.

      For example, to only apply the formatting if the value is greater than 85, type 85 in the field.

      Min Inclusive If you have provided a minimum value, then from the Min Inclusive drop-down list, select whether the provided value is inclusive.

      If you select True, then the formatting is applied if the value is greater than or equal to the provided value.

      If you select False, then the alert formatting is applied only if the value is greater than the provided value.

      Max In the Max field, type the maximum metric value for which to use this formatting.

      For example, to only use the formatting if the value is less than 100, type 100 in the field.

      Max Inclusive If you have provided a maximum value, then from the Max Inclusive drop-down list, select whether the provided value is inclusive.

      If you select True, then the alert formatting is applied if the value is less than or equal to the provided value.

      If you select False, then the alert message displays only if the value is less than the provided value.

      Icon From the Icon drop-down list, select the stoplight color to highlight on the metric box when the metric value meets the minimum/maximum value criteria.

      The color also is used on for the metric value text.

    3. After filling out the fields, to save the stoplighting rule, click Update.

      The stoplighting rule is added to the list.

      Spotlighting section of the Edit Metric Bar dialog after the spotlighting entry is added
    4. To edit an existing rule, double-click the message row. The fields are enabled to allow you to edit the rule.

      After making the edits, to save the changes, click Update.

    5. To remove a rule, click the rule, then click Remove.
  5. To save the metric configuration, click OK.

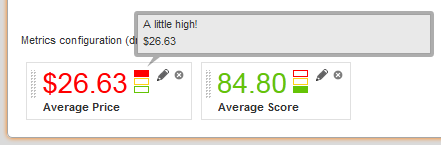
    On the edit view, the metric box is updated to reflect the new display name and format, and the text is displayed in the appropriate color based on the metric value.

    To test the alert message, hover the mouse over the stoplight icon.

    Metrics Bar edit view showing the updated colors and message on the metric boxes
  6. To exit the edit view, and return to the end user view, click Exit.