You select members for a variety of purposes within Smart View: ad hoc grids, functions, the POV Manager, and for taking Planning forms offline. The Member Selection dialog boxes in these locations may vary slightly from one another, and not all options are always available. You can select members for one dimension at a time.
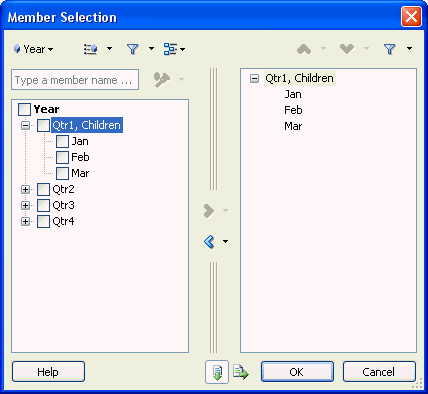
Figure 1, The Member Selection Dialog Box shows the Member Selection dialog box with the Year dimension and its members as examples.
 To select members:
To display the Member Selection dialog box, which contains a tree list of available members for the dimension selected, do one of the following:
Select a dimension or member on the grid, and then from an Ad Hoc data source ribbon, click Member Selection.
From an open dialog box enabled for member selection, click Member Selection.
On a blank worksheet, from the Smart View Panel, right-click a cube name and select Member Selection. Use this method to select members for functions and references (see Functions).
From Member Selection, to change the dimension, click the Dimension Selector button (for example,
 ) and select a dimension.
Optional: To find a specific member in the tree list, enter a member name in the search field and click
 .
.Optional: To find a specific member or group of members in the tree list, click
 and select one of these filters (filter options may vary by data source type):
Children to select only the children of the selected member
Descendents to select all descendents of the selected member
Level to display Level, where you select one level in the hierarchy of members
Generation to display Generation, where you select one generation in the hierarchy of members
UDA to display UDA, where you select a user-defined attribute (available only if defined by the administrator)
Note:
See also Filtering by Attribute, Filtering by Subsets, and Selecting Period-to-Date Members.
The members are transferred from the member tree list to the selection tree list in the pane on the right.
Optional: If this is the first member selection that you make in a blank worksheet, select one of these buttons:
 to display the selected members vertically, in a column
 to display the selected members horizontally, in a row
The members selected are displayed in the grid.
From the ribbon, click Refresh to update the data to correspond to the selected members.
 .
.