Using Primavera uDesigner’s auto-population feature, you can automatically populate fields on a form at the time the form is created. You can populate the fields on the new form with:
| • | Data from fields on other forms or Primavera Unifier sources |
| • | A constant value or boiler-plate text you specify (see "Auto-populating fields with a constant value," below.) |
|
Dynamic Data Sets
|
This can save time for users because they don’t have to fill in every field of the form. For example, you could use this feature to automatically fill in a “Plant Location” field from an attribute form. For another example, you could set up the date field on a time sheet to default to the server date and time so that users do not need to use a date picker. You could also set up a field to automatically display a title or other boilerplate text for common forms users need to fill in on a frequent basis. In addition, auto-population can be used with the Primavera Unifier portal. When a user logs into the portal to submit a form, such as a work order, the user’s information, such as his/her location and department, can be automatically populated on the work order. Or, when an employee “move” request is created, the current location of the employee can be auto-populated onto the move request form.
Auto-population works similarly to reference processes: It links a field on a form to outside data by “mapping” the field to a field on the outside source. In operation, the field you want to auto-populate will point to the outside source and use the value in that field to populate the field on the new form. Once the mapping link is created, you can use the outside source to populate any fields that the outside source and the new form have in common.
Note: To auto-populate fields, the data definition of both fields--the one on the current form as well as the one on the outside source--must match.
|
Auto-population occurs on the creation step |
Auto-population can be triggered whenever a business process is created using auto-creation (S-step or I-step) integration, CSV files, SmartForms, Unifier on mobile devices, or portal submissions. In some cases, you can design the auto-population to be triggered by a user data picker. (This is a type of data picker you can create. See About User Data Pickers.) For instance, you can design an office move order for an employee to be auto-populated with the employee’s current location when the Unifier user chooses the employee from a user data picker.
Use auto-population for text boxes, text areas, pickers (including user data pickers), pull-down lists, checkboxes, and radio buttons.
You can populate fields on a form from the following sources:
| • | Fields on an attribute form for managers (except a code-based configurable manager) |
| • | Fields on another (referenced) business process form |
| • | Fields on a user attribute form (via a user data picker) |
| • | Shell attribute forms |
| • | Fields from an upper form (to fields on a detail form) |
| • | Fields on single-record BPs at the company, shell, or standard project level |
| • | User data picker on a referenced business process (from a user data picker on the source business process) |
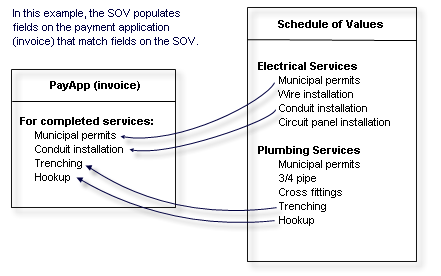
| • | Fields on an SOV (for a payment application BP) |
| • | Fields from document properties of a line item attachment |
| • | The total value from a line-item numeric field (can populate a field on an upper form; becomes a read-only field) |
| • | A constant value you enter when you set up auto-population for the field |
|
You cannot auto-populate:
|
To auto-populate a field
| 1 | Open the form that contains the field you want to auto-populate. The Form Designer window opens. |
| 2 | Click the Properties button on the toolbar. The Elements Properties window opens showing a list of the fields (data elements) on the form. |
| 3 | Highlight the field you want to auto-populate and lick the Auto-populate button. The Auto Populate window opens. |

| 4 | In the Source Name field, specify the outside source where the data should come from. |
The source of the populating data depends on the type of component you are designing. For example, for a payment application business process, you could auto-populate a field using data from:
| • | A BP picker on a referenced business process |
| • | A line item picker on the upper or detail form of a referenced business process |
| • | A fund or WBS picker on the detail form of a fund attribute or cost attribute form |
| • | A single-record BP |
| • | The upper form or detail form of the BP you are creating |
| • | The detail form of a Base Commit or Change Commit BP |
| • | The schedule of values (SOV) |
| • | A shell attribute form |
For another example, you could auto-populate the location field on an employee re-location business process by using a user data picker. When the re-location form is created, the employee name chosen from the data picker will auto-populate the location field with the employee’s current location.
| 5 | In the Source Element field, click the Select button and choose the name of the data element that contains the data you want to populate this field. |
The source elements you can choose depend on the Source Name you specified. The list will show the data elements the source and destination forms have in common; that is, those elements whose data definitions match.
| 6 | Click OK. |
If you are populating a field with a constant value, the Auto Populate window works differently. When you highlight the field you want to populate and click the Auto-populate button, the Auto Populate window opens.
Note: You cannot use a constant value for pull-down lists, check boxes, or radio buttons.

To auto-populate a field with a constant value
| 1 | Open the form that contains the field you want to auto-populate. The Form Designer window opens. |
| 2 | In the Form Designer window, click the Properties button on the toolbar. The Elements Properties window opens showing a list of the fields (data elements) on the form. |
| 3 | Highlight the field you want to auto-populate and click the Auto-populate button. The Auto Populate window opens. |
| 4 | In the Destination Element field, enter the name of the data element you want to populate. |
Enter the data element name; not the field label.
| 5 | In the Source Name field, click the Select button and choose ConstantValue. |
When you choose Constant Value, the Source Element field changes to read Source Value.
|
If you entered this as the Destination Element: |
The Source Value field will show: |
|
A date field |
A single read-only value—Today Date/Time. This means the Destination Element will be populated with the current server date and time. Note: This option is not available for any due_date element, or any data element built on the SYS Date Picker data definition. |
|
A text field |
A text area where you can enter the text you want to populate the destination element field. For example, if you want the field populated with the attendees of a regular meeting, enter a list of the attendee names. |
|
A numeric field |
A text area where you can enter the numbers you want to populate the destination element field. For example, if you want the field to contain a numeric ID for a type of document, enter that ID here. You can enter up to 13 digits; 15 if you include a fraction or a decimal. |
|
The name of a user data picker |
“Login User.” At runtime, the field will display the name of the user who has logged in and is using the business process. The field will be read-only. |
| 6 | Click OK. |
Oracle Corporation
Primavera Unifier 9.10 • Copyright © 1998, 2012, Oracle and/or its affiliates. All rights reserved.