| StorageTek Tape Analytics Installation and Configuration Guide Release 2.0.1 E41585-03 |
|


 Previous |
 Next |
| StorageTek Tape Analytics Installation and Configuration Guide Release 2.0.1 E41585-03 |
|
Previous |
Next |
After the libraries have been configured to send data to STA (as described in Chapter 4), use the following procedure to configure STA to receive data from the libraries.
To configure STA to receive SNMP data from the libraries, complete all the tasks in Table 5-1 in numerical order.
Table 5-1 Tasks to Configure SNMP in STA
This procedure verifies that UDP ports 161 and 162 have been enabled on all network nodes between the STA server and the library. It cannot validate that a v3 trap recipient has been specified correctly.
Establish a terminal session with the STA server, and log in as root.
At the command prompt, use the following command to test the SNMP v3 connection:
snmpget -v3 -u SNMP_user -a SHA -A auth_password -x DES -X priv_password -l authPriv library_IP_addr 1.3.6.1.4.1.1211.1.15.3.1.0
SNMP_user: The SNMP user you created in "Create an SNMP v3 User".
auth_password: The authorization password you assigned in "Create an SNMP v3 User".
priv_password: The privacy password you assigned in "Create an SNMP v3 User".
library_IP_addr: The IP address of the public port on the library, as follows:
For SL150 libraries, this is Network Port 1.
For SL500 libraries, this is port 1B.
For SL3000 and SL8500 libraries, there may be multiple ports to test, depending on whether Dual TCP/IP and/or Redundant Electronics are activated on the library. If there are multiple ports, run this command for each IP address.
1.3.6.1.4.1.1211.1.15.3.1.0: The SNMP object identifier (OID) for the library, which is the same for all library models.
If the command output displays the library model (Example 5-1), the test is successful. If unsuccessful (Example 5-2), you may need to troubleshoot packet routing between the library and STA server. Contact your network administrator or Oracle Support.
Example 5-1 Successful snmpget Command
# snmpget -v3 -u STAsnmp -a SHA -A authpwd1 -x DES -X privpwd1 -l authPriv 192.0.2.20 1.3.6.1.4.1.1211.1.15.3.1.0
SNMPv2-SMI::enterprises.1211.1.15.3.1.0 =STRING: "SL8500"
Example 5-2 Unsuccessful snmpget Commands
# snmpget -v3 -u STAsnmp -a SHA -A authpwd1 -x DES -X privpwd1 -l authPriv 192.0.2.20 1.3.6.1.4.1.1211.1.15.3.1.0
Timeout: No Response from 192.0.2.20.

# snmpget -v3 -u WrongUsr -a SHA -A authpwd1 -x DES -X WrongPwd -l authPriv 192.0.2.20 1.3.6.1.4.1.1211.1.15.3.1.0
snmpget: Authentication failure (incorrect password, community or key)
Go to the STA GUI login screen using the HTTP (default is 7021) or HTTPS (default is 7022) port number you selected during STA installation. "STA" must be uppercase.
http(s)://yourHostName:PortNumber/STA/
Log in using the STA GUI Login username and password.
Use this procedure to configure STA to receive SNMP data from one or more libraries. You need to create one client entry for your site.
In the navigation menu, select Setup & Administration > Configuration > SNMP Connections.
In the Client Attributes table, select the empty table row. In the toolbar, click Edit.
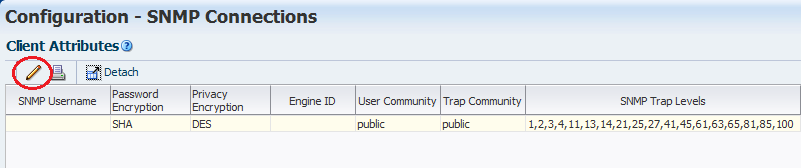
Complete the Define SNMP Client Settings dialog box.
|
Note: Even if STA will only be monitoring libraries configured for v2c communication, you must fill out all fields, including those applicable to v3. No fields may be left blank. See "SNMP Communication". |
STA SNMP Connection Username (Auth): The SNMP v3 user name you created in "Create an SNMP v3 User".
Enter STA SNMP Connection Password (Auth): The connection authorization password you created in "Create an SNMP v3 User".
Enter Privacy Encryption Password (Privacy): The privacy encryption password you created in "Create an SNMP v3 User".
User Community: Required for the initial handshake with the library, or if v2c will be used for STA communication. The default setting is public, but can be changed to match what is specified on the library. For more information, see "Ensure an SNMP v2c User".
Trap Community: Only used if v2c will be used for communication with the library. When using v3, leave this set to the default, public. If using v2c for communication with the library, it can be changed to what is specified on the library.
Click Save.
A message reminds you that a library connection test is required. You will perform this test later in the process.
Use this procedure to configure SNMP connections between STA and a library. Perform this procedure for each library before proceeding to Task 5.
In the navigation menu, select Setup & Administration > Configuration > SNMP Connections.
In the Monitored Libraries toolbar, click Add.
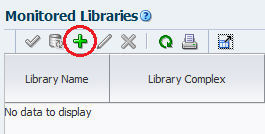
Complete the Define Library Connection Details dialog box.
|
Note: For libraries with Dual TCP/IP or Redundant Electronics, see "Dual TCP/IP and Redundant Electronics (SL3000 and SL8500 Only)" to determine which IP addresses to use. |
Library Name: This name will be used to identify the library throughout the STA user interface screens (for example, the library host name).
Library Primary IP Address: The IP address of the primary public port on the library that you recorded in "Retrieve the Library IP Address".
Library Secondary IP Address: For SL500 and SL150 libraries, leave this field blank. For SL3000 and SL8500 libraries, enter the secondary IP address you recorded in "Retrieve the Library IP Address".
STA IP Address: Select the IP address of the STA server.
Library Engine ID: Leave this field blank. This is the unique SNMP engine ID of the library automatically provided when the initial connection between STA and the library is made.
Automated Daily Data Refresh: The time of day STA collects the latest configuration data from the library. The data will be collected automatically every 24 hours at this time. You should choose a time when there is typically lighter library usage. The default is 00:00 (12:00 am). Use 24-hour time format.
|
Caution: If you leave this field blank, scheduled automatic library data collections will be disabled. This will cause your STA library configuration data to become out of sync with the library. |
Library Time Zone: The library's local time zone.
Click Save.
A message reminds you that a library connection test is required. You will perform this test later in the process.
Repeat this task for additional libraries.
Use this procedure to verify that a library is fully initialized and operational. If a library is not fully initialized, subsequent configuration steps will fail. Perform this procedure for each library before proceeding to Task 6.
Log in to the library with the SL Console.
From the menu, select Tools > System Detail.
In the left panel, select Library.
In the right panel, select Status.
Verify the library Operational State indicates Operational.
Log in to the library with the SL Console.
From the menu, select Tools > System Detail.
In the left panel, select Library.
In the right panel, select Status > General.
Verify the Device State indicates ”Ready”.
Log in to the browser-based user interface.
At the top of the screen, verify that Health indicates Operational.
Use this procedure to test the SNMP connection between STA and each library. You should use this procedure whenever you add or modify STA or library SNMP information. Only one library connection can be tested at a time.
|
Note: Because performing a connection test can cause a momentary loss of incoming packets, you should only do so when necessary. |
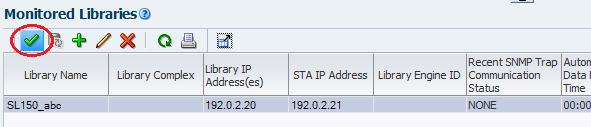
In the STA navigation menu, select Setup & Administration > Configuration > SNMP Connections.
In the Monitored Libraries table, select a library, and then click Check / Test Connection.
Test results for MIB Walk Channel, Trap Channel, and Media ValidationFoot 1 Support will appear momentarily. To troubleshoot a testFoot 2 , see "Troubleshooting Connection Tests and Data Collections".
Click OK. The Monitored Libraries table is updated, as follows:
The Library Complex field is blank, and will be updated in the next task.
The Library Engine ID field is populated. (A mismatch between the library engine ID shown here and the library engine ID specified when creating a trap recipient on the library does not affect the connection test.)
The Recent SNMP Trap Communication Status field indicates NONE.
The Last Successful Connection and Last Connection Attempt fields indicate the date and time when the connection test was completed and initiated, respectively.
The Last Connection Status field indicates ”SUCCESS”.
Repeat this task for additional libraries.
After testing library connections in Task 6, you must use this procedure to manually initiate a data collection for each library. (Though STA performs a data collection automatically every 24 hours at the time you scheduled in Task 4, you must perform a manual data collection whenever you add SNMP connection information for a library.) Data collections may take several minutes to an hour, depending on library size.
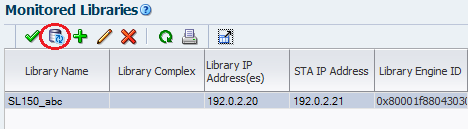
In the STA navigation menu, select Setup & Administration > Configuration > SNMP Connections.
Select a library in the Monitored Libraries table, and then click Get latest data.
|
Note: If you are completing this task for multiple libraries, you can initiate multiple "Get latest data requests" by selecting a library, clicking Get latest data, selecting another library, clicking Get latest data, and so on. |
Click OK to dismiss the message box. In the Monitored Libraries table, Last Connection Status will update as follows:
IN PROGRESS: The data collection process is underway.
SUCCESS: The data collection was successful. STA starts receiving exchange data from the library.
FAILED: The data collection was not successfulFootref 2. If possible, STA will provide information in the Last Connection Failure Detail field. (You may need to extend the column width to see the entire value.) See Appendix C, "Configuration Troubleshooting".
|
Note: The status is updated every four minutes, and the default screen refresh interval is 480 seconds. However, you can click the Refresh Table button to force a refresh of the table. |
|
Note: Recent SNMP Trap Communication Status may occasionally indicate MISSED HEARTBEAT. This is normal. |
Footnote Legend
Footnote 1: See the STA Requirements Guide for more information.
|
 Copyright © 2012, 2014, Oracle and/or its affiliates. All rights reserved. Legal Notices |
|