| Oracle® Health Sciences Mobile Clinical Research Associate Server Installation and Configuration Guide Release 1.3 E38578-04 |
|
|
PDF · Mobi · ePub |
| Oracle® Health Sciences Mobile Clinical Research Associate Server Installation and Configuration Guide Release 1.3 E38578-04 |
|
|
PDF · Mobi · ePub |
This section details the deployment of Mobile CRA Server - OCDA OBIEE repository (RPD) in the Mobile CRA Server environment.
This chapter includes the following sections:
Section 3.2, "Before Deploying Mobile Clinical Research Associate Server OBIEE Component"
Section 3.4, "Configuring Mobile Clinical Research Associate Server Repository"
Section 3.9, "Deploying Mobile Clinical Research Associate Server Pre-defined Alert"
Section 3.10, "Deploying Mobile Clinical Research Associate Server Reports Alert"
Section 3.11, "Updating OCDA with Mobile Clinical Research Associate Server Rules Engine"
For information about OBIEE and RPD in Oracle® Health Sciences Clinical Development Analytics (OHSCDA), see the following:
http://download.oracle.com/docs/cd/E25587_01/index.htm (for Plus configuration)
http://docs.oracle.com/cd/E50736_01/index.htm (for Standard configuration)
Before deploying Mobile CRA Server OBIEE, back up all OBIEE catalogs, RPD, and security profiles.
Before deploying Mobile CRA Server OBIEE component, ensure to collect the following files and DB user information:
Required RPDs
OCDA Repository: Ensure to make a note of the name, location, and the password for RPD (OCDA), which will be upgraded to include Mobile CRA Server Alert feature.
Mobile CRA Server Repository (Mobile CRA_Server_01.rpd): This repository contains Mobile CRA Server data source. This is used for Mobile CRA Server operations reports and is provided by Oracle. The default password is Admin123.
dummy.rpd: This is an empty RPD, which does not contain data source. This is required for merging process. The default password is Admin123.
Database user name and password for the following schemas:
Mobile CRA Server
Mobile CRA Server Rules Engine (This is required only for installation with OCDA)
OCDA (This is required only for installation with OCDA)
To configure OBIEE admin user, perform the following:
Log in to OBIEE server.
Log in to WLS Enterprise Manager as admin by entering the URL using the server address in Step 1 (for example, http://<server:port number>/console).
Click Security Realms.
Select myrealm from the list.
The Settings for myrealm screen is displayed in the right-side window panel.
Click Users and Groups.
Click Users tab and click New to create a user.
Enter the name.
Enter the description.
Retain the default value in the Provider field.
Enter a password of your choice.
Re-enter the password in the Confirm Password field.
Click OK to create the user.
Assign groups to the user as follows:
Click the user Mobile CRA-admin and select Groups.
Assign Administrator and BI Administrator groups to the user.
Click Save to save the user profile.
To configure Mobile CRA Server RPD to point to Mobile CRA Server database, perform the following:
Open the OBIEE Administration tool.
Open MobileCRA_Server_01.rpd.
Enter the password.
Oracle recommends you to modify the password of the RPD provided by Oracle. To change the password, perform the following:
From the File menu, select Change Password.
Enter the old and new password in the respective fields.
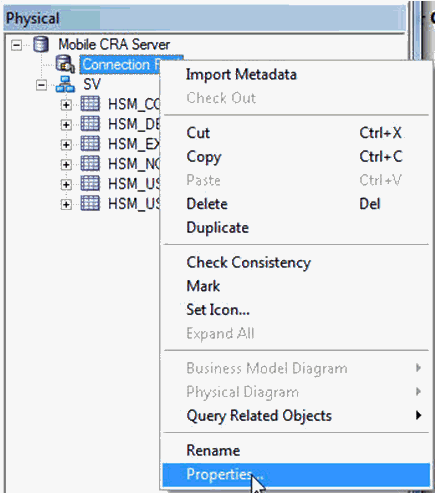
To configure Mobile CRA Server, navigate to the Physical tab, right-click on Mobile CRA Server Connection Pool, and choose Properties.
Figure 3-2 Connection Pool Properties Screen 1
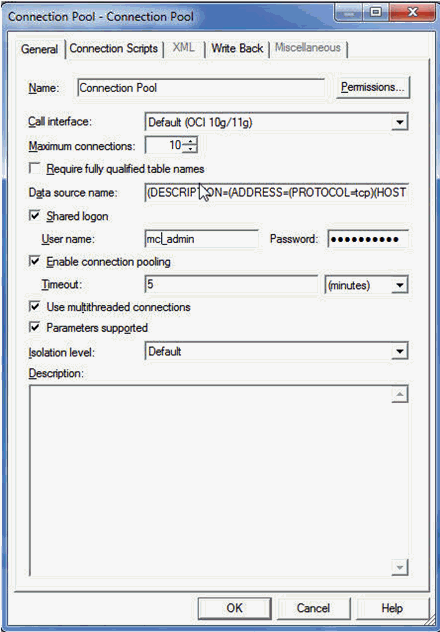
Modify the data source name, user name, and password to the database user created for the Mobile CRA Server data model.
Enter the data source name in the following format:
(DESCRIPTION=(ADDRESS=(PROTOCOL=tcp)(HOST=<hostname>)(PORT=<port>))(CONNECT_DATA=(SID=<oracle db sid>)))
Enter the user name and password for the Mobile CRA Server schema.
Figure 3-3 Connection Pool Window Screen 2
Save the RPD file.
Test your connections by viewing data on one of the tables in the datastore.
For example, if you see data return, it indicates that your configuration is working.
Click OK to save.
To upgrade OCDA repository to add Mobile CRA Server Rule engine data source, perform the following:
Refer to Section 3.11, "Updating OCDA with Mobile Clinical Research Associate Server Rules Engine" for instructions.
Save the created RPD as OCDA_MCRA_01.rpd.
To merge RPD, perform the following:
Take a backup of the following repository:
Updated version of OCDA repository (updated with Mobile CRA Server Rules Engine data source) OCDA_MCRE_01.rpd.
Mobile CRA Server Repository - MobileCRA_Server_01.rpd
Open the updated OCDA RPD, that is OCDA_MCRA_01.rpd.
From the File menu, select Merge.
The Merge Repository Wizard is displayed.
Select dummy.rpd in the Original Master Repository.
Enter the repository password for the dummy repository.
Select MobileCRA_Server_01.rpd in the Modified Repository.
Enter the repository password for Mobile CRA Server repository.
Retain Save Merged Repository as is and note down the saved merged repository name and location.
Click Next.
A screen is displayed which shows the conflicts.
Click the Decision column in the conflict row and select Current.
Click Next.
The Merge Repository screen is displayed.
Click Finish.
Verify that the physical layer has Mobile CRA Server, Mobile CRA database, and OCDA data warehouse schemas available in the Physical section.
Verify that the Mobile CRA Server and OCDA-DM are available in the Business Model and Mapping section.
Open Dim - Study in OCDA-DM from the Business Model and Mapping section, and verify that the HSM_OBI_STUDY_VW is included in the source.
Open Dim - Study-site in OCDA-DM from the Business Model and Mapping section, and verify that the HSM_OBI_STUDY_SITE_VW is included in the source.
Verify that the Mobile CRA Server and OCDA are available in the Presentation section.
Verify that the Mobile CRA Alert Engine, -Study, and -Study-site presentation tables are available under OCDA.
Save the updated OCDA repository (for example as OCDA_MCRE_MCSV_01.rpd).
To deploy updated OCDA RPD to OBIEE, perform the following:
Log in to Enterprise Manager (for example, http://<server:port number>/em).
Navigate to Business Intelligence and select Coreapplication.
Navigate to Deployment tab, and then to the Repository subtab.
Click Lock and Edit Configuration to lock the application.
In the Upload BI Server Repository pane, choose the RPD file that you want to upload, and load the updated OCDA repository (for example, OCDA_MCRE_MCSV_01.rpd).
Enter the password for updated OCDA repository.
Re-enter the password for the updated OCDA repository in the Confirm Password field.
Click Apply.
Click Activate Change.
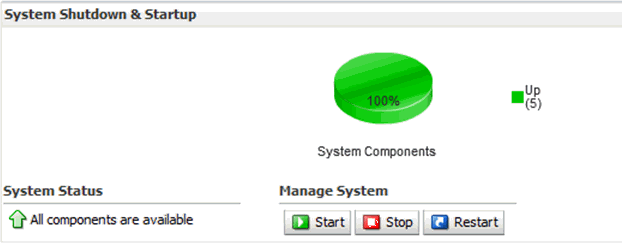
Restart to apply recent changes.
Restart all BI components.
Figure 3-11 System Shutdown and Startup Screen
Click Yes in the Confirmation window.
Once the restart is complete, a message is displayed indicating that the RPD deployment is complete.
To create a user to access the new OCDA - Mobile CRA Server RPD, perform the following:
Navigate to the Oracle WebLogic server (for example, http://<servername>/console/login/LoginForm.jsp).
Navigate to Security Realms and select myrealm.
The Settings for myrealms screen is displayed.
Click Users and Groups.
Click New in the Users subtab.
Enter the OBIEE user name (for example, Mobile CRA-admin).
Enter the OBIEE password.
Click OK to create user.
Assign groups to the user as follows:
Select the newly created user Mobile CRA-admin and navigate to Groups.
Assign groups to this user. For example, Administrator and BI Administrator.
Click Save to save the user profile.
Test the user by navigating to the OBIEE Analytics site (for example, http://<servername>/analytics).
Enter the user name and password.
You should be able to log in to OBIEE.
Create a new analysis.
If you see the following subject areas, it indicates that your RPD and user are configured and deployed correctly.
To deploy Mobile CRA Server pre-defined alert, perform the following:
Log in to the OBIEE Analytics.
Navigate to Catalog.
The Catalog Screen is displayed.
Select Shared Folders and click Unarchive in the bottom-left Tasks menu.
Click Browse and select the Mobile CRA.catalog file.
Figure 3-17 Selecting the Mobile CRA.catalog File

Click OK to unarchive the catalog.
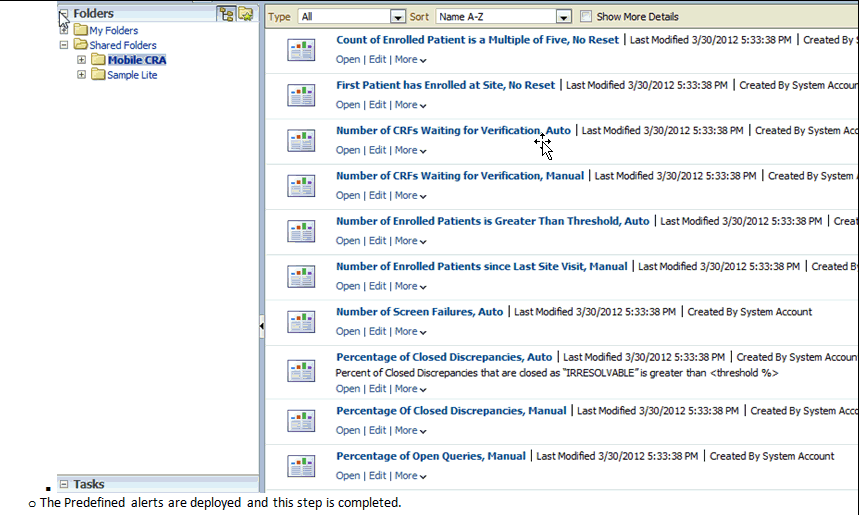
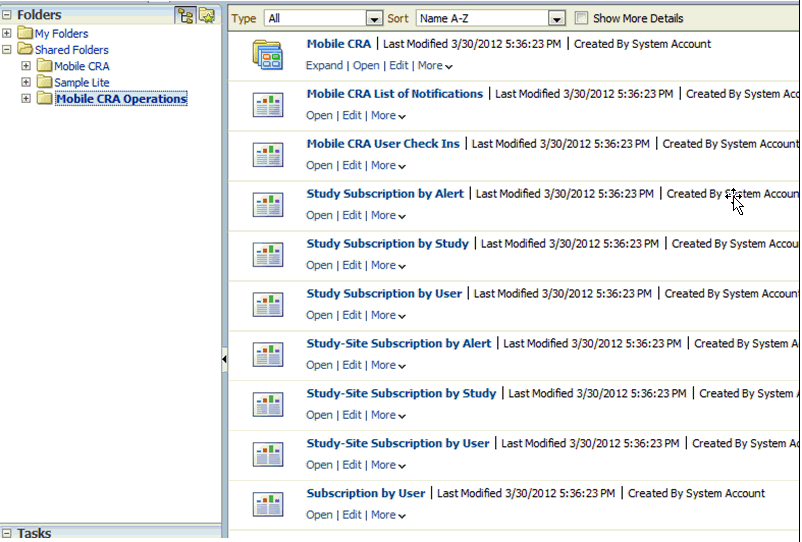
Navigate to Shared Folders and select Mobile CRA to see the predefined alert imported.
Figure 3-19 List of Predefined Alert Imported
To deploy Mobile CRA Server Reports alert, perform the following:
Log in to the OBIEE Analytics.
Navigate to Catalog.
The Catalog Screen is displayed.
Select Shared Folders and click Unarchive in the bottom-left Task menu.
Click Browse and select the Mobile CRA.catalog file.
Click OK to unarchive the catalog.
Navigate to Shared Folders and select Mobile CRA to see the predefined alert imported.
Figure 3-23 List of Predefined Alert Imported
This section contains the following topics:
To open OCDA RPD, perform the following:
Open the Oracle Business Intelligence Enterprise Edition Administration tool.
Open the OCDA repository (for example, OCDA_21_final.rpd).
Enter the repository password when prompted.
OCDA RPD will be loaded in the OBIEE Administration tool.
Save this RPD and note down the file name (for example, OCDA_MCRE_01.rpd) and the location.
From the File menu, select Import Metadata.
Select OCI 10g/11g in the Connection type.
Enter complete data source name, database user name, and password in the respective fields. Oracle recommends the following data source name format:
(DESCRIPTION=(ADDRESS=(PROTOCOL=tcp)(HOST=<hostname>)(PORT=<port>))(CONNECT_DATA=(SID=<oracle db sid>)))
Figure 3-29 Entering DB Connection Information

Click Next.
Select Views from the Metadata types to be imported.
Click Next.
Select the Mobile CRA Server Rule Engine Schema user from the list and select the following View object from the list:
HSM_OBI_STUDY_VW
HSM_OBI_STUDY_SITE_VW
Rename the data source to MobileCRA Database.
Rename the Physical schema to MobileCRA.
Right-click HSM_OBI_STUDY_VW and select Update Row Count.
Right-click HSM_OBI_STUDY_SITE_VW and select Update Row Count.
To create joins between Mobile CRA Server and OCDA tables, perform the following:
Create Join for HSM_OBI_STUDY_VW.
Select HSM_OBI_STUDY_VW from MobileCRA schema in the MobileCRA Database and Dim _W_RXI_STUDY_D from RXI schema in the OCDA Data Warehouse.
From the View menu, select Physical Diagram, and then Selected Object(s) only.
Click New Join.
Click HSM_OBI_STUDY_VW and drag the cursor (hold the mouse) to Dim_W_RXI_STUDY_D and release the cursor (release the mouse).
Select INTEGRATION_ID column from the Dim_W_RXI_STUDY_D table and STUDY_ID column from the HSM_OBI_STUDY_VW table (view).
Click OK.
Close the window.
Create Join for HSM_OBI_STUDY_SITE_VW.
The following steps are similar to creating join for HSM_OBI_STUDY_VW in step 1.
Select HSM_OBI_STUDY_SITE_VW from the MobileCRA schema in the MobileCRA Database and Dim _W_RXI_STUDY_SITE_D from the RXI schema in the OCDA Data Warehouse.
From the View menu, select Physical Diagram, and then select Selected Object(s) only.
Click New Join.
Click HSM_OBI_STUDY_SITE _VW and drag the cursor (hold the mouse button) to Dim_W_RXI_STUDY_SITE _D and release the cursor (release the mouse button).
Figure 3-37 Creating Join for HSM_OBI_STUDY_SITE _VW
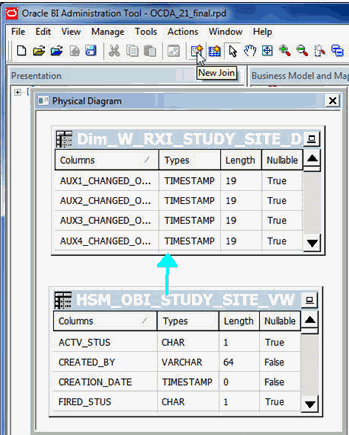
Select INTEGRATION_ID column from the Dim_W_RXI_STUDY_SITE_D table and STUDY_SITE_ID column from the HSM_OBI_STUDY_SITE_VW table (view).
Click OK.
Close the window.
To add Mobile CRA Server sources to OCDA Dimensions in the Business Model and Mapping Layer, perform the following:
Update Dim - Study.
Select OCDA-DM and expand by clicking +.
Select Dim - Study and expand by clicking +.
Click Sources and expand by clicking +.
Drag HSM_OBI_STUDY_VW from the Physical section and drop on Dim - Study in the Business Model and Mapping section.
Select HSM_OBI_STUDY_VW in Sources under Dim - Study.
From the Edit menu, select Properties to open property window.
Click Add to create join with Dim - Study.
Click Dim_W_RXI_STUDY_D from the right side and then click Select.
Click OK.
Update Dim - Study-Site.
Select Dim - Study-Site and expand by clicking +.
Click Sources and expand by clicking +.
Drag HSM_OBI_STUDY_SITE_VW from the Physical section and drop on Dim - Study-Site in the Business Model and Mapping section.
Select HSM_OBI_STUDY_SITE_VW in Sources under Dim-Study-Site.
From the Edit menu, select Properties to open property window.
Click Add to create join with Dim - Study-Site.
Click Dim_W_RXI_STUDY_SITE_D from the right side and then click Select.
Click OK to close the window.
The created join is displayed.
Create Custom Columns for HSM_OBI_STUDY_VW.
Create four new columns as follows:
SUBSCRIPTION LAST_UPDATED_BY
SUBSCRIPTION LAST_UPDATE_DATE
SUBSCRIPTION CREATION_DATE
SUBSCRIPTION CREATED_BY
Map these columns to LAST_UPDATED_BY, LAST_UPDATE_DATE, CREATION_DATE, and CREATED_BY respectively from HSM_OBI_STUDY_VW.
Add new columns as follows:
Right-click HSM_OBI_STYDY_VW, navigate to Properties, and then select the Column Mapping tab.
Click Add New Column.
Enter the column name, for example, SUBSCRIPTION LAST_CREATED_BY, and update the column mapping to select the correct source.
Update the Physical Table as HSM_OBI_STUDY_VW and Expression as CREATED_BY.
Repeat Step 5 for LAST_UPDATE_DATE, LAST_UPDATED_BY, and CREATED_BY columns as shown in the Figure 3-52.
Click OK.
Create Custom Columns for HSM_OBI_STUDY_SITE_VW.
Create custom columns for LAST_UPDATED_BY, LAST_UPDATE_DATE, CREATION_DATE and CREATED_BY columns as shown in Figure 3-53.
Map these columns to LAST_UPDATED_BY, LAST_UPDATE_DATE, CREATION_DATE, and CREATED_BY respectively from HSM_OBI_STUDY_VW.
Add a new column INTEGRATION_ID mapped to INTEGRATION_ID of Dim_W_RXI_STUDY_SITE_D.
Follow similar steps defined in Step 3 (Create Custom Columns for HSM_OBI_STUDY_VW).
To create presentation tables for Mobile CRA Server (presentation layer), perform the following:
Create New Presentation Table for Grouping Purpose.
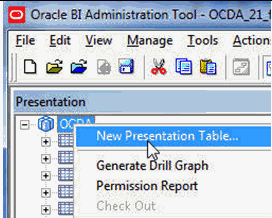
Right-click OCDA in the Presentation section and then click New Presentation Table.
Figure 3-54 Selecting New Presentation Table
Enter Mobile CRA Alert Engine in the Name field and click OK.
Locate the newly created presentation table (that is, Mobile CRA Alert Engine) in the Presentation section, and then locate Fact for Presentation Folder.
Drag and drop it on the Mobile CRA Alert Engine table in the presentation section.
Create New Presentation Table for Study.
Right-click OCDA in the Presentation section and then click the New Presentation table.
Enter - Study in the Name field and click OK.
Select the following columns from Dim - Study in the Business Model and Mapping section and drop on - Study presentation table in the Presentation section.
HSM_RULE_SBSCRTIONS_ID
USER_ID
HSM_RULES_ID
HSM_RULES_NAME
HSM_RULES_DESCR
HSM_RULES_FNCTN
STUDY_ID
ACTV_STUS
FIRED_STUS
THRESH_DT1
THRESH_DT1_NM
THRESH_DT2
THRESH_DT2_NM
THRESH_DT3
THRESH_DT3_NM
THRESH_DT4
THRESH_DT4_NM
THRESH_DT5
THRESH_DT5_NM
THRESH_NUM1
THRESH_NUM1_NM
THRESH_NUM2
THRESH_NUM2_NM
THRESH_NUM3
THRESH_NUM3_NM
THRESH_NUM4
THRESH_NUM4_NM
THRESH_NUM5
THRESH_NUM5_NM
THRESH_STR1
THRESH_STR1_NM
THRESH_STR2
THRESH_STR2_NM
THRESH_STR3
THRESH_STR3_NM
THRESH_STR4
THRESH_STR4_NM
THRESH_STR5
THRESH_STR5_NM
SUBSCRIPTION LAST_UPDATED_BY
SUBSCRIPTION LAST_UPDATE_DATE
SUBSCRIPTION CREATION_DATE
SUBSCRIPTION CREATED_BY
Create New Presentation Table for Study-Site.
Right-click OCDA in the Presentation section and then click New Presentation Table.
Enter - Study Site in the Name field and click OK.
Select the following columns from Dim - Study-Site in the Business Model and Mapping section and drop on - Study Site presentation table in the Presentation section.
HSM_RULE_SBSCRTIONS_ID
USER_ID
HSM_RULES_ID
HSM_RULES_NAME
HSM_RULES_DESCR
HSM_RULES_FNCTN
STUDY_SITE_ID
ACTV_STUS
FIRED_STUS
THRESH_DT1
THRESH_DT1_NM
THRESH_DT2
THRESH_DT2_NM
THRESH_DT3
THRESH_DT3_NM
THRESH_DT4
THRESH_DT4_NM
THRESH_DT5
THRESH_DT5_NM
THRESH_NUM1
THRESH_NUM1_NM
THRESH_NUM2
THRESH_NUM2_NM
THRESH_NUM3
THRESH_NUM3_NM
THRESH_NUM4
THRESH_NUM4_NM
THRESH_NUM5
THRESH_NUM5_NM
THRESH_STR1
THRESH_STR1_NM
THRESH_STR2
THRESH_STR2_NM
THRESH_STR3
THRESH_STR3_NM
THRESH_STR4
THRESH_STR4_NM
THRESH_STR5
THRESH_STR5_NM
SUBSCRIPTION LAST_UPDATED_BY
SUBSCRIPTION LAST_UPDATE_DATE
SUBSCRIPTION CREATION_DATE
SUBSCRIPTION CREATED_BY
Create a new column Src Unique Site ID in Study-Site, which is mapped to logical column INTEGRATION_ID of Dim_Study Site created in Section 3.11.4, "Adding Mobile Clinical Research Associate Server Sources to OCDA Dimensions in the Business Model and Mapping Layer"(Step 4).
To save the RPD, perform the following:
From the File menu, select Save.
To deploy site-at-a-glance reports, perform the following:
Log in to OBIEE analytics.
Navigate to Catalog.
Select Shared folders and click Unarchive in the bottom-left Task menu.
Click Browse and choose the Site-At-A-Glance-.catalog file.
Figure 3-57 Selecting Site-At-A-Glance-.catalog File

Click OK to unarchive the catalog.
Navigate to the Shared folder and select Site-At-A-Glance.
A list of predefined reports that are imported is displayed which will be deployed.