| Oracle® Health Sciences Mobile Clinical Research Associate Server User's Guide Release 1.3 E38751-04 |
|
|
PDF · Mobi · ePub |
| Oracle® Health Sciences Mobile Clinical Research Associate Server User's Guide Release 1.3 E38751-04 |
|
|
PDF · Mobi · ePub |
This chapter describes how to work with trip reports. It contains the following topics:
Section 4.7, "Modifying an Item in the Trip Report Check List"
Section 4.10, "Saving Trip Report Data to Oracle Siebel Clinical Trial Management System"
Mobile CRA will display trip reports that are on the device or in CTMS. If the trip report is not on the device, the system will automatically fetch it.
You can create a trip report visit by entering a site visit date and selecting a site visit template. You can perform the following activities in relation to trip reports:
Access the trip reports already created in CTMS
Create a trip report
Add attendees to the trip report
Complete trip report activities by changing status, adding comments, and filling out custom fields
Depending on your implementation, add trip report activities to check list
Alter user-created trip report activities
Create trip report follow up items
Review previous trips reports
Review final trip report
Submit trip report to work flow for approval
To create a Trip Report on Mobile CRA, you must:
have access to the study and site in question.
create a site visit record when you schedule the site visit.
Every organization has different views of how trip reports should be structured. Mobile CRA supports each of the above modules out of the box. Your organization's configuration may result in different elements.
The following is an example of a trip report:
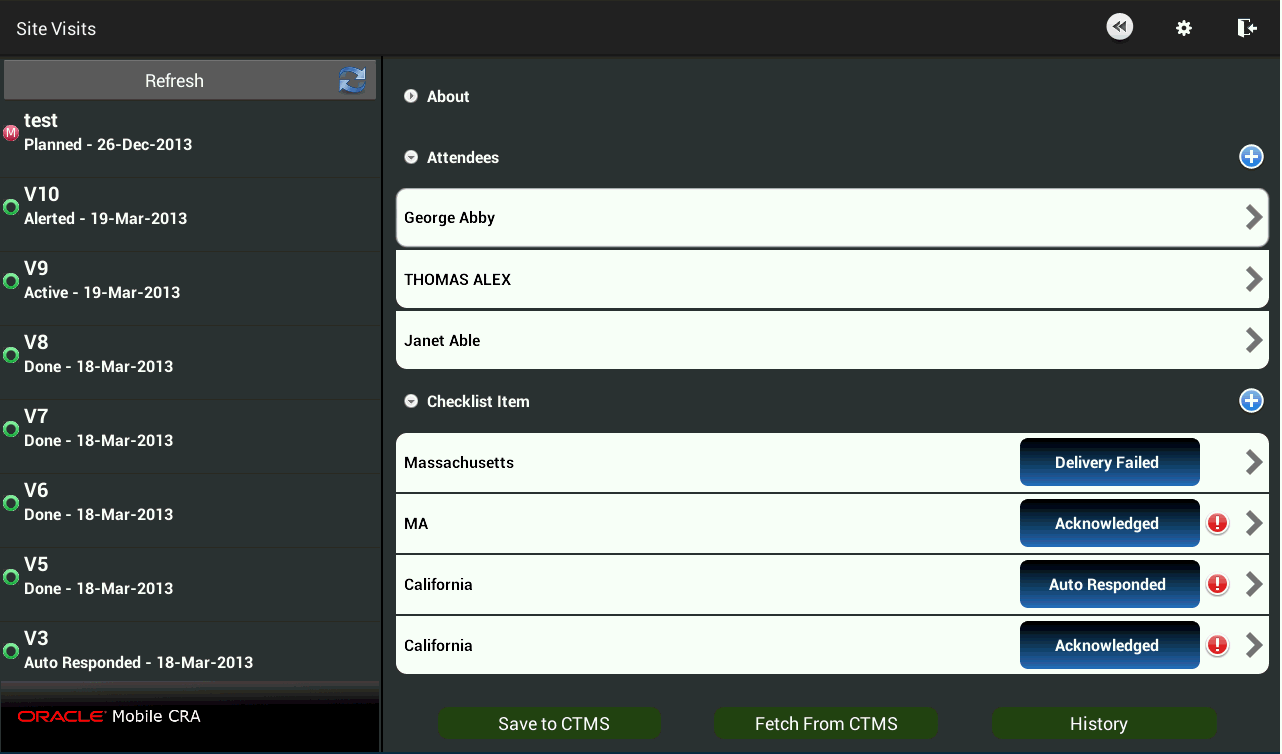
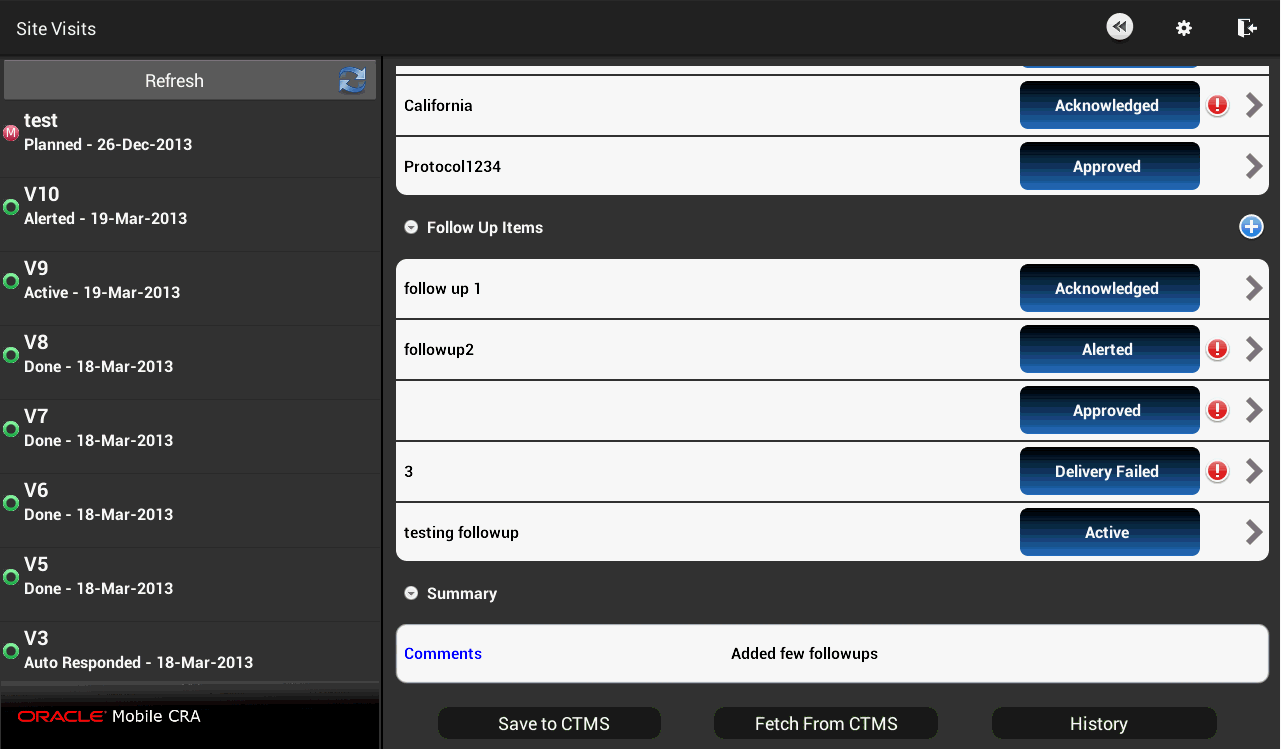
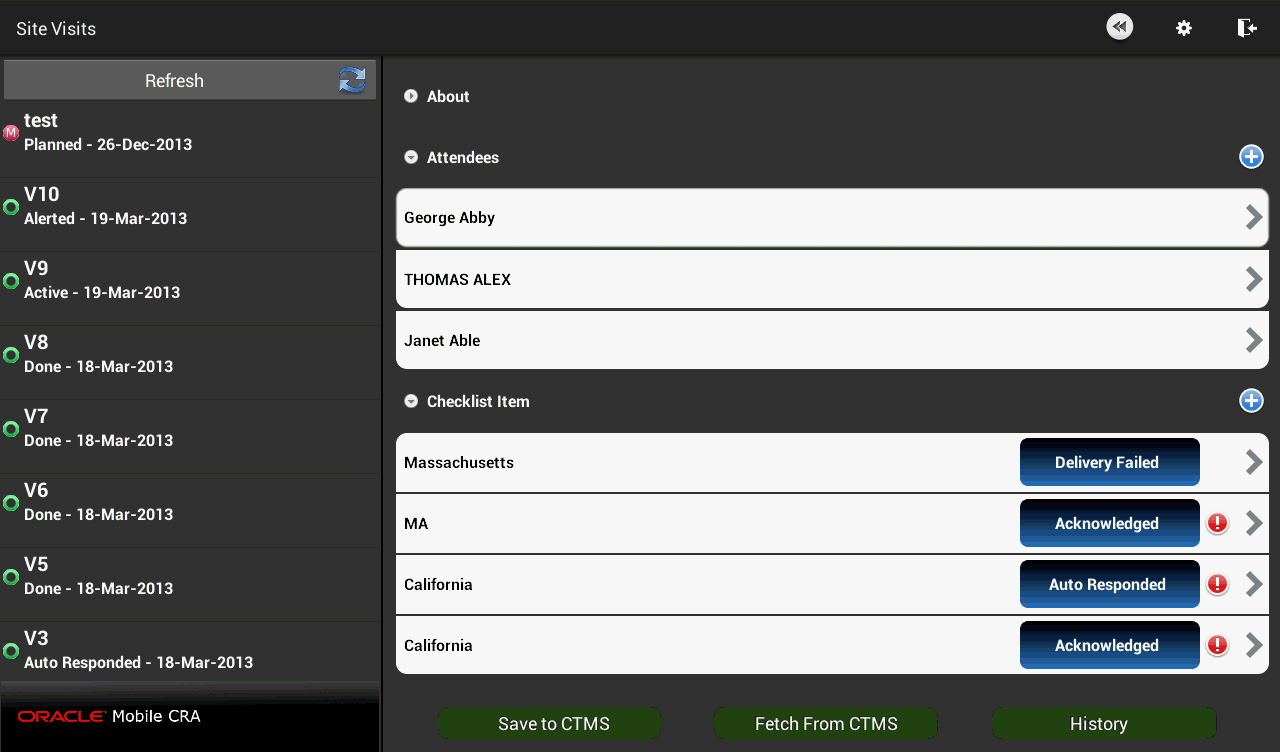
A trip report consists of the following four main areas:
About - This section contains details of the trip report like individuals working on it, the protocol it is related to, different dates associated and so on.
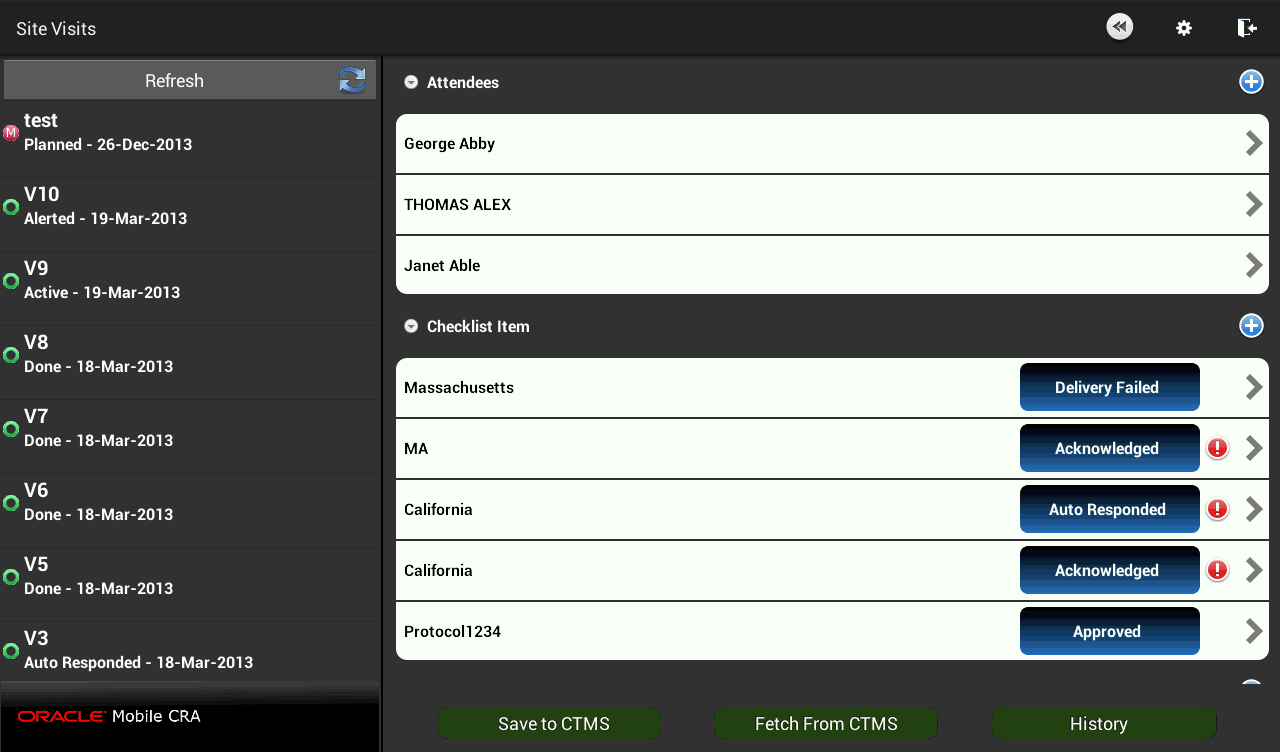
Attendees - This section lists all the people associated with a particular site.
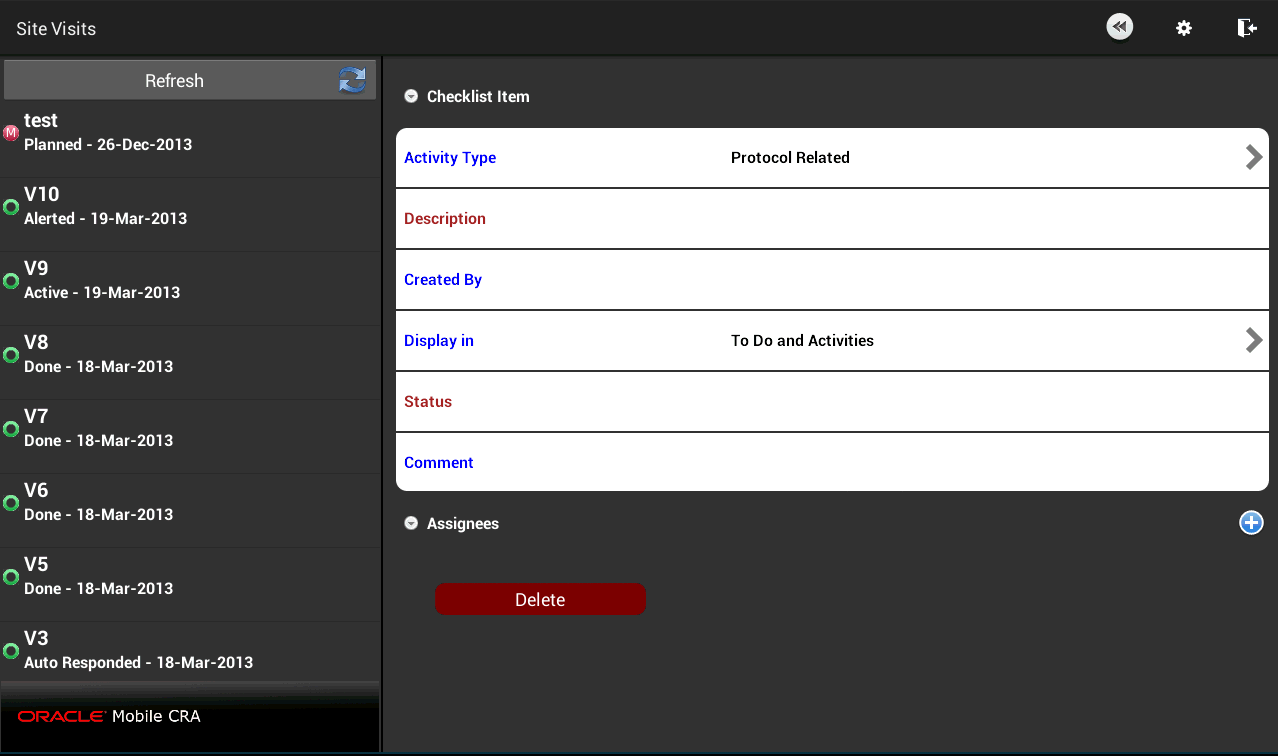
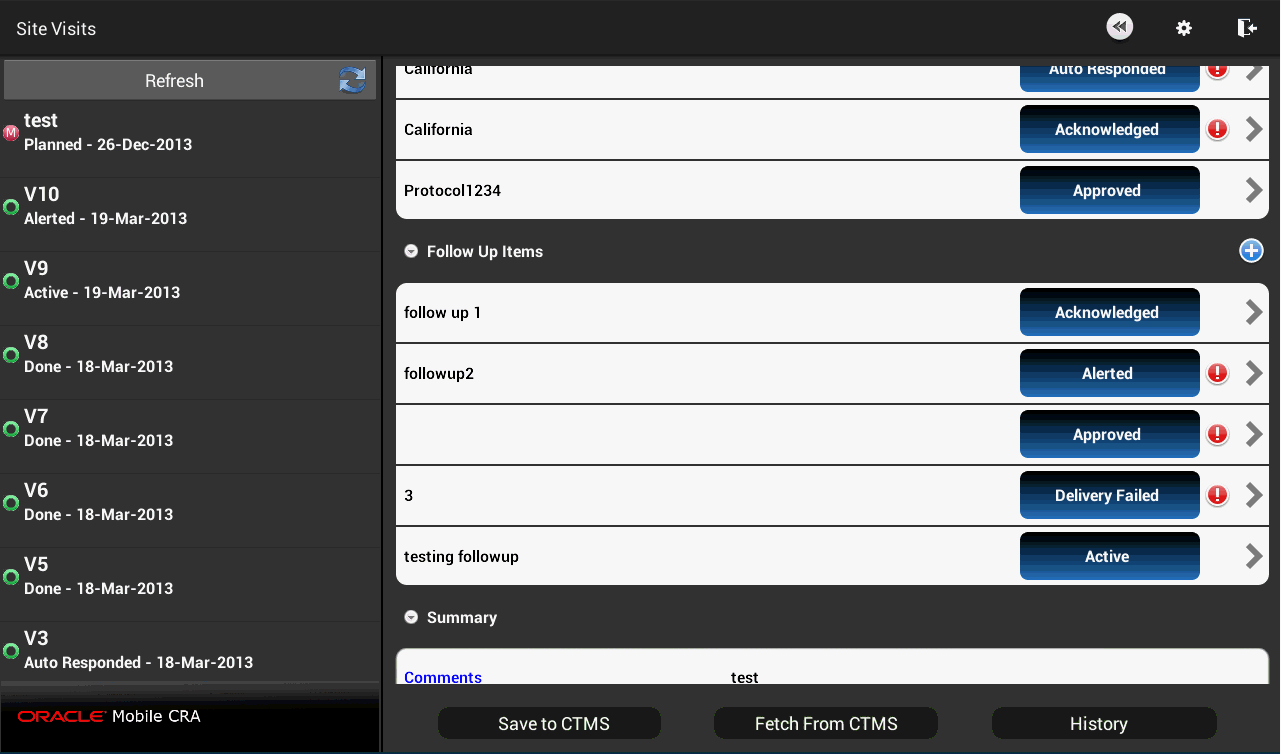
Checklist Items - This section displays the list of tasks to be accomplished for a visit.
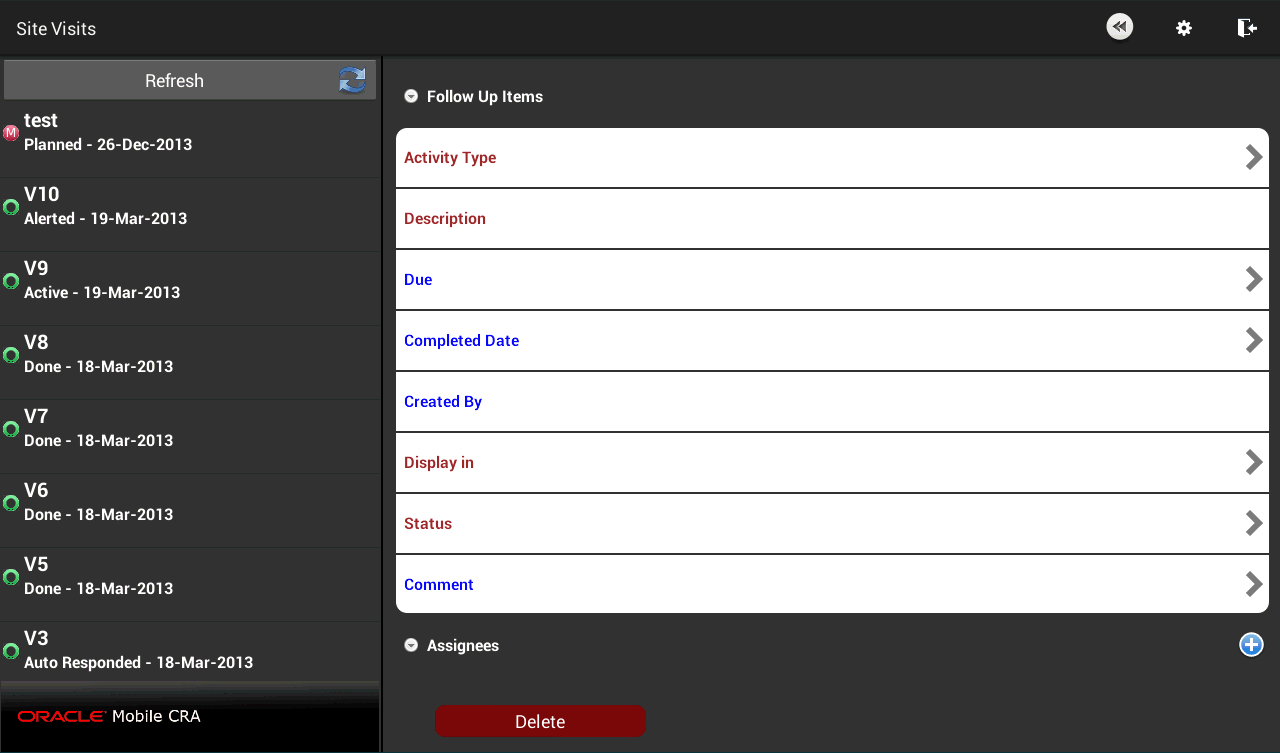
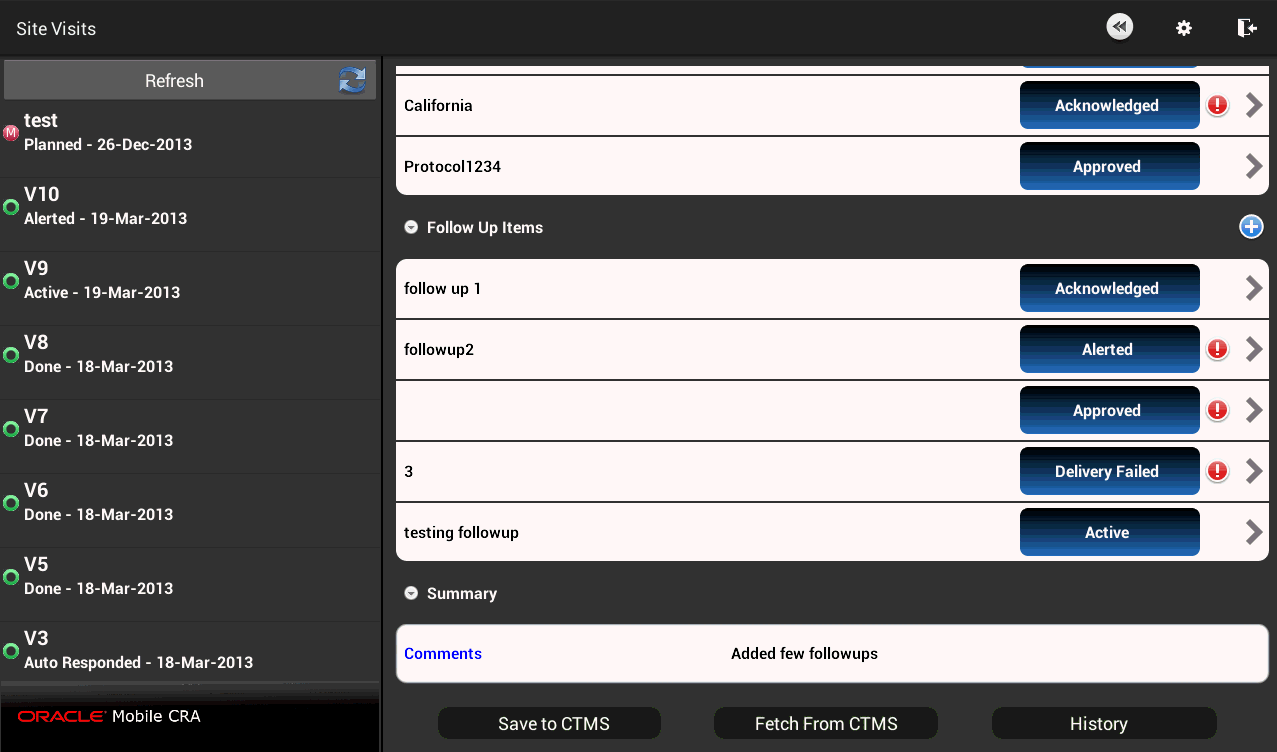
Follow Up Items - This section displays the subsequent tasks to be performed before a visit can be completed.
Summary - This section displays comments, summary of the site visit, or additional comments that is applicable for the entire trip report
For more information on the various fields in each section, refer to the Oracle Siebel Clinical Trial Management System User's Guide.
Following are the possible status icons for a trip report:
The green filled circle indicates the trip report is on the device.
The green open circle indicates that the trip report is not on the mobile device.
The red filled circle with an M indicates that the trip report has been modified and not saved to the device.
If the trip report has not been created for a site visit, the trip report creation screen is displayed. If the trip report is on the device, you can use it immediately, in on-line or disconnected mode.
Perform the following steps to create a trip report:
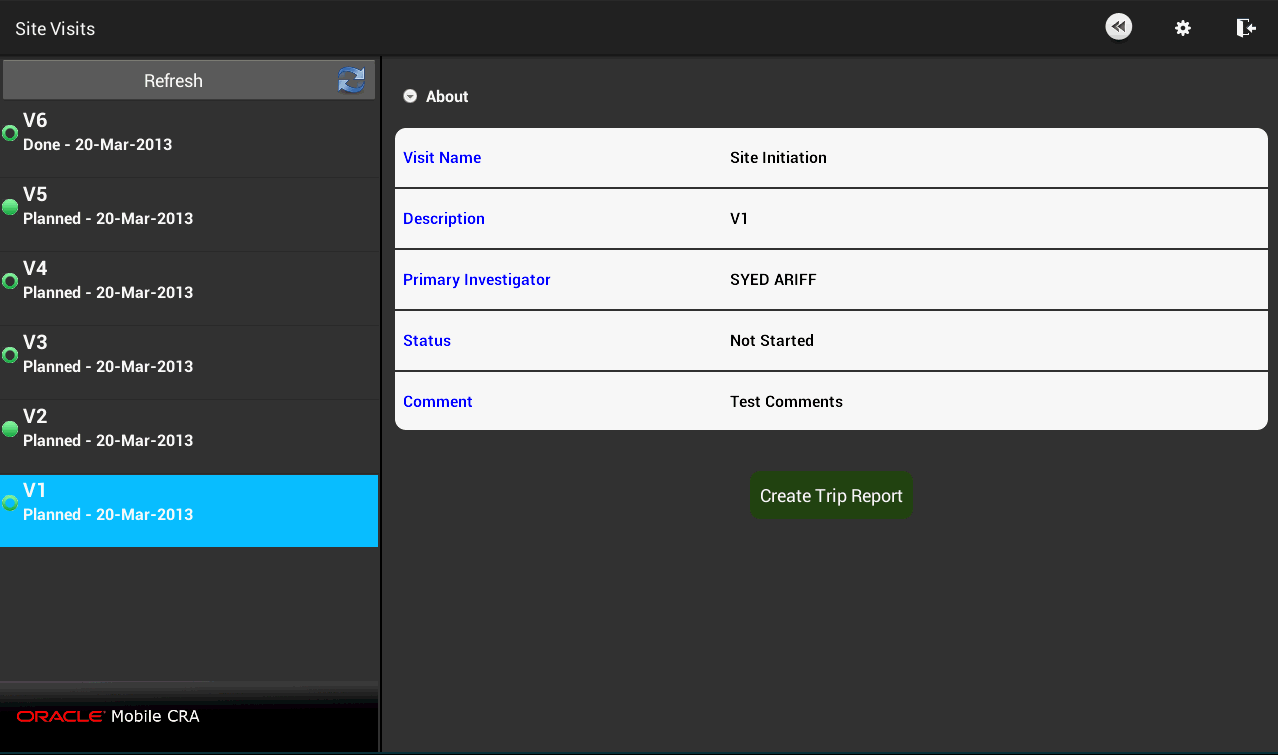
In the My Studies pane, tap a study to view all the sites under it.
Tap a site to view all its details.
Tap Trip Reports. The site visits displayed.
Tap a visit to view its details.
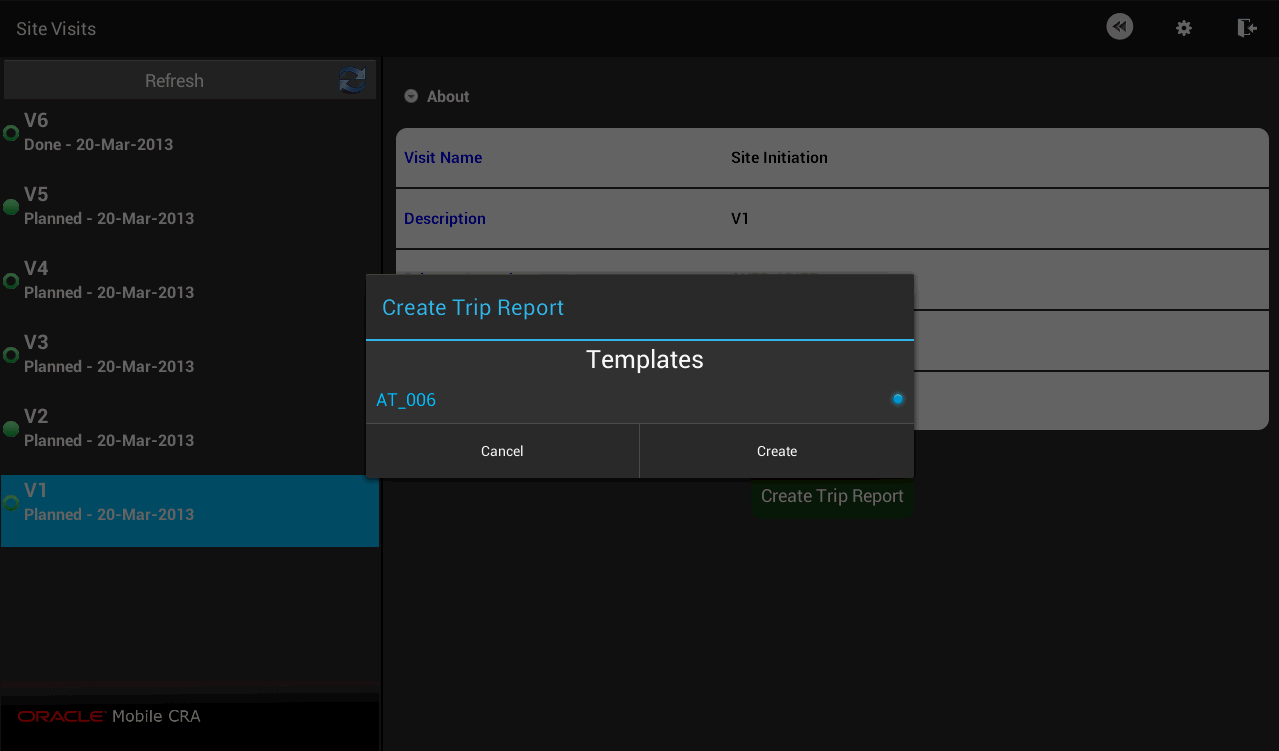
Tap Create Trip Report. A list of trip report templates is displayed.
Select a template and tap Create.
Note:
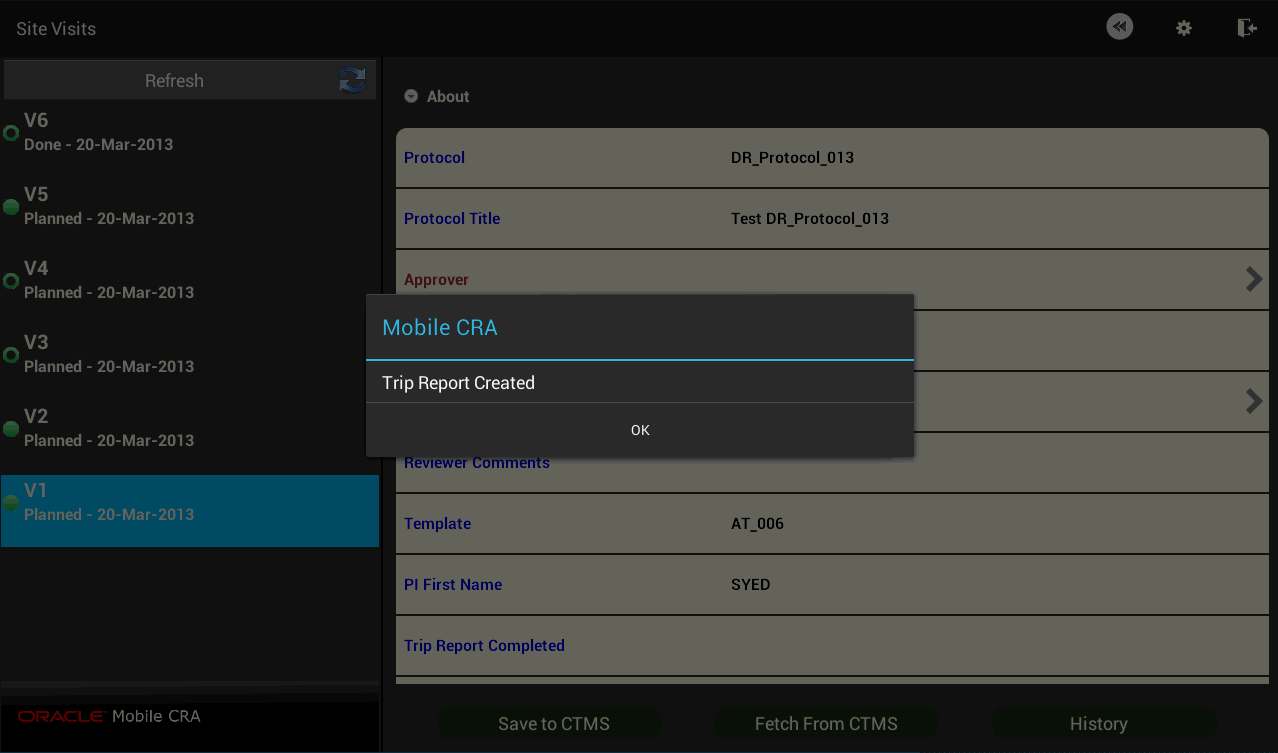
To exit the trip report creation process, tap Cancel on the top right.A trip report is created and a confirmation screen is displayed.
Click OK to view the trip report.
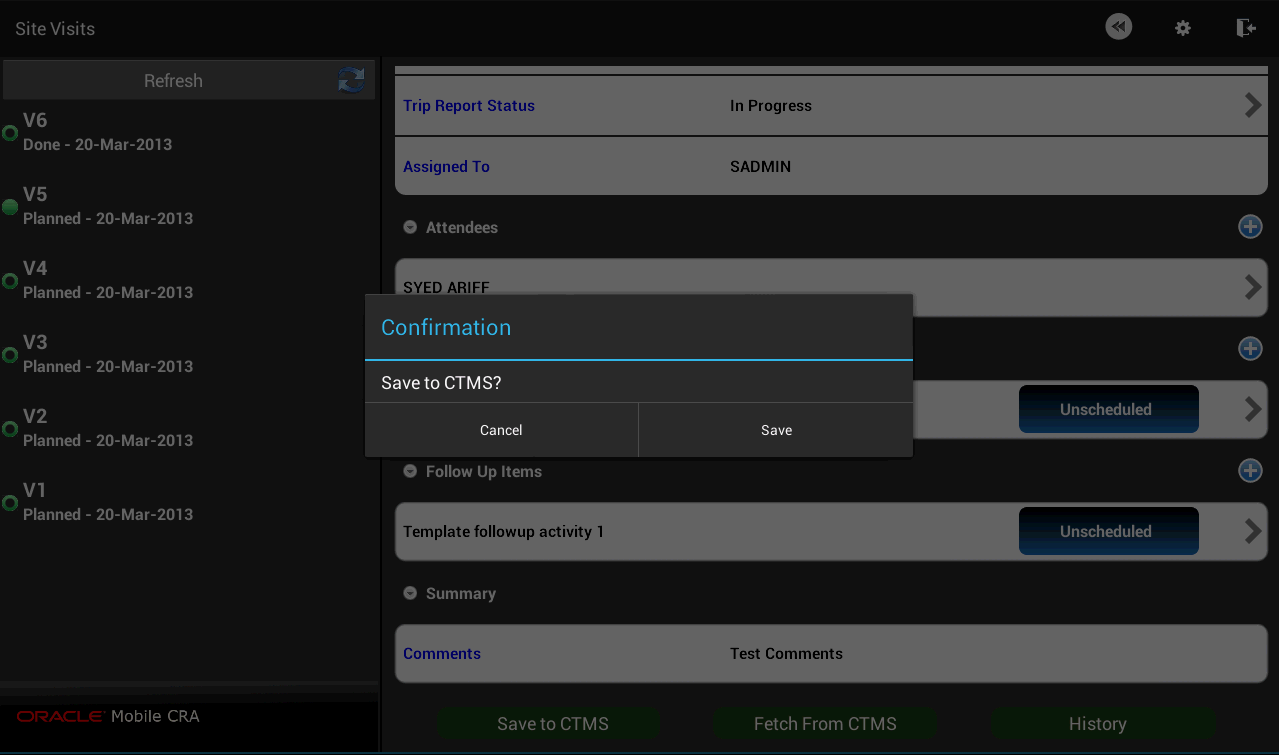
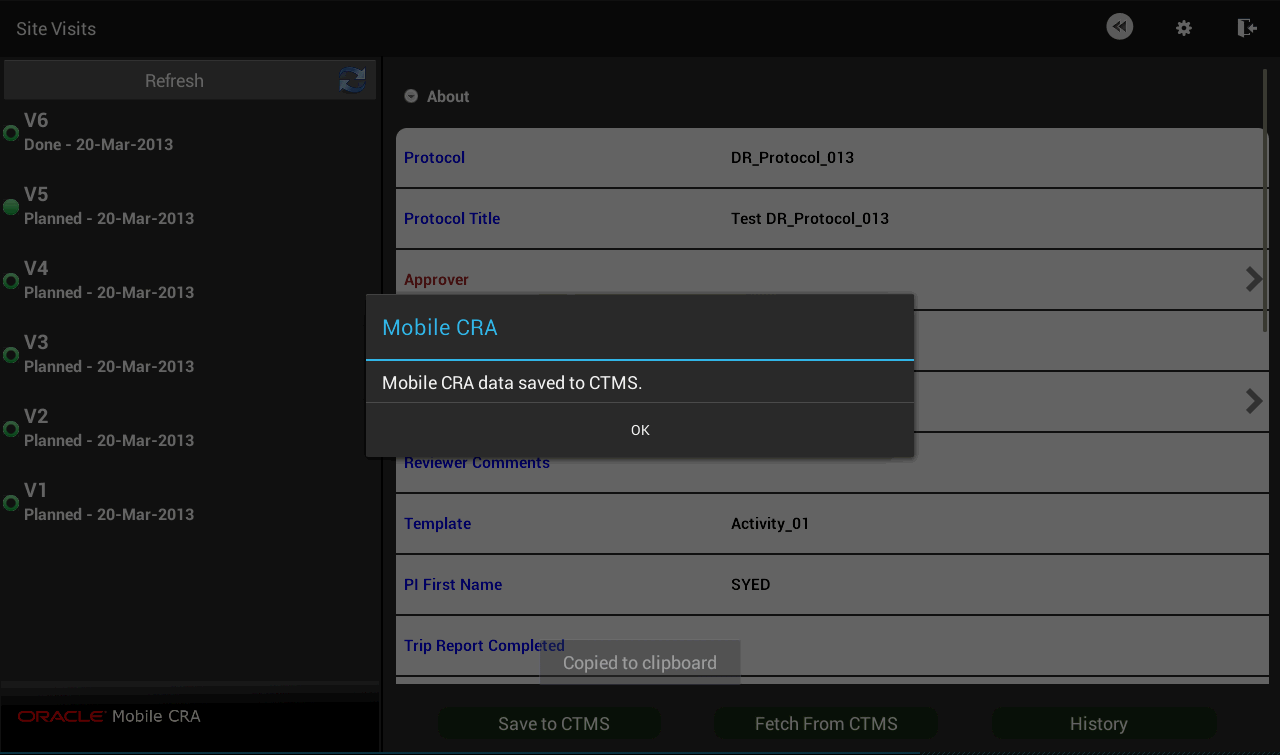
Edit the appropriate trip report fields and tap Save to CTMS.
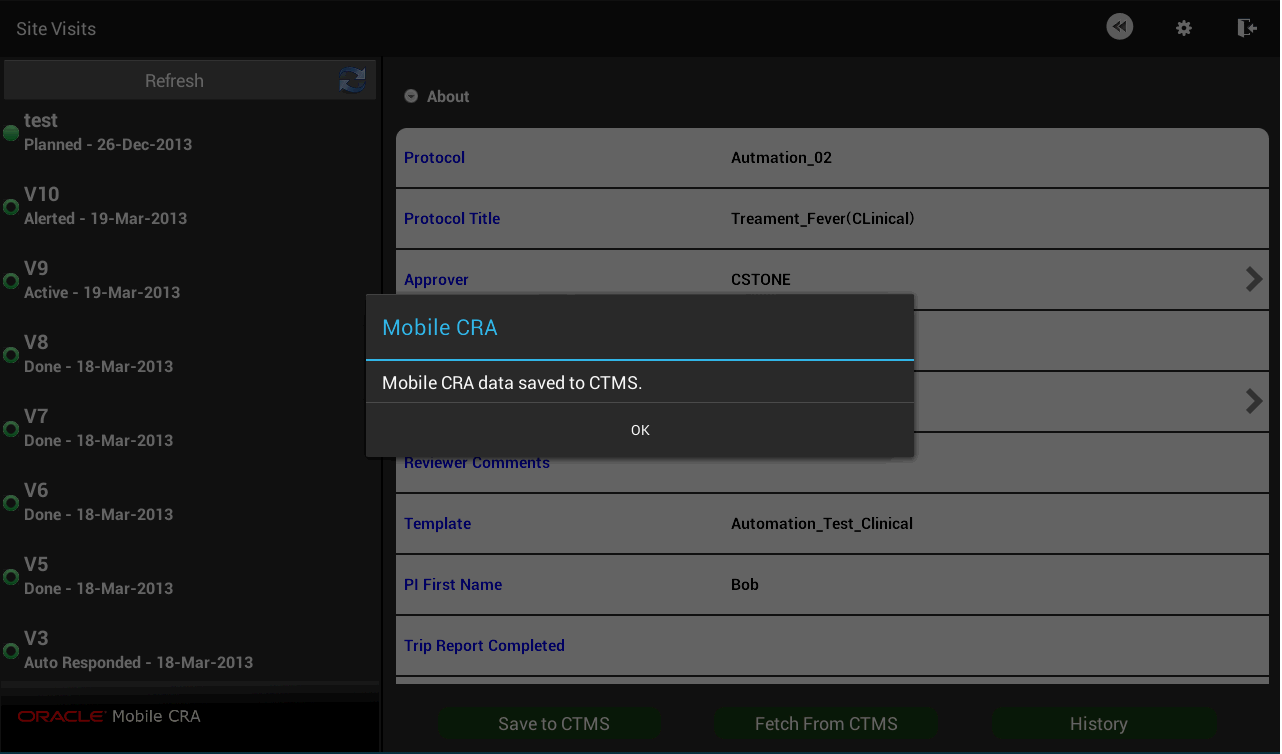
Tap Save. Your report will be saved to CTMS and the status will change to completed. The following confirmation will be displayed:
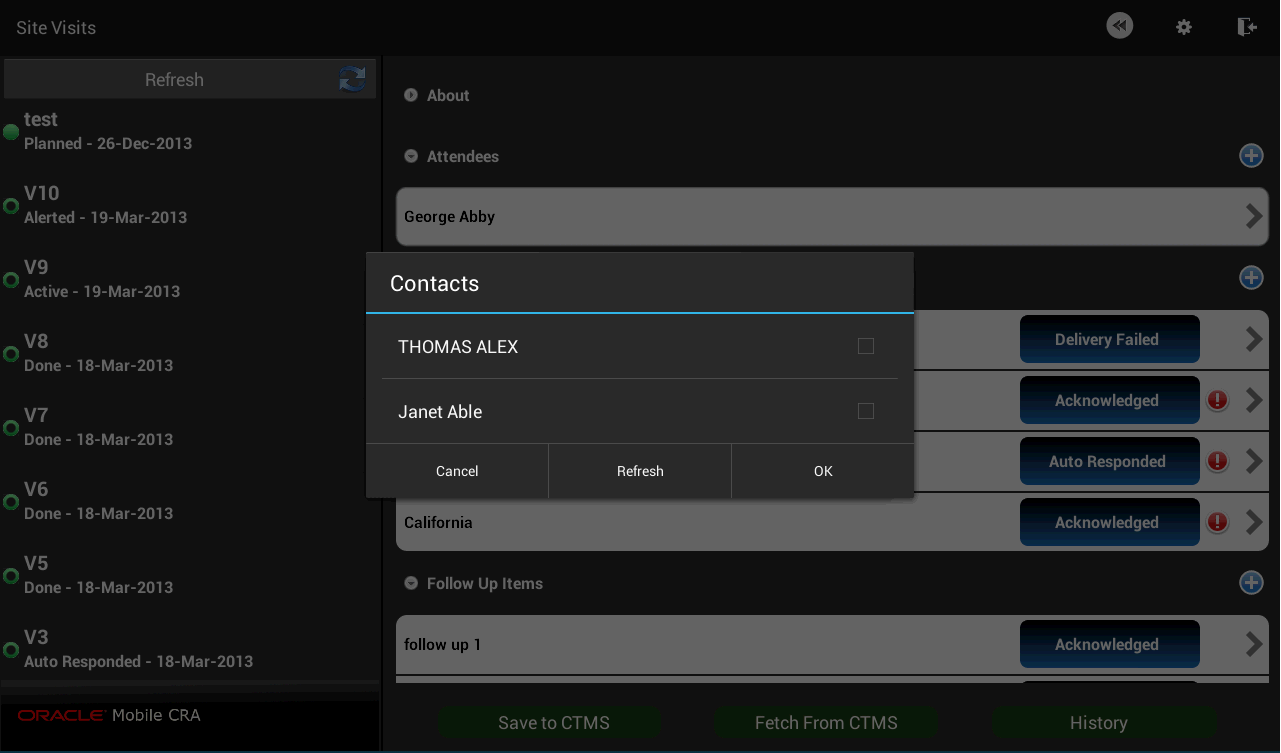
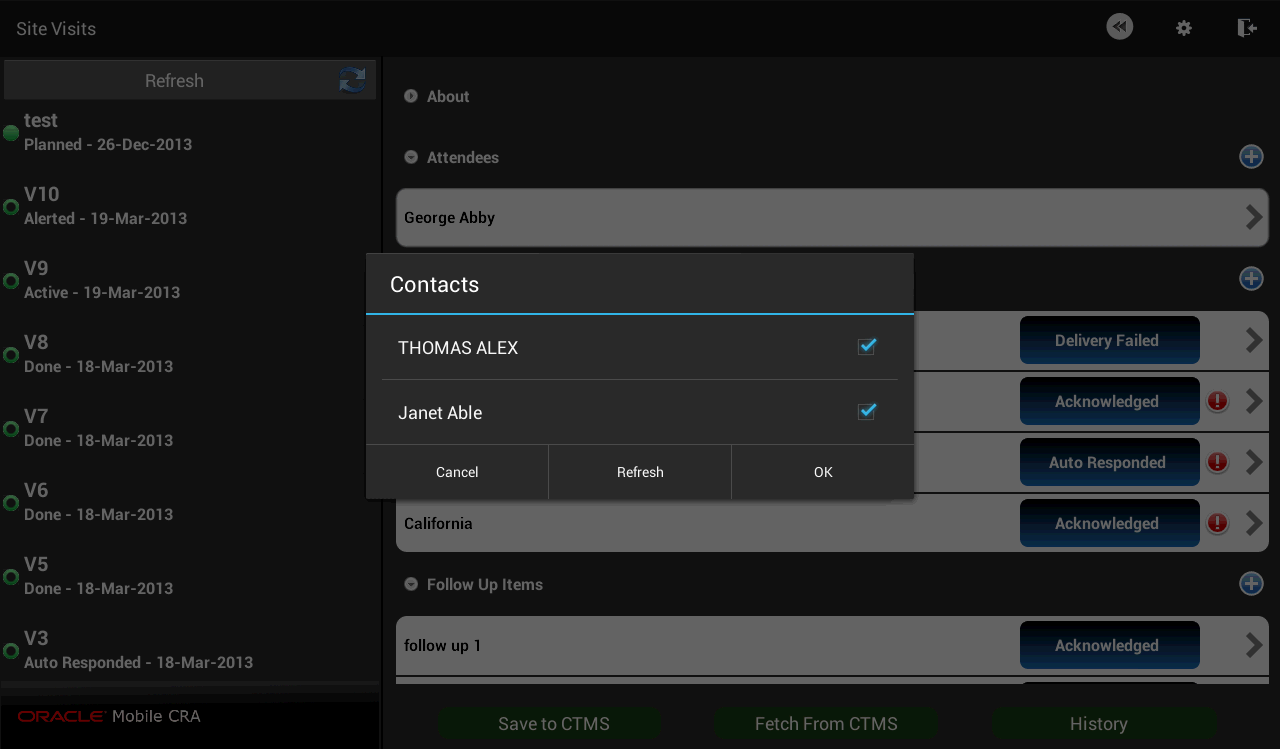
You can add attendees to the trip report by selecting a contact from your Mobile CRA contact list. Perform the following steps to add attendees to your trip report:
In the My Studies pane, select a study and study-site.
Tap Trip Reports.
Select a trip report.
Open the attendee list for that trip report. Tap the following icon to add attendees.
Your Mobile CRA contacts associated with the study-site will be displayed.
Tap the contact you want to add to the attendee list.
Note:
You can add multiple contacts by selecting them at once.Tap Done on the top left. The contact will be added.
Figure 4-12 Attendee Added to Trip Report
Perform the following steps to add an item to the trip report check list:
In the My Studies pane, select a study and study-site.
Tap Trip Reports.
Select a trip report.
Tap the icon below to add a checklist item.
Edit the required fields.
Navigate back to the trip report. The checklist item will be added.
Perform the following steps to add an item to the trip report check list:
Note:
You cannot modify an item that originated in CTMS. Doing so will display an error message.In the My Studies pane, select a study and study-site.
Tap Trip Reports.
Select a trip report.
Tap the checklist item you want to modify.
You can modify the type, display location, comments and status. You can also add an assignee. Make the modifications you require.
Note:
You can also change the Status of the checklist item at the top level.You can edit a follow up item for completeness until it is submitted. You can add a due date to the item and add it to the Task Calendar. Perform the following steps to add an item to the trip report check list:
In the My Studies pane, select a study and study-site.
Tap Trip Reports.
Select a trip report.
Tap the icon below to add a follow up item.
Navigate back to the trip report, the follow up item will be added to it.
Perform the following steps to add an item to the trip report check list:
In the My Studies pane, select a study and study-site.
Tap Trip Reports.
Select a trip report.
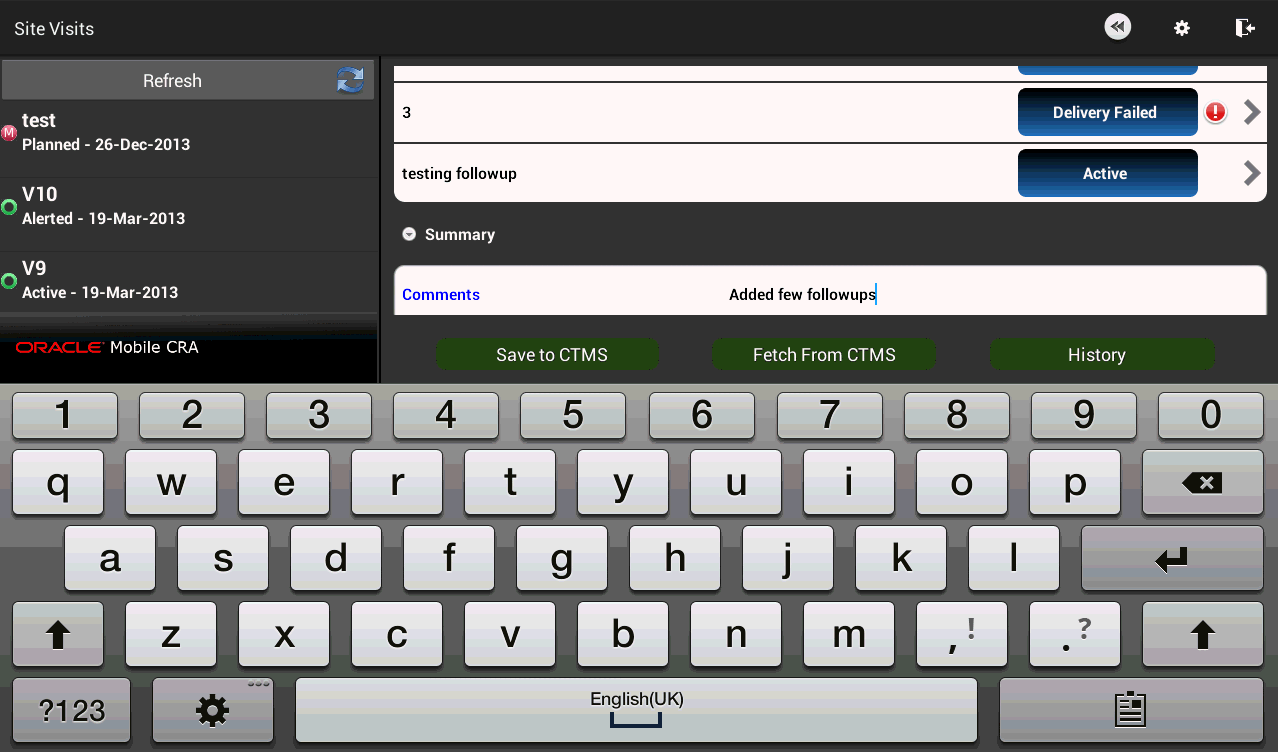
Tap the field below Summary to add comments.
Type your comments. They will be added to the trip report. To save your changes to CTMS, refer to Section 4.10.
Perform the following steps to add an item to the trip report check list:
Tap a study to view all the sites under it.
Tap a site to view all its details.
Tap Trip Reports. A list of visits is displayed.
Select a trip report for which you want to save data. Visits containing unsaved data are displayed with a red M icon next to them.
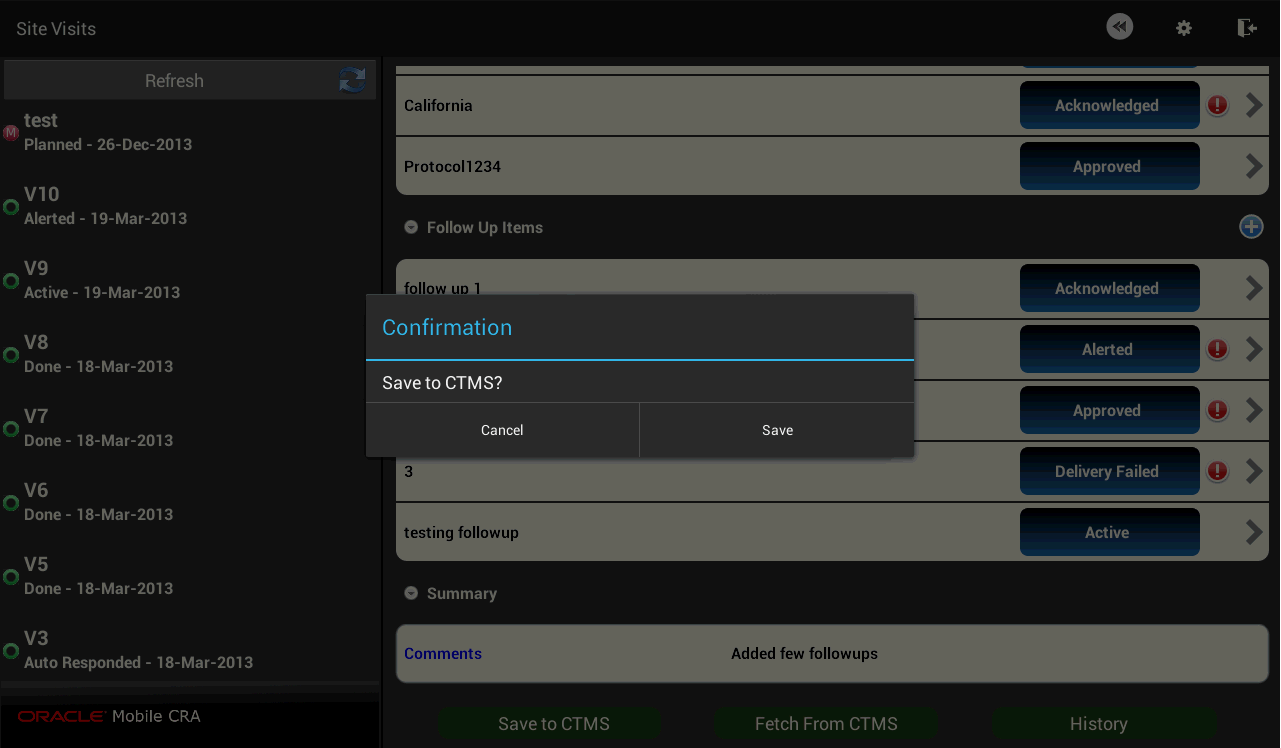
Tap Save to CTMS.
Tap Save. Your changes will be saved to CTMS and the red M icon is cleared from the visit list.
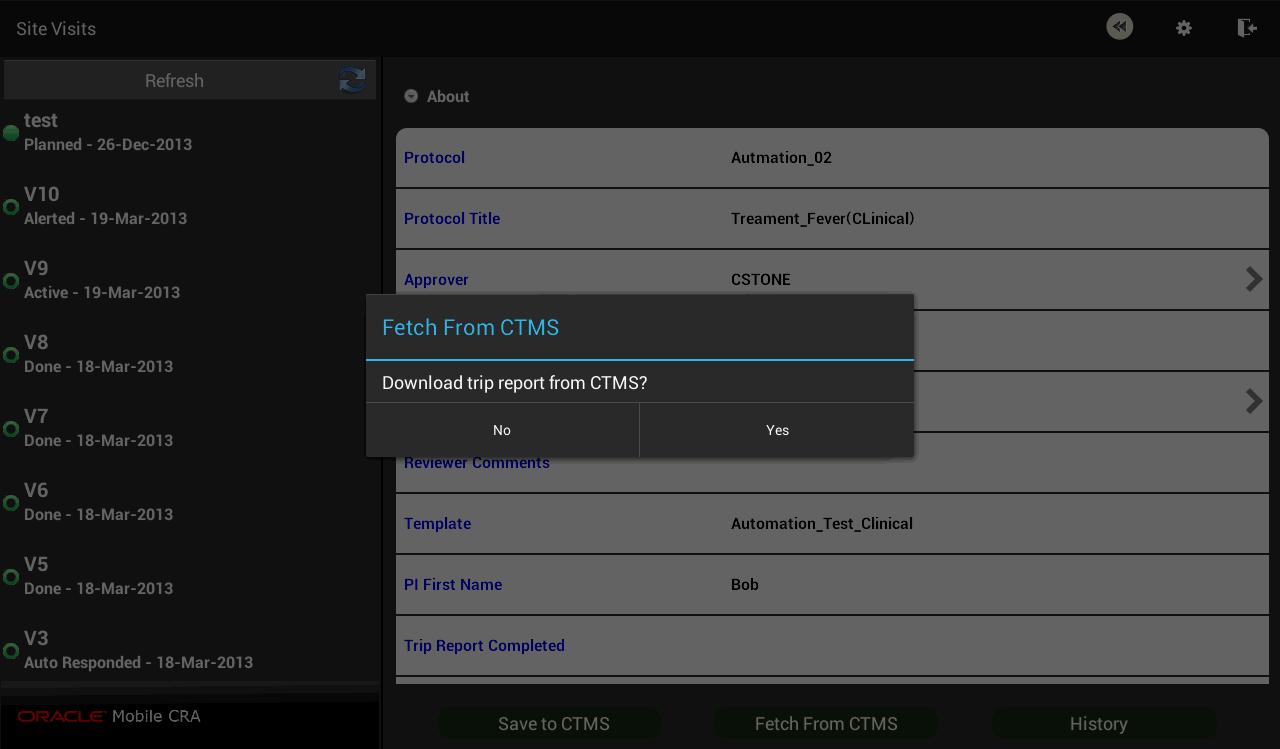
Fetching Data from Siebel Clinical Trial Management System
You can reset your trip report data by downloading data available on CTMS. Perform the follow steps to reset your trip report data.
Tap a study to view all the sites under it.
Tap a site to view all its details.
Tap Trip Reports. A list of visits is displayed.
Select the trip report for which you want to reset data.
Tap Fetch from CTMS.
Tap Yes.
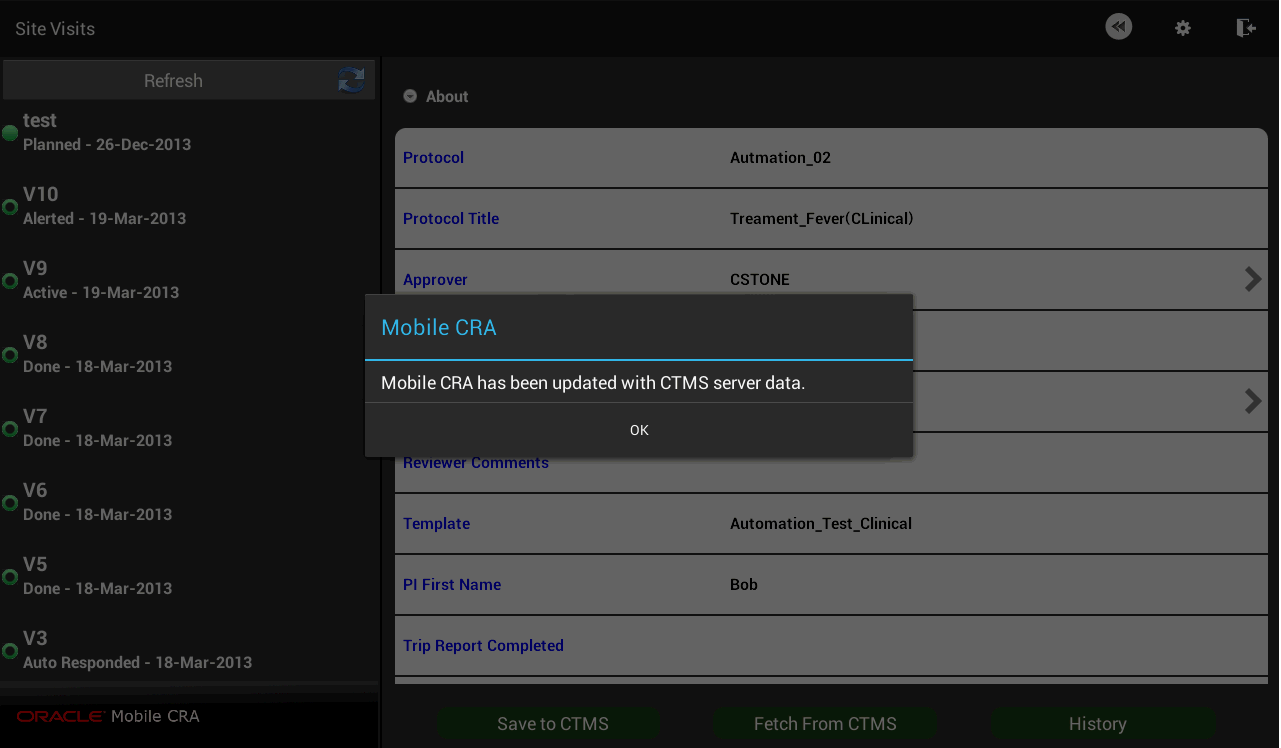
Figure 4-30 Trip Report Data Fetched from CTMS
The work flow process in CTMS can be configured in Mobile CRA. For more information on your status flows, consult with your configuration teams. CTMS lets you select the reviewer and approvers for the Trip Report. Currently, this activity must be done in CTMS, and the result fetched to Mobile CRA, in order to submit from Mobile CRA to the work flow.
Perform the following steps to submit your trip report:
Note:
If multiple reports are submitted for the same visit, CTMS will only display the latest report.In the My Studies pane, tap a study to view all the sites under it.
Tap a site to view all its details.
Tap Trip Reports. The site visits displayed.
Select the visit whose report you want to submit. The trip report saved on CTMS is displayed.
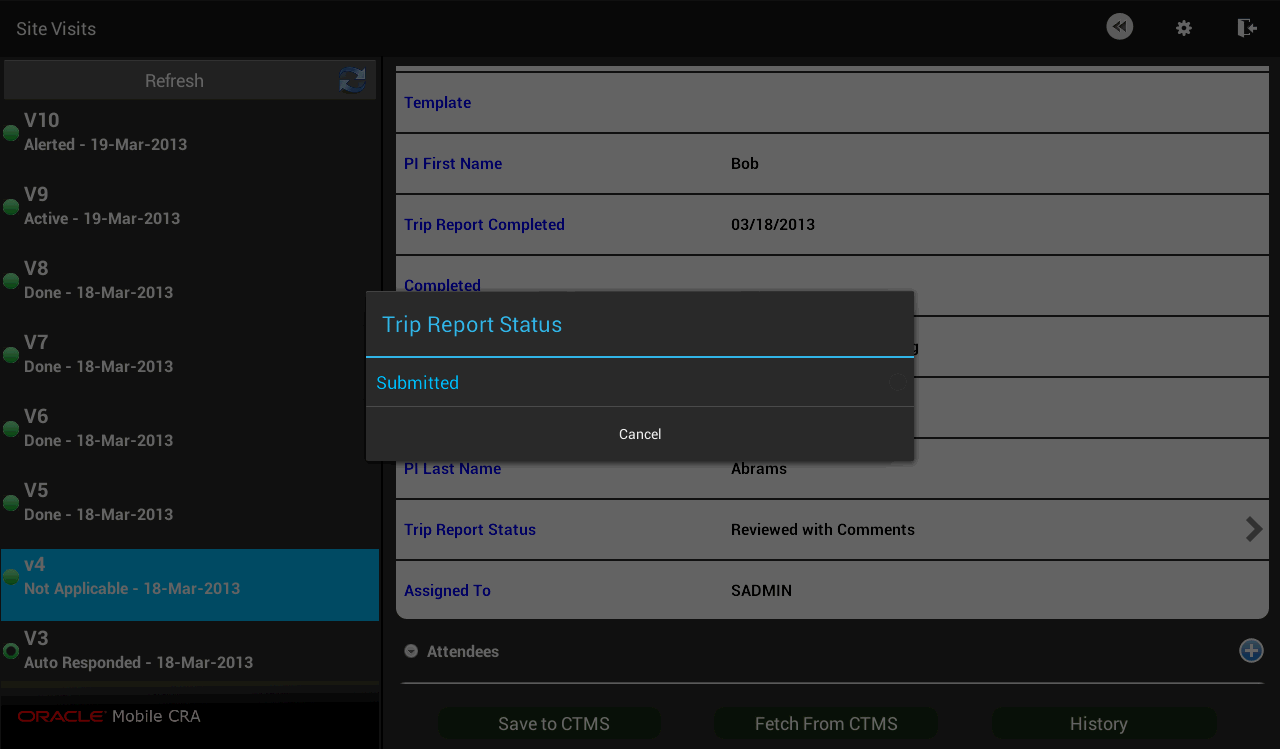
in the About section, tap Trip Report Status. The following options are displayed:
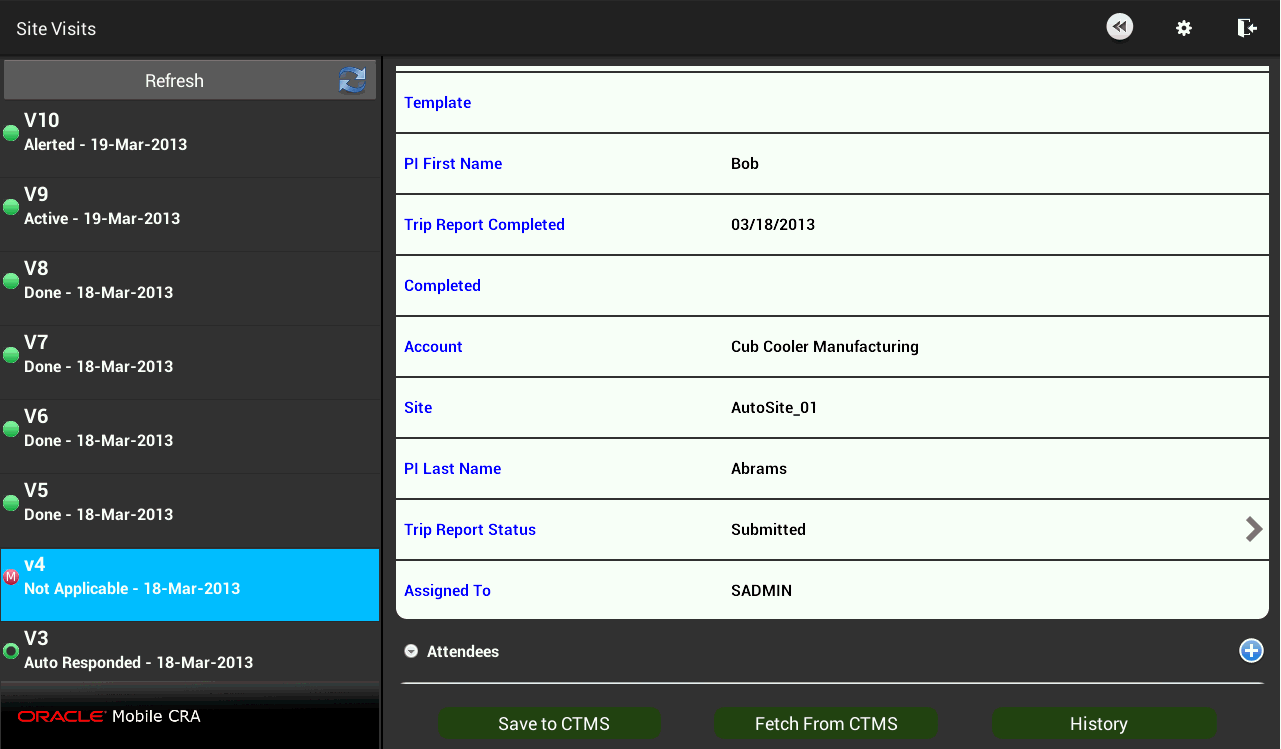
Tap Submitted. The trip report status will be changed to submitted.
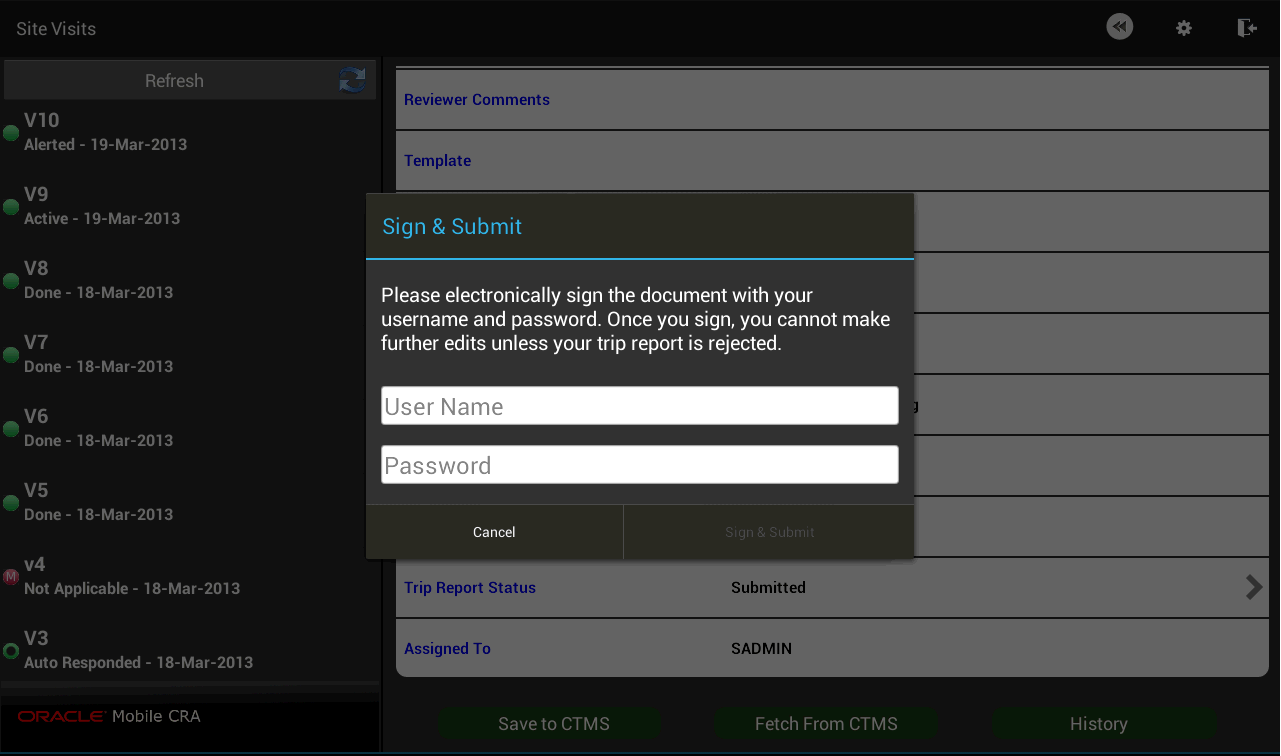
Tap Save to CTMS. The Sign and Submit screen is displayed.
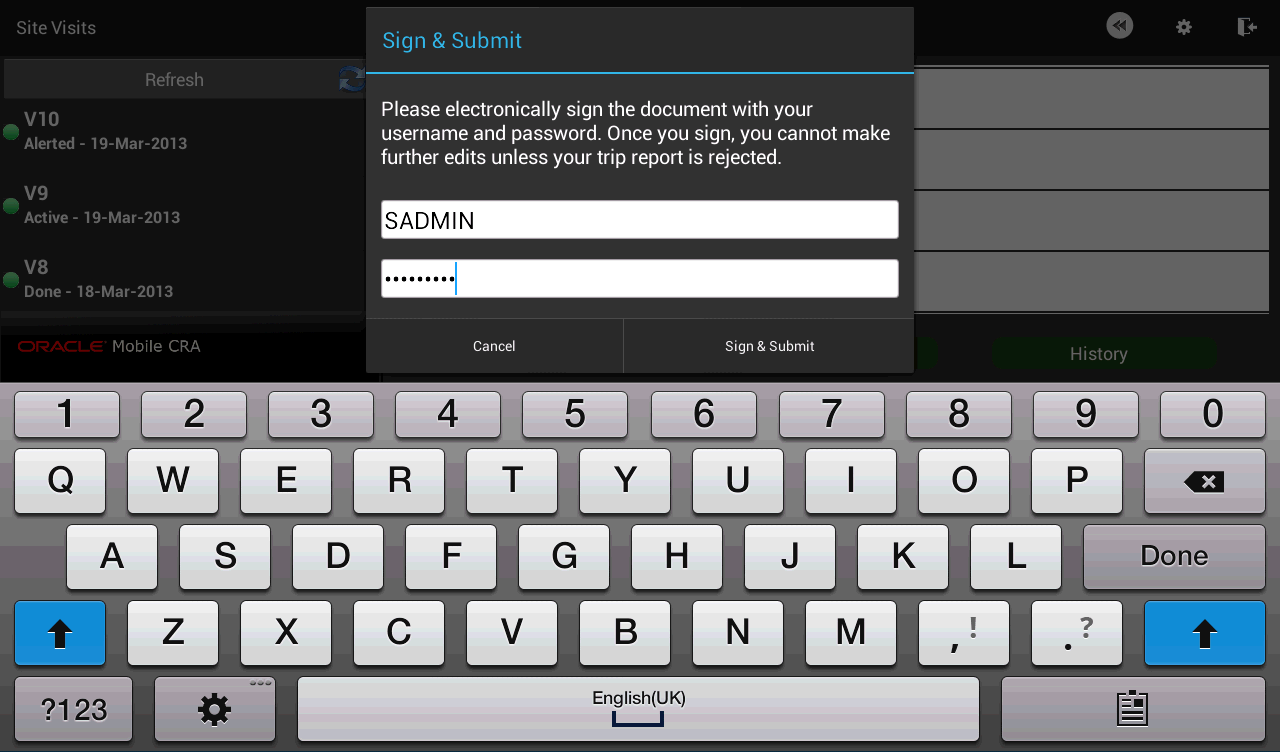
Enter your user name and password and tap Sign & Submit.
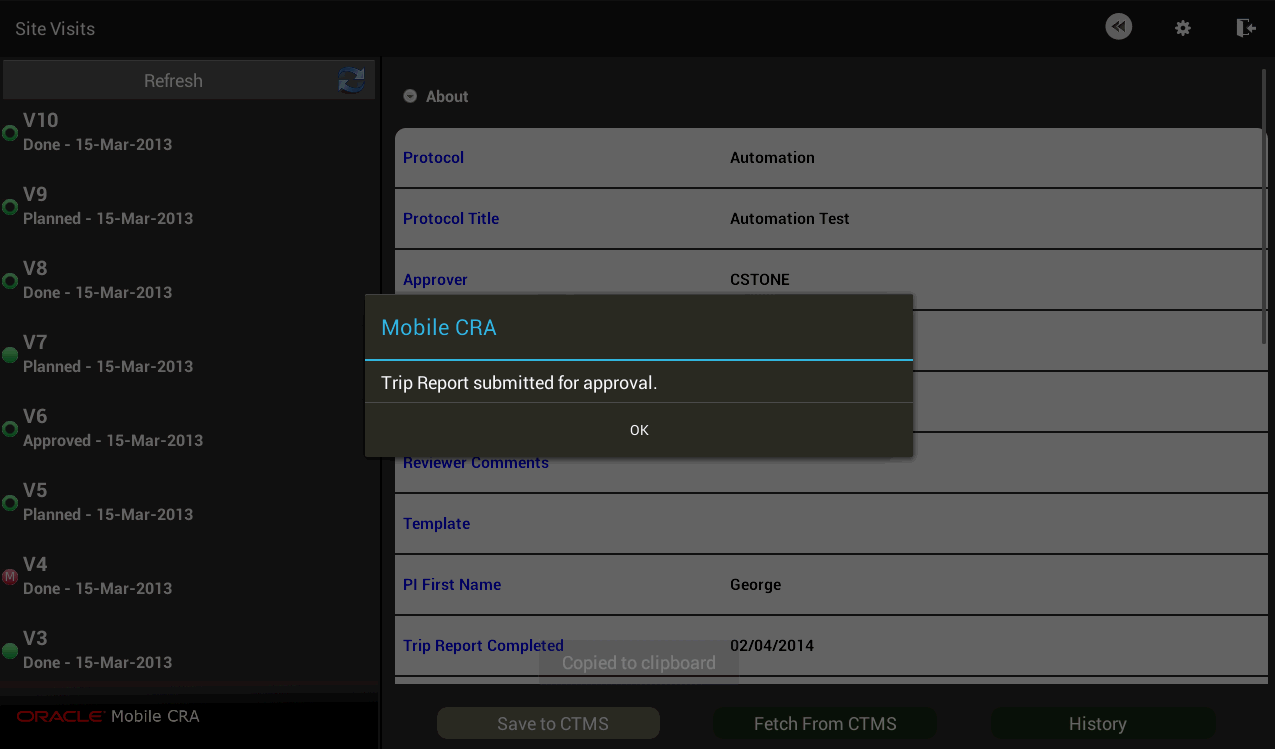
Your trip report will be submitted for approval and you will receive a confirmation.
Perform the following steps to view an approved trip report:
Tap a study to view all the sites under it.
Tap a site to view all its details.
Tap Trip Reports. A list of visits is displayed.
Select an approved trip report.
You can review all findings in the trip report. However, you may not modify it.
|
Copyright © 2012, 2014, Oracle and/or its affiliates. All rights reserved. Legal Notices |
|