| Oracle® Communications Service Broker Security Guide Release 6.1 E29458-01 |
|
|
PDF · Mobi · ePub |
| Oracle® Communications Service Broker Security Guide Release 6.1 E29458-01 |
|
|
PDF · Mobi · ePub |
This chapter describes the security model for Oracle Communications Service Broker (Service Broker) and explains how to configure it.
Service Broker is a flexible product designed to community with a wide variety of other network nodes and applications. Consequently the there are also a wide variety of security concerns when dealing with Service broker security that explained in "Implementing Service Broker Securely".
This chapter assumes that you have already installed the operating system required by Service Broker, and then installed Service Broker itself. For details see Service Broker Installation Guide.
By default Service Broker is configured to be as secure as possible. If you disabled any of these security settings to create a test and evaluation system, be sure enable them before starting a productions implementation
This section describes recommended deployment configurations for a secure Service Broker implementation. Configure Service Broker security with these steps:
Install the operating system that Service Broker runs on.
The first step in creating a Service Broker implementation is to install the operating system it runs on. See your operating system documentation for instructions on how to install it securely. Also see "Basic Security Considerations"
Install Service Broker.
See Service Broker Installation Guide for details on installation. By default Service Broker is configured to be as secure as possible. You may have disabled these security settings when you created a test and evaluation system. Be sure enable the security settings before starting a productions implementation.
Change the default ports. See "Changing Default Ports" for details.
Maintain a high level of password security. See "Configuring Password Security" for details.
Secure the connection between the Administration Console and the Administration Server. See "Securing the Administration Console Connection" for details.
(As needed) Secure clusters. See "Securing Clusters" for details.
Configure domain security settings with the Service Broker properties files. See "Configuring Domain Security" for information.
Secure the Service Broker Managed Servers. See "Securing Administration Clients and Managed Servers" for details.
Enable SSL security for HTTP connections. See "Enabling and Disabling SSL" for details.
Set up a Public Key Infrastructure to store SSL/TLS credentials. See "Setting Up the Service Broker Public Key Infrastructure" for information.
(As needed) Set up Credential Store for storing non-keystore credentials. See "Setting Up a Credential Store" for information.
Set up telecom protocol traffic security. See "Setting Up Network Communication End Points" for details.
Configure your Service Broker network entry points, routing, and aliases (IMs, OE, and SSUs). See "Setting Up Network Communication End Points" for details.
Configure your server firewalls. See "Securing Service Broker with Firewalls" for details.
(As needed) Configure protocol security support. See "Securing Network Traffic with Protocol-Specific Security" for details.
(As needed) Secure the Service Broker Network Applications. See "Securing the SVC Feature" and "Securing the VPN Feature" for details.
Secure network traffic communication. See "Securing Network Communication" for details.
(As needed) Set up event monitoring. See "Monitoring Service Broker Events" for details.
Configure security for other Oracle products. See "Related Documents" for details.
These steps are explained in the sections that follow.
After installing Service Broker be sure to change all the default ports, and continue doing so as you complete the post installation steps listed in Service Broker Installation Guide.
Table 2-1 lists the default server port numbers that Service Broker uses by default and where to change them.
Table 2-1 Service Broker Default Server Ports
| Component/Protocol | Port Number | Description |
|---|---|---|
|
Administration Console (Web) |
9001 for HTTPS 9000 for HTTP |
Set in the hosting.properties and admin.properties property files. See "Securing the Administration Port" for details. Also see the system administrator's reference in Service Broker System Administrator's Guide for details. |
|
Policy Designer Interface |
8091 for HTTPS 8090 for HTTP |
Set in the oracle.ocsb.app.rcc.pcrf.gui.port or pcrf.gui.http.port.secure system properties. For details see the discussion on configuring Service Broker for Policy Controller in Service Broker Policy Controller Implementation Guide. |
|
Admin Port (for Administrator Console to Managed Server communication) |
8901 for HTTPS 8900 for HTTP |
Set in the Admin Port entry when creating a Managed Server. For details see the discussion on post installation tasks in Service Broker Installation Guide. |
|
Managed Server JMX JRMP port |
10003 |
Set in the JMX JRMP port entry when creating a Managed Server. For details see the discussion on post installation tasks in Service Broker Installation Guide |
|
JMX Registry port |
10103 |
Set in the JMX Registry port entry when creating the Managed Server. For details see the discussion on post installation tasks in Service Broker Installation Guide |
|
Log4J socket server port |
4096 |
The common.properties property file. See the system administrator's reference in Service Broker System Administrator's Guide for details. |
|
IP Multicast port |
1024 |
Set in the common.properties property file. See the system administrator's reference in Service Broker System Administrator's Guide for details. |
|
Multicast Port |
1025 |
The common.properties property file. See the system administrator's reference in Service Broker System Administrator's Guide for details. |
|
Profile Database Server IP |
1521 |
Set in SSU WEB SERVICES. For details see the discussion on enabling subscriber profile service connectivity in Service Broker Subscriber Store User's Guide. |
|
Diameter |
3588 |
Set in the SSU DIAMETER. For details see the discussion on configuring Diameter signaling server units in Service Broker Signaling Server Units Configuration Guide. |
|
Radius |
1812-Authentication 1813- Accounting |
You set a range of NAS ports to use in the Radius SSU. For details see the discussion on configuring RADIUS signaling server units in Service Broker Signaling Server Units Configuration Guide. |
|
HTTP |
None |
Set in SSU WEB SERVICES. For details see the discussion on configuring the web services signaling server units in Service Broker Signaling Server Units Configuration Guide. |
|
SMPP |
None |
Set in the SSU SMPP. For details see the discussion on configuring SMPP signaling server units in Service Broker Signaling Server Units Configuration Guide. |
|
SS7 |
None |
Set in one of the SS7 SSU, depending on the SS7 protocol used. For details see the discussion on configuring the SS7 Signaling Server Unit for your protocol in Service Broker Signaling Server Units Configuration Guide. |
|
SIP |
5060 |
Set in the SIP SSU. For details see the discussion on configuring SIP signaling server units in Service Broker Signaling Server Units Configuration Guide |
Configuration and deployment updates are propagated to processing servers and signaling servers over the administration port defined for the server. Oracle recommends that you secure the administration port with SSL encryption and to have client authentication enabled. Do this by setting the axia.ssl domain properties to true.
The property axia.admin.verify.hostname specifies if host name verification is used for the SSL connection between the Administration Console and the servers. If set to true, each server must specify a host identity that matches the managed server listening address as specified in its key.
See "Enabling and Disabling SSL".
There are also requirements on how the SSL certificates are generated:
If the server name is specified as a host name in the domain configuration, the common name (CN) in the certificate for the server is specified using one of these options:
The CN in the certificate for the server is identical to the server name defined in the domain configuration.
In this case, a certificate must be created for each server.
The CN in the certificate is set to *.domain.
In this case, all servers can use the same certificate.
This requires that the server names must be specified with their full names, including the domain, in the domain configuration. For example if the servers names are server1.us.oracle.com, server2.us.oracle.com, and so on, the CN is set to *.us.oracle.com.
If the server name is specified as an IP-address in the domain configuration, a certificate must be generated for each server.
For more information on server identity certificate validation in HTTP/TLS, see section 3.1. Server Identity in RFC 2818:
By default, all passwords used when authenticating between the Administration Console and the Administration Server must be at least six characters long, contain at least one lowercase character, one upper case character, and one digit.
You have the option of changing these password strength requirements using property in the Oracle_home/ocsb61/admin_server/properties/common.properties file:
Whether the password is validated.
A minimum length for the password
Whether an upper-case character is required in the password.
Whether a lower-case character is requried in the password.
Whether an integer is requried in the password.
Restart the Administration Server after changing any of these properties to make them take effect.
See the system administrator's reference in Service Broker System Administrator's Guide for details on the settings.
The connection between the Administration Console and the Administration server is by default secured by SSL. The user of the Administration Console is by default asked to authenticate with the server. The default authentication method is HTTP Digest, where an encrypted version of the password is sent to the server.
Oracle strongly recommends that you retain the default security measures for a production deployment, although to streamline testing you can disable them on a test and evaluation system.
The first time you access the Administration Console, you are prompted to accept the certificate provided in the default clientkeystore keystore in the Administration Console server. The server uses the default credential location called clientkeystore.
How you are prompted depends on:
The Web browser you use
If a self-signed certificate is used or if the certificate was provided by a certificate authority
See "Setting Up the Service Broker Public Key Infrastructure" for details on configuring and using the keystore.
You have these options for defining how to authenticate between the Administration Server and the Administration Console:
Leave axia.digest.auth on its default setting of true, which requires a username and password to authenticate the Administration Console. The username is sent in clear text, but the password is encrypted using a nonce value. This is the most secure setting and is recommended for production deployments.
Change axia.digest.auth=true to axia.basic.auth=true. This requires a username and password to authenticate the Administration Console, but sends them in clear text. This is less secure than using digest authentication, but may be required by some clients.
Remove axia.digest.auth altogether. This disables authentication between the Administration Console and the Administration Server. This is only appropriate for test and evaluation deployment used by trusted personnel.
This digest authentication requires that passwords be encrypted as specified in IETF RFC 2617 (see http://www.ietf.org/rfc/rfc2617.txt for details).
Once the Administration Console to Administration Server connection is established, the communication between the Administration Console server and client is protected by HTTPS.
You can specify whether to use SSL for the HTTP session (HTTPS) or not by using the org.eclipse.equinox.http.jetty.https.enabled (boolean) and org.eclipse.equinox.http.jetty.http.enabled (boolean) settings in the Oracle_Home/admin_server/properties/admin.properties file. These settings are mutually exclusive; if one is set to true the other must be false.
See the system administrator's reference appendix in System Administrator's Guide for details on the admin.properties file an its entries.
See "Enabling and Disabling SSL" for more details on using and changing the default SSL security.
By default Oracle Cluster Coherence is not protected, which is acceptable for the typical environment. However, for untrusted environments, you can secure the Coherence cluster using the standard SSL Coherence configuration settings.
In untrusted environments, Oracle recommends that you secure the cluster by creating a Coherence configuration override file, packaging it as an OSGI bundle fragment and deploying it.
For more information on concepts of the Coherence security, refer to Oracle Coherence 3.7 Security Guide.
For information on how to create a Coherence configuration override file and details on the available security options, see Oracle Coherence Release 3.7 Developer's Guide, section Operational Configuration Elements, and Oracle Coherence Security Guide.
Both documents are available from Oracle Coherence Knowledge Base:
http://coherence.oracle.com/display/COH/Oracle+Coherence+Knowledge+Base+Home
The Coherence operational override configuration file must be named tangosol-coherence-override-axia.xml to complement, rather than replace, the override settings already defined by Service Broker.
For information on how to create an OSGi bundle fragment, refer to OSGi Service Platform Release 4 Core specification, section 3.14 Fragment Bundles. The specification can be downloaded from:
http://www.osgi.org/Release4/Download
The fragment host for the OSGi fragment bundle must be oracle.axia.storage.provider.coherence.
Service Broker collects it's processing and signalling servers into domains that are protected first by the firewalls that secure your physical server, second by HTTPS security, and finally using file system-level security within the server.
For General information, see the discussion about domains in Service Broker System Administrator's Guide.
File system-level security mechanisms are used for controlling access to the domain configuration. A user that starts any of the following must have read and write privileges to the domain configuration directory and all files in it:
Administration Server
Scripting Engine
The Domain Web server must have read access to the domain configuration directory and all files in it.
Use operating system-specific commands to:
Configure users that have privilege to start the Administration Server or Scripting Engine.
Make sure these users have read/write or read access to the domain configuration directory.
Managed servers that use NFS or a local file system to read the domain configuration directory must have read access to all files in that directory.
Oracle recommends that you only allow the owner or a trusted user group to have any privileges to the directory.
Most of Service Broker's application-facing security settings are contained in these property files:
Oracle_home/ocsb61/admin_server/properties
common.properties - Contains property settings that control all actions associated with the Administration Console, which means this is where most of Service Broker's security settings are.
hosting.properties - Contains properties settings that control hosted domains. See the discussion on security for the domain configuration in Service Broker System Administrator's Guide for details.
script.properties - Contains properties settings for the scripting engine.
admin.properties - Contains property settings for the Administration Server and the Administration Console.
Domain_home/Domain_name/domain.properties - contains domain-specific properties settings. Do not change any of these settings, they are not configurable.
Oracle_home/ocsb61/managed_server/server.properties - Contains properties settings for the Managed Server.
For a listing and descriptions of the security settings in these files, see:
The system administrators reference appendix in Service Broker System Administrator's Guide.
The properties files themselves.
When using a hosted domain configuration accessed by a Domain Web server, you can choose to access it using HTTP or HTTPS. The default is to use HTTPS with SSL client certificate authentication.
These settings are controlled by entries in the Oracle_home/ocsb61/admin_server/properties/hosting.properties file. See system administrator's reference appendix in System Administrator's Guide for details on these entries.
When HTTPS and client authentication are enabled, you must configure the trusted client certificates on the managed servers in your domain. You have these options for storing the client certificates:
Import them into default domain hosting keystore specified by the javax.net.ssl.keyStore parameter in common.properties (clientkeystore is the default).
This is somewhat counter-intuitive because:
This stores a web server keystore in a default location called clientkeystore
Unlike other Service Broker components, the trusted client authentication certificates are imported into a keystore rather than a separate truststore.
Import them into a different keystore that you specify by uncommenting the org.eclipse.equinox.http.jetty.ssl.keystore=jettysslkeystore entry in the hosting.properties file. You can either use the default jettysslkeystore, or specify a different keystore.
Each domain's processing and signaling servers contain Java MBean servers for the MBeans they expose. These MBean servers all use a JMX SSL connection that requires both the server and an administration client to authenticate. Administration clients include the Administration Server and the Service Broker scripting engine.
The same security mechanisms that applies to these tools also applies to any administration client that uses JMX to configure, administer, and operate Service Broker.
Oracle recommends that you secure the JMX port with SSL encryption to enable client authentication. SSL encryption is enabled by default and is controlled by entries in the Oracle_home/ocsb61/admin_server/properties/common.properties file. See the system administrator's reference appendix in Administrator's Guide for details on these entries.
SSL encryption requires a public key infrastructure (PKI) where each server has a public key and a private key. The key-pair is stored in an entry in a keystore. The server uses the private key itself. The administration client use the public key.
Each administration client also has a private key and a public key.
Public keys are wrapped in public certificates that can be either self-signed or issued by a Certificate Authority (CA).
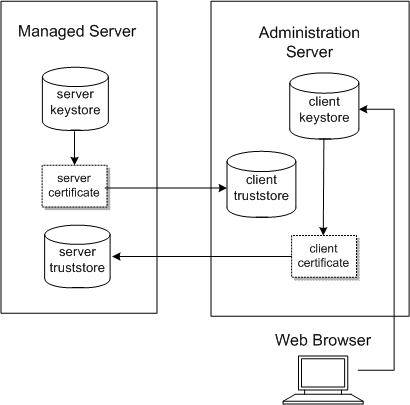
Each server has two stores:
Server keystore
Administration client truststore
Each administration client has two stores:
Administration client keystore
Server truststore
Figure 2-1 shows how the Managed Servers and Administration Server exchange certificates.
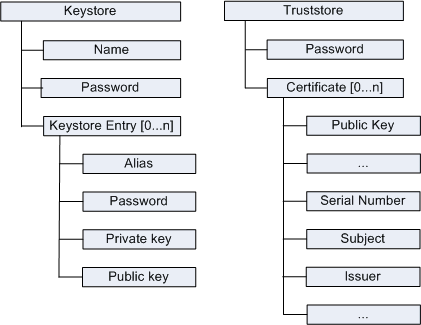
A keystore contains keystore entries. A truststore contains public certificates. Figure 2-2 shows the structure of the keystore and truststore.
The keystores, truststores, and certificates are files. Certificates are exported from keystores, or provided by CAs, and imported to truststores.
Each keystore has a name and a password. Each keystore entry has an alias that identifies a key-pair and a password for the entry.
Each truststore has a password. A truststore can contain one or more certificate.
The certificate contains the public key and data about the certificate such as serial number, subject (the entity being identified by the certificate), and issuer of the certificate.
It is possible to use the same certificate for all administration clients, meaning that the server truststore contains only one administration client certificate. This approach is less secure than having individual certificates for each administration client.
See "Setting Up the Service Broker Public Key Infrastructure" for details on setting up the keystores and truststores.
Note:
Oracle recommends that you do not disable SSL for production systems.You enable and disable SSL connection security using the Service Broker system properties entries.
These system property entries control Service Broker SSL security:
axia.ssl (boolean) in the common.properties file specifies whether SSL is enabled or disabled for the Service Broker implementation. By default, SSL is enabled.
If SSL is enabled, use HTTPS to connect to the Administration Server or Domain Web server. If SSL is disabled, use HTTP
axia.admin.ssl specifies if SSL is enabled or disabled for the administration port. Configuration updates and deployment operations are propagated to processing servers and signaling servers over this port.
axia.digest.auth (boolean) in the (admin.properties file specifies whether to use Digest Authentication when authentication the Administration Console with the Administration Server. See "Securing the Administration Console Connection" for details.
axia.ssl.cipher_suites in the common properties file specifies the enabled platform SSL cipher suites. See Java Cryptography Architecture Sun Providers Documentation Cipher Suite documentation for Sun JSSE Provider for supported values, including how to use unlimited encryption options. The property is set to a comma-separated list of cipher suites.
https.cipherSuites in the common properties file specifies the enabled HTTPS cipher suites. See Java Cryptography Architecture Sun Providers Documentation Cipher Suite documentation for Sun JSSE Provider for supported values, including how to use unlimited encryption options. The property is set to a comma-separated list of cipher suites.
javax.net.ssl.keyStore in the common.properties files specifies the SSL keystore location.
javax.net.ssl.trustStore in the common.properties files specifies the SSL truststore location.
org.eclipse.equinox.http.jetty.https.enabled in the hosting.properties file specifies that HTTPS connects are required for hosted domains. org.eclipse.equinox.http.jetty.https.enabled.port sets the port number to use for the communication.
org.eclipse.equinox.http.jetty.ssl.needclientauth in the hosting.properties file specifies whether HTTPS is requried for the hosted domain/client connection.
org.eclipse.equinox.http.jetty.ssl.keystore in the hosting.properties file specifies the keystore location if HTTPS is requried for hosted domains.
org.eclipse.equinox.http.jetty.https.enabled in script.properties file specifies whether the scripting engine connections require HTTPS security.
org.eclipse.equinox.http.jetty.https.enabled in the admin.properties file specifies whether the Administration Console requires HTTPS security for connections to the Administration Server. org.eclipse.equinox.http.jetty.https.port sets the port number to use for the communication
org.eclipse.equinox.http.jetty.ssl.keystore in the admin.properties file specifies the keystore location for the Administration Server credentials.
See the system administrator's reference appendix in Oracle Communications Service Broker System Administrator's Guide for a complete list of the system security properties.
When you change these properties, you must restart all processing servers, signaling servers, the Administration Server, and the Domain Web server. SSL is enabled or disabled on deployment level, so all servers and administration clients must have the same setting.
This section explains how to set up the Public Key Infrastructure (PKI) that you use to secure the connections between the:
Administration Server and the Administration Console (executing as a web-based client).
Administration Server and managed servers
By default, Service Broker creates a single credential location for both of these. However, these two types of connects are different in nature and you can create and use different locations to store credentials.
Setting up PKI procedure includes these procedures:
Setting Up the PKI for Administration Server-Managed Server Security
Setting Up the PKI for Administration Server to Administration Console Security
The org.eclipse.equinox.http.jetty.ssl.keystore system property in the admin.properties file controls whether you use the default keystore/truststore to secure Administration Server to Administration Console connections:
If org.eclipse.equinox.http.jetty.ssl.keystore is not defined (the default), the default keystore is used.
If org.eclipse.equinox.http.jetty.ssl.keystore is defined, a separate keystore is used.
See the system administrator's reference appendix in Service Broker System Administrator's Guide for details on the system properties.
You set up the Service Broker PKI using keytool, a key and a certificate management tool. keytool is a part of the Oracle Java Development Kit (JDK) and is located in the Oracle_home/ocsb61/jdk/bin by default. For details on keytool and the X.500 distinguished names it uses see:
http://docs.oracle.com/javase/6/docs/technotes/tools/solaris/keytool.html
This section explains how to use the keytool program to set up the PKI between the Administration Server and managed servers using self-signed X.500 certificates.
To set up the PKI with self-signed certificates:
Generate the public and private keys for each managed server. Repeat this for each server:
Generate the keys for the managed server:
keytool -genkeypair “distinguished_name“ -alias server_keystore_entry -keypass key_password -keystore server_keystore -storepass server_keystore_password
Where:
distinguished_name is a X.500 distinguished name for the issuer of the certificate. For details, see:
http://docs.oracle.com/javase/6/docs/technotes/tools/solaris/keytool.html
server_keystore_entry is a keystore entry for the certificate chain and the private key for the managed server.
key_password is a password used to protect the private key.
server_keystore is a name of the server keystore. Oracle suggests that you name your keystore so it can be identified with the server it will be used with. Example: ssu_server_1_keystore, ssu_server_2_keystore, and so on.
server_keystore_password is the password that protects the server keystore.
Export the public key from the managed server keystore entry into a self-signed certificate:
keytool -exportcert -alias server_keystore_entry -keystore server_keystore -storepass server_keystore_password -rfc -file server_certificate.cer
Where:
server_keystore_entry is the keystore entry for the certificate chain and the private key for the managed server. Same as the server_keystore_entry used when the keys were generated in the previous step.
server_keystore is the name of the managed server keystore to export the certificate from. Same as the server_keystore used when the keys were generated in the previous step. Example: ssu_server_1_keystore, ssu_server_2_keystore, and so on.
server_keystore_password is the password setup to protect the server keystore. Same as the server_keystore_password used when the keys were generated in the previous step.
server_certificate is the name of the certificate. This certificate shall be imported to each administration client's truststore. Oracle suggests that you name your certificate so it can be identified with the server it originates from. Example: ssu_server_1.cer, ssu_server_2.cer, and so on.
Generate the public and private keys for each Administration Server:
keytool -genkeypair “distinguished_name“ -alias client_keystore_entry -keypass key_password -keystore client_keystore -storepass client_keystore_password
Where:
distinguished_name is a X.500 distinguished name for the issuer of the certificate.
client_keystore_entry is a keystore entry for the certificate chain and the private key for the Administration Server.
key_password is a password used to protect the private key.
client_keystore is a name of the Administration Server keystore. Oracle suggests that you name your keystore so it can be identified with the administration client it will be used with. Example: admin_1_keystore, admin_2_keystore, and so on.
client_keystore_password is the password that protects the Administration Server keystore.
Export the public key from the Administration Server keystore entry into a self-signed certificate:
keytool -exportcert -alias client_keystore_entry -keystore client_keystore -storepass client_keystore_password -rfc -file client_certificate.cer
Where:
client_keystore_entry is the keystore entry for the certificate chain and the private key for the Administration Server. Same as the client_keystore_entry used when the keys were generated in the previous step.
client_keystore is the name of the Administration Server keystore to export the certificate from.
client_keystore_password is the password setup to protect the Administration Server keystore. Same as the client_keystore_password used when the keys were generated in the previous step.
client_certificate is the name of the certificate. This certificate is imported to each server's truststore. Oracle suggests that you name your certificate so it can be identified with the administration client it originates from. Example: admin_1.cer, admin_2.cer, and so on.
Repeat Step 2 for each Administration Server.
Import the server certificate into the administration client truststore:
keytool -importcert -file server_certificate -keystore client_truststore -storepass client_truststore_password -noprompt
Where:
server_certificate is the name of the server certificate. Example: ssu_server_1.cer, ssu_server_2.cer, and so on.
client_truststore is a name for the administration client truststore.
client_truststore_password is the password that protects the administration client truststore.
Repeat Step 4 for each Administration Server.
Import the Administration Server certificate into the server truststore:
keytool -importcert -file client_certificate -keystore server_truststore -storepass server_truststore_password -noprompt
Where:
client_certificate is the name of the administration client certificate. Example: admin_1.cer, admin_2.cer, and so on.
server_truststore is a name for the server truststore.
server_truststore_password is the password that protects the server truststore.
Repeat Step 6 for each server.
Distribute the keystores and truststores to the servers and administration clients.
Note:
The keystores and trustores might be in different directories and might have different names than specified below. The following directories and file names are according to default settings. See "Setting Up the Service Broker Public Key Infrastructure".Identify which keystore-truststore pair belongs to which server or administration client.
Copy the keystore-truststore pair to the correct server. Repeat this for each server:
Copy or use FTP to put the keystore in:
Oracle_home/ocsb61/managed_server/serverkeystore
Copy or use FTP to put the truststore in:
Oracle_home/ocsb61/managed_server/servertruststore
Copy the keystore-truststore pair to the correct administration client. Repeat this for each administration client:
Copy or use FTP to put the keystore in:
Oracle_Home/ocsb61/admin_server/clientkeystore
Copy or use FTP to put the truststore in:
Oracle_Home/ocsb61/admin_server/clienttruststore
This section explains how to use the keystore/truststore you created in Setting Up the PKI for Administration Server-Managed Server Security for Administration Server to Administration Console security.
You have the option of using the Service Broker default credentials location, or a different location. See "Setting Up the Service Broker Public Key Infrastructure" for details about setting up the credential locations.
To set up Administration Server to Administration Console security:
Change directory to:
Oracle_home/ocsb61/admin_server/properties
Open the admin.properties file for editing.
See the system administrator's reference appendix in Service Broker System Administrator's Guide for details on this property file setting.
Set the org.eclipse.equinox.http.jetty.ssl.keystore system property entry for your implementation:
To use the default credential location make sure there is a hash-sign (#) before the entry.
Example: #org.eclipse.equinox.http.jetty.ssl.keystore=jettysslkeystore
To use a different location, make sure there is no hash-sign (#) before the entry in this file and specify a new location for the keystore:
Example: #org.eclipse.equinox.http.jetty.ssl.keystore=new_keystore_location
The value of this property is the file name of and path to the keystore. When using relative paths, it is relative to the directory admin_server
Save and close the admin.properties file.
Change directory to:
Oracle_home/ocsb61/admin_server
Use keytool to generate a public and private key for the Administration Server and store them in the administration client keystore:
keytool -genkeypair “distinguished_name“ -alias keystore_entry -keypass key_password -keystore keystore -storepass keystore_password
Where:
distinguished_name is a X.500 distinguished name for the issuer of the certificate. See "About Keytool and X.500 Distinguished Names".
keystore_entry is a keystore entry for the certificate chain and the private key for the server.
key_password is a password used to protect the private key.
keystore is the name of the keystore defined for the administration client keystore. Example: console_keystore.
keystore_password is the password that protects the administration client keystore.
Repeat Step 6 for each administration Client.
Use keytool to export the public key from the keystore entry into a self-signed certificate:
keytool -exportcert -alias keystore_entry -keystore keystore -storepass keystore_password -rfc -file certificate.cer
Where:
keystore_entry is the keystore entry for the certificate chain and the private key for the server. Same as the keystore_entry used when the keys were generated in the previous step.
keystore is the name of the keystore to export the certificate from. Same as the keystore used when the keys were generated in the previous step. Example: console_keystore.
keystore_password is the password setup to protect the administration client keystore. Same as the keystore_password used when the keys were generated in the previous step.
certificate is the name of the certificate. This certificate shall be imported to the Administration Server truststore. Oracle suggests that you name your certificate so it can be identified with the Administration Server. Example: web_client_server.cer.
Use keytool to import the certificate into the administration client truststore:
keytool -importcert -file certificate -keystore truststore -storepass truststore_password -noprompt
Where:
certificate is the name of the server certificate. Example: web_console_server.cer.
truststore is the name for the Administration Server truststore.
truststore_password is the password that protects the truststore.
Service Broker provides a Credential Store feature to store credentials for applications and protocols that use username credentials or keystores for access. See "Administering Credential Stores" for details on setting up the Credential Store.
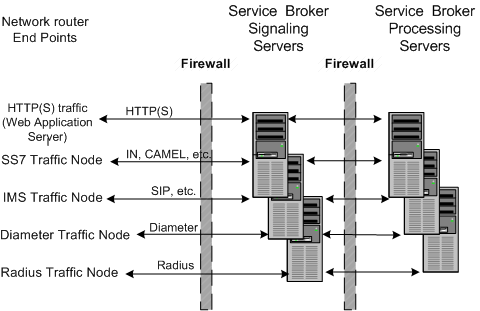
Service Broker communicates with Telecom networks using a variety of supported IMS and SS7-based protocols. You secure communication with network elements by creating Signaling Server Units (SSUs) that are network communication end points for the network traffic. Each protocol SSU has its own security features based on the individual precool. See "Securing Network Communication" for details on securing traffic for individual protocols.
Figure 2-3 shows a typical Service Broker production deployment. Oracle recommends that you protect Service Broker from security risks by configuring firewalls between each the Service Broker processing layers, and between Service Broker and any network traffic. See your firewall product documentation for information on how to set them up with Service Broker.
Because Service Broker supports a variety of protocols, it relies on the security features of those individual protocols for higher-level security support. The combination of firewall protection and protocol-level security support protect Service Broker from network security risks.
The Service Broker Service controller features mediate between various telecom network protocols. Securing communication protocols mainly involves creating virtual “white lists” of trusted systems to communicate with.
You have the option of using either HTTP or HTTPS for test and evaluation Service Broker implementations, but production implementations must use the security provided by HTTPS/SSL/TLS. All web applications that you use with Service Broker must support HTTPS/SSL/TLS features.
The HTTPS/SSL/TLS network traffic that passes to Service Broker is protected by HTTPS/SSL/TLS security, and all applications and internet entities must support HTTPS to work with Service Broker.
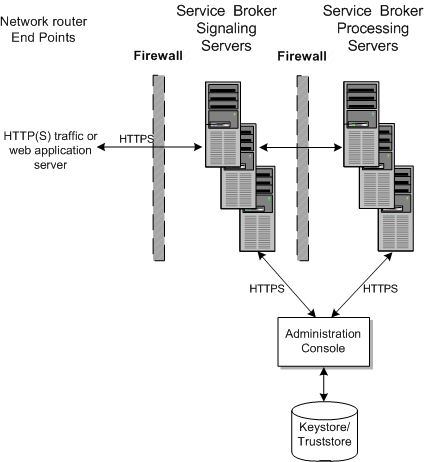
During installation, you configure the keystores and truststores that Service Broker uses to authenticate HTTPS traffic. Figure 2-4 shows how the Service Broker SSU and PN servers share the stores. See Service Broker System Administrator's Guide for details on setting up the keystores and truststores.
Service Broker also includes a Credential Store feature for programs that use username credentials instead of HTTPS-style certificates (for example, LDAP servers). See Service Broker System Administrator's Guide for details on setting up Credential Stores.
Figure 2-4 Service Broker HTTPS Keystores and Truststores
The Service Broker Social Voice Communicator (SVC) feature application runs inside of Service Broker so it is protected from your web application server and Internet nodes by two layers of firewall and HTTPS support.
Figure 2-5 shows a Service Broker implementation with the SVC and VPN features configured. Both of these features run inside Service Broker in a Processing Server. The Processing Server executes the RESTful interface that these features are base on. Once set up, your subscribers access the SVC/VPN features through a web interface that you create and run on a web application server. This diagram illustrates the firewalls required to secure them. Your subscribers access the web interface using the HTTPS protocols. See "Setting Up the Service Broker Public Key Infrastructure" for details on setting up the PKI required to use HTTPS.
Figure 2-5 Service Broker SVC/VPN Security Overview
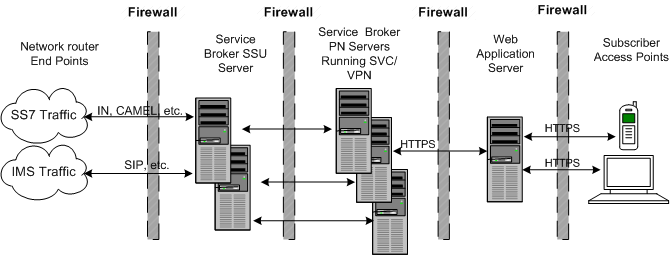
Other than requiring HTTPS and an additional firewall to protect the web application server, there are no special security considerations for using this feature. See Service Broker Social Voice Communicator Implementation Guide for details on how to set up and use this feature, and the remainder of this chapter for instructions on how to implement a secure Service Broker.
The Service Broker VPN feature requires HTTPS and an additional firewalls to protect the web application server that your subscribers use to access this feature. Also see Service Broker VPN Implementation Guide for other security considerations.
If you use the Online Mediation Controller to mediate between Service Broker and your online charging application, see these documents for instructions on how to set it up securely:
Your online charging application's documentation.
The "Securing Network Communication" section.
The discussion on setting up RADIUS Mediation for Authentication and Authorization in the Radius in Service Broker Online Mediation Controller Implementation Guide.
This section explains the protocol-specific security features that Service Broker uses to communicate securely over networks using supported protocols. Service Broker implements protocol security features in the signaling domain. Service Broker provides a Signaling Server Unit (SSU) for each of the supported protocols. You use the SSUs to configure the protocol, including security. An SSU might contain session timers, encryption choices, client port number or other protocol-specific security parameters. The supported protocols include:
You configure these SSUs using the Administration Console, or in some cases Java MBeans exposed for this purpose.
For details on these SSUs and how to configure them, see Service Broker System Administrator's Guide.
The following sections list the security options that you configure for each protocol.
You use the SSU SS7 SIGTRAN or the corresponding Java MBeans to set up security by specifying trusted SIP network entities that use SIP network channels you specify. See configuring SIP Signaling Server Units in Service Broker Signaling Server Units Configuration Guide for details.
In addition, Oracle recommends that you implement security measures appropriate to your implementation, such as:
Implement the IPsec protocol between the system running Service Broker and the network nodes.
Use TLS tunneling between the network node and Service Broker by implementing a load balancer/firewall (such as an F5 load balancer) at the DMZ that performs hardware acceleration/offloading on the secured connection from the firewall to the external network element.
You use the SSU SS7 SIGTRANN or the Java MBeans operations and parameters to set up security by specifying M3UA layer, trusted SCCP sites, and incoming routing rules for SIGTRAN network traffic. See the discussion on configuring SIP Signaling Server Units in Service Broker Signaling Server Units Configuration Guide for details.
You use the SSU SS7 SIGTRANN or the Java MBeans to set up security by specifying MTP connectivity and mapping, SCCP addresses, and incoming routing rules for TDM network traffic. See configuring the SS7 Signaling Server Units for TDM in Service Broker Signaling Server Units Configuration Guide for details.
You use the SSU Diameter or the corresponding Java MBeans to set up security by specifying trusted nodes and peers, and creating routing rules for their network traffic. See configuring Diameter Signaling Server Units in Service Broker Signaling Server Units Configuration Guide for details.
In addition, Oracle recommends that you implement security measures appropriate to your implementation, such as:
Implement the IPsec protocol between the system running Service Broker and the network nodes.
Use TLS tunneling between the network node and Service Broker by implementing a load balancer/firewall (such as an F5 load balancer) at the DMZ that performs hardware acceleration/offloading on the secured connection from the firewall to the external network element.
You use the SSU Radius to set up security by specifying trusted clients to accept accounting and authentication requests from. The SSU Radius also supports the Service Broker Credential Store feature for storing username credentials for Radius users.
The Service Broker SSU Radius supports these authentication methods:
EAP MDS
EAP-TLS
EAP-TTLS with inner authentication (PAP, CHAP, EAP-MD5, MSCHAPv2)
PAP
CHAP
See configuring Diameter Signaling Server Units in Service Broker Signaling Server Units Configuration Guide for details on configuring the SSU Radius. See securing credentials with Credential Store in Service Broker System Administrator's Guide for details on using the Credential Store.
You use the Service Broker SMPP SSU or the corresponding MBeans to set up security by specifying trusted Short Message Service Centers (SMSCs) and the Extended Short Message Entities (ESMEs) they connect to.
See configuring SMPP Signaling Server Units in Service Broker Signaling Server Units Configuration Guide for details. See securing credentials with Credential Store in Service Broker System Administrator's Guide for details on using the Credential Store.
You use the Service Broker SSU PCP or the corresponding MBeans to set up security by specifying a trusted Oracle Communications BRM connection manager (CM) to connect Service Broker to. You specify the specific CM pool ID, host, port, and so on, that identifies the CM. The SSU PCP also supports the Service Broker Credential Store feature for storing username credentials required by BRM.
See configuring PCP Signaling Server Units in Service Broker Signaling Server Units Configuration Guide for details. See securing credentials with Credential Store in Service Broker System Administrator's Guide for details on using the Credential Store.
The Service Broker connection to the Oracle Communications ECE Coherence cluster can be secured using SSL. The SSU ECE also supports the Service Broker Credential Store feature for storing username credentials required by ECE.
To use Service Broker SSL communication with ECE, obtain the ECE credentials, well known address, and port information for the ECE Coherence cluster. Use the information to populate the SSU ECE settings in the Administration Console. Additional steps are required to complete the configuration on both the ECE and Service Broker host.
See the chapter on configuring the ECE Signaling Server Unit in Service Broker Signaling Server Units Configuration Guide for more information on configuring the SSL connection to ECE. See securing credentials with Credential Store in Service Broker System Administrator's Guide for details on using the Credential Store.
You use Service Broker SSU Web Services to specify trusted web entities that Service Broker communicates with by specifying incoming and outgoing routing rules. You also set up HTTP network access points (addresses and ports) for your trusted nodes to use, the SSL security (credential store settings), and set the authentication method (basic or digest).
The SOAP Web Services protocol adapter uses the HTTP protocol adapter network access points, and inherits any security configured for the context used. It also supports the Service Broker Credential Store feature for storing username credentials to authenticate traffic.
See configuring Web Services Signaling Server Units in Service Broker Signaling Server Units Configuration Guide for details. See securing credentials with Credential Store in Service Broker System Administrator's Guide for details on using the Credential Store
You may choose to monitor Service Broker events, such as creating a VPN administrative user, or changing user permissions, using its runtime MBeans. For details on setting up monitoring, see the monitoring Service Broker discussion in Service Broker System Administrator's Guide.
|
Copyright © 2012, 2013, Oracle and/or its affiliates. All rights reserved. Legal Notices |
|