|
Siebel CRM Desktop for Microsoft Outlook Administration Guide > Customizing Picklists > Process of Creating Predefined Picklists >
Customizing the Physical Layout for the Pick List
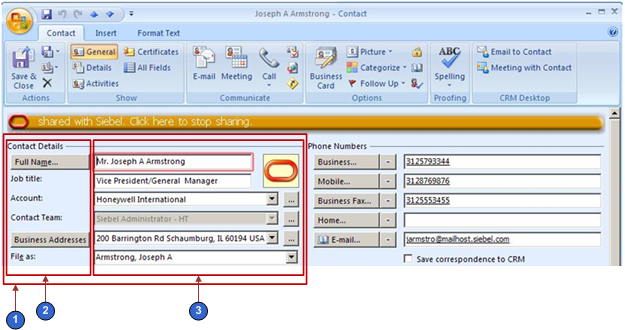
This task is a step in Process of Creating Predefined Picklists. Figure 16 illustrates the Contact Details section of the contact form you customize in this example.
Figure 16. Contact Details Section of the Contact Form
|
Explanation of Callouts The Contact form includes the following parts:
- The following object in the forms_11.xml file identifies the Contact Details section:
SBL Contact
Siebel CRM Desktop considers this area as a single cell. This cell includes two child regions that are placed horizontally in relationship to one another.
- The left side of the cell includes six cells that are arranged vertically.
- The right side of the cell includes the following items:
- The Oracle oval link and the ellipses (. . .) buttons include their own cell layers.
- The starting cell includes the following items:
- Two horizontal subcells. These subcells accommodate the Oracle oval link.
- Two vertical subcells that accommodate the fields to the left of the Oracle oval link.
- The remaining cells following the starting cell include subcells that accommodate their picklists and ellipses (. . .) buttons.
To customize the physical layout for the pick list
- Examine the physical location of where to place the custom field:
- Open the client and then navigate to the Contact form.
For more information, see Figure 16.
- In the Contact Details section, locate the Business Addresses field.
In this example, you add the custom Preferred Contact Method field under the existing Business Address field.
- Provide sufficient vertical room for the custom field and label. Increase the cell size:
- Locate the cell size attribute for the cell you must increase.
You must increase the size of the cell that contains all the other cells. In this example, examine Figure 16, and then note that you must increase the height of cells that are labeled 2 and 3. To do this, you increase the size of the cell that is labeled 1.
- Increase the cell size by 30.
For example, if the current cell size is 155, then change it to 185:
<cell size="185">
- Add the label for the custom field:
- Use an XML editor to open the forms_11.xml file.
In this example, assume you are using Microsoft Outlook 2003. For more information, see Customizing Forms.
- Locate the form you must modify. Locate the following code:
form id="SBL Contact"
Each form includes the SBL prefix. The object name follows this prefix.
- Locate the following code. This code defines the label for the existing business address:
<cell size="22">
<control id="dd_addresses" class="dropdown"
caption="#head_business_addresses" tab_order="12" />
</cell>
Code for the label and fields is located in the following object after the validation rules:
SBL Contact
- Create the label for the new contact method. You add the following code immediately following the code you located in Step c:
<cell size="22">
<static id="ContactMethod" tab_order="9">
<text>#lbl_ContactMethod</text>
<static>
</cell>
For more information, see Code That Creates the Label for a Custom Field.
- Add the custom field:
- Locate the following code. This code defines the field for the existing business address:
<cell size="21">
<stack layout="horz" spacing="5">
<cell>
<combobox id="business_address_mvg" tab_order="13">
<field>Primary Address Id</field>
DETAILS DELETED
</control>
</cell>
</stack>
</cell>
To simplify this step, search for unique text, such as business_address_mvg. For brevity, DETAILS DELETED indicates that details for this tag are removed from this book.
For more information, see "Adding Custom Fields" on page 221.
- Create the field for the new contact method. You add the following code immediately following the code you located in Step a:
<cell size="22">
<combobox id="cbx_ContactPreferred CommunicationsPicklist">
<field>Preferred Communications</field>
<source type="ContactPreferred CommunicationsPicklist" field="Value" format=":[:(Label):]"> </source>
</combobox>
</cell>
For more information, see Code That Creates the Custom Field, and Combobox Control of the Forms File.
- Specify the custom symbolic strings:
- Use an XML editor open the package_res.xml file.
- Add the following code anywhere in the file:
<str key="lbl_ContactMethod">Contact Method:</str>
<str key="head_contact_method">Contact Method</str>
You can place these strings anywhere in the file. To assist with maintenance, it is recommended that you place them with similar strings. If necessary, to create symbolic strings that accommodate another language, you can create alternate package_resource_xml files. For more information, see Localizing Strings.
Code That Creates the Label for a Custom Field
To create the label for the custom contact method field, you add the following code: <cell size="22">
<static id="ContactMethod" tab_order="9">
<text>#lbl_ContactMethod</text>
<static>
</cell>
where:
- Id is an arbitrary, unique value for the form.
- Tab_order determines the order that CRM Desktop uses to position the cursor in the fields in the form when the user presses the TAB key.
- Text defines the text that Siebel CRM Desktop uses for the label.
- # indicates the symbolic string that the package_res.xml file defines. You can use this string for a global deployment.
Code That Creates the Custom Field
To create the custom field for the contact method, you add the following code: <cell size="22">
<combobox id="cbx_ContactPreferred CommunicationsPicklist">
<field>Preferred Communications</field>
<source type="ContactPreferred CommunicationsPicklist" field="Value" format=":[:(Label):]">
</source>
</combobox>
</cell>
where:
- Id is an arbitrary, unique value in the form. A picklist must include the cbx prefix.
- Tab_order determines the order that Siebel CRM Desktop uses to place the cursor in the fields in the form when the user presses the TAB key. The value you enter here must be greater than the value you enter in the Tab_order for the label.
- Source determines where to get the data.
- Type identifies the object name. This name is defined in the siebel_basic_mapping.xml file.
- Field specifies the field that provides the values that the user chooses from the pick list. In this example, the Value field provides these values.
- <Field> identifies the field name from the object definition that populates the picklist.
- Format specifies how to display text in the picklist.
The format tag allows you to use a combination of static text and fields in the picklist. It uses the following format: *any_static_text*:[:(field1_name):]*any_static_text*:[:(field2_name):]*any_static_text*
You must use the bracket, colon, and parentheses. For example: Contact :[:(First Name):] :[:(Last Name):] ? Contact: John Smith
For more information, see "Adding Custom Fields" on page 221 and Combobox Control of the Forms File.
|