24 Reporting and Auditing
Oracle Adaptive Access Manager provides access to a rich set of forensic data to power investigations and auditing:
-
OAAM reports enables you to use Oracle BI Publisher as the reporting solution for OAAM components.
-
Oracle Adaptive Access Manager leverages the common audit framework from Oracle Platform Security Services to capture full audit trails for administration console users.
This chapter contains the following sections:
24.1 Configuring OAAM Reports
Oracle Adaptive Access Manager enables you to use Oracle BI Publisher as the reporting solution. Oracle Adaptive Access Manager provides a restricted-use license for Oracle BI Publisher and easy-to-use reporting packages. Oracle Adaptive Access Manager reports use Oracle BI Publisher to query and report on information in the OAAM schema.
24.1.1 OAAM Standard Reports
OAAM provides a range of standard reports that are accessible through Oracle Business Intelligence Publisher.
24.1.1.1 Common Reports
These reports provide data based on device location or login information.
24.1.1.2 Devices Reports
These reports provide data based on the device information.
24.1.1.3 KBA Reports
These reports provide data based on the KBA information.
Note:
Updated statistics are not available immediately after a user is challenged or answers a question. The Oracle BI Publisher reports are generated from the database and database updates do not occur in real-time for the statistics.24.1.1.5 Location Reports
These reports provide data based on the location information.
24.1.1.6 Performance Reports
These reports provide data based on the performance information.
24.1.1.7 Security Reports
These reports provide data based on the security information.
24.1.1.8 Summary Reports
These reports provide summaries for date ranges.
24.1.2 What is Oracle BI Publisher?
Oracle BI Publisher is an Oracle's enterprise reporting solution and provides a single reporting environment to author, manage, and deliver all of your reports and business documents. Utilizing a set of familiar desktop tools, such as Microsoft Word, Microsoft Excel, or Adobe Acrobat, you can create and maintain report layouts based on data from diverse sources
See Also:
Oracle Business Intelligence Publisher Documentation to learn more about Oracle BI Publisher functionality.The Oracle Business Intelligence Publisher Documentation Library is available on the Oracle Technology Network web site. You can access the Oracle Technology Network Website at:
24.1.3 Setting Up Oracle BI Publisher for OAAM Reports
When your data resides in a database, you can run pre-defined Oracle Business Intelligence Publisher (Oracle BI Publisher) reports and create your own reports on the data. This section contains these topics about configuring Oracle BI Publisher for OAAM reports:
For performance reasons, it is recommended to replicate production data into a reporting database and to provide a dedicated reporting environment for Oracle BI Publisher. For information on how to configure audit reporting and view audit reports, refer to "Using Audit Analysis and Reporting" in Oracle Fusion Middleware Application Security Guide.
24.1.3.1 Prerequisites
You must create a repository in your database by using the Repository Configuration Utility (RCU) before installing BI Publisher 11g. For installing BI Publisher 11g, the following metadata repositories are required:
-
Metadata Store (MDS)
-
Business Intelligence Platform (BI Platform)
To create the repository in your database by using the RCU utility:
-
Log in to the database as SYSDBA.
To run RCU, you must have the DBA privilege. Therefore, you must log in as SYSDBA, for example, as user SYS.
-
Navigate to the RCU_HOME/bin/ directory.
-
To start RCU:
-
For UNIX, run:
./rcu -
For Microsoft Windows, run:
rcu.bat
-
-
Choose Create at the starting screen and click Next.
-
Specify the connection details, as listed in the following table, and click Next.
Field Data to Enter Database Type Oracle Database Host Name Name of the host on which the database is deployed. Port Port number to connect to the host identified in the Host Name field. Service Name A string that is the global database name, a name comprised of the database name and domain name, entered during installation or database creation. Username User name for a database schema user that has access to Oracle Adaptive Access Manager, such as SYS. Password Password for the user identified in the Username field. Role The role with DBA privilege, such as SYSDBA. -
In the Component Details page, select the Oracle Business Intelligence component. This action automatically selects the MDS schema under the AS Common Schemas group, which is also required by Oracle Business Intelligence.
24.1.3.2 Acquiring and Installing Oracle BI Publisher
OAAM uses Oracle BI Publisher to generate OAAM reports. Perform the following steps to acquire and install Oracle BI Publisher:
-
Go to Oracle Technology Network web site at
http://www.oracle.com/technetwork/index.html -
Locate the Oracle BI Publisher Download page by searching on the key words Oracle BI Publisher or Oracle BI Publisher Download.
-
Review the Oracle Technology Network License Agreement that appears on the Oracle BI Publisher Download page. You must accept the Oracle Technology Network License Agreement to download Oracle BI Publisher.
-
Download the version of Oracle BI Publisher that is appropriate for your operating system by clicking on the appropriate link.
-
Install Oracle BI Publisher by referring to the Oracle Business Intelligence Publisher Documentation.
-
Verify your Oracle BI Publisher is operational before installing and configuring the OAAM reports.
24.1.3.3 Copying OAAM Reports to the Reporting Database
This section explains how to install Oracle BI Publisher OAAM reports. You must install Oracle BI Publisher and verify it is operational before installing the OAAM reports. Refer to the Oracle Business Intelligence Publisher Documentation for more information on verifying the installation.
Perform the following steps to install the reports:
-
Stop the Oracle BI Publisher server. Refer to Oracle Business Intelligence Publisher Documentation if you need more information.
-
On your OAAM host, locate the OAAM products reports package in the
$ORACLE_HOME/oaam/reportsdirectory. -
Navigate to the BI Publisher repository and create a new directory called
oaamin the directory:Oracle_IDM1/Middleware/user_projects/domains/bifoundation_domain/config/bipublisher/repository/Reports
Note:
After installing BI Publisher 11g, theOracle_IDM1/Middleware/user_projects/domains/bifoundation_domain/config/bipublisher/repository/Reportsdirectory is created in the WebLogic domain. -
Extract the file into the
Oracle_IDM1/Middleware/user_projects/domains/bifoundation_domain/config/bipublisher/repository/Reports/oaamdirectory. -
Start the Oracle BI Publisher server. Refer to Oracle Business Intelligence Publisher Documentation if you need more information.
24.1.3.4 Setting Up the JDBC Data Source for the OAAM Reports
Perform the following steps to configure the data source for the reports:
-
Configure the JDBC Data Source for the reports by performing the following steps:
-
Log in to Oracle BI Publisher from a Web browser as an Administrator using the URL:
http://host.domain.com:port/xmlpserver/
Refer to Oracle Business Intelligence Publisher Documentation if you need more information.
-
Click the Admin tab, then click JDBC under Data Sources, and then click the Add Data Source button. The Add Data Source screen appears.
-
Enter the following information in the fields on the Add Data Source screen. Replace the
variable valuesin the following examples with the actual values for your Oracle Adaptive Access Manager database.Field Data to Enter Data Source Name ARMFor the Oracle Adaptive Access Manager reports to work as standard, the JDBC data source must be named as "ARM". If you choose a different name, you must modify the data source property in all reports.
Connection String jdbc:oracle:thin:@host:port:sidUser Name User name for a database schema user that has access to Oracle Adaptive Access Manager. Password Password for user identified in the User Name field. Database Driver Class oracle.jdbc.driver.OracleDriver -
Click the Test Connection button to test the connection to the JDBC Data Source. You will receive the
Connection established successfullymessage if your connection is successful.If you do not receive the
Connection established successfullymessage, verify the data you entered is accurate and check if the OAAM database is running. -
Click the Apply button on the Add Data Source screen after you have received the Connection established successfully message.
-
-
Configure the AdminProperties Data Source. The AdminProperties contains configuration information that Oracle BI Publisher will need to read when generating the reports.
-
Click the Admin tab, then click File under Data Sources, and then click the Add Data Source button. The Add Data Source screen appears.
-
Enter the following information in the fields on the Add Data Source screen:
Field Data to Enter Data Source Name AdminPropertiesYou must name this Data Source
AdminProperties.Full Path of Top-level Directory Path is where you copied the reports package into Reports/OAAM directory. For example: /scratch//example_user/Oracle/BI_Middleware/user_projects/domains/bifoundation_domain/config/bipublisher/repository/Reports/OAAM.
The configuration for the data source is complete. Refer to the Oracle Business Intelligence Publisher Documentation Library for more information on generating reports.
-
24.1.4 Viewing/Running OAAM Reports
This section explains how to view/run reports. Take these steps to view/run a report:
-
Log in to Oracle BI Publisher from a Web browser as an Administrator using the URL:
http://host.domain.com:port/xmlpserver/
Refer to Oracle Business Intelligence Publisher Documentation if you need more information.
-
Click Reports, Shared Folders, and then oaam.
Reports are grouped under Common, KBA, OTP, Security, Users, Devices, Location, Performance, and Summary.
In case you do not see the OAAM folder under Shared Folders, verify the Catalog type under Administration > System Maintenance > Server configuration > Catalog type. It should be the Oracle BI Publisher file system
-
Choose any report from these groupings.
-
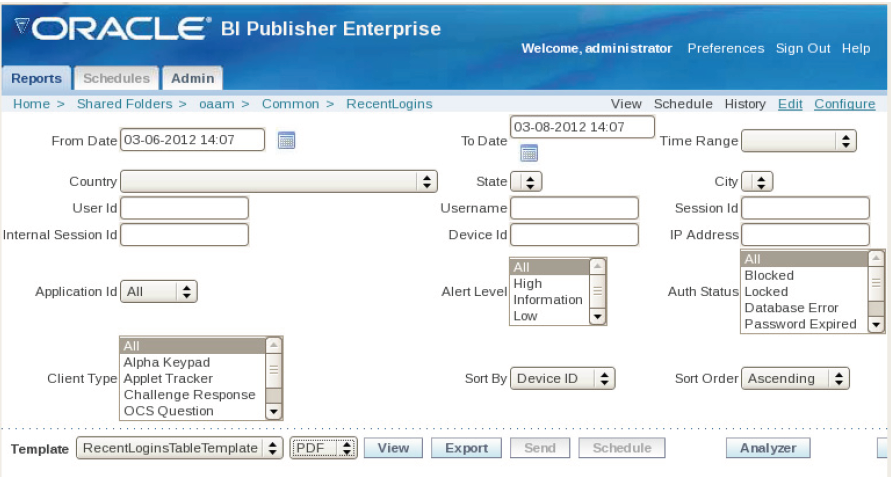
Set the search criteria. From example, set the From Date and To Date.
The figure shows the search screen for the RecentLogins report.
-
Choose EXCEL, HTML, or other output type, and click View.
24.1.5 Setting Preferences
You can set the Report Locale, User Interface Language, Time Zone, and Accessibility Mode for Oracle BI Publisher. Table 24-1 provides details on the preferences you can set.
Table 24-1 BI Publisher Preferences
| Preferences | Descriptions |
|---|---|
|
Report Locale |
A locale is a language and territory combination (for example, English (United States) or French (Canada)). Oracle BI Publisher uses the report locale selection to determine the template translation to apply, the number formatting and date formatting to apply to the report data. |
|
User Interface Language |
The User Interface language is the language that your user interface displays in. The language that you selected at login will be selected as the default. However, you can choose from the languages that are available for your installation through this option. |
|
Time Zone |
Select the time zone to apply to your reports. Reports run by you (this user) will display the time according to the time zone preference selected here. |
|
Accessibility Mode |
Setting this to "On" will display the report catalog in a tree structure that is accessible via keyboard strokes. |
For more information on setting preferences, refer to the Oracle Business Intelligence Publisher Documentation.
24.1.6 Adding Translations for the Oracle BI Publisher Catalog and Reports
In release 11g, Oracle BI Publisher supports two types of translation:
-
Catalog Translation
-
Template (or layout) Translation
Catalog translation enables the extraction of translatable strings from all objects contained in a selected catalog folder into a single translation file; this file can then be translated and uploaded back to Oracle BI Publisher and assigned the appropriate language code.
Catalog translation extracts not only translatable strings from the report layouts, but also the user interface strings that are displayed to users, such as catalog object descriptions, report parameter names, and data display names.
Users viewing the catalog will see the item translations appropriate for the user interface language they selected in their My Account preferences. Users will see report translations appropriate for the Report Locale they selected in their My Account preferences.
Template translation enables the extraction of the translatable strings from a single RTF-based template (including sub templates and style templates) or a single Oracle BI Publisher layout template (.xpt file). Use this option when you only need the final report documents translated. For example, your enterprise requires translated invoices to send to German and Japanese customers.
For information describing the process of downloading and uploading translation files, refer to the Oracle Business Intelligence Publisher Documentation.
24.1.7 Localizing Reports
If you want to localize reports perform the following steps:
-
Unzip
oaam_reports_translations.zip. Theoaam_reports_translations.zipis in the same directory as the reports you installed earlier. Refer to Section 24.1.3.3, "Copying OAAM Reports to the Reporting Database." -
In the Oracle BI Publisher catalog, select the OAAM folder.
-
Click the option to Import XLIFF.
-
Upload the
Catalog_*.xlffile for the languages you want to use.
24.1.8 Scheduling a Report
Oracle BI Publisher Enterprise enables you to schedule reports, and deliver the executed output to various destinations. Oracle BI Publisher Scheduler is configured as a part of the Oracle BI Enterprise Edition installation process. Ensure that the scheduler is configured properly, before you start scheduling the reports. For information on scheduling reports, refer to the Oracle Business Intelligence Publisher Documentation.
24.1.9 Creating Custom OAAM Reports
If you have additional reporting requirements beyond the standard reports described in Section 24.1.1, "OAAM Standard Reports", you can create custom reports. You may want to refer to the Oracle Adaptive Access Manager Database Schema chapter in the Oracle Fusion Middleware Reference for Oracle Identity Management. It describes the OAAM schema, which is useful when building custom reports. This section discusses advanced report creation.
To create a custom OAAM report, you must perform the following tasks:
An example is provided for your reference. In code listings OAAM table and field names are bold and italic.
24.1.9.1 Creating a Data Model
A Data Model defines data that is used by a report. Creating a new data model or selecting an existing/predefined data model is the first step in creating a BI Publisher report. A Data Model may contain multiple data sets and it defines how data fields are structured in relation to each other. It may also contain parameters with lists of values, bursting definitions and other structures or properties that determine how data is provided to a report. Oracle BI Publisher has a Data Model Editor, a graphical user interface for building data models within the BI Publisher interface.
To create a data model:
-
Log in to Oracle BI Publisher from a Web browser as an Administrator using the URL:
http://host.domain.com:port/xmlpserver/
Refer to Oracle Business Intelligence Publisher Documentation if you need more information.
-
From the New menu, select Data Model.
-
Click New Data Set.
-
From the New Data Set menu, select SQL Query.
-
Enter the name of the data set.
-
Select the default data source.
-
Click Query Builder.
-
Select the tables and columns to include, optionally create joins and add conditions.
-
Click Save.
-
Add parameters and associate each parameter with a List of Values.
-
Click the Structure tab to edit the Display Names of the data elements.
-
Click the Data tab, and then View to generate sample data.
-
Select Save as Sample Data, and then OK.
-
Save the Data Model.
24.1.9.2 Mapping User Defined Enum Numeric Type Codes to Readable Names
Several fields in many tables are numeric type codes, which correspond to OAAM User Defined Enums. Refer to the Oracle Fusion Middleware Developer's Guide for Oracle Adaptive Access Manager for more information on OAAM User Defined Enums. Information on how to map those type codes to readable names is presented in this section. There are two methods for resolving these names, and the one to choose depends on whether you must display in English only or in internationalized strings.
24.1.9.2.1 Results Display
To display a readable string rather than a type code value in the report output, the report writer will need to add a join to the tables that hold the User Defined Enums, and then add the field to the select clause.
24.1.9.2.2 English Only User Defined Enum Result Display
The following SQL code shows how to add the join criteria to the query:
SELECT …
FROM …
LEFT OUTER JOIN (
      SELECT enumElement.num_value, enumElement.label
      FROM v_b_enum enum
             INNER JOIN v_b_enum_elmnt enumElement ON on enum.enum_id = enum_element.enum_id
      WHERE enum.prop_name = 'enum name') alias
      ON table.type_field = alias.num_value
…
In this code, table.type_field is the field containing a type code value that you want to replace with a string. Alias is the name you are giving the inner select clause. Finally, enum_name is the property name of the User Defined Enum.
To display in the report, you must add alias.label to the select clause.
24.1.9.2.3 Internationalized User Defined Enum Result Display
The following SQL code shows how to add the join criteria to the query:
SELECT …
FROM …
LEFT OUTER JOIN (
      SELECT t0.config_value, element.num_value
      FROM v_b_config_rb t0
      INNER JOIN (
             SELECT enum_element.num_value, enum_element.str_value, enum.prop_name
             FROM v_b_enum enum
                   INNER JOIN v_b_enum_elmnt enum_element ON enum.enum_id = enum_element.enum_id
             WHERE enum.prop_name = 'enum name') element
             ON t0.config_name=element.prop_name || '.' || element.str_value || '.name'
      WHERE t0.locale_id = (
             SELECT locale_id FROM v_b_locale
             WHERE language = substr(:xdo_user_ui_locale, 1, 2)
                   AND country = substr(:xdo_user_ui_locale, 4, 2)
                   AND (substr(:xdo_user_ui_locale, 1, 2) in ('de', 'en', 'es', 'fr', 'it', 'ja', 'ko')
                         OR (substr(:xdo_user_ui_locale, 1, 2) = 'pt' AND substr(:xdo_user_ui_locale, 4, 2) = 'BR')
                         OR (substr(:xdo_user_ui_locale, 1, 2) = 'zh' AND substr(:xdo_user_ui_locale, 4, 2) IN ('CN', 'TW')))
             UNION SELECT locale_id FROM v_b_locale
             WHERE language = substr(:xdo_user_ui_locale, 1, 2)
                   AND NOT EXISTS(SELECT locale_id FROM v_b_locale
                   WHERE language = substr(:xdo_user_ui_locale, 1, 2)
                         AND country = substr(:xdo_user_ui_locale, 4, 2))
                         AND country IS NULL
                         AND (substr(:xdo_user_ui_locale, 1, 2) in ('de', 'en', 'es', 'fr', 'it', 'ja', 'ko')
                               OR (substr(:xdo_user_ui_locale, 1, 2) = 'pt' AND substr(:xdo_user_ui_locale, 4, 2) = 'BR')
                               OR (substr(:xdo_user_ui_locale, 1, 2) = 'zh' AND substr(:xdo_user_ui_locale, 4, 2) IN ('CN', 'TW')))
             UNION SELECT locale_id FROM v_b_locale
             WHERE language = 'en'
                   AND NOT (substr(:xdo_user_ui_locale, 1, 2) in ('de', 'en', 'es', 'fr', 'it', 'ja', 'ko')
                         OR (substr(:xdo_user_ui_locale, 1, 2) = 'pt' AND substr(:xdo_user_ui_locale, 4, 2) = 'BR')
                         OR (substr(:xdo_user_ui_locale, 1, 2) = 'zh' AND substr(:xdo_user_ui_locale, 4, 2) IN ('CN', 'TW'))))
      ORDER BY t0.config_name) alias
      ON table.type_field = alias.num_value
…
In this code, table.type_field is the field containing a type code value that you want to replace with a string. Alias is the name you want to give the inner select clause. Finally, enum_name is the property name of the User Defined Enum.
To display in the report, you must add alias.config_value to the select clause.
24.1.9.3 Adding Lists of Values
Add parameters to your report definition to enable your users to interact with the report and specify the data of interest from the data set.
To allow a user to select from a list of readable strings representing type codes, the report writer will need to create a List of Values (LOV) from a query on the User Defined Enums tables, filtered by the enum name.
24.1.9.3.1 User Defined Enums as List of Values for Filtering, English Only
The following listing shows how to write the query to populate the list of values.
SELECT enumElement.label, enumElement.num_value
FROM v_b_enum enum
      INNER JOIN v_b_enum_elmnt enumElement ON on enum.enum_id = enumElement.enum_id
WHERE enum.prop_name = 'enum name'
ORDER BY enumElement.label
The following listing shows how to filter the report based on this LOV.
WHERE …
AND (:parameter IS NULL OR :parameter = table.type_field)
In these listings, enum_name is the property name of the User Defined Enum, table.type_field is the field containing a type code value that you want to replace with a string, and parameter is the named parameter. Review the Oracle Business Intelligence Publisher Documentation for information about creating and setting up report parameters.
24.1.9.3.2 User Defined Enums as List of Values for Filtering, Internalized
The following listing shows how to write the query to populate the list of values.
SELECT t0.config_value, element.num_value
FROM v_b_config_rb t0
INNER JOIN (
      SELECT enum_element.num_value, enum_element.str_value, enum.prop_name
      FROM v_b_enum enum
             INNER JOIN v_b_enum_elmnt enum_element ON enum.enum_id = enum_element.enum_id
      WHERE enum.prop_name = 'enum name') element
      ON t0.config_name=element.prop_name || '.' || element.str_value || '.name'
WHERE t0.locale_id = (
      SELECT locale_id FROM v_b_locale
      WHERE language = substr(:xdo_user_ui_locale, 1, 2)
             AND country = substr(:xdo_user_ui_locale, 4, 2)
             AND (substr(:xdo_user_ui_locale, 1, 2) in ('de', 'en', 'es', 'fr', 'it', 'ja', 'ko')
                   OR (substr(:xdo_user_ui_locale, 1, 2) = 'pt' AND substr(:xdo_user_ui_locale, 4, 2) = 'BR')
                   OR (substr(:xdo_user_ui_locale, 1, 2) = 'zh' AND substr(:xdo_user_ui_locale, 4, 2) IN ('CN', 'TW')))
      UNION SELECT locale_id FROM v_b_locale
      WHERE language = substr(:xdo_user_ui_locale, 1, 2)
             AND NOT EXISTS(SELECT locale_id FROM v_b_locale
             WHERE language = substr(:xdo_user_ui_locale, 1, 2)
                   AND country = substr(:xdo_user_ui_locale, 4, 2))
                   AND country IS NULL
                   AND (substr(:xdo_user_ui_locale, 1, 2) in ('de', 'en', 'es', 'fr', 'it', 'ja', 'ko')
                         OR (substr(:xdo_user_ui_locale, 1, 2) = 'pt' AND substr(:xdo_user_ui_locale, 4, 2) = 'BR')
                         OR (substr(:xdo_user_ui_locale, 1, 2) = 'zh' AND substr(:xdo_user_ui_locale, 4, 2) IN ('CN', 'TW')))
      UNION SELECT locale_id FROM v_b_locale
      WHERE language = 'en'
             AND NOT (substr(:xdo_user_ui_locale, 1, 2) in ('de', 'en', 'es', 'fr', 'it', 'ja', 'ko')
                   OR (substr(:xdo_user_ui_locale, 1, 2) = 'pt' AND substr(:xdo_user_ui_locale, 4, 2) = 'BR')
                   OR (substr(:xdo_user_ui_locale, 1, 2) = 'zh' AND substr(:xdo_user_ui_locale, 4, 2) IN ('CN', 'TW'))))
ORDER BY t0.config_name
The filtering is done in the same manner as the English Only version.
24.1.9.4 Adding Geolocation Data
The OAAM schema includes tables that map IP address ranges to location data including city, state, and country. The relevant tables are VCRYPT_IP_LOCATION_MAP, VCRYPT_CITY, VCRYPT_STATE, and VCRYPT_COUNTRY. Many tables contain IP addresses, and VCRYPT_IP_LOCATION_MAP contains foreign keys to each of VCRYPT_CITY, VCRYPT_STATE, and VCRYPT_COUNTRY.
In OAAM, IP addresses are stored as long numerals. The following listing shows how join a table containing an IP address to the VCRYPT_IP_LOCATION_MAP.
SELECT ...
FROM vcrypt_tracker_usernode_logs logs
      INNER JOIN vcrypt_ip_location_map loc ON (
             logs.remote_ip_addr >= loc.from_ip_addr AND logs.remote_ip_addr <= loc.from_ip_addr
      )
For user input and display purposes, you will normally want to use the standard four-part IP address. The following listing shows how to display a numeric IP address as a standard IP, where ipField is the field or parameter containing the numeric IP address you want to display.
…
to_char(to_number(substr(to_char(ipField, 'XXXXXXXX'), 1, 3), 'XX')) || '.' ||
      to_char(to_number(substr(to_char(ipField, 'XXXXXXXX'), 4, 2), 'XX')) || '.' ||
      to_char(to_number(substr(to_char(ipField, 'XXXXXXXX'), 6, 2), 'XX')) || '.' ||
      to_char(to_number(substr(to_char(ipField, 'XXXXXXXX'), 8, 2), 'XX'))
...
The following listing shows how to convert a standard IP address to the long numeric format.
…
to_number(substr(ipField, 1, instr(ipField, '.')-1))*16777216 +
      to_number(substr(ipField, instr(ipField, '.', 1, 1)+1, instr(ipField, '.', 1, 2)-instr(ipField, '.', 1, 1)-1))*65536 +
      to_number(substr(ipField, instr(ipField, '.', 1, 2)+1, instr(ipField, '.', 1, 3)-instr(ipField, '.', 1, 2)-1))*256 +
      to_number(substr(ipField, instr(ipField, '.', 1, 3)+1))
24.1.9.5 Adding Sessions and Alerts
Sessions and alerts exist in the VCRYPT_TRACKER_USERNODE_LOGS and VCRYPT_ALERT tables, respectively. They join to each other via the REQUEST_ID field, and they each join to the geolocation data via the VCRYPT_IP_LOCATION_MAP table via the BASE_IP_ADDR field.
24.1.9.5.1 Type Code Lookups
The session table and the alert table have several type code fields that may be translated into readable text by following the instructions to look up the user defined enums by name. The following tables will list the type code fields and the name of the user defined enum.
24.1.9.6 Example
This report will show a list of sessions, with user id, login id, auth status, and location. To start with, you will need to create two date parameters, fromDate and toDate. The query will look like this:
SELECT s.request_id, s.user_id, s.user_login_id, auth.label, country.country_name, state.state_name,
city.city_name
FROM vcrypt_tracker_usernode_logs s
      INNER JOIN vcrypt_ip_location_map loc ON s.base_ip_addr = loc.base_ip_addr
      INNER JOIN vcrypt_country country ON loc.country_id = country.country_id
      INNER JOIN vcrypt_state loc ON loc.state_id = country.state_id
      INNER JOIN vcrypt_city city ON loc.city_id = city.city_id
      LEFT OUTER JOIN (
             SELECT enumElement.num_value, enumElement.label
             FROM v_b_enum enum
                   INNER JOIN v_b_enum_elmnt enumElement ON on enum.enum_id = enum_element.enum_id
             WHERE enum.prop_name = 'auth.status.enum') auth
             ON s.auth_status = auth.num_value
WHERE (:fromDate IS NULL OR s.create_time >= :fromDate)
      AND (:toDate IS NULL OR s.create_time <= :toDate)
ORDER BY s.create_time DESC
24.1.10 Building OAAM Transactions Reports
This section explains how you can build transaction reports. It contains the following topics:
24.1.10.1 Getting Entities and Transactions Information
To obtain the Transaction Definition key and Entity Definition keys, follow these steps:
-
Log in to the OAAM Administration Console as an administrator.
-
Double-click Transactions in the Navigation pane.
The Transaction Definition Search page is displayed.
-
Specify criteria in the Search Filter to locate the transaction definition you are interested in and click Search.
The Search Results table displays a summary of the transaction definitions that match the search criteria.
-
Click the row for the transaction definition you are interested in to view more details.
-
In the Transaction Definition Details page, click the General tab.
-
Note down the Definition Key of the transaction. This is the Transaction Definition Key of the transaction.
This definition key value is used to map the client/external transaction data to transaction definitions in Oracle Adaptive Access Manager server.
This value is sent while making the API call for creating or updating the transaction data in OAAM Server.
-
In the Transaction Definition Details page, click the Entities tab.
-
Note down the lists of names in the Entity Name column.
-
Double-click Entities in the Navigation pane.
The Entity Definition Search page is displayed.
-
In the Entity Definition Search page, enter the search criteria you want and click Search.
-
Note the Key of each of those entities. That is the Entity Definition Key of the entities.
The definition key is the unique identifier for an entity definition.
24.1.10.2 Discovering Entity Data Mapping Information
To discover entity data mapping information that you will need to create your report, follow the procedures in this section.
24.1.10.2.1 Information about Data Types
For your reference, number data types are listed in the following table.
Table 24-4 Information about Data Types
| Data Type | Description |
|---|---|
|
1 |
Represents String data |
|
2 |
Represents Numeric data. Data stored is equal to (Original value * 1000). |
|
3 |
Date type data. Store the data in "'YYYY-MM-DD HH24:MI:SS TZH:TZM" format and also retrieve it using same format. |
|
4 |
Boolean data. Stored as strings. "True" represents TRUE and "False" represents FALSE |
24.1.10.2.2 Discover Entity Data Details Like Data Type, Row and Column Mappings
To obtain the entity data details that you will need to construct your report, follow these steps:
-
Double-click Entities in the Navigation pane.
The Entity Definition Search page is displayed.
-
In the Entity Definition Search page, enter the search criteria you want and click Search.
-
Note the Key of the entity. That is the Entity Definition Key of the entity
The definition key is the unique identifier for an entity definition.
-
Obtain details of how entity data is mapped using the SQL Query:
SELECT label,
  data_row,
  data_col,
  data_type
FROM vt_data_def_elem
WHERE status =1
AND data_def_id =
  (SELECT data_def_id
  FROM vt_data_def_map
  WHERE relation_type   ='data'
  AND parent_obj_type   =3
  AND parent_object_id IN
    (SELECT entity_def_id
    FROM vt_entity_def
    WHERE entity_def_key=<Entity Definition Key>
    AND status =1
    )
  )
ORDER BY data_row ASC,
  data_col ASC;
24.1.10.2.3 Building Entity Data SQL Queries and Views
The SQL query in Section 24.1.10.2.2 gives a list of data fields of the entity with data type and row, column position. Using that information, build a SQL query based on the following information that represents the data of the given entity. It is also recommended to create/build a view based on this SQL query that represents data of the given entity.
Note:
EntityRowN represents an entity data row. If your entity has 3 distinct data_row values from the above query then you would have 3 EntityRows, name the aliases as EntityRow1, EntityRow2, and so on, and similarly take care of the corresponding joins as shown below.
SELECT ent.ENTITY_ID,
    ent.EXT_ENTITY_ID,
    ent.ENTITYNAME,
    ent.ENTITY_KEY,
    ent.ENTITY_TYPE,
    EntityRowN<row>.DATA<col> <column_name>,
    (EntityRowN<row>.NUM_DATA<col>/ 1000.0) <numeric_column_name>,
    to_timestamp_tz(EntityRowN<row>.DATA<col>, 'YYYY-MM-DD HH24:MI:SS TZH:TZM') <date_column_name>,
    ent.CREATE_TIME,
    ent.UPDATE_TIME,
    ent.EXPIRY_TIME,
    ent.RENEW_TIME
  FROM
    VT_ENTITY_DEF entDef,
    VT_ENTITY_ONE ent
    LEFT OUTER JOIN VT_ENTITY_ONE_PROFILE EntityRowN
          ON (EntityRowN.ENTITY_ID    = ent.ENTITY_ID
          AND EntityRowN.ROW_ORDER    = <row>
          AND EntityRowN.EXPIRE_TIME IS NULL)
    LEFT OUTER JOIN VT_ENTITY_ONE_PROFILE EntityRowN+1
        ON (EntityRowN+1.ENTITY_ID    = ent.ENTITY_ID
          AND EntityRowN+1.ROW_ORDER    = <row+1>
        AND row1.EXPIRE_TIME IS NULL)
  WHERE
        ent.ENTITY_DEF_ID      = entDef.ENTITY_DEF_ID and
        entDef.ENTITY_DEF_KEY=<Entity Definition Key>
24.1.10.3 Discovering Transaction Data Mapping Information
To discover transaction data mapping information that you will need to create your report, follow the procedures in this section.
24.1.10.3.1 Discovering Transaction data Details like Data Type, Row and Column Mappings
To obtain entity data details you will need to construct your report by following these steps:
-
Obtain a list of transaction to entity definition mapping IDs using the following SQL:
SELECT map_id FROM vt_trx_ent_defs_map, vt_trx_def WHERE vt_trx_ent_defs_map.trx_def_id = vt_trx_def.trx_def_id AND vt_trx_def.trx_def_key =<Transaction Definition Key> -
Use the following SQL query to obtain details of all transaction data fields, their data type and their row, and column mapping:
SELECT label,
  data_row,
  data_col,
  data_type
FROM vt_data_def_elem
WHERE status    =1
AND data_def_id =
  (SELECT data_def_id
  FROM vt_data_def_map
  WHERE relation_type   ='data'
  AND parent_obj_type   =1
  AND parent_object_id IN
    (SELECT trx_def_id
    FROM vt_trx_def
    WHERE trx_def_key='mayo_pat_rec_acc'
    AND status       =1
    )
  )
ORDER BY data_row ASC,
  data_col ASC;
24.1.10.3.2 Building Transaction Data SQL Queries and Views
Use the information from the previous section and build a SQL query that represents transaction data based on the following:
Note:
It is recommended to build a view based on this query so that it is easier to build reports
SELECT trx.LOG_ID,
    trx.USER_ID,
    trx.REQUEST_ID,
    trx.EXT_TRX_ID,
    trx.TRX_TYPE,
    trx.STATUS,
    trx.SCORE,
    trx.RULE_ACTION,
    trx.TRX_FLAG,
    trx.POST_PROCESS_STATUS,
    trx.POST_PROCESS_RESULT,
    TxnDataRowN<row>.DATA<col> <data_column_name>,
   (TxnDataRowN<row>.NUM_DATA<col>/ 1000.0) <numeric_column_name>,
    to_timestamp_tz(TxnDataRowN<row>.DATA<col>, 'YYYY-MM-DD HH24:MI:SS TZH:TZM') <date_column_name>,
    (SELECT entTrxMap.MAP_OBJ_ID
    FROM VT_ENT_TRX_MAP entTrxMap
    WHERE entTrxMap.DEF_MAP_ID = <Transaction to Entity Mapping Id of Entity1_Name>
    AND entTrxMap.TRX_ID       = trx.LOG_ID
    ) <EntityN_Name>,
    (SELECT entTrxMap.MAP_OBJ_ID
    FROM VT_ENT_TRX_MAP entTrxMap
    WHERE entTrxMap.DEF_MAP_ID = <Transaction to Entity Mapping Id of Entity2_Name>
    AND entTrxMap.TRX_ID       = trx.LOG_ID
    ) <EntityN+1_Name>,
    trx.CREATE_TIME,
    trx.UPDATE_TIME,
    TRUNC(trx.create_time, 'HH24') created_hour,
    TRUNC(trx.create_time, 'DDD') created_day,
    TRUNC(trx.create_time, 'DAY') created_week,
    TRUNC(trx.create_time, 'MM') created_month,
    TRUNC(trx.create_time, 'YYYY') created_year
  FROM VT_TRX_DEF trxDef,
    VT_TRX_LOGS trx
  LEFT OUTER JOIN VT_TRX_DATA TransactionDataRowN
  ON (TransactionDataRowN.TRX_ID         = trx.LOG_ID
  AND TransactionDataRowN.ROW_ORDER      = <rowN>)
LEFT OUTER JOIN VT_TRX_DATA TransactionDataRowN+1
  ON (TransactionDataRowN+1.TRX_ID         = trx.LOG_ID
  AND TransactionDataRowN+1.ROW_ORDER      = <rowN+1>)
  WHERE trx.TRX_DEF_ID      = trxDef.TRX_DEF_ID  and
trxDef.TRX_DEF_KEY=<Transaction Definition Key>
24.1.10.4 Building Transaction Reports
Follow the instructions in this section to build reports for entities and transactions.
24.1.10.4.1 Building Entity Data Reports
Use the SQL Queries or Views built using the information mentioned in Section 24.1.10.2.3, "Building Entity Data SQL Queries and Views."
24.1.10.4.2 Building Transaction Data Reports
Use the SQL Queries or Views built using the information mentioned in Section 24.1.10.3.2, "Building Transaction Data SQL Queries and Views."
24.2 Auditing Management Events
In Oracle Fusion Middleware, auditing refers to the process of collecting for review specific information related to administrative, authentication, and run-time events. Auditing can help you evaluate adherence to polices, user access controls, and risk management procedures. Auditing provides a measure of accountability and answers to the "who has done what and when" types of questions. You can use audit data to create dashboards, compile historical data, and assess risks. Analyzing recorded audit data allows compliance officers to perform periodic reviews of compliance policies.
This section describes the management events that can be audited for Oracle Adaptive Access Manager. The Fusion Middleware Audit Framework leverages Oracle BI Publisher to audit data recorded to an audit database. By using Oracle BI Publisher, you can take advantage of powerful reporting features such as flexible report display, filtering, scheduling, and custom reporting.
24.2.1 Introduction to Auditing
Many businesses must now be able to audit identity information and user access on applications and devices. Compliance audits help an enterprise conform with regulatory requirements—Sarbanes-Oxley or the Health Insurance Portability and Accountability Act (HIPAA) are two examples.
Oracle Adaptive Access Manager uses the Oracle Fusion Middleware Common Audit Framework to support auditing for a number of events. The Oracle Fusion Middleware Common Audit Framework provides uniform logging and exception handling and diagnostics for all audit events.
While auditing can be enabled or disabled, it is normally enabled in production environments. Auditing has minimal performance impact, and the information captured by auditing can be useful (even mission-critical).
Audit data can be written to either a single, centralized Oracle Database instance or to flat files known as bug-stops. Regardless of where the audit record is stored, it contains a sequence of items that can be configured to meet particular requirements. The audit log file helps the audit administrator track errors and diagnose problems if the audit framework is not working properly.
24.2.2 Audit Record Storage
Audit data can be written to either a single, centralized Oracle Database instance or to flat files known as bus-stop files. By default, audit data is recorded to a file. However, Administrators can change the configuration to log audit data to a database. Although the formats differ, audit data content is identical in both the flat file and the database.
Audit Bus-stop: Local files containing audit data records before they are pushed to the audit data store. In the event that no audit data store is configured, audit data remains in these bus-stop files. The bus-stop files are simple text files that can be queried easily to look up specific audit events. When an audit data store is in place, the bus-stop acts as an intermediary between the component and the audit data store. The local files are periodically uploaded to the audit data store based on a configurable time interval.
Bus-stop files are located in:
$DOMAIN_HOME/servers/$SERVER_NAME/logs/auditlogs/OAAM/audit.log
Database Logging: Implements the Common Auditing Framework across a range of Oracle Fusion Middleware products. The benefit is audit-function commonality at the platform level.
Database Audit Store: In production environments, Oracle recommends using a database audit store to provide scalability and high-availability for the Common Audit Framework. Audit data is cumulative and grows over time. Ideally this is a database for only audit data; not used by other applications.
Note:
The preferred mode in production environments is writing audit records to a stand-alone RDBMS database for audit data only.A key advantage of the audit data store is that audit data from multiple components can be correlated and combined in reports, for example, authentication failures in all Middleware components, instances and so on.
To switch to a database as the permanent store for your audit records, you must first use the Repository Creation Utility (RCU) to create a database schema for audit data. The RCU seeds that database store with the schema required to store audit records in a database. After the schema is created, configuring a database audit store involves:
-
Creating a data source that points to the audit schema you created
-
Configuring the audit store to point to the data source
Figure 24-2 provides a simplified view of the audit architecture with a supported database. The Oracle Fusion Middleware Audit Framework schema for audit log tables is provided by the Repository Creation Utility (RCU), which must be run before you can log information to the database.
Figure 24-2 Audit to Database Architecture
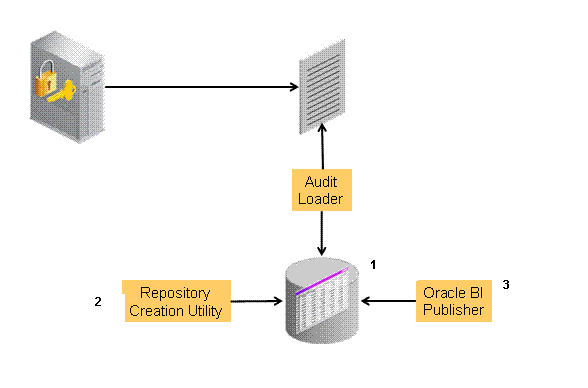
Description of "Figure 24-2 Audit to Database Architecture"
An independent audit loader process reads the flat log file and inserts records in the log table of the Oracle database. The Audit Loader is a module of the Oracle WebLogic Server instance and supports audit activity in that instance. When an audit data store is configured, audit loader is responsible for collecting the audit records for all components running in that instance and loading them to the data store. The audit store allows Administrators to expose audit data with Oracle Business Intelligence Publisher using a variety of out-of-the-box reports. You can use BI Publisher to report and publish or visualize the data to gain more insights.
24.2.3 Audit Reports and Oracle Business Intelligence Publisher
Oracle Adaptive Access Manager integrates with Oracle Business Intelligence Publisher, which provides a pre-defined set of compliance reports. The data in the database audit store is exposed through pre-defined reports in Oracle Business Intelligence Publisher. These reports allow you to drill down the audit data based on various criteria, such as user name, time range, application type, and execution context identifier (ECID).
You must prepare Oracle Business Intelligence Publisher for use with audit reports. Follow the BI Publisher documentation for details on enabling monitoring and auditing in BI Publisher.
24.2.4 Oracle Adaptive Access Manager CSR and Management Events You Can Audit
OAAM events are those generated when the Oracle Adaptive Access Manager Console is used. The OAAM events that can be audited and the details captured in them are listed in this section. These event definitions and configurations are implemented as part of the audit service in Oracle Platform Security Services.
24.2.4.1 Customer Care Events
Customer Care events are shown in Table 24-5.
Table 24-5 Customer Care Events
| Event | Event Data |
|---|---|
|
Create CSR Case |
CaseId, UserGroupName, UserId, CaseSeverity, Description |
|
Update Cases |
CaseId, CaseSeverity, CaseStatus, CaseDisposition, CaseExpirationDurationInHrs, ActionNotes, CaseActionResult |
|
Change Status |
CaseId, CaseStatus, CaseDisposition, ActionNotes, CaseActionResult |
|
Perform Case Action |
CaseId, CaseActionEnum, CaseSubActionEnum, ActionNotes, CaseActionResult |
|
Get Challenge Question |
CaseId, ActionNotes, CaseChallengeQuestion |
|
Check Challenge Question Response |
CaseId, ActionNotes, CaseChallengeQuestion, CaseChallengeQuestionResult |
24.2.4.2 KBA Questions Events
KBA Questions events are listed in Table 24-6.
Table 24-6 KBA Questions Events
| Event | Event Data |
|---|---|
|
Create KBA Category |
KBACategoryId, KBACategoryName, KBACategoryDetails |
|
Update KBA Category |
KBACategoryId, KBACategoryName, KBACategoryDetails |
|
Delete KBA Categories |
KBACategoryIds |
|
Create KBA Question |
KBAQuestionId, KBAQuestion, KBAQuestionDetails |
|
Update KBA Question |
KBAQuestionId, KBAQuestion, KBAQuestionDetails |
|
Delete KBA Questions |
KBAQuestionIds |
|
Create KBA Validation |
KBAValidationId, KBAValidationName, KBAValidationDetails |
|
Update KBA Validation |
KBAValidationId, KBAValidationName, KBAValidationDetails |
|
Delete KBA Validation |
KBAValidationIds |
|
Add KBA Validation to Global |
KBAValidationId |
|
Delete KBA Validation from Global |
KBAValidationId |
|
Update KBA Answer Logic |
KBAAnswerLogicDetails |
|
Update KBA Registration Logic |
KBARegistrationLogicDetails |
24.2.4.3 Policy Management Events
Policy Management events are listed in Table 24-7.
Table 24-7 Policy Management Events
| Event | Event Data |
|---|---|
|
Create Policy |
PolicyId, PolicyName, PolicyDetails |
|
Copy Policy |
SourcePolicyId, PolicyName, PolicyDetails |
|
Update Policy |
PolicyId, PolicyName, PolicyDetails |
|
Delete Policy |
PolicyIds |
|
Add Override |
PolicyId, PolicyOverrideRowId, PolicyOverrideDetails |
|
Update Overrides |
PolicyId, PolicyOverrideIds, PolicyOverrideDetails |
|
Delete Overrides |
PolicyId, PolicyOverrideIds |
|
Link Policy To Group |
PolicyId, GroupId, ActionNotes |
|
Unlink Policy from Groups |
PolicyId, GroupIds |
|
Create Rule |
PolicyId, RuleId, RuleName, RuleDetails |
|
Add Conditions to Rule |
PolicyRuleMapId, RuleConditionIds |
|
Update Rule in Policy |
PolicyId, RuleId, RuleName, RuleDetails |
|
Copy Rule to Policy |
PolicyId, PolicyRuleMapDetails |
|
Delete Rules from Policy |
PolicyRuleMapIds |
|
Update Rules Order in Policy |
PolicyRuleMapId, RuleConditionMapIds |
|
Update Rule Parameter values |
PolicyRuleMapId, RuleConditionMapId, RuleParamValueDetails |
24.2.4.4 Policy Set Management Events
Policy set management events are listed in Table 24-8.
24.2.4.5 Group/List Management Events
Group/List Management events are listed in Table 24-9.
Table 24-9 Group Management Events
| Event | Event Data |
|---|---|
|
Add Group |
GroupId, GroupName, GroupDetails |
|
Update Group |
GroupId, GroupName, GroupDetails |
|
Delete Groups |
GroupIds |
|
Add Group Elements |
GroupId, GroupElementsDetails |
|
Update Group Element |
GroupId, GroupElementId, GroupElementValue |
|
Delete Group Elements |
GroupId, GroupElementIds |
|
Delete all Group Elements |
GroupId |
24.2.4.6 Pattern Management Events
Pattern management events are listed in Table 24-10.
Table 24-10 Pattern Management Events
| Event | Event Data |
|---|---|
|
Pattern Update Status |
UpdatePattern |
|
Pattern Create |
CreatePattern |
|
Pattern Update |
UpdatePatternStatus |
|
Pattern Delete |
DeletePattern |
|
Pattern Add Parameter |
AddParam |
|
Pattern Update Parameter |
UpdateParam |
|
Pattern Delete Parameter |
DeleteParams |
|
Pattern Update Parameter Order |
UpdateParamsOrder |
24.2.4.7 Dynamic Action Management Events
Dynamic action management events are listed in Table 24-11.
Table 24-11 Dynamic Action Management Events
| Event | Event Data |
|---|---|
|
Dynamic Action Create |
CreateDynamicAction |
|
Dynamic Action Update |
UpdateDynamicAction |
|
Dynamic Action Delete |
DeleteDynamicActions |
|
Dynamic Action Create Instance |
CreateDynamicActionInstance |
|
Dynamic Action Update Instance |
UpdateDynamicActionInstance |
|
Dynamic Action Update Status |
UpdateDynamicActionInstanceStatus |
|
Dynamic Action Delete Instance |
DeleteDynamicActionInstances |
24.2.4.8 Entity Management Events
Entity Management events are listed in Table 24-12.
Table 24-12 Entity Management Events
| Event | Event Data |
|---|---|
|
Entity Create |
CreateEntityDef |
|
Entity Update |
|
|
Entity Update Status |
UpdateEntityDefStatus |
|
Entity Delete |
DeleteEntityDefs |
|
Entity Save Data |
SaveDataElements |
|
Entity Delete Data |
DeleteDataElements |
|
Entity Add ID |
AddIDSchemeElements |
|
Entity Update ID |
UpdateIDSchemeElements |
|
Entity Delete ID |
DeleteIDSchemeElements |
|
Entity Add Display |
AddDisplayElements |
|
Entity Update Display |
UpdateDisplayElements |
|
Entity Delete Display |
DeleteDisplayElements |
|
Entity Create Reference |
CreateEntityDefsRelation |
|
Entity Update Reference |
UpdateEntityDef |
|
Entity Delete Reference |
DeleteEntityDefsRelations |
Note:
When an update to attributes/properties of an entity definition is performed, the following audit events are triggered:-
Update Entity Def
-
Update ID Scheme Elements
-
Save Data Elements
24.2.4.9 Transaction Management Events
Transaction management events are listed in Table 24-13.
Table 24-13 Transaction Management Events
| Event | Event Data |
|---|---|
|
Transaction Create |
CreateTransactionDef |
|
Transaction Update |
UpdateTransactionDef |
|
Transaction Update Status |
UpdateTransactionDefStatus |
|
Transaction Delete |
DeleteTransactionDef |
|
Transaction Add Entity |
AddTransactionEntityDefMap |
|
Transaction Update Entity |
UpdateTransactionEntityDefMap |
|
Transaction Delete Entity |
DeleteTransactionEntityDefMaps |
|
Transaction Save Data |
SaveTransactionDataElemDefs |
|
Transaction Delete Data |
DeleteTransactionDataElemDefs |
|
Transaction Save Source |
SaveTransactionSourceDataElemDefs |
|
Transaction Delete Transaction Source Data Element Definitions |
DeleteTransactionSourceDataElemDefs |
|
Transaction Set Data Map |
SetTransactionDataMapping |
|
Transaction Delete Data Map |
DeleteTransactionDataMappings |
|
Transaction Set Entity Map |
SetTransactionEntityDataMapping |
|
Transaction Delete Entity Map |
DeleteTransactionEntityDataMappings |
Note:
When an update to attributes/properties of a transaction definition occurs, an audit event is triggered and audit events of related APIs. For example, when the transaction "save source" is performed the following audit events are also triggered:-
Save transaction data-element defs
-
Update a transaction definition
24.2.4.10 Snapshot Management Events
Snapshot management events are listed in Table 24-14.
24.2.4.11 OAAM Server Administration Events
OAAM Server Administration events are listed in Table 24-15
24.2.4.12 User Detail Events
User events are listed in Table 24-16.
24.2.4.13 Import Events
Import events are listed in Table 24-17.
| Event | Event Data |
|---|---|
|
Import Policy |
ImportPolicies |
|
Import KBA |
ImportKBAQuestions |
|
Import Dynamic Action |
ImportDynamicActions |
|
Import Transaction |
ImportTransactions |
|
Import Pattern |
ImportPatterns |
|
Import Entity |
ImportEntities |
|
Import Condition |
ImportConditions |
|
Import Group |
ImportGroups |
|
Import Property |
ImportProperties |
|
Import Validation |
ImportValidations |
24.2.5 Setting Up Auditing for Oracle Adaptive Access Manager
The following overview provides a list of the tasks that must be performed before you can perform auditing for Oracle Adaptive Access Manager.
-
Run the Oracle Fusion Middleware Repository Creation Utility (RCU) against the database, as described in Section 24.2.5.1, "Creating the Audit Schema Using Repository Creation Utility."
-
Set up audit data sources for the audit loader and configure it for the OAAM Server as described in Section 24.2.5.2, "Configuring a Data Source for the Audit Database."
-
Set the audit level with Fusion Middleware Control as described in Section 24.2.5.3, "Setting the Audit Level Using Fusion Middleware Control."
-
Register JDBC data source for Audit Policy Store with Fusion Middleware Control as described in Section 24.2.5.4, "Registering JDBC Data Source for Audit Policy Store with Fusion Middleware Control."
-
Set up Fusion Middleware audit reports as described in Section 24.2.5.5, "Setting Up Audit Reports."
-
Restart the WebLogic Server.
For information on deploying auditing, refer to "Configuring and Managing Auditing" in the Oracle Fusion Middleware Application Security Guide.
24.2.5.1 Creating the Audit Schema Using Repository Creation Utility
To switch to a database as the permanent store for your audit records, you first use the Oracle Fusion Middleware Repository Creation Utility (RCU) to create an audit data store. by default, the audit data is on a file system (IAMDomain/servers/AdminServer/logs/auditlogs/JPS/audit.log) rather than a database.
The audit data store is the repository of audit event records. It is a database that contains a pre-defined Oracle Fusion Middleware Audit Framework schema, created by Repository Creation Utility (RCU). Once the audit data store is configured, all the audit loaders are aware of the store and upload data to it periodically. The audit data in the store is expected to be cumulative and will grow overtime. Ideally, this should not be an operational database used by any other applications - rather, it should be a standalone database used for audit purposes only.
Before you begin, make sure to collect the details on which database to use, along with the DBA credentials to use.
To create the audit schema by using the RCU utility:
-
Log in to the database as SYSDBA.
To run RCU, you must have the DBA privilege. Therefore, you must log in as SYSDBA, for example, as user SYS.
-
Navigate to the RCU_HOME/bin/ directory.
-
To start RCU:
-
For UNIX, run:
./rcu -
For Microsoft Windows, run:
rcu.bat
-
-
Choose Create at the starting screen and click Next.
-
Specify the connection details, as listed in the following table, and click Next.
Field Data to Enter Database Type Oracle Database Host Name Name of the host on which the database is deployed. Port Port number to connect to the host identified in the Host Name field. Service Name A string that is the global database name, a name comprised of the database name and domain name, entered during installation or database creation. Username User name for a database schema user that has access to Oracle Adaptive Access Manager, such as SYS. Password Password for the user identified in the Username field. Role The role with DBA privilege, such as SYSDBA. -
Choose the option to create a new prefix or an existing prefix.
-
In the Component Details page, select Audit Services from the list of schemas.
-
Click Next and accept the tablespace creation.
-
Click Finish to start the process.
RCU creates the
DEV_IAUschema or prefix_IAUschema with the supporting tables used for audit logging.
To view tables created in the database during the schema creation:
-
Login to SQLPLUS as the
DEV_ IAUuser. -
Execute the following command to display the list of tables:
SQL> select TABLE_NAME from USER_TABLES;
A list of tables that were created during installation is displayed. The
IAU_BASEtable is the table in which the audit framework writes the audit records. -
Execute the following command to view OAAM tables:
SQL> describe OAAM;
24.2.5.2 Configuring a Data Source for the Audit Database
After you create a database schema to store audit records in a database, you must define the JDBC data source on your WebLogic Server for the audit database so that the Audit Framework can access the database and start loading data.
To create the data source, perform the following tasks:
-
Log in to the Oracle WebLogic Administration Console using the URL:
http://hostname:port/console
-
Lock the environment by clicking the Lock button in the upper left corner of the WebLogic Administration Console.
-
Click IAMDomain, and under Services, click Data Sources.
The Summary of JDBC Sources appears in the right panel.
-
Click New and then Generic Datasource to create a new datasource.
-
In the Create a New JDBC Datasource page, enter the following details for the new data source and then click Next.
Name: AuditDB
JNDI Name: jdbc/AuditDB
Database Type: Oracle
-
In the second page, accept the defaults, and click Next.
-
In the Transaction Options page, click Next.
-
In the Connection properties page, enter the connection properties as follows and then click Next.
Database Name: Name of the database (SID) to which you will connect.
Host Name: Hostname of the database.
Port: Database port.
Database User Name: This is the name of the audit schema that you created in RCU. The suffix is always
IAUfor the audit schema.Password: This is the password for the audit schema that you created in RCU.
The next page lists the JDBC driver class and database details.
-
Accept the defaults, and click Test Configuration to verify the connection. If you see the message "Connection established Successfully", click Next. If it displays any error, go back and check the connection details.
-
Select the servers where you want to make this JDBC connection available: administration server and
oaam_admin_server1,oaam_server_server1, andoaam_offline_server1servers. -
Click Finish and then Activate Changes so that the new JDBC connection takes effect.
24.2.5.3 Setting the Audit Level Using Fusion Middleware Control
Set a level of the auditing for each BI Publisher's auditing type by using Fusion Middleware Control.
-
Log in to Oracle Enterprise Manager Fusion Middleware Control.
http://hostname:port/em
-
Navigate to the IAM_Domain.
-
For the IAM_Domain, under the WebLogic Domain, right-click domain, select Security, and then click Audit Policy.
-
Use the Audit Component Name drop-down to select Oracle Adaptive Access Manager (whose audit policy you wish to configure).
When you select Oracle Adaptive Access Manager, a list of audit categories relevant to the OAAM is displayed underneath.
-
Use the Audit Level drop-down to set the audit level for the audit events for OAAM. The choices are:
-
None - No event categories selected.
-
Low, Medium, High - Enables you to set a pre-defined level of auditing.
-
Custom - Enables you to set a customized level of auditing for each category of event.
-
-
Select the audit level and the check box next to OAAM or OAAM event category. Then click Apply.
24.2.5.4 Registering JDBC Data Source for Audit Policy Store with Fusion Middleware Control
Register the JDBC data source to store your auditing data. In order to do that, you need to register the JDBC connection you created in Section 24.2.5.2, "Configuring a Data Source for the Audit Database."
-
Log in to Oracle Enterprise Manager Fusion Middleware Control.
http://hostname:port/em
-
Select WebLogic Domain, right-click domain, select Security, and then Audit Store.
-
In the Audit Store page, click Search (searchlight icon) next to the Datasource JNDI Name field.
-
In the Select Datasource dialog, select jdbc/AuditDB, which you created in Section 24.2.5.2, "Configuring a Data Source for the Audit Database," and click OK.
-
Enter the audit loader frequency in seconds. The audit loader checks for and pushes records to the repository at the specified intervals.
-
In the Audit Store page, click Apply to continue.
-
Restart the administration server and
oaam_admin_server1,oaam_server_server1, andoaam_offline_server1servers where you deployed the JDBC data source.
24.2.5.5 Setting Up Audit Reports
You must install Oracle BI Publisher and verify it is operational before installing the Fusion Middleware Audit reports. Refer to Oracle Business Intelligence Publisher Documentation if you need more information.
Perform the following steps to set up standard Oracle BI Publisher audit reports in their default formats as standard.
-
Stop the Oracle BI Publisher server. Refer to Oracle Business Intelligence Publisher Documentation if you need more information.
-
On your OAAM host, locate the
AuditReportTemplates.jar.You can find
AuditReportTemplates.jarat$MW_ORA_HOME/oracle_common/modules/oracle.iau_version/reports/AuditReportTemplates.jar. -
SFTP the file from the OAAM host to a location on the database host. For example:
Oracle_IDM1/Middleware/user_projects/domains/bifoundation_domain/config/bipublisher/repository/Reports
Note:
After installing BI Publisher 11g, theOracle_IDM1/Middleware/user_projects/domains/bifoundation_domain/config/bipublisher/repository/Reportsdirectory is created in the WebLogic domain. -
Navigate to the database machine and extract the file into the
Oracle_IDM1/Middleware/user_projects/domains/bifoundation_domain/config/bipublisher/repository/Reportsdirectory.A new directory called Oracle_Fusion_Middleware_Audit is created with the audit reports. The directory is listed with the other report directories when you perform an
ls. -
Start the Oracle BI Publisher server. Refer to Oracle Business Intelligence Publisher Documentation if you need more information.
-
To be able to run reports against the data in the audit tables in the database, configure the JDBC Data Source to point to the Audit schema by performing the following steps:
-
Log in to Oracle BI Publisher from a Web browser as an Administrator using the URL:
http://host.domain.com:port/xmlpserver/
Refer to Oracle Business Intelligence Publisher Documentation if you need more information.
-
Click the Admin tab, then click JDBC under Data Sources, and then click the Add Data Source button. The Add Data Source screen appears.
-
Enter the following information in the fields on the Add Data Source screen. Replace the
variable valuesin the following examples with the actual values for your audit schema.Field Data to Enter Data Source Name AuditProvide a name for the data source.
Connection String jdbc:oracle:thin:@host:port:sidUser Name User name for a audit schema user. Password Password for user identified in the User Name field. Database Driver Class oracle.jdbc.driver.OracleDriver
-
-
Test for a successful connection. If the connection is not successful, check the values you entered.
-
Click Apply.
24.2.5.6 Restarting the WebLogic Server
Restart WebLogic Server instances. You must restart all the WebLogic Server instances (the admin server and all the managed server instances in the domain). During the restart, the audit loader rereads the audit store configuration and starts using the database for auditing.
24.2.6 Running OAAM Audit Reports
To run reports in Oracle BI Publisher, perform the following steps:
-
Log in to Oracle BI Publisher from a Web browser as an Administrator using the URL:
http://host.domain.com:port/xmlpserver/
Refer to Oracle Business Intelligence Publisher Documentation if you need more information.
-
Click the Reports tab and click Shared Folders.
-
Click Oracle_Fusion_Middleware_Audit, then navigate to the report you want to run.
-
Use filter options in the top part of the report page to filter reported data in various ways.
-
Click View.Report data appears on the bottom part of the report page.
You should be able to see the auditing data in the database scheme. If you are not seeing any data, then you might want to check the log file, which is located at
ORACLE_MW_HOME/user_projects/domains/IAMDomain/servers/oaam_admin_server1/logs/auditlogs/oaam.
24.2.7 Running the Fusion Middleware Common User Activities Reports
Perform the following steps to run the Fusion Middleware common user activities reports in Oracle BI Publisher:
-
Log in to Oracle BI Publisher from a Web browser as an Administrator using the URL:
http://host.domain.com:port/xmlpserver/
Refer to Oracle Business Intelligence Publisher Documentation if you need more information.
-
Select the Reports tab.
-
Click More to expose the list of standard reports, including audit reports.
-
Click Oracle_Fusion_Middleware_Audit, then navigate to the report you want to run.
-
Select All Events.
24.2.8 Setting Up Audit Report Filters
You can use the standard audit reports in their default formats as standard. However, if you want to customize the scope of data and other related aspects of the reports, you do so by setting up audit report filters. For information, refer to "Using Audit Analysis and Reporting" in Oracle Fusion Middleware Application Security Guide.
24.2.9 Designing and Creating Audit Reports
The data in the database audit store is exposed through BI Publisher reports. OAAM audit reports are not available with standard Oracle Adaptive Access Manager. Oracle Fusion Middleware Audit Framework ships with a set of pre-defined reports that are designed to work, as standard, with Oracle Fusion Middleware components, but you can design and create custom reports with Oracle Business Intelligence Publisher's complete set of capabilities for designing and creating custom reports. This chapter provides details for creating some custom reports for OAAM. For detailed information on creating audit reports, refer to "Using Audit Analysis and Reporting" in Oracle Fusion Middleware Application Security Guide.
24.3 Use Cases
The following section provides a scenario of how Oracle Adaptive Access Manager's reports are used.
24.3.1 Use Case: BIP Reports
You are Marty, a business analyst for Acme Corp. You have been asked to gather some aggregate data on the impact to customers by the Oracle Adaptive Access Manager security system.
Directions: Run the KBA challenge statistics report and rules aggregate breakdown report. Also run the recent logins report, filtering for sessions that resulted in a block. Run all the reports with XLS output so you can share the results with your business unit.
24.3.1.2 Steps
This use case demonstrates how to use Oracle BI Publisher reports.
-
Log in to Oracle BI Publisher from a Web browser as an Administrator using the URL:
http://host.domain.com:port/xmlpserver/
Refer to Oracle Business Intelligence Publisher Documentation if you need more information.
-
Select OAAM under Shared Folders.
-
Under oaam folder, select oradb.
-
Locate the report to run.
-
Under the Common folder, click RecentLogins to view the RecentLogins report.
-
Under the KBA folder, click ChallengeStatistics to view the Challenge Statistics report.
-
Under the KBA folder, click QuestionStatistics to view the QuestionStatistics report
-
Under the Security folder, click RulesBreakdown to view the RulesBreakdown report.
-
-
For the RecentLogins report, select Blocked in Auth Status as a search criteria.
-
Repeat the following steps for each report.
-
Click View.
-
In Template menu, select Excel2000 and click Export.
-
24.3.2 Use Case: LoginSummary Report
The LoginSummary displays login aggregate summary for the designated date range.
-
Log in to Oracle BI Publisher from a Web browser as an Administrator using the URL:
http://host.domain.com:port/xmlpserver/
Refer to Oracle Business Intelligence Publisher Documentation if you need more information.
-
In the main page, click OAAM under Shared Folders and then oradb.
-
Under the Security folder, click LoginSummary to view the LoginSummary report.
The Login Summary Report opens with the default time range of one month.
The summary graph shows the following:
-
The count of sessions
-
The count of users
-
The count of registrations
-
The count of blocks
-
-
Save or export the report as desired.