4 Creating a Deployment Response File
This chapter describes how to create a deployment response file using the Oracle Identity and Access Management Deployment Wizard.
This chapter contains the following sections:
-
Section 4.2, "Starting the Identity and Access Management Deployment Wizard"
-
Section 4.3, "Creating a Deployment Response File for a Single-Host Topology"
-
Section 4.4, "Creating a Deployment Response File for a Multi-Host Topology"
4.1 Overview of Deployment Response File
Before you can perform deployment, you must provide information about your topology to the Oracle Identity and Access Management Deployment Wizard. Once you have provided all the necessary input, the wizard will create a deployment response file that you use to perform the deployment operation. The default name of the deployment response file is provisioning.rsp. You can change the deployment response file name in the Summary screen of the Oracle Identity and Access Management Deployment Wizard.
4.2 Starting the Identity and Access Management Deployment Wizard
Before running the Oracle Identity and Access Management Deployment Wizard, ensure that the environment variable JAVA_HOME is set to REPOS_HOME/jdk6
To start the Oracle Identity and Access Management Deployment Wizard, go to the following directory:
IDMLCM_HOME/provisioning/bin
where IDMLCM_HOME is the directory where you installed the Oracle Home Directory for Oracle Identity and Access Management, using the installation script for the Oracle Identity and Access Management Deployment Wizard and Oracle Identity and Access Management Patching Tools, as described in Section 2.8, "Installing the Oracle Identity and Access Management Lifecycle Tools."
On Linux or UNIX, run the following command:
./iamDeploymentWizard.sh
After the Oracle Identity and Access Management Deployment Wizard starts, proceed to one of the following section based on your topology selection:
4.3 Creating a Deployment Response File for a Single-Host Topology
Complete the following steps to create a new Deployment Response File for a single-host topology:
Note:
Single-host deployment using the Oracle Identity and Access Management Deployment Wizard is not meant for production use. This should be used for demonstrations and testing purposes only.-
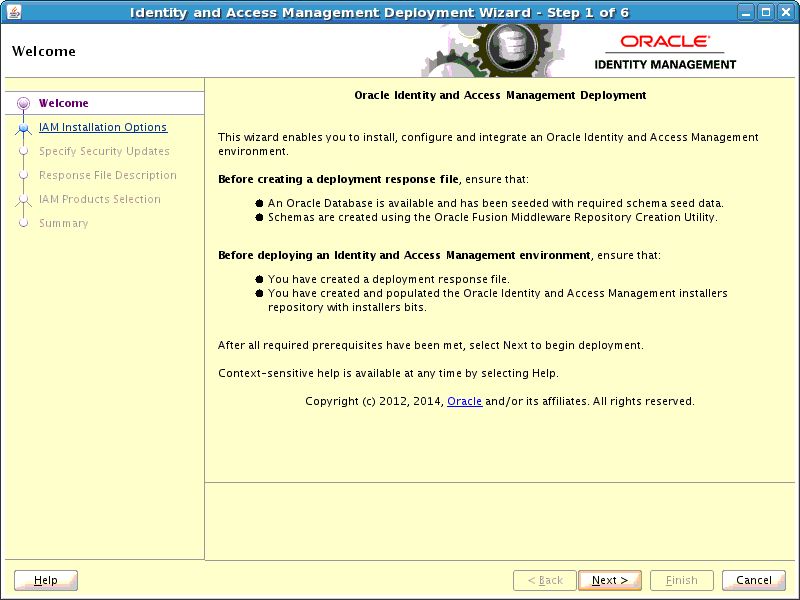
Start the Deployment Wizard by performing the steps in Section 4.2, "Starting the Identity and Access Management Deployment Wizard". After you complete those steps, the Welcome screen appears.
Use the Welcome screen to learn more about the wizard, including some prerequisites for using it. The Welcome screen provides a brief overview of the wizard and lists some requirements that must be met.
Click Next on the Welcome screen.
-
If you are presented with the Specify Inventory Directory screen, proceed as described in Step 2 in Section 2.8, "Installing the Oracle Identity and Access Management Lifecycle Tools." Click OK to continue. The Choose IAM Installation Options screen appears.
-
On the Choose IAM Installation Options screen, select Create a New Identity and Access Management Environment Deployment Response File if you are creating a response file for the first time. Click Next. The Specify Security Updates screen appears.
-
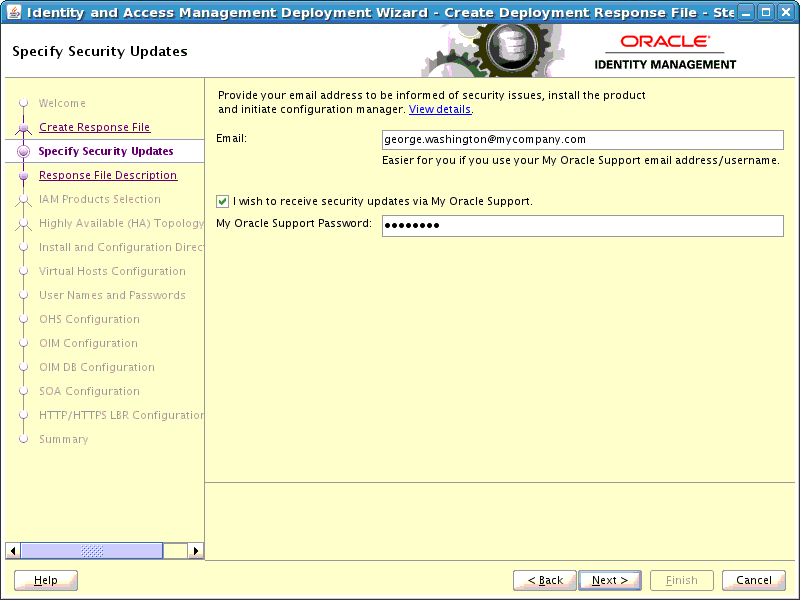
Use the Specify Security Updates screen to set up a notification preference for security-related updates and installation-related information from My Oracle Support. This information is optional.
-
Email: Specify your email address to have updates sent by this method.
-
I wish to receive security updates via My Oracle Support: Select this option to have updates sent directly to your My Oracle Support account. You must enter your My Oracle Support Password if you select this option.
Click Next. The Describe Response File screen appears.
-
-
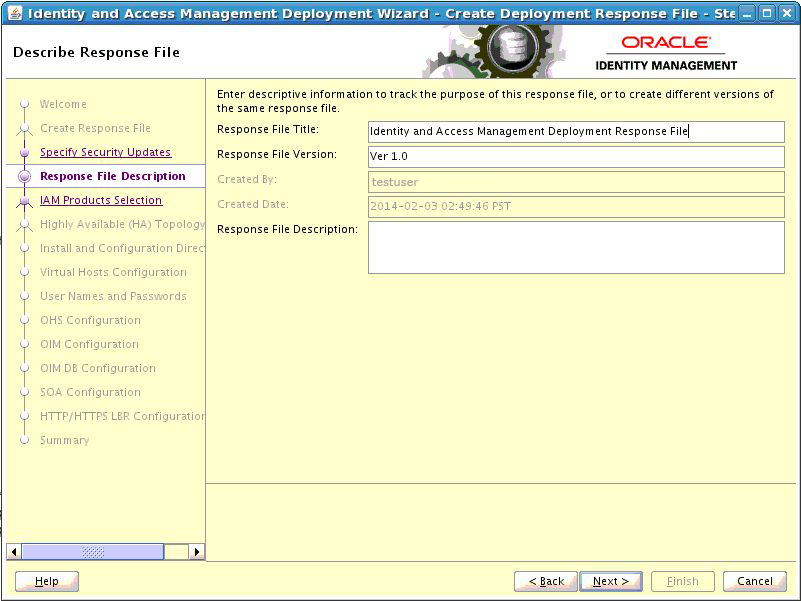
On the Describe Response File screen, specify descriptive information to identify the response file. The information entered on this screen is metadata information. This information can be used to uniquely identify a response file if multiple response files are created.
-
Response File Title: The Oracle Identity and Access Management Deployment Wizard provides the default title
Oracle Identity and Access Management Deployment Response File. You can change this. -
Response File Version: The Oracle Identity and Access Management Deployment Wizard provides a default value, which you can change. You can use this to keep track of different file versions.
-
Created By: Defaults to the operating system user who invoked the Deployment Wizard. Set when the response file is initially created and cannot be modified for the current response file.
-
Created Date: Defaults to the date that the response file was initially created. Set when the response file was initially created and cannot be modified for the current response file.
-
Response File Description: Provide a description of this response file. This is an optional field.
Click Next. The Select IAM Products screen appears.
-
-
On the Select IAM Products screen, select the type of deployment that you would like to perform. The following options are available:
-
Oracle Identity Manager (OIM) Only: Select this option to install and configure Oracle Identity Manager and SOA with Oracle HTTP Server.
-
Oracle Access Manager (OAM) Suite Only: Select this option to install and configure Oracle Access Management suite with Webgate and Oracle HTTP Server.
-
OIM-OAM Integrated and Oracle Unified Directory (OUD): Select this option to install and configure the following products:
-
Oracle Identity Manager
-
Oracle SOA
-
Oracle Access Management
-
Oracle Unified Directory
-
Oracle HTTP Server
-
Webgate
-
Note:
After you select IAM components that you want to deploy, do not click the Back button in the subsequent screens to modify your product selection. If you need to make any modification in the previous screens, you must cancel this wizard, and restart the Oracle Identity and Access Management Deployment Wizard.Click Next. The Select Topology screen appears.
-
-
On the Select Topology screen, select the Single Node option. In the Host Name field, specify the host where you want to deploy Identity and Access Management, as a fully-qualified host name.
Click Next. The Select Installation and Configuration Locations screen appears.
-
Use the Select Installation and Configuration Locations screen to supply the location of the various directories required for installation and configuration actions.
-
Lifecycle Management Store Location: This is a location for storing data to support lifecycle management, for example:
/u01/lcm(LCM_HOME)Log files are present under the logs directory in
LCM_HOME. On Linux, this is located atLCM_HOME/provisioning/logs. -
Software Repository Location: This is the location of the Deployment repository, for example:
/u01/lcm/Repository -
Software Installation Location: Specify the location where you want the Middleware Homes to be placed.
Ensure that this directory path is 45 characters or fewer in length. A longer pathname can cause errors during Oracle Identity and Access Management deployment. See Section 8.2.1, "Null Error Occurs When WebLogic Patches Are Applied."
-
Shared Configuration Location: Specify the location of shared configuration, for example:
/u01/oracle/config(SHARED_CONFIG_DIR). (In a single host environment, the shared configuration location is not actually shared.)
Click Next. The Set User Names and Passwords screen appears.
-
-
The Set User Names and Passwords screen shows the users that will be created during the deployment process. You can either set a common password for all of the user accounts listed, or set individual passwords as required for each of the accounts. It is also possible to change some of the default usernames that are created, if desired.
-
Enter Common IAM Password: Enter a common IAM password. This is the default password that will be used by all accounts unless overriden on an account by account basis.
-
Confirm Common IAM Password: Confirm the password.
-
If you want to override the default usernames and common password, then select the Modify the Username and Password for the user accounts option. Select Edit next to the account you wish to modify, and override the Username and Password as desired.
Click Next.
-
-
The Configure Oracle Unified Directory screen appears.
Note:
This screen will appear only if you selected the OIM-OAM Integrated and Oracle Unified Directory (OUD) option on the Select IAM Products screen.Use the Configure Oracle Unified Directory screen to select configuration options for Oracle Unified Directory.
Oracle Unified Directory Configuration Parameters
-
First OUD Host: This field is purely informational. The value is determined by the host entered in the Select Topology screen.
-
Port of First OUD Instance: Specify the non-SSL port number to be used by Oracle Unified Directory.
-
SSL Port of First OUD Instance: Specify the SSL port to be used for the first instance of Oracle Unified Directory.
-
Identity Store Realm DN: Specify the Distinguished Name of the Oracle Unified Directory realm, for example:
dc=mycompany,dc=com
Click Next. The Configure Oracle HTTP Server screen appears.
-
-
Use the Configure Oracle HTTP Server screen to change the installation ports used for Oracle HTTP Server (OHS).
Oracle HTTP Server Configuration Parameters
-
Host: This field is purely informational. The value is determined by the host entered in the Select Topology screen.
-
HTTP Port: Specify the non-SSL port number to be used for the Oracle HTTP Server.
-
SSL Port: Specify the SSL port number to be used for the Oracle HTTP Server.
-
OAM Admin Front End Port: This field is purely informational. This value points to the HTTP port value.
-
OIM Admin Front End Port: Specify the port to be used by the Oracle Identity Manager Administration Server.
-
Instance Name: This field is purely informational. It displays the instance name of the Oracle HTTP Server.
Click Next.
-
-
The Configure Oracle Identity Manager screen appears.
Note:
This screen will appear only if you selected one of the following options on the Select IAM Products screen:-
Oracle Identity Manager (OIM) Only
-
OIM-OAM Integrated and Oracle Unified Directory (OUD)
Use the Configure Oracle Identity Manager screen to modify the ports used by Oracle Identity Manager and, optionally, to configure an email server.
Oracle Identity Manager Configuration Parameters
-
OIM Host: This field is purely informational. The value is determined by the host entered in the Select Topology.
-
Admin Server Port: The port number that the IAMGovernanceDomain Admin Server will use, for example:
7101 -
Port: Specify the port to be used by the Oracle Identity Manager managed server, for example:
14000 -
Configure Email Server: Select this if you want to configure OIM to send Email Notifications. If you select Configure Email Server, you must provide the following details:
-
Outgoing Server Name: Specify the name of your outgoing email server, for example:
email.mycompany.com -
Outgoing Server Port: Specify the port that your outgoing email server uses, for example:
465 -
Outgoing Email Security: The security used by SMTP server. Select an option from the drop-down list. Possible values are
None,TLSandSSL. -
Username: If you require a username to authenticate with the email server, enter that username.
-
Password: Enter the password for the username.
-
Click Next.
-
-
The Configure Oracle Identity Manager Database screen appears.
Note:
This screen is displayed only if you selected one of the following options on the Select IAM Products screen:-
Oracle Identity Manager (OIM) Only
-
OIM-OAM Integrated and Oracle Unified Directory (OUD)
Use the Configure Oracle Identity Manager Database screen to enter information about the Database that contains the schemas for Oracle Identity Manager, SOA, and Oracle Platform Security Services.
Oracle Identity Manager (OIM) Database Configuration
-
Schema Prefix: Specify the prefix that you want to use for the OIM schema. The schema prefix should be the same as the one that you provided when running the RCU.
The default value of this field is
DEV. This value can be edited. -
Schema User Name: This field specifies the name of the schema user.
The value of this field depends on the Schema Prefix value. This field takes the value of Schema Prefix and adds an OIM suffix to it. For example,
DEV_OIM. -
Service Name: Specify the service name of the database service, for example:
oimdb.mycompany.com -
Schema Password: Specify the password you used when creating the Oracle Identity Manager and SOA schemas using the Oracle Identity and Access Management RCU.
-
Single Instance Database: Select if you are using a single Oracle Database.
-
Host Name: Specify the host name of the Oracle Database.
-
Listener Port: Specify the database listener port.
-
-
RAC Database: Select if you are using an Oracle RAC Database.
-
Scan Address: Enter the Grid Infrastructure SCAN Address, for example:
IAMDBSCAN.mycompany.com. -
Scan Port: Enter the port used by the Grid Infrastructure Listener, for example:
1521. -
ONS Scan Address: Defaults to the scan address.
-
ONS Port: Determine the ONS port by using the RAC
srvctlcommand on the Oracle Database server, as shown in the following example:srvctl config nodeapps -s ONS exists: Local port 6100, remote port 6200, EM port 2016
-
Click Next.
-
-
The Configure SOA screen appears.
Note:
This screen is displayed only if you selected one of the following options on the Select IAM Products screen:-
Oracle Identity Manager (OIM) Only
-
OIM-OAM Integrated and Oracle Unified Directory (OUD)
Use the Configure SOA screen to enter the ports to be used by the SOA Managed server.
SOA Configuration Parameters
-
SOA Host: This field is purely informational
-
Port: Specify the port number to be used by the SOA Server.
Click Next.
-
-
The Configure Oracle Access Manager screen appears.
Note:
This screen is displayed only if you selected one of the following options on the Select IAM Products screen:-
Oracle Access Manager (OAM) Suite Only
-
OIM-OAM Integrated and Oracle Unified Directory (OUD)
On the Configure Oracle Access Manager screen, enter the following information:
Oracle Access Management Suite Configuration Parameters
-
OAM Host: This field is purely informational. The value is determined by the host entered in the Select Topology screen.
-
Admin Server Port: The Port that the IAMAccessDomain Admin Server will use, for example:
7001 -
OAM Port: Specify the port number to be used by OAM Managed Server.
-
OAM Transfer Mode: This field is purely informational.
-
Cookie Domain: Specify the cookie domain. For example:
.mycompany.com
Click Next.
-
-
The Configure Oracle Access Manager Database screen appears.
Use the Configure Oracle Access Manager Database screen to enter information about the Database that contains the schemas for Oracle Access Manager.
Note:
This screen is displayed only if you selected one of the following options on the Select IAM Products screen:-
Oracle Access Manager (OAM) Suite Only
-
OIM-OAM Integrated and Oracle Unified Directory (OUD)
-
Schema Prefix: Specify the prefix that you want to use for the OAM schema. The schema prefix should be the same as the one that you provided when running the RCU.
The default value of this field is
DEV. This value can be edited. -
Schema User Name: This field specifies the name of the schema user.
The value of this field depends on the Schema Prefix value. This field takes the value of Schema Prefix and adds an OAM suffix to it. For example,
DEV_OAM. -
Service Name: Specify the service name of the database service, for example:
oamdb.mycompany.com -
Schema Password: Specify the password you used when creating the Oracle Access Manager schema using the Oracle Identity and Access Management RCU.
-
Single Instance Database: Select if you are using a single Oracle Database.
-
Host Name: Specify the host name of the Oracle Database.
-
Listener Port: Specify the database listener port.
-
-
RAC Database: Select if you are using an Oracle RAC Database.
-
Scan Address: Enter the Grid Infrastructure SCAN Address, for example:
IAMDBSCAN.mycompany.com. -
Scan Port: Enter the port used by the Grid Infrastructure Listener, for example:
1521. -
ONS Port: Determine the ONS port by using the RAC
srvctlcommand on the Oracle Database server, as shown in the following example:srvctl config nodeapps -s ONS exists: Local port 6100, remote port 6200, EM port 2016
-
Click Next.
-
-
The Summary screen appears.
Use the Summary screen to view a summary of your selections and enter additional information.
-
Provisioning Response File Name: Provide the name of the response file to be created. The default name of the deployment response file is
provisioning.rsp. You can change this value. -
Provisioning Summary: Provide the name of the deployment summary file to be created.
-
Directory: Specify the directory where you want this Deployment Response File to be saved.
Click Finish to exit the wizard.
Note:
The Identity and Access Management Deployment Wizard creates a deployment response file in the directory that you specify on the Summary screen. It also creates a folder named responsefilename_data, for example:provisioning_data. This folder contains thecwallet.ssofile, which has encryption and decryption information.If you move or copy the deployment response file to another location, you must also move or copy the responsefilename_datafolder containing thecwallet.ssofile to the same location. -
4.4 Creating a Deployment Response File for a Multi-Host Topology
Complete the steps described in this section to create a new Deployment Response File for a multi-host topology. This section includes the following topics:
-
Section 4.4.1, "Creating a Deployment Response File for Only Oracle Identity Manager with HA"
-
Section 4.4.2, "Creating a Deployment Response File for Only Access Management with HA"
4.4.1 Creating a Deployment Response File for Only Oracle Identity Manager with HA
This section outlines the tasks you must perform to set up only Oracle Identity Manager with High Availability (HA). It includes the following topics:
-
Section 4.4.1.8, "Select Installation and Configuration Locations"
-
Section 4.4.1.13, "Configure Oracle Identity Manager Database"
4.4.1.1 Welcome
Start the Deployment Wizard by performing the steps in Section 4.2, "Starting the Identity and Access Management Deployment Wizard". After you complete those steps, the Welcome screen appears
Use the Welcome screen to learn more about the wizard, including some prerequisites for using it.
The Welcome screen provides a brief overview of the wizard and lists some requirements that must be met.
Description of the illustration welcome.jpg
Click Next.
4.4.1.2 Specify Inventory Directory
If you are presented with the Specify Inventory Directory screen, proceed as described in Step 2 in Section 2.8, "Installing the Oracle Identity and Access Management Lifecycle Tools."
Click OK.
4.4.1.3 Choose IAM Installation Options
Select Create a New Identity and Access Management Environment Deployment Response File if you are creating a response file for the first time.
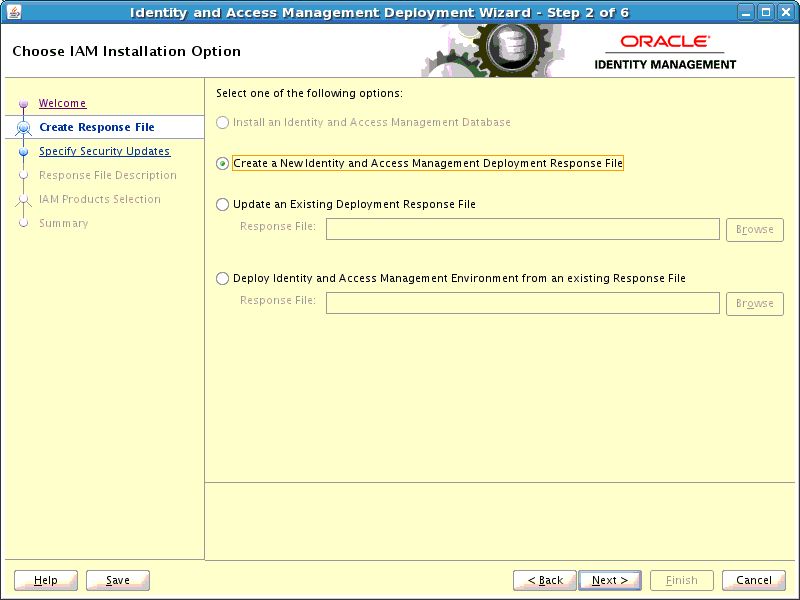
Description of the illustration inst_options.jpg
Click Next.
4.4.1.4 Specify Security Updates
Use the Specify Security Updates screen to set up a notification preference for security-related updates and installation-related information from My Oracle Support. This information is optional.
-
Email: Specify your email address to have updates sent by this method.
-
I wish to receive security updates via My Oracle Support: Select this option to have updates sent directly to your My Oracle Support account. You must enter your My Oracle Support Password if you select this option.
Description of the illustration specify_security.jpg
Click Next.
4.4.1.5 Describe Response File
Specify descriptive information to identify the response file. The information entered on this screen is metadata information. This information can be used to uniquely identify a response file if multiple response files are created.
-
Response File Title: The Oracle Identity and Access Management Deployment Wizard provides the default title
Oracle Identity and Access Management Deployment Response File. You can change this. -
Response File Version: The Oracle Identity and Access Management Deployment Wizard provides a default value, which you can change. You can use this to keep track of different file versions.
-
Created By: Defaults to the operating system user who invoked the Deployment Wizard. Set when the response file is initially created and cannot be modified for the current response file.
-
Created Date: Defaults to the date that the response file was initially created. Set when the response file was initially created and cannot be modified for the current response file.
-
Response File Description: Provide a description of this response file. This is an optional field.
Description of the illustration response_file.jpg
Click Next.
4.4.1.6 Select IAM Products
On the Select IAM Products screen, select the type of deployment that you would like to perform. The following options are available:
-
Oracle Identity Manager (OIM) Only: Select this option to install and configure Oracle Identity Manager and SOA with Oracle HTTP Server.
-
Oracle Access Manager (OAM) Suite Only: Select this option to install and configure Oracle Access Management suite with Webgate and Oracle HTTP Server.
-
OIM-OAM Integrated and Oracle Unified Directory (OUD): Select this option to install and configure the following products:
-
Oracle Identity Manager
-
Oracle SOA
-
Oracle Access Management
-
Oracle Unified Directory
-
Oracle HTTP Server
-
Webgate
-
Note:
If you want to deploy a multiple host topology using the OIM-OAM Integrated and Oracle Unified Directory (OUD) option, then do not use this guide. This guide covers only the following HA deployments:-
Oracle Identity Manager (OIM) Only
-
Oracle Access Manager (OAM) Suite Only
For performing an HA deployment using you using the OIM-OAM Integrated and Oracle Unified Directory (OUD) option, you must refer to Oracle Fusion Middleware Enterprise Deployment Guide for Oracle Identity and Access Management.
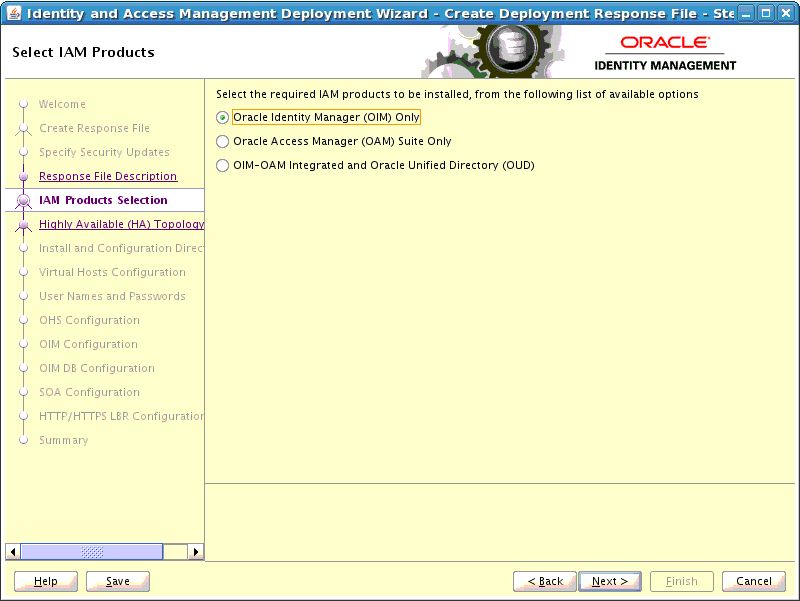
Description of the illustration suite_level_selection_oim.jpg
Note:
After you select IAM components that you want to deploy, do not click the Back button in the subsequent screens to modify your product selection. If you need to make any modification in the previous screens, you must cancel this wizard, and restart the Oracle Identity and Access Management Deployment Wizard.Click Next.
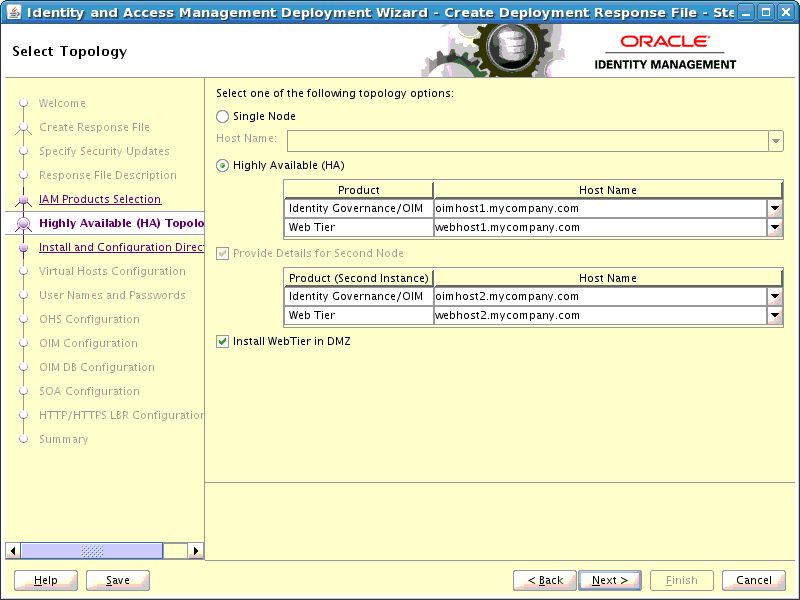
4.4.1.7 Select Topology
Use the Select Topology screen to select configuration options and provide information about hosts and products.
-
Single Node: Select this option to deploy a simple, single host topology.
-
Host Name: Specify the host where you want to deploy Identity and Access Management, as a fully-qualified host name.
-
-
Highly Available (HA): This option enables you to deploy a multiple host topology. Select this option to perform an HA deployment.
You must provide the following information:
Note:
All host names must be fully qualified.The products that are listed under the Product column depends on the option that you selected on the "Select IAM Products" screen.
-
Identity Governance /OIM: Specify the fully qualified host name which will be running Oracle Identity Manager. For example,
OIMHOST1.mycompany.com -
Web Tier: Specify the fully qualified host name which will be running the Oracle HTTP server and WebGate. For example,
WEBHOST1.mycompany.com
Ensure Provide Details for Second Node is selected, then enter the following information:
-
Identity Governance (OIM): Specify the fully qualified host name which will be running the second instance of Oracle Identity Manager. For example,
OIMHOST2.mycompany.com -
Web Tier: Specify the fully qualified host name which will be running the second instance of Oracle HTTP server and WebGate. For example,
WEBHOST2.mycompany.com
Note:
After you select the topology option, do not click the Back button in the subsequent screens to modify your topology options. If you need to make any modification in the previous screens, you must cancel this wizard, and restart the Oracle Identity and Access Management Deployment Wizard. -
Description of the illustration node_topology_oim.jpg
Click Next.
4.4.1.8 Select Installation and Configuration Locations
Use the Select Installation and Configuration Locations screen to supply the location of the various directories required for installation and configuration actions.
-
Lifecycle Management Store Location: This is a location for storing data to support lifecycle management, for example:
/u01/lcm(LCM_HOME)Log files are present under the logs directory in
LCM_HOME. On Linux, this is located atLCM_HOME/provisioning/logs.Note:
You should mount theLCM_HOMEdirectory on every host for the duration of Identity and Access Management Deployment. If you have done this, select the Mounted on Web hosts option.If, however, you cannot mount the directory for the duration of provisioning, you can still perform deployment, but you must also perform some manual steps. See Section 5.3, "Deploying Identity and Access Management Without a Common LCM_HOME" for details.
-
Mounted on Web hosts: If you have mounted your
LCM_HOMEdirectory on your web hosts then, select Mounted on Web hosts. -
Software Repository Location: This is the location of the Deployment repository, for example:
/u01/lcm/Repository -
Software Installation Location: This is the location on shared storage under where you want the Middleware Home to be placed, for example:
/u01/oracleEnsure that this directory path is 45 characters or fewer in length. A longer pathname can cause errors during Oracle Identity and Access Management deployment. See Section 8.2.1, "Null Error Occurs When WebLogic Patches Are Applied."
-
Shared Configuration Location: Specify the location of shared configuration, for example:
/u01/oracle/config(SHARED_CONFIG_DIR). -
Enable Local Configuration Location: Select this option to enable local configuration.
-
Local Configuration Location: This is the location on local storage where the OIM managed servers, SOA managed servers, and the OHS instances are stored, for example:
/u02/private/oracle/config.
Note:
The Identity and Access Management process requires that you use the same Deployment profile on all hosts in the deployment. Therefore, the locations you enter on this screen must be consistent across all hosts.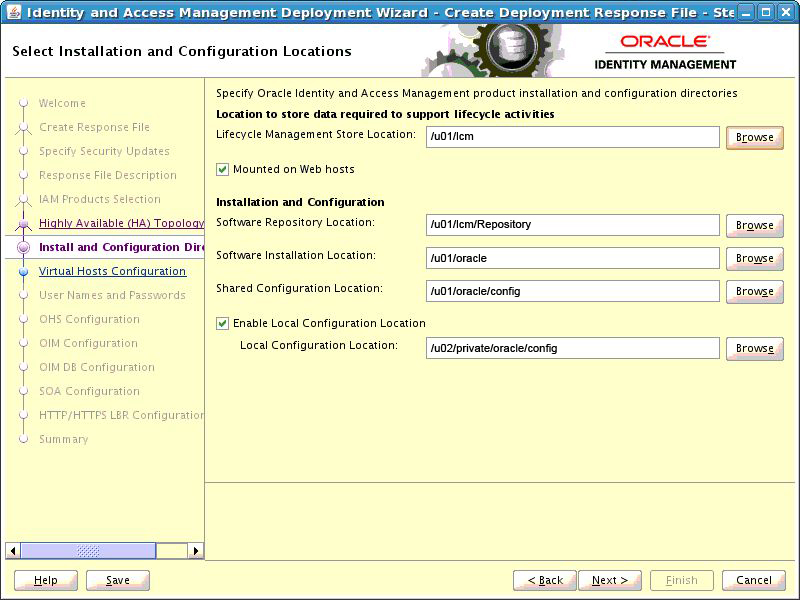
Description of the illustration install_location.jpg
Click Next.
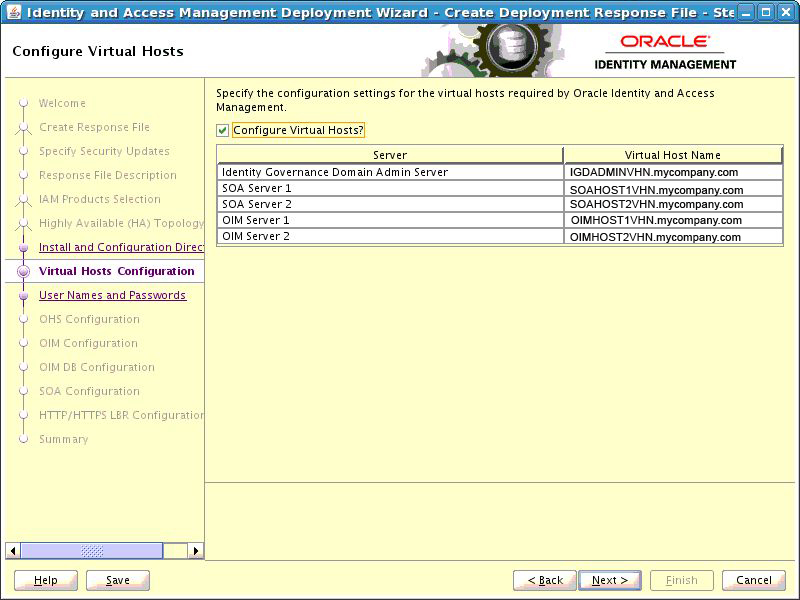
4.4.1.9 Configure Virtual Hosts (Optional)
If you want to configure virtual hosts, then on the Configure Virtual Hosts screen, select the Configure Virtual Hosts check box, and provide the virtual host names for the servers listed on the screen.
You can provide a virtual host for the Administration Server, SOA server and OIM server. These virtual servers should be resolved either through DNS or through the /etc/hosts file.
Enter the Virtual Host Name for each Server in the topology, for example:
-
Governance Domain Admin Server:
IGDADMINVHN.mycompany.com -
SOA Server:
SOAHOST1VHN.mycompany.com -
SOA Server 2:
SOAHOST2VHN.mycompany.com -
OIM Server:
OIMHOST1VHN.mycompany.com -
OIM Server 2:
OIMHOST2VHN.mycompany.com
Description of the illustration virtual_hosts_oim.jpg
Click Next.
4.4.1.10 Set User Names and Passwords
The Set User Names and Passwords screen shows the users that will be created during the deployment process. You can either set a common password for all of the user accounts listed, or set individual passwords as required for each of the accounts. It is also possible to change some of the default usernames that are created, if desired.
-
Enter Common IAM Password: Enter a common IAM password. This is the default password that will be used by all accounts unless overriden on an account by account basis.
-
Confirm Common IAM Password: Re-enter the password.
-
If you want to override the default usernames and common password, then select the Modify the Username and Password for the user accounts option. Select Edit next to the account you wish to modify, and override the Username and Password as desired.
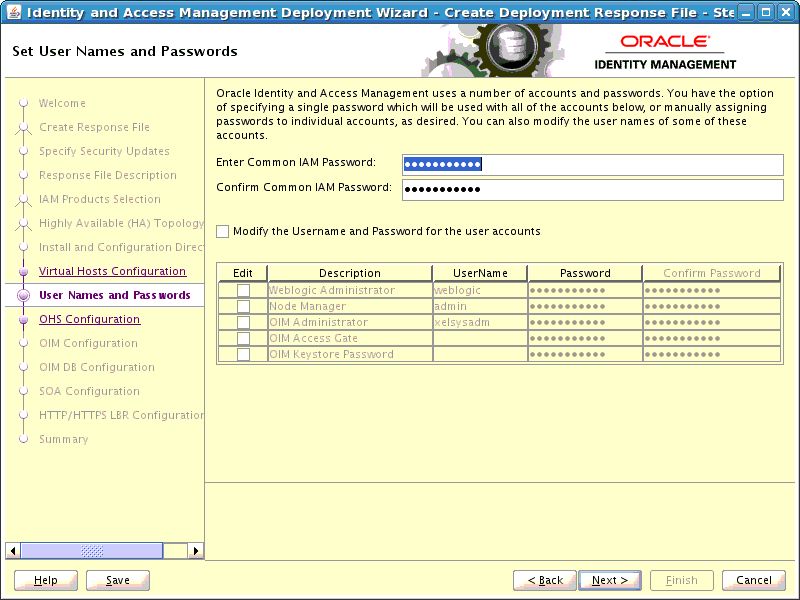
Description of the illustration common_passwords_oim.jpg
Click Next.
4.4.1.11 Configure Oracle HTTP Server
Use the Configure Oracle HTTP Server screen to change the installation ports used for Oracle HTTP Server (OHS).
-
Host: This field is purely informational. The value is determined by the host entered in the Select Topology screen.
-
HTTP Port: Specify the non-SSL port number to be used for the Oracle HTTP Server.
-
SSL Port: Specify the SSL port number to be used for the Oracle HTTP Server.
-
Instance Name: This field is purely informational. It displays the instance name of the Oracle HTTP Server.
-
Second OHS Host: This field is purely informational. The value is determined by the host entered in the Select Topology screen.
-
Second OHS Port: Specify the non-SSL port number to be used for the second instance of Oracle HTTP Server.
-
Second OHS SSL Port: Specify the SSL port number to be used for the second instance of Oracle HTTP Server.
-
Second Instance Name: This field is purely informational. It displays the second instance name of the Oracle HTTP Server.
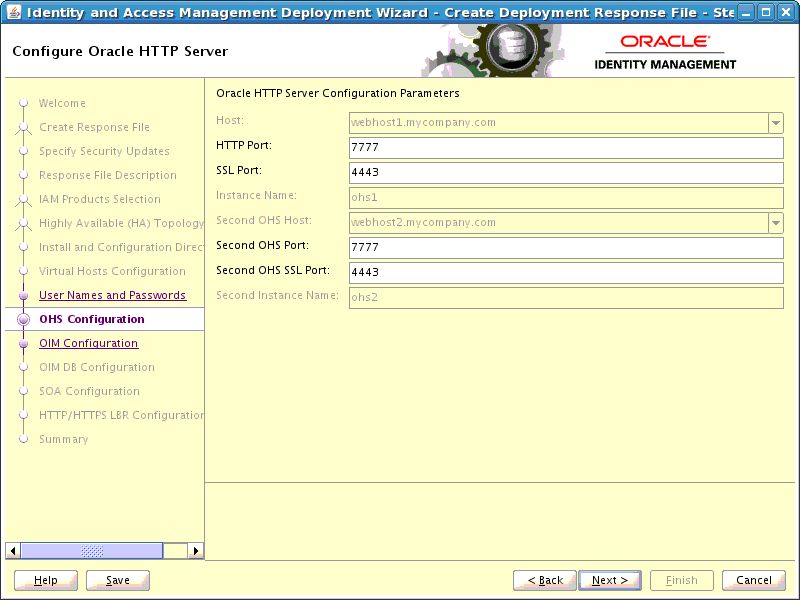
Description of the illustration ohs_config.jpg
Click Next to continue.
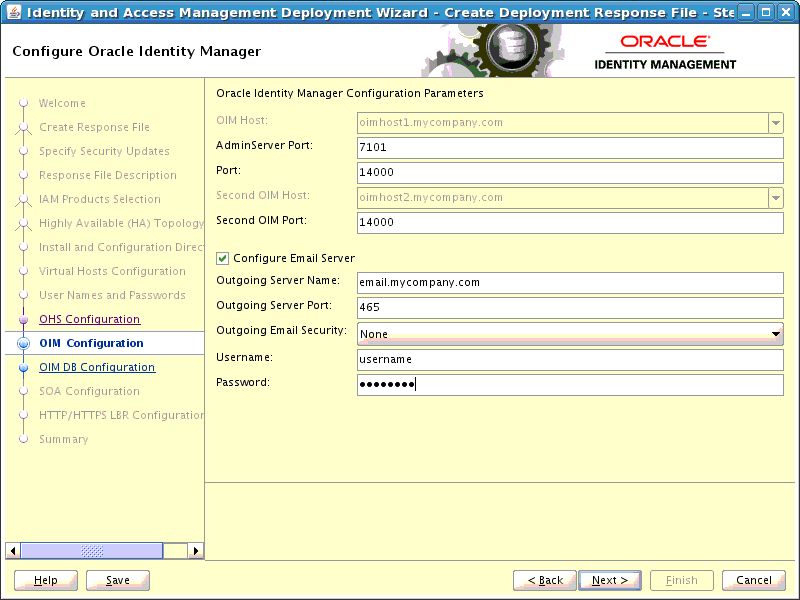
4.4.1.12 Configure Oracle Identity Manager
Use the Configure Oracle Identity Manager screen to modify the ports used by Oracle Identity Manager and, optionally, to configure an email server.
-
OIM Host: This field is purely informational. The value is determined by the host entered in the Select Topology.
-
Admin Server Port: The port number that the IAMGovernanceDomain Admin Server will use, for example:
7101 -
Port: Specify the port to be used by the first instance of Oracle Identity Manager managed server, for example:
14000 -
Second OIM Host: This field is purely informational. The value is determined by the host entered in the Select Topology.
-
Second OIM Port: Specify the port number to be used by the second instance of OIM Managed Server, for example:
14000 -
Configure Email Server: Select this if you want to configure OIM to send Email Notifications. If you select Configure Email Server, you must also select Configure Email Server and provide the following details:
-
Outgoing Server Name: Specify the name of your outgoing email server, for example:
email.mycompany.com -
Outgoing Server Port: Specify the port that your outgoing email server uses, for example:
465 -
Outgoing Email Security: The security used by SMTP server. Select an option from the drop-down list. Possible values are
None,TLSandSSL. -
Username: If you require a username to authenticate with the email server, enter that username.
-
Password: Enter the password for the username.
-
Description of the illustration oim_config.jpg
Click Next.
4.4.1.13 Configure Oracle Identity Manager Database
Use the Configure Oracle Identity Manager Database screen to enter information about the Database that contains the schemas for Oracle Identity Manager, SOA, and Oracle Platform Security Services.
-
Schema Prefix: Specify the prefix that you want to use for the OIM schema. The schema prefix should be the same as the one that you provided when running the RCU.
The default value of this field is
DEV. This value can be edited. -
Schema User Name: This field specifies the name of the schema user.
The value of this field depends on the Schema Prefix value. This field takes the value of Schema Prefix and adds an OIM suffix to it. For example,
DEV_OIM. -
Service Name: Specify the service name of the database service, for example:
oimdb.mycompany.com -
Schema Password: Specify the password you used when creating the Oracle Identity Manager and SOA schemas using the Oracle Identity and Access Management RCU.
-
Single Instance Database: Select if you are using a single Oracle Database.
-
Host Name: Specify the host name of the Oracle Database.
-
Listener Port: Specify the database listener port.
-
-
RAC Database: Select if you are using an Oracle RAC Database.
-
Scan Address: Enter the Grid Infrastructure SCAN Address, for example:
IAMDBSCAN.mycompany.com. -
Scan Port: Enter the port used by the Grid Infrastructure Listener, for example:
1521. -
ONS Scan Address: Defaults to the scan address.
-
ONS Port: Determine the ONS port by using the RAC
srvctlcommand on the Oracle Database server, as shown in the following example:srvctl config nodeapps -s ONS exists: Local port 6100, remote port 6200, EM port 2016
-
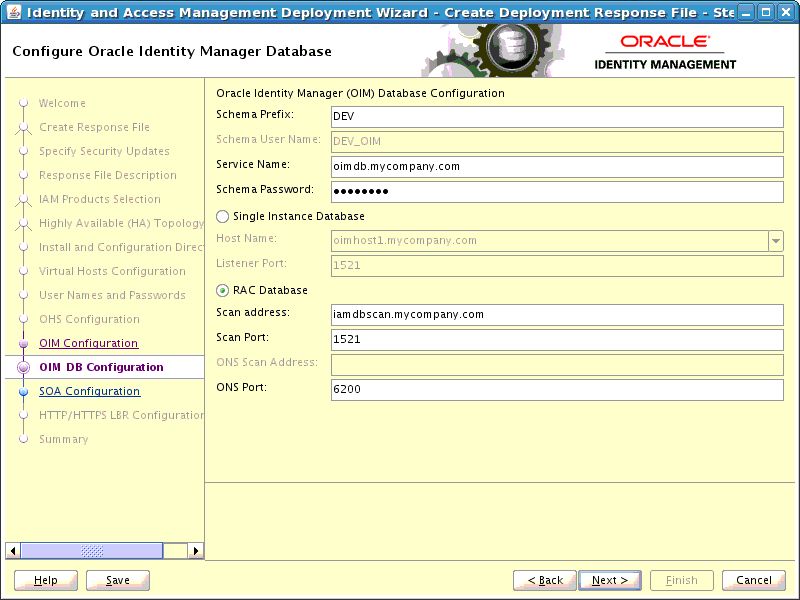
Description of the illustration oim_db.jpg
Click Next.
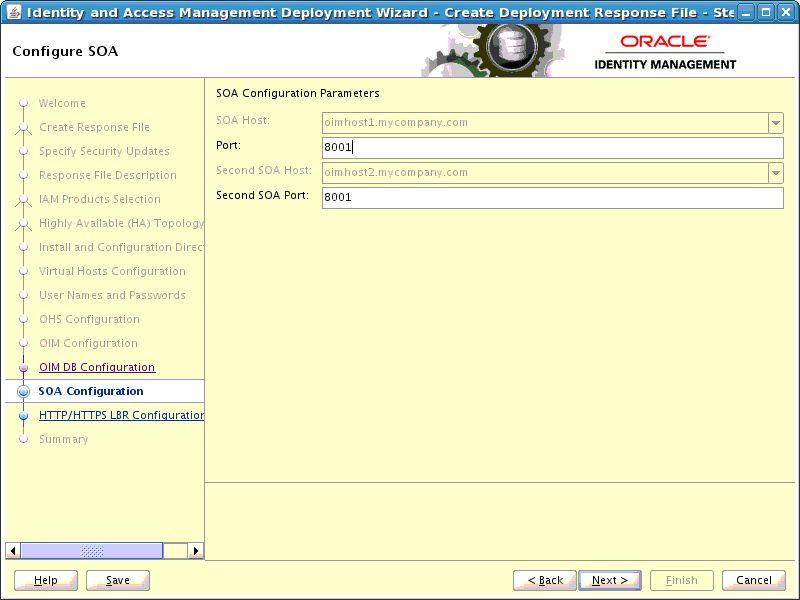
4.4.1.14 Configure SOA
Use the Configure SOA screen to enter the ports to be used by the SOA Managed server.
-
SOA Host: This field is purely informational
-
Port: Specify the port number to be used by the SOA Managed Server, for example:
8001. -
Second SOA Port: Specify the port number to be used by the second instance of SOA Managed Server, for example:
8001.
Description of the illustration soa_config.jpg
Click Next.
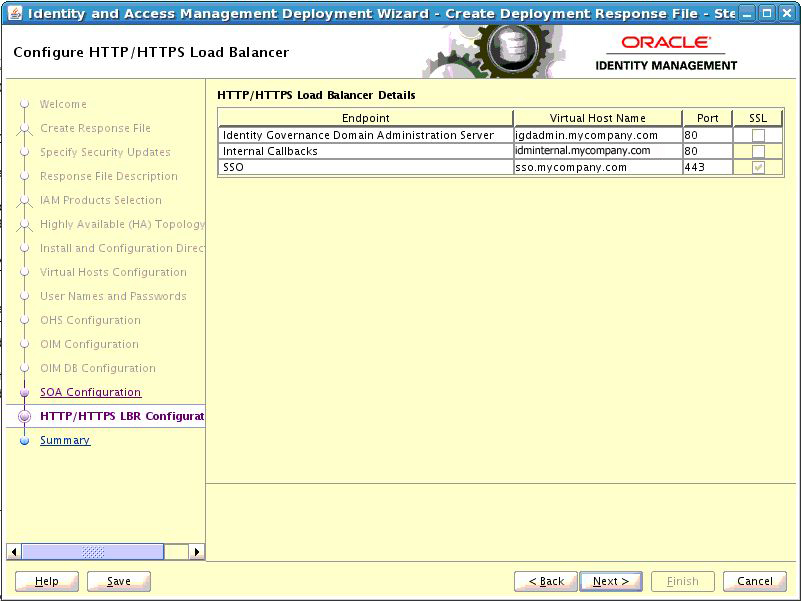
4.4.1.15 Configure HTTP/HTTPS Load Balancer
On the HTTP/HTTPS Load Balancer screen, enter details about your load balancer virtual hosts.
Under HTTP/HTTPS Load Balancer Details, enter the Virtual Host Name and Port for each Endpoint.
-
IAM Governence Domain Admin: The Load Balancer end point used to access the IAMGovernanceDomain Administration functions, for example:
igdadmin.mycompany.com, Port80, Not SSL -
Internal Callbacks: This is the internal call back virtual host and port, for example:
idminternal.mycompany.com, Port80 -
SSO: This is the main application entry point, for example:
sso.mycompany.comPort443
Description of the illustration load_balancer.jpg
Click Next.
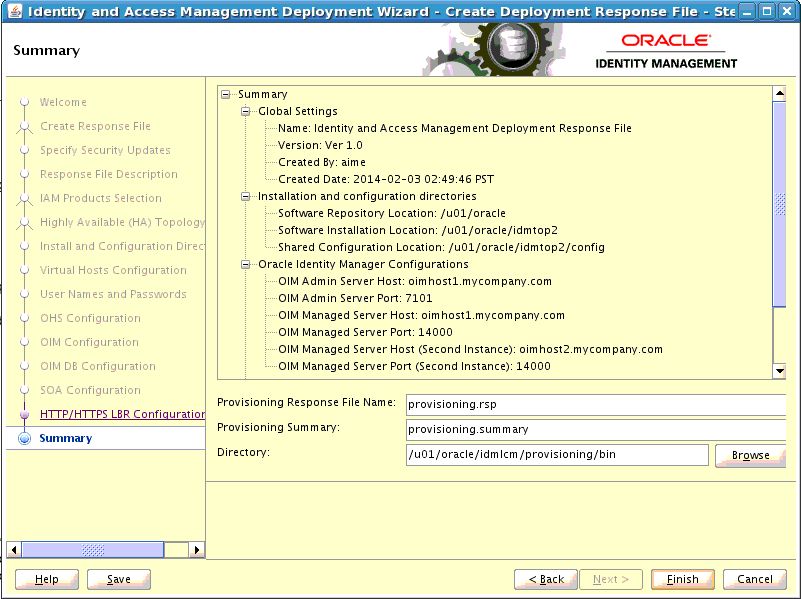
4.4.1.16 Summary
Use the Summary screen to view a summary of your selections and enter details about the response file.
-
Provisioning Response File Name: Provide the name of the response file to be created. The default name of the deployment response file is
provisioning.rsp. You can change this value. -
Provisioning Summary: Provide the name of the deployment summary file to be created.
-
Directory: Specify the directory where you want this Deployment Response File to be saved.
Description of the illustration summary_oim.jpg
Click Finish to generate the Deployment response file.
Note:
The Identity and Access Management Deployment Wizard creates a deployment response file in the directory that you specify on the Summary screen. It also creates a folder named responsefilename_data, for example: provisioning_data. This folder contains the cwallet.sso file, which has encryption and decryption information.If you move or copy the deployment response file to another location, you must also move or copy the responsefilename_data folder containing the cwallet.sso file to the same location.4.4.2 Creating a Deployment Response File for Only Access Management with HA
This section outlines the tasks you must perform to set up only Oracle Access Management with High Availability (HA). It includes the following topics:
-
Section 4.4.2.8, "Select Installation and Configuration Locations"
-
Section 4.4.2.13, "Configure Oracle Access Manager Database"
4.4.2.1 Welcome
Start the Deployment Wizard by performing the steps in Section 4.2, "Starting the Identity and Access Management Deployment Wizard". After you complete those steps, the Welcome screen appears
Use the Welcome screen to learn more about the wizard, including some prerequisites for using it.
The Welcome screen provides a brief overview of the wizard and lists some requirements that must be met.
Description of the illustration welcome.jpg
Click Next to continue.
4.4.2.2 Specify Inventory Directory
If you are presented with the Specify Inventory Directory screen, proceed as described in Step 2 in Section 2.8, "Installing the Oracle Identity and Access Management Lifecycle Tools."
Click OK to continue.
4.4.2.3 Choose IAM Installation Options
Select Create a New Identity and Access Management Environment Deployment Response File if you are creating a response file for the first time.
Description of the illustration inst_options.jpg
Click Next to continue.
4.4.2.4 Specify Security Updates
Use the Specify Security Updates screen to set up a notification preference for security-related updates and installation-related information from My Oracle Support. This information is optional.
-
Email: Specify your email address to have updates sent by this method.
-
I wish to receive security updates via My Oracle Support: Select this option to have updates sent directly to your My Oracle Support account. You must enter your My Oracle Support Password if you select this option.
Description of the illustration specify_security.jpg
Click Next to continue.
4.4.2.5 Describe Response File
Specify descriptive information to identify the response file. The information entered on this screen is metadata information. This information can be used to uniquely identify a response file if multiple response files are created.
-
Response File Title: The Oracle Identity and Access Management Deployment Wizard provides the default title
Oracle Identity and Access Management Deployment Response File. You can change this. -
Response File Version: The Oracle Identity and Access Management Deployment Wizard provides a default value, which you can change. You can use this to keep track of different file versions.
-
Created By: Defaults to the operating system user who invoked the Deployment Wizard. Set when the response file is initially created and cannot be modified for the current response file.
-
Created Date: Defaults to the date that the response file was initially created. Set when the response file was initially created and cannot be modified for the current response file.
-
Response File Description: Provide a description of this response file. This is an optional field.
Description of the illustration response_file.jpg
Click Next to continue.
4.4.2.6 Select IAM Products
On the Select IAM Products screen, select the type of deployment that you would like to perform. The following options are available:
-
Oracle Identity Manager (OIM) Only: Select this option to install and configure Oracle Identity Manager and SOA with Oracle HTTP Server.
-
Oracle Access Manager (OAM) Suite Only: Select this option to install and configure Oracle Access Management suite with Webgate and Oracle HTTP Server.
-
OIM-OAM Integrated and Oracle Unified Directory (OUD): Select this option to install and configure the following products:
-
Oracle Identity Manager
-
Oracle SOA
-
Oracle Access Management
-
Oracle Unified Directory
-
Oracle HTTP Server
-
Webgate
-
Note:
If you want to deploy a multiple host topology using the OIM-OAM Integrated and Oracle Unified Directory (OUD) option, then do not use this guide. This guide covers only the following HA deployments:-
Oracle Identity Manager (OIM) Only
-
Oracle Access Manager (OAM) Suite Only
For performing an HA deployment using you using the OIM-OAM Integrated and Oracle Unified Directory (OUD) option, you must refer to Oracle Fusion Middleware Enterprise Deployment Guide for Oracle Identity Management.
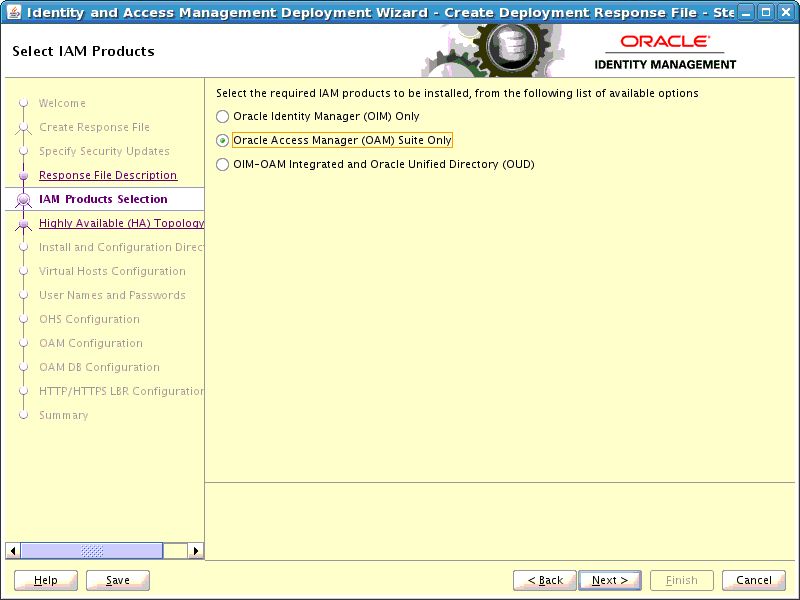
Description of the illustration suite_level_selection_oam.jpg
Note:
After you select IAM components that you want to deploy, do not click the Back button in the subsequent screens to modify your product selection. If you need to make any modification in the previous screens, you must cancel this wizard, and restart the Oracle Identity and Access Management Deployment Wizard.Click Next to continue.
4.4.2.7 Select Topology
Use the Select Topology screen to select configuration options and provide information about hosts and products.
-
Single Node: Select this option to deploy a simple, single host topology.
-
Host Name: Specify the host where you want to deploy Identity and Access Management, as a fully-qualified host name.
-
-
Highly Available (HA): This option enables you to deploy a multiple host topology. Select this option to perform an HA deployment.
You must provide the following information:
Note:
All host names must be fully qualified.The products that are listed under the Product column depends on the option that you selected on the "Select IAM Products" screen.
-
Access Management: Specify the fully qualified host name which will be running Oracle Access Management. For example,
OAMHOST1.mycompany.com -
Web Tier: Specify the fully qualified host name which will be running the Oracle HTTP server and WebGate. For example,
WEBHOST1.mycompany.com
Ensure Provide Details for Second Node is selected, then enter the following information:
-
Access Management: Specify the fully qualified host name which will be running the second instance of Oracle Access Management. For example,
OAMHOST2.mycompany.com -
Web Tier: Specify the fully qualified host name which will be running the second instance of Oracle HTTP server and WebGate. For example,
WEBHOST2.mycompany.com
Note:
After you select the topology option, do not click the Back button in the subsequent screens to modify your topology options. If you need to make any modification in the previous screens, you must cancel this wizard, and restart the Oracle Identity and Access Management Deployment Wizard. -

Description of the illustration node_topology_oam.jpg
Click Next to continue.
4.4.2.8 Select Installation and Configuration Locations
Use the Select Installation and Configuration Locations screen to supply the location of the various directories required for installation and configuration actions.
-
Lifecycle Management Store Location: This is a location for storing data to support lifecycle management, for example:
/u01/lcm(LCM_HOME)Log files are present under the logs directory in
LCM_HOME. On Linux, this is located atLCM_HOME/provisioning/logs.Note:
You should mount theLCM_HOMEdirectory on every host for the duration of Identity and Access Management Deployment. If you have done this, select the Mounted on Web hosts option.If, however, you cannot mount the directory for the duration of provisioning, you can still perform deployment, but you must also perform some manual steps. See Section 5.3, "Deploying Identity and Access Management Without a Common LCM_HOME" for details.
-
Mounted on Web hosts: If you have mounted your
LCM_HOMEdirectory on your web hosts then, select Mounted on Web hosts. -
Software Repository Location: This is the location of the Deployment repository, for example:
/u01/lcm/Repository -
Software Installation Location: This is the location on shared storage under where you want the Middleware Home to be placed, for example:
/u01/oracleEnsure that this directory path is 45 characters or fewer in length. A longer pathname can cause errors during Oracle Identity and Access Management deployment. See Section 8.2.1, "Null Error Occurs When WebLogic Patches Are Applied."
-
Shared Configuration Location: Specify the location of shared configuration, for example:
/u01/oracle/config(SHARED_CONFIG_DIR). -
Enable Local Configuration Location: Select this option to enable local configuration.
-
Local Configuration Location: This is the location on local storage where the OAM managed servers, and the OHS instances are stored, for example:
/u02/private/oracle/config.
Note:
The Identity and Access Management process requires that you use the same Deployment profile on all hosts in the deployment. Therefore, the locations you enter on this screen must be consistent across all hosts.Description of the illustration install_location.jpg
Click Next to continue.
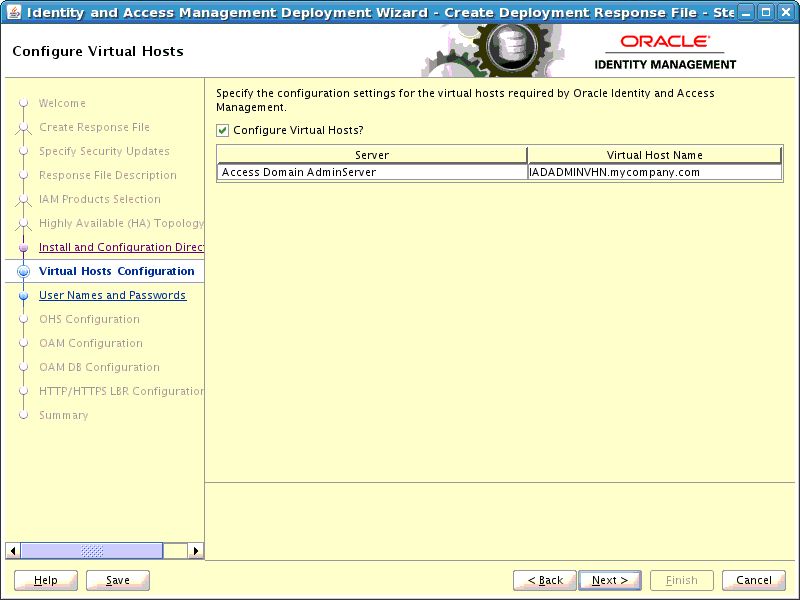
4.4.2.9 Configure Virtual Hosts
If you want to configure virtual hosts, then on the Configure Virtual Hosts screen, select the Configure Virtual Hosts check box, and provide the virtual host names for the servers listed on the screen.
For the Oracle Access Manager (OAM) Suite Only topology, you can provide a virtual host name for the Administration Server. The virtual host name should be resolved either through DNS or through the /etc/hosts file.
Enter the Virtual Host Name for each Server in the topology, for example:
Access Domain AdminServer: IADADMINVHN.mycompany.com
Description of the illustration virtual_hosts_oam.jpg
Click Next.
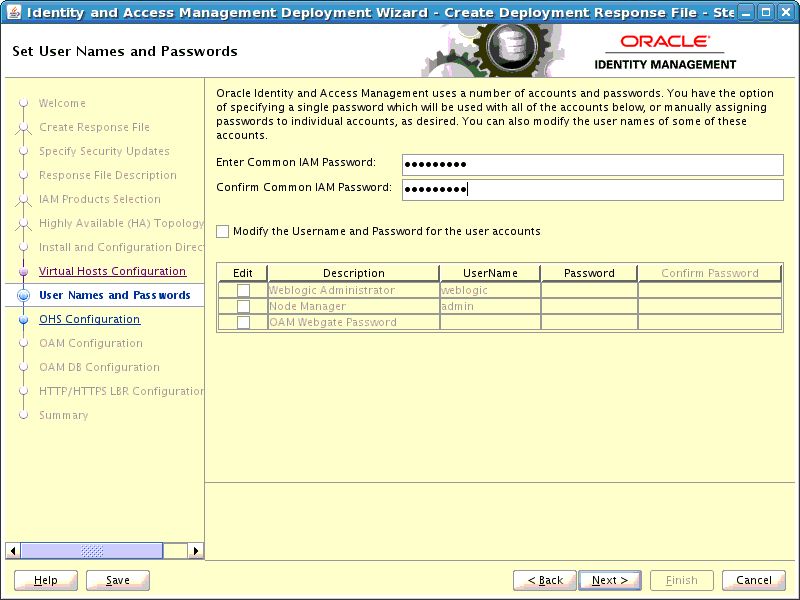
4.4.2.10 Set User Names and Passwords
The Set User Names and Passwords screen shows the users that will be created during the deployment process. You can either set a common password for all of the user accounts listed, or set individual passwords as required for each of the accounts. It is also possible to change some of the default usernames that are created, if desired.
-
Enter Common IAM Password: Enter a common IAM password. This is the default password that will be used by all accounts unless overriden on an account by account basis.
-
Confirm Common IAM Password: Re-enter the password.
-
If you want to override the default usernames and common password, then select the Modify the Username and Password for the user accounts option. Select Edit next to the account you wish to modify, and override the Username and Password as desired.
Description of the illustration common_passwords_oam.jpg
Click Next to continue.
4.4.2.11 Configure Oracle HTTP Server
Use the Configure Oracle HTTP Server screen to change the installation ports used for Oracle HTTP Server (OHS).
Oracle HTTP Server Configuration Parameters
-
Host: This field is purely informational. The value is determined by the host entered in the Select Topology screen.
-
HTTP Port: Specify the non-SSL port number to be used for the Oracle HTTP Server.
-
SSL Port: Specify the SSL port number to be used for the Oracle HTTP Server.
-
Instance Name: This field is purely informational. It displays the instance name of the Oracle HTTP Server.
-
Second OHS Host: This field is purely informational. The value is determined by the host entered in the Select Topology screen.
-
Second OHS Port: Specify the non-SSL port number to be used for the second instance of Oracle HTTP Server.
-
Second OHS SSL Port: Specify the SSL port number to be used for the second instance of Oracle HTTP Server.
-
Second Instance Name: This field is purely informational. It displays the second instance name of the Oracle HTTP Server.
Description of the illustration ohs_config.jpg
Click Next to continue.
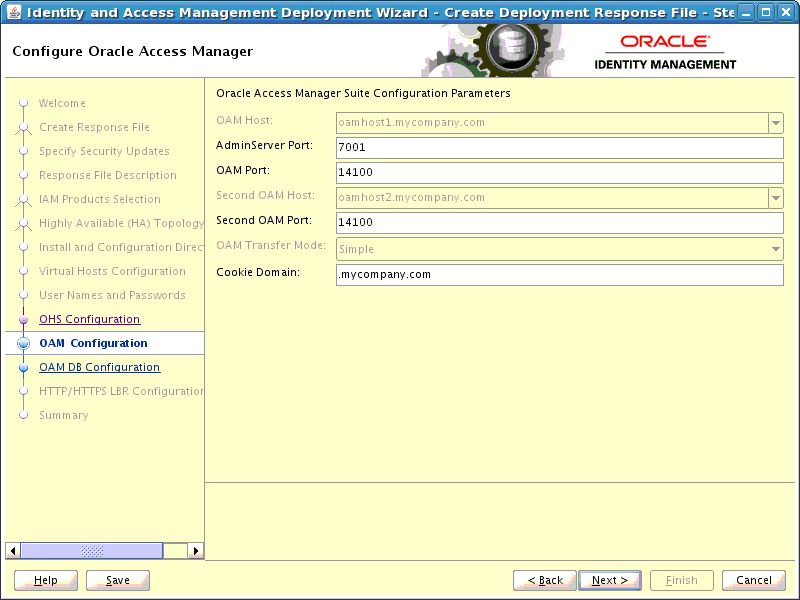
4.4.2.12 Configure Oracle Access Manager
Use the Configure Oracle Access Manager screen to select installation options for Oracle Access Management suite.
-
OAM Host: This field is purely informational. The value is determined by the host entered in the Select Topology.
-
Admin Server Port: The Port that the IAMAccessDomain Admin Server will use, for example:
7001 -
OAM Port: Specify the port number to be used by the first instance of OAM Managed Server, for example:
14100 -
Second OAM Host: This field is purely informational. The value is determined by the host entered in the Select Topology.
-
Second OAM Port: Specify the port number to be used by the second instance of OAM Managed Server, for example:
14100 -
OAM Transfer Mode: This field is purely informational.
-
Cookie Domain: Specify the cookie domain. For example:
.mycompany.com
Description of the illustration oam_config.jpg
Click Next.
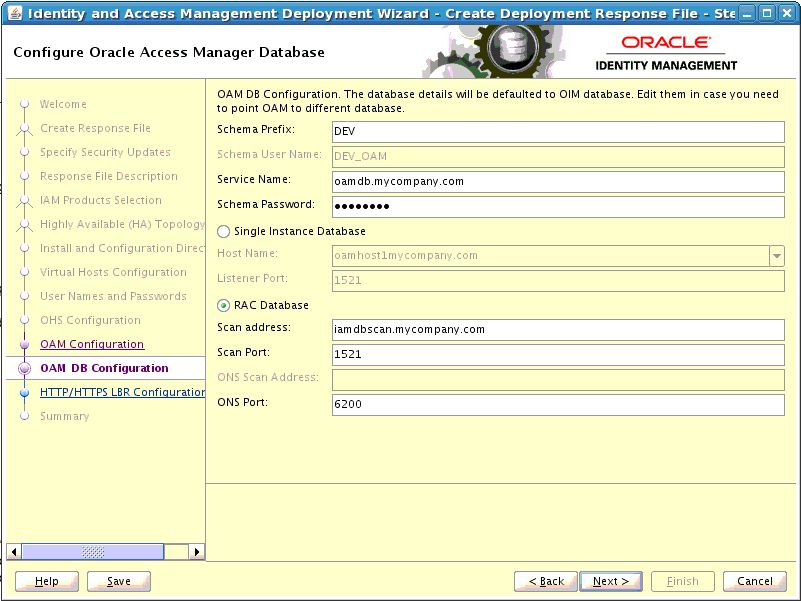
4.4.2.13 Configure Oracle Access Manager Database
Use the Configure Oracle Access Manager Database screen to enter information about the Database that contains the schemas for Oracle Access Manager.
-
Schema Prefix: Specify the prefix that you want to use for the OAM schema. The schema prefix should be the same as the one that you provided when running the RCU.
The default value of this field is
DEV. This value can be edited. -
Schema User Name: This field specifies the name of the schema user.
The value of this field depends on the Schema Prefix value. This field takes the value of Schema Prefix and adds an OAM suffix to it. For example,
DEV_OAM. -
Service Name: Specify the service name of the database service, for example:
oamdb.mycompany.com -
Schema Password: Specify the password you used when creating the Oracle Access Manager schema using the Oracle Identity and Access Management RCU.
-
Single DB: Select if you are using a single Oracle Database.
-
Host VIP Name: Specify the host name of the Oracle Database.
-
Listener Port: Specify the database listener port.
-
-
RAC DB: Select if you are using an Oracle RAC Database.
-
Scan Address: Enter the Grid Infrastructure SCAN Address, for example:
IAMDBSCAN.mycompany.com. -
Scan Port: Enter the port used by the Grid Infrastructure Listener, for example:
1521. -
ONS Scan Address: Defaults to the scan address.
-
ONS Port: Determine the ONS port by using the RAC
srvctlcommand on the Oracle Database server, as shown in the following example:srvctl config nodeapps -s ONS exists: Local port 6100, remote port 6200, EM port 2016
-
Description of the illustration oam_db.jpg
Click Next to continue.
4.4.2.14 Configure HTTP/HTTPS Load Balancer
On the HTTP/HTTPS Load Balancer screen, enter details about your load balancer virtual hosts.
Under HTTP/HTTPS Load Balancer Details, enter the Virtual Host Name and Port for each Endpoint.
-
Access Domain Administration Server: The Load Balancer end point used to access the IAMAccessDomain Administration functions, for example:
iadadmin.mycompany.com,Port80, Not SSL -
SSO: This is the main application entry point, for example:
sso.mycompany.com, Port443
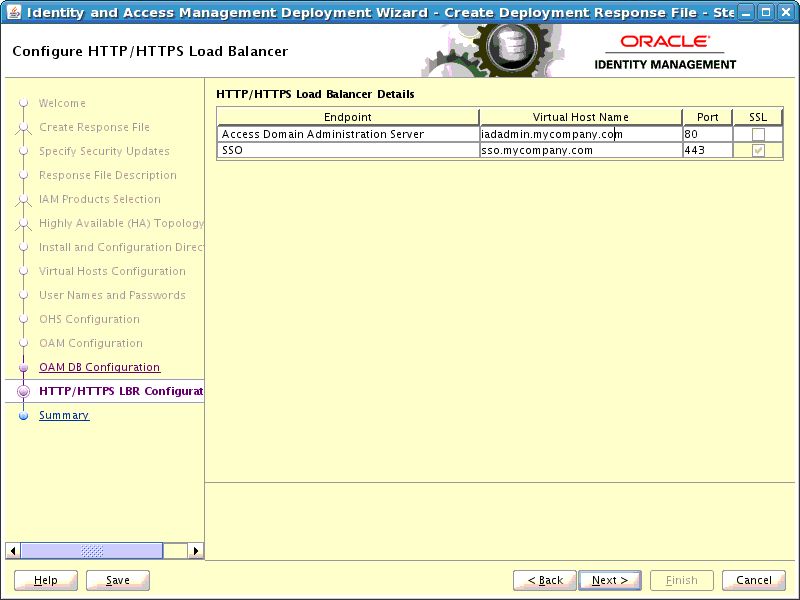
Description of the illustration load_balancer_oam.jpg
Click Next.
4.4.2.15 Summary
Use the Summary screen to view a summary of your selections and enter details about the response file.
-
Provisioning Response File Name: Provide the name of the response file to be created. The default name of the deployment response file is
provisioning.rsp. You can change this value. -
Provisioning Summary: Provide the name of the deployment summary file to be created.
-
Directory: Specify the directory where you want this Deployment Response File to be saved.
Click Finish to exit the wizard.
Note:
The Identity and Access Management Deployment Wizard creates a deployment response file in the directory that you specify on the Summary screen. It also creates a folder named responsefilename_data, for example: provisioning_data. This folder contains the cwallet.sso file, which has encryption and decryption information.If you move or copy the deployment response file to another location, you must also move or copy the responsefilename_data folder containing the cwallet.sso file to the same location.4.5 Copying Required Artifacts to DMZ Hosts
Complete this task only if you have installed web tier in the DMZ.
The process described in this chapter creates a deployment response file in the directory you specified on the Summary screen. When a deployment response file is created (for example, provisioning.rsp), an additional folder named responsefilename_data is created. For example, provisioning_data. This folder contains cwallet.sso, which has encryption and decryption information.
The deployment response file and the folder containing cwallet.sso must be available to each host in the topology. If you have a deployment directory shared across all hosts in the topology, then the required files are automatically available. If, however, you have not shared your deployment directory, you must manually copy the deployment response file (provisioning.rsp) and the folder containing cwallet.sso (provisioning_data) to the same location on the DMZ hosts, WEBHOST1, and WEBHOST2.
Note:
If the deployment response file and the folder containing cwallet.sso are not copied to the DMZ hosts, the deployment process may fail in the preverify phase.