2 Preparing for Oracle Identity and Access Management Deployment
This chapter describes the prerequisites for deploying Oracle Identity and Access Management.
Before deploying Oracle Identity and Access Management using the Oracle Identity and Access Management Deployment Wizard, you must complete all prerequisites described in this section.
This chapter contains the following sections:
-
Section 2.1, "Hardware Requirements for Oracle Identity and Access Management Deployment"
-
Section 2.2, "Software Requirements for Oracle Identity and Access Management Deployment"
-
Section 2.5, "Preparing the Database for Repository Creation Utility (RCU)"
-
Section 2.7, "About the Lifecycle Management and Deployment Repository"
-
Section 2.8, "Installing the Oracle Identity and Access Management Lifecycle Tools"
2.1 Hardware Requirements for Oracle Identity and Access Management Deployment
You can deploy either a distributed or a consolidated topology. The consolidated topology uses a small number of powerful servers, which makes the deployment simpler. It is, however, not mandatory to use such powerful servers. The distributed topology uses a larger number of smaller servers.
For detailed hardware requirements, see Oracle Fusion Middleware System Requirements and Specifications.
Note:
Oracle recommends configuring all nodes in the topology identically with respect to operating system levels, patch levels, user accounts, and user groups.2.2 Software Requirements for Oracle Identity and Access Management Deployment
This section describes the software required for an Oracle Identity and Access Management deployment.
This section contains the following topics:
2.2.1 Software Versions
Table 2-1, "Software Versions Used" lists the Oracle software you need to obtain before starting the procedures in this guide.
Table 2-1 Software Versions Used
| Short Name | Product | Version |
|---|---|---|
|
OHS11G |
Oracle HTTP Server |
11.1.1.7.0 |
|
JRockit |
Oracle JRockit |
jrockit-jdk1.6.0_29-R28.2.0-4.0.1 or newer |
|
WLS |
Oracle WebLogic Server |
10.3.6.0 |
|
IAM |
Oracle Identity and Access Management |
11.1.2.2.0 |
|
SOA |
Oracle SOA Suite |
11.1.1.7.0 |
|
WebGate |
WebGate 11g |
11.1.2.2.0 |
|
RCU |
Repository Creation Utility |
11.1.2.2.0 |
2.2.2 About Obtaining Software
You must download the Identity and Access Management deployment repository, not the individual components. The Identity and Access Management deployment repository contains all the installers required to deploy a new Oracle Identity and Access Management environment.
This repository is referred to as REPOS_HOME in this guide.
For complete information about downloading Oracle Fusion Middleware software, see the Oracle Fusion Middleware Download, Installation, and Configuration Readme for this release, at: http://docs.oracle.com/cd/E23104_01/download_readme.htm
2.2.3 Summary of Oracle Homes
Oracle binaries are installed into an Oracle Fusion Middleware home. Individual products are installed into Oracle homes within the Middleware home. Table 2-2 is a summary of the Middleware homes and Oracle homes used in this document.
The installation and configuration of Oracle Identity Management is outside the scope of this Guide. See Oracle Fusion Middleware High Availability Guide for more information.
| Home Name | Home Description | Products Installed |
|---|---|---|
|
|
Consists of the Oracle WebLogic Server home and, optionally, one or more Oracle homes. In the OIM-Only deployment scenario, In the OAM-Only deployment scenario, Note that each |
|
|
|
This is the root directory in which Oracle WebLogic Server is installed. The Note that |
Oracle WebLogic Server |
|
|
Each Identity and Access Management In the OIM-Only deployment scenario, an Oracle Home for Oracle Identity Manager is included. The binary and library files required for Oracle Identity Manager are located in |
Access Manager Oracle Identity Management |
|
|
Each Identity and Access Management In the OAM-Only deployment scenario, an Oracle Home for Oracle Access Management Suite is included. The binary and library files required for Oracle Access Management are located in |
Access Manager Oracle Identity Management |
|
|
Contains the binary and library files required for Oracle HTTP Server. It is located in |
Oracle WebGate |
|
|
Contains the binary and library files required for the Oracle SOA Suite. It is located in |
Oracle SOA Suite |
|
|
Contains the generic Oracle home files. This Oracle home is created automatically by any product installation and is located in |
Generic commands |
|
|
A subdirectory of the Oracle Middleware Home directory where the Identity and Access Management Lifecycle Tools will be installed |
Identity and Access Management Lifecycle Tools |
2.2.4 Applying Patches and Workarounds
There might be cases where additional patches are required to address specific known issues. See the section "Downloading and Applying Required Patches" in the Oracle Fusion Middleware Identity Management Release Notes for a list of patches to apply. You must apply the patches to ensure that your software operates as expected.
Before starting the deployment, download any patches that are listed in the Release Notes, plus any other patches that are appropriate for your environment. The deployment tool can apply these patches automatically at the time it runs.
Patches are available for download from http://support.oracle.com. You can find instructions for deploying each patch in the enclosed README.html file. Download the patches and unzip each patch to the directory appropriate for the product, as listed in Table 2-3. If the directory does not exist, create it.
After unzipping the patch, ensure that the Patch Directory (as listed in Table 2-3) contains a directory which is a number. That directory contains directories and files similar to:
-
etc
-
files
-
README.txt
This is the directory layout for most patches. In some cases, such as bundle patches, the layout might be similar to:
bundle_patch_no/product/product_patch_no
In this case ensure that it is product_patch_no which appears in the Patch Directory not bundle_patch_no.
If a bundle patch contains fixes for multiple products ensure that the individual patches appear in the correct Patch Directory as listed below.
Table 2-3 Product Patch Directories
| Product | Patch Directory |
|---|---|
|
Oracle Common |
|
|
Directory |
|
|
Oracle Access Management Access Manager |
|
|
OHS |
|
|
WebGate |
|
|
Oracle Identity Manager |
|
|
SOA |
|
|
WebLogic Server |
|
2.2.4.1 Mandatory Patches Required for Installing Oracle Identity Manager
There are some mandatory patches that must be applied for installing and configuring Oracle Identity Manager. For more information about these patches, see the section "Mandatory Patches Required for Installing Oracle Identity Manager" in the Oracle Fusion Middleware Identity Management Release Notes.
In addition, Oracle Identity Manager also requires specific database patches. For more information, see the section "Patch Requirements" in the Oracle Fusion Middleware Identity Management Release Notes.
2.3 Verifying Java
Ensure that your Deployment Repository contains Java. It should reside in a directory called jdk6.
2.4 Installing the Database
For information on Database requirements, see Section 3.4, "Overview of Database Preparation".
2.5 Preparing the Database for Repository Creation Utility (RCU)
To prepare the Oracle Database for RCU, follow the instructions in the section "RCU Requirements for Oracle Databases" in the Oracle Fusion Middleware System Requirements and Specifications.
2.6 Running Oracle Identity and Access Management Repository Creation Utility (Oracle Identity and Access Management RCU)
Use the Oracle Identity and Access Management version of RCU, which is in the following directory:
REPOS_HOME/installers/fmw_rcu/linux/rcuHome.zip
where REPOS_HOME is the Oracle Identity and Access Management deployment repository that contains all the installers required to deploy a new Oracle Identity and Access Management environment.
Extract the contents of the rcuHome.zip file to a directory of your choice; this directory is referred to as the RCU_HOME directory.
Start the RCU from the bin directory inside the RCU_HOME directory.
On UNIX:
cd RCU_HOME/bin
./rcu
You must create and load the appropriate Oracle Identity and Access Management schemas in the database using RCU, before deploying the following Oracle Identity and Access Management components:
-
Oracle Identity Manager
-
Oracle Access Management
Select the appropriate components from the following table for the topology you are using:
| Product | RCU Option | Comments |
|---|---|---|
| Oracle Platform Security Services for IAMAccessDomain | AS Common Schemas–Oracle Platform Security Service | Required to hold policy store information. |
| Oracle Access Management Access Manager | Oracle Access Manager | Audit Services will also be selected. |
| Oracle Adaptive Access Manager | Oracle Adaptive Access Manager | This is optional. |
| Oracle Platform Security Services for IAMGovernanceDomain | AS Common Schemas–Oracle Platform Security Service | Required to hold policy store information. |
| Oracle Identity Manager | Identity Management–Oracle Identity Manager | Metadata Services, SOA infrastructure, and User Messaging will also be selected. |
You must select a single password for all the schema while running the RCU.
For more information about RCU, see Oracle Fusion Middleware Repository Creation Utility User's Guide.
-
Oracle Identity and Access Management deployment supports separate OIM and OAM databases. If databases are separate for OIM and OAM, then you can provide separate schema prefix and password for OIM and OAM schemas.
-
If you are using separate databases, then the Oracle Platform Security Services (OPSS) schema that is used for the policy store, depends on the option that you select on the Select IAM Products screen of the Oracle Identity and Access Management Deployment Wizard. This screen appears when you create the deployment response file. For more information, see Section 4.4.1.6, "Select IAM Products".
-
Oracle Identity Manager (OIM) Only: If you select this option, then the Oracle Platform Security Services (OPSS) schema in the OIM database is used.
-
Oracle Access Manager (OAM) Suite Only: If you select this option, then the Oracle Platform Security Services (OPSS) schema in the OAM database is used.
-
OIM-OAM Integrated and Oracle Unified Directory (OUD): If you select this option, then you must create two Oracle Platform Security Services (OPSS) schemas; one for OIM in the OIM database, and one for OAM in the OAM database.
Note:
The OIM-OAM Integrated and Oracle Unified Directory (OUD) option is not documented in this guide. For information about this deployment option, refer to Oracle Fusion Middleware Enterprise Deployment Guide for Oracle Identity and Access Management.
-
-
Be sure to remember the schema prefix, host, port, servicename, username, and password that you provide when creating the schemas using RCU. You will need to provide this information when you create the deployment response in Chapter 4, "Creating a Deployment Response File".
-
You must create different schema prefix, host, port, and servicename for OIM, and OAM schemas. However, the schema prefix, host, port, servicename, and password should be the same for OIM and all OIM dependent components. Similarly, the schema prefix, host, port, servicename, and password should be the same for OAM and all OAM dependent components.
2.7 About the Lifecycle Management and Deployment Repository
The lifecycle repository contains the Lifecycle Management Tools, such as the deployment and patching tools. It also contains a software repository which includes the software to be installed as well as any patches to be applied.
Note:
It is important that minimum privileges are assigned to UNIX users on the Deployment Repository. In order to do this, navigate to the extracted IAM Deployment Repository, and run the following command. This updates the permissions on the content of the repository.chmod ¿R 755 *
You need a separate share to hold the Lifecycle Management Tools and Deployment Repository. This share is only required during deployment and any subsequent patching. After deployment is complete, you can unmount this share from each host.
Note:
If you have patches that you want to deploy using the patch management tool, you must remount this share while you are applying the patches.Ideally, you should mount this share on ALL hosts for the duration of deployment. Doing so will make the deployment process simpler, as you will not need to manually copy any files, such as the keystores required by the Web Tier.
If your organization prohibits sharing the LCM_HOME to the webtier hosts (even for the duration of deployment), you must create a local copy of the contents of this share on the DMZ hosts and make manual file copies during the deployment phases. For more information, refer to Section 5.3, "Deploying Identity and Access Management Without a Common LCM_HOME".
Figure 2-1 Deployment Repository Structure
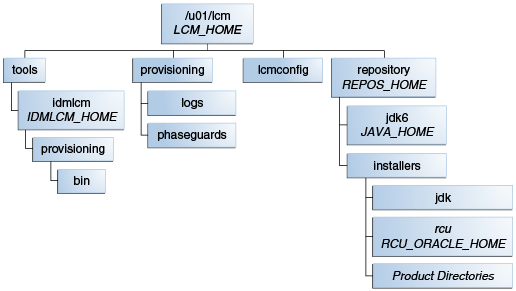
Description of "Figure 2-1 Deployment Repository Structure"
2.7.1 More Information About Shared and Local Storage
For information about the shared storage structure, refer to the "Shared Storage" topic in the Oracle Fusion Middleware Enterprise Deployment Guide for Oracle Identity and Access Management.
For information about the local storage structure, refer to the "Private Storage" topic in the Oracle Fusion Middleware Enterprise Deployment Guide for Oracle Identity and Access Management.
Note:
Based on your topology selection, some components mentioned in the above sections of Oracle Fusion Middleware Enterprise Deployment Guide for Oracle Identity and Access Management may not be applicable to your deployment scenario.2.8 Installing the Oracle Identity and Access Management Lifecycle Tools
The Oracle Identity and Access Management Deployment Wizard is a component of the Oracle Identity and Access Management Lifecycle Tools, which also includes the Oracle Identity and Access Management Patching Framework. You must install the tools by running an installer, which is located in the Oracle Identity and Access Management deployment repository.
The installation script for the Oracle Identity and Access Management Lifecycle Tools (IAM Deployment Wizard and IAM Patching Tools) resides in the following directory:
REPOS_HOME/installers/idmlcm/idmlcm/Disk1
where REPOS_HOME is the Oracle Identity and Access Management deployment repository that contains all the installers required to deploy a new Oracle Identity and Access Management environment.
To begin installing the tools, change to that directory and start the script.
On UNIX:
cd REPOS_HOME/installers/idmlcm/idmlcm/Disk1
./runInstaller -jreLoc REPOS_HOME/jdk6
Then proceed as follows:
-
On the Welcome page, click Next.
-
If you are using a UNIX platform, and you have not previously installed an Oracle product on this host, you might be presented with the Specify Inventory Directory page, which prompts you for the location of the Inventory Directory. This directory is used to keep track of all Oracle products installed on this host. If you see this page, proceed as follows:
In the Operating System Group ID field, select the group whose members you want to grant access to the inventory directory. All members of this group can install products on this host. Click OK to continue.
The Inventory Location Confirmation dialog prompts you to run the
inventory_directory/createCentralInventory.shscript asrootto create the/etc/oraInst.locfile. This file is a pointer to the central inventory and must be present for silent installations. It contains two lines:inventory_loc=path_to_central_inventoryinst_group=install_groupThe standard location for this file is
/etc/oraInst.loc, but it can be created anywhere. If you create it in a directory other than/etc, you must include the-invPtrLocargument and enter the location of the inventory when you run theIdentity and Access Management Deployment Wizardor therunIAMDeployment.shscript.If you do not have root access on this host but want to continue with the deployment, select Continue installation with local inventory.
Click OK to continue.
-
On the Prerequisite Checks page, verify that checks complete successfully, then click Next.
-
On the Specify Install Location page, enter the following information:
-
Oracle Middleware Home - This is the parent directory of the directory where the Identity and Access Management Lifecycle Tools will be installed.
-
Oracle Home Directory - This is a subdirectory of the Oracle Middleware Home directory where the wizard will be installed. For example:
idmlcmIn the current guide, this subdirectory is referred to as
IDMLCM_HOME.
Click Next.
-
-
On the Installation Summary page, click Install.
-
On the Installation Progress page, click Next.
-
On the Installation Complete page, click Finish.