10 Managing Oracle Entitlements Server on IBM WebSphere
This chapter contains information about installing and managing Oracle Entitlements Server on IBM WebSphere.
This chapter contains the following sections:
-
Overview of Oracle Entitlements Server Installation on IBM WebSphere
-
Installation and Configuration Roadmap for Oracle Entitlements Server on IBM WebSphere
-
Configuring Oracle Entitlements Server Administration Server
-
Using Oracle Entitlements Server wsadmin Commands on IBM WebSphere
-
Getting Started with Oracle Entitlements Server After Installation
-
Configuring High Availability for Oracle Entitlements Server
-
Upgrading Oracle Entitlements Server 11g Release 2 (11.1.2.1) to 11g Release 2 (11.1.2.2.0)
10.1 Overview of Oracle Entitlements Server Installation on IBM WebSphere
Oracle Entitlements Server is a fine-grained authorization and entitlement management solution that can be used to precisely control the protection of application resources. It simplifies and centralizes security for enterprise applications and SOA by providing comprehensive, reusable, and fully auditable authorization policies and a simple, easy-to-use administration model. For more information, see "Introducing Oracle Entitlements Server" in Oracle Fusion Middleware Administrator's Guide for Oracle Entitlements Server.
Oracle Entitlements Server 11g Release 2 (11.1.2.2.) includes two distinct components:
-
Oracle Entitlements Server Administration Server: this component is included in the Oracle Identity and Access Management 11g Release 2 (11.1.2.2) installation.
-
Oracle Entitlements Server Client (Security Module): this component has its own installer and is not included in the Oracle Identity and Access Management 11g Release 2 (11.1.2.2) installation and does not require IBM WebSphere.
10.2 Installation and Configuration Roadmap for Oracle Entitlements Server on IBM WebSphere
Table 10-1 lists the tasks for installing and configuring Oracle Entitlements Server.
Table 10-1 Installation and Configuration Flow for Oracle Entitlements Server
| No. | Task | Description |
|---|---|---|
|
1 |
Review the system requirements and certification documents to ensure that your environment meets the minimum installation requirements for the components you are installing. |
For more information, see Section 2.1, "Task 1: Review the System Requirements and Certification Information." |
|
2 |
Obtain the necessary software. |
For more information, see Section 2.2, "Task 2: Obtain the Necessary Software Media or Downloads." |
|
3 |
Install Oracle Database for the Oracle Entitlements Server policy store and create and load the appropriate schemas for Oracle Entitlements Server. |
When using Oracle Database for Oracle Entitlements Server, you must create schemas for Oracle Entitlements Server using Oracle Fusion Middleware Repository Creation Utility. For more information, see Section 2.3, "Task 3: Identify a Database and Install the Required Database Schemas." |
|
4 |
Install IBM WebSphere. |
For more information, see Section 2.4, "Task 4: Install the IBM WebSphere Software." |
|
5 |
Review the special instructions for installing Oracle Fusion Middleware with IBM WebSphere. |
For more information, see Section 2.6.1, "Special Instructions When Installing Oracle Identity and Access Management with IBM WebSphere". |
|
6 |
Upgrade the OPSS Schema using Patch Set Assistant |
For more information, see Section 2.8, "Task 8: Upgrading OPSS Schema using Patch Set Assistant." |
|
7 |
Install the Oracle Identity and Access Management software, including Oracle Entitlements Server. |
Oracle Entitlements Server is included in the Oracle Identity and Access Management Suite. You can use the Oracle Identity and Access Management 11g Installer to install Oracle Identity and Access Management Suite. For Oracle Entitlements Server, select the AS Common Schemas - Oracle Platform Security Services schema. By default, the AS Common Schemas - Metadata Services schema is also selected. For more information, see Section 2.6, "Task 6: Install Oracle Identity and Access Management Suite". |
|
8 |
Configure Oracle Entitlements Server Administration Server using the Oracle Fusion Middleware Configuration Wizard. |
For more information, see Section 10.3, "Configuring Oracle Entitlements Server Administration Server". |
|
9 |
Install the Oracle Entitlements Server Client Software. |
For more information, see Section 10.4, "Installing Oracle Entitlements Server Client". |
|
10 |
Configure the Oracle Entitlements Server Client. |
For more information, see Section 10.5, "Configuring IBM WebSphere Security Module". |
|
11 |
Get started with Oracle Entitlements Server. |
For more information, see Section 10.8, "Getting Started with Oracle Entitlements Server After Installation". |
10.3 Configuring Oracle Entitlements Server Administration Server
This section discusses the following topics:
-
Prerequisites for Configuring Oracle Entitlement Server Administration Server
-
Configuring Oracle Entitlements Server in a New IBM WebSphere Cell
-
Configuring Security Store for Oracle Entitlements Server Administration Server
-
Verifying Oracle Entitlements Server Administration Server Configuration
10.3.1 Prerequisites for Configuring Oracle Entitlement Server Administration Server
Oracle Entitlements Server Administration Server must already be installed, as described in Section 10.2, "Installation and Configuration Roadmap for Oracle Entitlements Server on IBM WebSphere."
10.3.2 Configuring Oracle Entitlements Server in a New IBM WebSphere Cell
A special version of the Oracle Fusion Middleware Configuration Wizard is used to configure Oracle Entitlements Server Administration Server in an IBM WebSphere environment. For more information about using this wizard, see Section 2.9, "Task 9: Configure Your Oracle Identity and Access Management Components in a New IBM WebSphere Cell".
For complete information about configuring the Administration Server, see "Configuring Oracle Entitlements Server in a New WebLogic Domain" in Oracle Fusion Middleware Installation Guide for Oracle Identity and Access Management. When configuring the Administration Server in an IBM WebSphere environment, note the following applies:
-
Select template Oracle Entitlements Server for Admin Server - 11.1.1.0 [Oracle_IDM1]. The following options are also selected by default: Oracle Platform Security Service 11.1.1.0, Oracle JRF 11.1.1.0.
-
In JDBC configuration screen, set the correct service_name, hostname, user_name, password & port for the OPSS data-source.
-
When the IBM WebSphere cell is created and the Oracle Entitlements Server template is selected, SSL is enabled by default. The DemoTrust certificate is used as the trust certificate, and a certificate signed by DemoTrust is used as the keystore certificate. In a production environment, change the SSL configuration to use a custom certificate.
10.3.3 Configuring SSL in an Extended IBM WebSphere Domain
If you have already created a WebSphere domain and want to extend this domain with the OES template, refer to the steps in this section. In WebSphere extension case, if there are personal certificates configured, you should enable the log to see if there are other steps to set up SSL.
Configure the log file by issuing the command:
./was_config.sh -log=/scratch/was_config.log -log_priority=debug
If no certificates are configured, Oracle Entitlements Server deals with this scenario automatically. Demo certificates are used. You do not have to perform steps to set up SSL. Demo cert will be used is printed in log.
If one certificate is configured, Oracle Entitlements Server deals with this scenario automatically. The customer certificate is used. You do not have to perform steps to set up SSL. No special log will be recorded in log.
If multiple certificates are configured, no certificate is used. There are multiple certificates in the keystore. Try to enable SSL for OES Server using one of the certificates will be printed in the log. You will need to configure SSL manually following these steps:
-
Import the issued private key into the IBM WebSphere node default keystore as follows:
-
You may find the import in the IBM WebSphere Administration Server console:
security >SSL certificate and key management > Key stores and certificates > NodeDefaultKeyStore > Personal certificates.
-
Click Import.
-
Select Keystore and enter the path to the keystore file.
-
Select JKS as type and enter the password you used to create the keystore file.
-
The certificate alias name is the same name as the hostname.
-
-
Enable Inbound SSL for the server running IBM WebSphere Security Module as follows:
-
In the IBM WebSphere administration console, go to Security >SSL certificate and key management > Manage endpoint security configurations.
-
Expand inbound tree to get: Inbound > DefaultCell (CellDefaultSSLSettings) > nodes > DefaultCellFederatedNode > servers > Server_name_running_IBM_WebSphere_Security_Module and select the server.
-
In the General Properties page, select Override inherited values.
-
From the SSL configuration list, select NodeDefaultSSLSettings.
-
Click the Update certificate alias list button, and then, choose the private key alias you (customer) wanted to use for SSL in the Certificate alias in key store list.
-
Click Apply.
-
-
Enable Out bound SSL for the server running IBM WebSphere Security Module, follows:
-
In the IBM WebSphere administration console, go to Security >SSL certificate and key management > Manage endpoint security configurations.
-
Expand inbound tree to get: Outbound > DefaultCell (CellDefaultSSLSettings) > nodes > DefaultCellFederatedNode > servers > Server_name_running_IBM_WebSphere_Security_Module and select the server.
-
In the General Properties page, select Override inherited values.
-
From the SSL configuration list, select NodeDefaultSSLSettings.
-
Click the Update certificate alias list button, and then, choose the private key alias you (customer) wanted to use for SSL in the Certificate alias in key store list.
-
Click Apply.
-
For information on configuring security modules, see "Configuring Security Modules" in Oracle Fusion Middleware Installation Guide for Oracle Identity and Access Management. If you are using third-party certificates, see "Using Default or Third Party Digital Certificates" in Oracle Fusion Middleware Administrator's Guide for Oracle Entitlements Server for instructions on how to configure the security module.
10.3.4 Configuring Security Store for Oracle Entitlements Server Administration Server
You must run the configureSecurityStoreWas.py script to configure the security store for Oracle Entitlements Server Administration Server. For more information about configureSecurityStoreWas.py script, see Section 2.10, "Task 10: Configure the Database Security Store". However, when using the script to configure Oracle Entitlements Server, you do not use --config IAM option.
The configureSecurityStoreWas.py script is located in the <IAM_HOME>\common\tools directory. For example, to obtain help use the --help option as follows:
<IAM_HOME>\common\bin\wsadmin.sh <IAM_HOME>\common\tools\configureSecurityStoreWas.py --help
Configure the security store for Oracle Entitlements Server Administration Server as follows:
-
On UNIX:
./wsadmin.sh -lang jython -profileName DEPLOYMENT_MANAGER_PROFILE_NAME
  -f IAM_HOME/common/tools/configureSecurityStoreWas.py
  -d PATH_TO_DEPLOYMENT_MANAGER_CELL_DIRECTORY
  -t DB_ORACLE -j cn=jpsroot
  -m create --passcode OPSS_SCHEMA_PASSWORD --wasadmin WAS_ADMIN_USERNAME
For example:
./wsadmin.sh -lang jython -profileName Dmgr01
  -f IAM_HOME/common/tools/configureSecurityStoreWas.py
  -d IAM_HOME/was/install/was6076/profiles/Dmgr01/config/cells/DefaultCell01
  -t DB_ORACLE -j cn=jpsroot
  -m create --passcode opsschemapassword --wasadmin WAS_ADMIN_USERNAME
Note:
If the password is not specified at the command line,configureSecurityStoreWas.pyscript will prompt for the datasource password and accept user input.
Table 10-2 lists the valid configureSecurityStoreWas parameters in an IBM WebSphere environment.
Table 10-2 configureSecurityStoreWas Parameters
| Parameter | Description |
|---|---|
|
|
The configuration mode of the domain. For example:
|
|
|
The data source of security store configured in domain. Default value is |
|
|
Location of the OES Administration Server Domain. |
|
|
The security store farm name. It is optional. The default value is cell name. |
|
|
Use |
|
|
Prints usage message. |
|
|
Use |
|
|
The distinguished name of |
|
|
The directory containing the encryption key file |
|
|
The password used when the domain's key file was generated. If |
|
|
Valid values are |
|
|
The OPSS schema password. |
|
|
The policy store type. For example: |
|
|
The user name of the OPSS schema. If |
|
|
Use |
|
|
Use |
|
|
The admin user name of the WAS domain. Optional parameter used when |
Configuring the Database Security Store Using the Join Option
When using -m join option to configure the database, you must first export the domain encryption key from a domain in the same logical Oracle Identity and Access Management deployment already configured to work with the database security store, and then run the configureSecurityStoreWas.py script. This requires you run exportEncryptionKey on the first domain, and then use the ewallet.p12 file generated as a parameter for -keyfile. The password (in exportEncryptionKey) is required as the parameter for -keyfilepassword. For more information and examples, see "Configuring the Database Security Store" in Oracle Fusion Middleware Installation Guide for Oracle Identity and Access Management.
10.3.5 Configuring the Identity Store
You must configure the identity store for Oracle Platform Security Services (OPSS). For more information, see Section 2.11, "Task 11: Configure the Identity Store".
10.3.6 Starting the Administration Server
For information on starting the Administration Server (OracleAdminServer), see Section 2.12, "Task 12: Start the IBM WebSphere Servers."
10.3.7 Verifying Oracle Entitlements Server Administration Server Configuration
To verify that your Oracle Entitlements Server Administration Server configuration was successful, use the following URL to log in to the Oracle Entitlements Server Administration Console:
http://hostname:port/apm/
where hostname is the DNS name or IP address of the Administration Server and port is the address of the port on which the Administration Server listens for requests.
For more information, see "Accessing the Administration Console" in Oracle Fusion Middleware Administrator's Guide for Oracle Entitlements Server.
10.4 Installing Oracle Entitlements Server Client
This section discusses the following topics:
10.4.1 Prerequisites for Installing the Oracle Entitlement Server Client
Before installing the Oracle Entitlements Server Client software, you must install and configure Oracle Entitlements Server Administration Server as described in Section 10.3, "Configuring Oracle Entitlements Server Administration Server."
10.4.2 Obtaining Oracle Entitlements Server Client Software
For information about where to download the Oracle Entitlements Server Client software, refer to the Oracle Fusion Middleware Download, Installation, and Configuration Readme Files on the Oracle Technology Network (OTN): https://download.oracle.com/docs/cd/E23104_01/download_readme.htm.
10.4.3 Installing Oracle Entitlements Server Client
To install Oracle Entitlements Server Client 11g Release 2 (11.1.2.2) on IBM WebSphere, follow the instructions for installing on Oracle WebLogic Server. For information, see "Installing Oracle Entitlements Server Client" in Oracle Fusion Middleware Installation Guide for Oracle Identity and Access Management.
10.4.4 Applying a Patch
You may need to apply a patch if you have installed Oracle Entitlements Server Client software in a separate Middleware Home than the Oracle Entitlements Server Administration Server. For information, see "Applying a Patch Using OPatch" in Oracle Fusion Middleware Installation Guide for Oracle Identity and Access Management.
10.5 Configuring IBM WebSphere Security Module
You can configure the WebSphere Security Module in a JRF environment or in a non-JRF environment or if a third party digital certificate is used. Depending on the option you select complete one of the following:
For information about using a Security Sockets Layer (SSL) connection and using third party digital certificate with a WebSphere Security Module, see "Using Default or Third Party Digital Certificates" in Oracle Fusion Middleware Administrator's Guide for Oracle Entitlements Server.
10.5.1 Configuring WebSphere Security Module in a Non-JRF Environment
To configure the WebSphere Security Module in a non-JRF environment, complete the following steps:
-
Create a new application server using the IBM WebSphere console and name it
OesServer. -
Start the Oracle Entitlements Server (
OesServer) you created for IBM WebSphere. -
Open the
smconfig.prpfile in a text editor and specify the pd client port and the pd app client context. The pd client port number is the SSL port number of the IBM WebSphere application server and pd app client context is the location where the was-client.jar is deployed. For example:oracle.security.jps.pd.was.client.appcontext=pd-client oracle.security.jps.pd.clientPort=8002
-
Run the
config.shcommand as follows:$OES_CLIENT_HOME/oessm/bin/config.sh -smType was -smConfigId mySM_WAS -serverLocation WAS_HOME -profileName dmgr_profile_name
WAS_HOMEis the location of the IBM WebSphere Application Server.For any distribution mode you choose, you must specify the IBM WebSphere server user name and password, when prompted.
In controlled push mode, you will be prompted for Oracle Entitlements Server Administration Server user name, Oracle Entitlements Server Administration Server password, and a new key store password for enrollment.
In non-controlled and controlled-pull modes, you will be prompted for Oracle Entitlements Server schema user name and password.
Table 10-3 describes the parameters you specify on the command line.
Table 10-3 IBM WebSphere Security Module Parameter
Parameter Description smTypeType of security module instance you want to create. For example,
was.smConfigIdName of the security module instance. For example,
mySM_WAS.serverLocationLocation of the IBM WebSphere Server.
Note:
Controlled-push distribution is the default distribution mode for IBM WebSphere Security Module a non-JRF environment. -
Configure SSL for the IBM WebSphere application server as follows:
-
Import the Oracle WebLogic Server demo trust certificate into IBM WebSphere node default trust keystore and cell default trust keystore by using keytool to export WLS demo trust certificate from WLS demo trust keystore file, or
OES trust.jksfile into a.der, as shown in the following example:keytool -exportcert -keystore $OES_CLIENT_HOME/oessm/enroll/DemoTrust.jks -alias wlscertgencab -file ~/was.der
-
Import the
was.derfile into WAS node default trust keystore and cell default trust keystore as follows:-
You may find the import in IBM WebSphere Administration Server console:
security > SSL certificate and key management > Key stores and certificates > <NodeDefaultTrustStore> <CellDefaultTrustStore> (select one name) > Signer certificates.
-
Click Add.
-
Enter an alias. For example, WAS.
-
Choose the
.derfile that you exported earlier, and select data type as DER.
-
-
Import the issued private key into the IBM WebSphere node default keystore as follows:
-
You may find the private key to import in IBM WebSphere Administration Server console:
security > SSL certificate and key management > Key stores and certificates > NodeDefaultKeyStore > Personal certificates.
-
Click Import.
-
Select Keystore and enter the path to the keystore file (located in
OES_CLIENT_HOME/oes_sm_instances/mySM_WAS/security/identity.jks) -
Select JKS as type and enter the password you used to create the keystore file.
-
The certificate alias name is the same name as the hostname.
Note:
You must import demo trust certificate into two trust stores for the WAS ND edition. For the private key, you must import one keystore.
-
-
Enable Inbound SSL for the server running IBM WebSphere Security Module as follows:
-
In the IBM WebSphere administration console, go to Security > SSL certificate and key management > Manage endpoint security configurations.
-
Expand inbound tree to get:Inbound > DefaultCell(CellDefaultSSLSettings) > nodes > DefaultCellFederatedNode > servers > <server name running IBM WebSphere Security Module> and select the server.
-
In the General Properties page, select Override inherited values.
-
From the SSL configuration list, select NodeDefaultSSLSettings.
-
Click the Update certificate alias list button and then choose the private key alias you (customer) wanted to use for SSL in the Certificate alias in key store list.
-
Click Apply.
-
-
Enable Outbound SSL for the server running IBM WebSphere Security Module, follows:
-
In the IBM WebSphere administration console, go to Security > SSL certificate and key management > Manage endpoint security configurations.
-
Expand outbound tree to get:Outbound > DefaultCell(CellDefaultSSLSettings) > nodes > DefaultCellFederatedNode > servers > <server name running IBM WebSphere Security Module> and select the server.
-
In the General Properties page, select Override inherited values.
-
From the SSL configuration list, select NodeDefaultSSLSettings.
-
Click Update certificate alias list and choose the new imported private key alias in the Certificate alias in key store list.
-
Click Apply.
-
-
10.5.2 Configuring WebSphere Security Module in a JRF Environment
To configure WebSphere Security Module in a JRF environment, complete the following steps:
-
Configure IBM WebSphere Application Server, as described in Chapter 2 and Oracle Fusion Middleware Configuration Guide for IBM WebSphere Application Server.
Note:
In the Add Products to Cell screen, ensure that you select Oracle JRF for WebSphere - 11.1.1.0 [oracle_common] -
Run the
config.shcommand as follows:$OES_CLIENT_HOME/oessm/bin/config.sh -smType was -smConfigId mySM_WAS -serverLocation WAS_HOME -profileName dmgr_profile_name
WAS_HOMEis the location of the IBM WebSphere Application Server.For any distribution mode you choose, you must specify the IBM WebSphere server user name and password, when prompted.
In controlled push mode, you will be prompted for Oracle Entitlements Server Administration Server user name, Oracle Entitlements Server Administration Server password, and a new key store password for enrollment.
In non-controlled and controlled-pull modes, you will be prompted for Oracle Entitlements Server schema user name and password.
Table 10-4 describes the parameters you specify on the command line.
Table 10-4 IBM WebSphere Security Module Parameter
Parameter Description smTypeType of security module instance you want to create. For example,
was.smConfigIdName of the security module instance. For example,
mySM_WAS.serverLocationLocation of the IBM WebSphere Server.
hostSpecify the WebSphere host name.
portSpecify the WebSphere Node Manager port. For example:
8882userSpecify the WebSphere username. For example:
webspherepasswordSpecify the WebSphere password.
Note:
Non-controlled distribution is the default distribution mode for the IBM WebSphere Security Module in a JRF environment. It will not change even if you edit the distribution mode in thesmconfig.prpfile.
After configuring WebSphere Security Module in a JRF environment, you must set up a connection to Oracle Database.
Setting Up Connection to Oracle Database
For setting up connection to Oracle Database, complete the following steps:
-
Create a JDBC Data Source using the WebLogic Server Administration Console. For more information, see "Create JDBC generic data sources" in Oracle Fusion Middleware Oracle WebLogic Server Administration Console Online Help.
-
Open the
jps-config.xmlfile.File is located in
<OES_DOMAIN_HOME>/config/oeswlssmconfigdirectory (on UNIX). -
Locate
pdp.serviceand replace the existingjdbc.urlproperty with the following property:<property value="jdbc/APMDBDS" name="datasource.jndi.name"/>Note:
jdbc/APMDBDSis the name of the JDBC datasource used for the Oracle Entitlements Server. -
Delete the following properties:
-
jdbc.driver -
jdbc.url -
bootstrap.security.principal.key -
bootstrap.security.principal.map
-
-
Save the
jps-config.xmlfile.
10.6 Using Oracle Entitlements Server wsadmin Commands on IBM WebSphere
You can run Oracle Entitlements Server commands from the IBM WebSphere wsadmin command line interface. For more information, see Section 3.1.3, "Using the Oracle Fusion Middleware wsadmin Commands".
Oracle Entitlements Server commands are documented in Oracle Fusion Middleware Administrator's Guide for Oracle Entitlements Server. Oracle Entitlements Server commands are functionally identical on WebLogic Server and IBM WebSphere Server.
10.7 Configuring Security Modules for Other Application Servers
In addition to IBM WebSphere Security Module, Oracle Entitlements Server includes additional Security Modules for other application servers. For more information about configuring them, see "Configuring Security Modules" in Oracle Fusion Middleware Installation Guide for Oracle Identity and Access Management.
10.8 Getting Started with Oracle Entitlements Server After Installation
After installing Oracle Entitlements Server, refer to the following documents:
-
Oracle Fusion Middleware Administrator's Guide for Oracle Entitlements Server
-
Oracle Fusion Middleware Developer's Guide for Oracle Entitlements Server
Note that the information provided in these two documents is generally specific to using Oracle Entitlements Server on Oracle WebLogic Server.
10.9 Configuring High Availability for Oracle Entitlements Server
This section describes how to configure high availability for Oracle Entitlements Server on IBM WebSphere. In this release, the Oracle Entitlements Server Administration Server can be configured as a cluster in an active-active configuration.
This section discusses the following topics:
10.9.1 Overview of a Cluster Configuration
A cluster is a set of processes running on a single or multiple computers that share the same workload. After system components have been clustered, they are viewed functionally as a single entity from the perspective of a client for runtime processing and manageability. There is a close correlation between clustering and redundancy. A cluster provides redundancy for a system. With a load-balancing mechanism in place, the instances are redundant. If any of the instances fail, requests to the failed instance can be sent to the surviving instances. If failover occurs during a transaction in a clustered environment, the session data is retained as long as there is at least one surviving instance available in the cluster.
See Also:
"Oracle Entitlements Server High Availability Concepts" in Oracle Fusion Middleware High Availability Guide.In this release, the Oracle Entitlements Server Administration Server can be configured in a two-node cluster. Table 10-5 summarizes the components in a typical two-node cluster.
Table 10-5 Overview of Horizontal (2-Node) Clustered Configuration
| Deployment Manager Machine | WebSphere Node 2 Machine |
|---|---|
|
1. WebSphere Deployment Manager (DMGR) |
WebSphere Node 2 OES_SERVER_2 |
|
2. WebSphere Node 1 |
|
|
3. OracleAdminServer |
|
|
4. OES_SERVER_1 |
Figure 10-1 Oracle Entitlements Server on IBM WebSphere in Controlled-push Mode
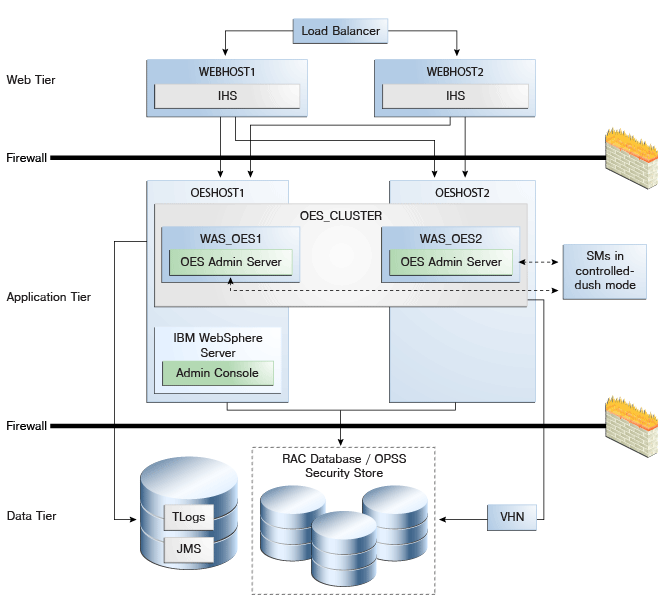
Description of "Figure 10-1 Oracle Entitlements Server on IBM WebSphere in Controlled-push Mode"
The components illustrated in Figure 10-1 are detailed in Table 10-5. On OESHOST1, you see the following installations:
-
An Oracle Entitlements Server instance is installed in the WAS_OES1 Managed Server and a APM instance is installed in the WAS_OES1 Managed Server.
-
The Oracle RAC database is configured in a JDBC multi data source to protect the instance from Oracle RAC node failure.
-
An IBM WebSphere Server Administration Server is installed. Under normal operations, this is the active Administration Server.
On OESHOST2, you see the following installations:
-
An Oracle Entitlements Server instance is installed in the WAS_OES2 Managed Server and an APM instance is installed in the WAS_OES2 Managed Server.
-
The Oracle RAC database is configured in a JDBC multi data source to protect the instance from Oracle RAC node failure.
-
The instances in the WAS_OES1 and WAS_OES2 Managed Servers on OESHOST1 and OESHOST2 are configured as the OES_CLUSTER cluster.
10.9.2 Horizontal Cluster Topology
A typical horizontal cluster topology consists of two nodes. The following is an example configuration.
Deployment Manager (DMGR Host), Node 1
-
Create an IBM WebSphere cell and Oracle-standard local nodes.
Includes cell, management profiles (contains node with DMGR) and managed profile (contains custom node used to house local servers such as
OracleAdminServer). -
If the local node will be used to house layered product or component managed servers, select the product or component template.
-
Create a cluster using the same server used in step 2.
-
Add cluster members as necessary to scale-out.
Assumes a cluster has already been created in the cell.
-
Create custom profile and federate node to cell.
-
Add cluster member to existing cluster.
Select node associated with host.
-
Repeat for each additional remote host.
10.9.3 High Availability Installation and Configuration Roadmap
This section describes the process to configure a typical two-node horizontal cluster for Oracle Entitlements Server. For complete information about installing and configuring Oracle Identity and Access Management on IBM WebSphere, see Chapter 2. For more information about configuring the Administration Server on IBM WebSphere, see Section 10.3, "Configuring Oracle Entitlements Server Administration Server".
Table 10-6 lists the key tasks for installing and configuring high availability for Oracle Entitlements Server.
Table 10-6 Key Tasks: High Availability Installation and Configuration Flow for Oracle Entitlements Server
| No. | Task | Description |
|---|---|---|
|
1 |
Review the information about how to install Oracle Identity and Access Management on IBM WebSphere and how to configure a high availability environment on IBM WebSphere. |
For information about installing Oracle Identity and Access Management on IBM WebSphere, see Chapter 2. For information about configuring a highly available environment on IBM WebSphere, see Section 3.4, "Configuring Oracle Fusion Middleware High Availability on IBM WebSphere". |
|
2 |
Review the information about configuring high availability for Oracle Entitlements Server. |
For more information, see Section 10.9.1, "Overview of a Cluster Configuration" and Section 10.9.2, "Horizontal Cluster Topology". |
|
3 |
Review the System Requirements and Certification Information. |
For more information, see Section 2.1, "Task 1: Review the System Requirements and Certification Information". |
|
4 |
Install Oracle Database for the Oracle Entitlements Server policy store and create and load the appropriate schemas for Oracle Entitlements Server. |
When using Oracle Database for Oracle Entitlements Server, you must create schemas for Oracle Entitlements Server using Oracle Fusion Middleware Repository Creation Utility. For more information, see Section 2.3, "Task 3: Identify a Database and Install the Required Database Schemas". |
|
5 |
Install IBM WebSphere on OESHOST1 and OESHOST2. |
For more information, see Section 2.4, "Task 4: Install the IBM WebSphere Software". |
|
6 |
Install Oracle Entitlements Server Administration software on OESHOST1 and OESHOST2. |
Oracle Entitlements Server is included in the Oracle Identity and Access Management Suite. You can use the Oracle Identity and Access Management 11g Installer to install Oracle Identity and Access Management Suite. For Oracle Entitlements Server, select the AS Common Schemas - Oracle Platform Security Services schema. By default, the AS Common Schemas - Metadata Services schema is also selected. For more information, see Section 2.6, "Task 6: Install Oracle Identity and Access Management Suite". |
|
7 |
Configure the Deployment Manager Machine on the primary host (IBM WebSphere Node 1). |
The database security store and identity store are also configured. For more information, see Section 10.9.4.1, "Configure the Deployment Manager Machine (Primary Host, IBM WebSphere Node 1)". |
|
8 |
Configure the Remote Machine on the secondary host (IBM WebSphere Node 2). |
For more information, see Section 10.9.4.2, "Configure the Remote Machine (Secondary Host, IBM WebSphere Node 2)". |
|
9 |
Restart the Node Agents and IBM WebSphere Servers. |
For more information, see Section 10.9.4.3, "Restart the Servers". |
10.9.4 Configuring a Two Node Horizontal Cluster
To configure high availability for the Oracle Entitlements Server Administration Server user interface, you must create an IBM WebSphere Server cluster. To configure a high availability database for the Administration Server user interface, you use multi source data source, Oracle RAC, and other typical elements.
This section discusses the following topics:
-
Configure the Deployment Manager Machine (Primary Host, IBM WebSphere Node 1)
-
Configure the Remote Machine (Secondary Host, IBM WebSphere Node 2)
10.9.4.1 Configure the Deployment Manager Machine (Primary Host, IBM WebSphere Node 1)
Use the Oracle Fusion Middleware Configuration Wizard to configure Oracle Entitlements Server in a new IBM WebSphere cell. For complete information about using the Oracle Fusion Middleware Configuration Wizard, including information about adding servers and clusters to a cell, see Oracle Fusion Middleware Configuration Guide for IBM WebSphere Application Server.
To configure Oracle Entitlements Server in a new IBM WebSphere cell, complete the following steps:
-
Create an IBM WebSphere cell for OES Admin Server by starting the Oracle Fusion Middleware Configuration Wizard. Run the following command from the Oracle Identity and Access Management home:
(UNIX) ORACLE_HOME/common/bin/was_config.sh
The Welcome screen of the Oracle Fusion Middleware Configuration Wizard appears. Provide the information required to create the cell.
-
In Add Products to Cell screen, select Oracle Entitlements Server for Manage Server - 11.1.1.0. The following options are also selected by default: Oracle Platform Security Service 11.1.1.0, Oracle JRF 11.1.1.0.
-
In Configure JDBC Components Schema screen, configure JDBC properties for all of the schemas. Set the correct service_name, hostname, user_name, password, and port for the OPSS data-source.
For the Oracle RAC Database, check Configure selected component schemas as RAC data source schemas in the next panel, and click Next to go to Oracle RAC data source configuration panel.
-
For the Oracle RAC data source configuration panel, enter the following information:
-
In the Service Name field, enter the Oracle RAC Database service name.
-
In the User Name field, enter the OPSS schemas' user name.
-
In the Password field, enter the OPSS schemas' password.
-
Provide/add the two Oracle RAC nodes' hostnames and the ports.
-
-
In Test JDBC - Component Schema screen, click Select All then Test Connections.
-
In Select Optional Configuration screen, select Administration Server and Managed Servers, Clusters and Machines.
-
In Configure Application Servers screen, one managed server named oes_server1 is created automatically. You can rename oes_server1 and modify the attributes if needed. For the second OES_SERVER, click Add and provide a name: OracleAdminServer.
-
In the Configure Clusters screen, click Add to create a cluster. Enter the Cluster Names, for example, OES_Server_Cluster_1. Next select oes_server1 as First cluster member.
-
Skip the Configure Additional Cluster Members and Configure End Points screens by clicking Next.
-
In Target Deployments to Cluster or Servers screen, from left pane select the following Targets individually, then in right pane select the following Applications for each Target:
-
OES_ServerCluster_1: oracle.security.apm, DMS Application_11.1.1.3.0, oracle.oes.admin.enroll_11.1.1.3.0, oracle.oes.admin.pd.ssl_11.1.1.3.0, wsil-nonwls
-
DMGR: Dmgr DMS Application_11.1.1.1.0
-
OracleAdminServer: DMS Application_11.1.1.0, FMW Welcome Page Application_11.1.0.0.0, wsil-nonwls
-
-
In Target Services to Clusters or Servers screen, from left pane select the following Targets individually, then select the following libraries from Services list:
-
OES_ServerCluster_1: all libraries in Service list
-
OracleAdminServer: all libraries in Service list
-
-
In Target Custom Services to Servers screen, accept the default services.
-
In the Configuration Summary screen, click Create.
The Configuring Cell screen appears and displays progress.
-
After the cell is created, stop the node agent process. See Section 10.9.4.3, "Restart the Servers".
-
Configure the database security store by running the
configureSecurityStoreWas.pyscript. See Section 10.3.4, "Configuring Security Store for Oracle Entitlements Server Administration Server". -
Configure the identity store for Oracle Platform Security Services (OPSS). See Section 2.11, "Task 11: Configure the Identity Store".
-
Start the server manager (Dmgr02). See Section 10.9.4.3, "Restart the Servers".
-
Start the node agent, sync node to custom profile, and start servers (Custom02). See Section 10.9.4.3, "Restart the Servers".
10.9.4.2 Configure the Remote Machine (Secondary Host, IBM WebSphere Node 2)
To configure Oracle Entitlements Server in a new IBM WebSphere cell, complete the following steps:
-
Start the Oracle Fusion Middleware Configuration Wizard to federate the machine and configure its cell. Run the command from the Oracle Identity and Access Management home:
(UNIX) ORACLE_HOME/common/bin/was_config.sh
-
In the Select Configuration Option screen, select the Federate Machine and Configure Cell options.
-
In the Specify Profile and Node Name Information screen, specify the Application Server Profile Name and Application Server Node Name.
-
In the Specify Deployment Manager Information screen, enter information about the existing Deployment Manager System to federate machine.
-
Skip the following wizard screens by clicking Next: Add Products to Cell, Configure JDBC Component Schema, Test JDBC Component Schema.
-
In Select Optional Configuration screen, select Application Servers, Clusters and End Points and Deployments and Services.
-
Skip the following wizard screens by clicking Next: Configure Application Servers, Configure Clusters.
-
In Configure Additional Cluster Members screen, complete the fields to add the remote cluster member to the cluster created on the primary host. For example:
-
Click Add.
-
Name: provide the name for the cluster's remote (secondary) host, such as oes_server2.
-
Node Name: select node agent for oes_server2 from list, such as WebSphereNode2.
-
Cluster Name: select OES_ServerCluster_1 from list.
-
-
Skip the following wizard screens (accept the default values) by clicking Next: Configure End Points, Target Deployments to Clusters or Servers, Target Services to Clusters or Servers, Target Custom Services to Servers.
-
In Configuration Summary screen, click Extend.
The Configuring Cell screen appears and displays progress.
-
Stop the node agent process on the secondary host. See Section 10.9.4.3, "Restart the Servers".
-
Start the node agent, sync node to custom profile, and start servers (Custom02). See Section 10.9.4.3, "Restart the Servers"
10.9.4.3 Restart the Servers
To restart the servers:
-
Stop the node and Deployment Manager on Deployment Manager machine. Execute the following from $WAS_HOME/bin:
./stopNode.sh -profileName server_profile_name -username wasadmin_username
   -password wasadmin_password
./stopManager.sh -profileName dmgr_profile_name -username wasadmin_username
   -password wasadmin_password
-
Stop the node on IBM WebSphere Node 2 machine. Execute:
./stopNode.sh -profileName server_profile_name -username wasadmin_username -password wasadmin_password
-
Start the Deployment Manager, node, and servers on Deployment Manager machine. Execute:
./startManager.sh -profileName dmgr_profile_name
./startNode.sh -profileName server_profile_name
./startServer.sh OracleAdminServer -profileName server_profile_name
./startServer.sh server_name -profileName server_profile_name
-
Start the node and OES server on IBM WebSphere Node 2 machine:
./startNode.sh -profileName server_profile_name
./startServer.sh server_name -profileName server_profile_name
10.10 Upgrading Oracle Entitlements Server 11g Release 2 (11.1.2.1) to 11g Release 2 (11.1.2.2.0)
This section describes how to upgrade your existing Oracle Entitlements Server 11g Release 2 (11.1.2.1) environment to Oracle Entitlements Server 11g Release 2 (11.1.2.2.0) on IBM WebSphere.This chapter contains the following sections:
Read the Oracle Fusion Middleware System Requirements and Specifications document to ensure that your environment meets the minimum requirements for the products you are installing or upgrading.
10.10.1 Upgrading Oracle Entitlements Server Administration Server
This section contains the following topics:
-
Upgrade Roadmap for Oracle Entitlements Server Administration Server
-
Upgrading Oracle Entitlements Server Administration Server 11g Release 2 (11.1.2.1)
-
Updating Platform Security Services and Metadata Services Schemas Using the Patch Set Assistant
-
Upgrading Oracle Platform Security Services 11.1.2.1.x to 11.1.2.2
10.10.1.1 Upgrade Roadmap for Oracle Entitlements Server Administration Server
Note:
If you do not follow the exact sequence provided in this task table, your Oracle Entitlements Server Administration Server upgrade may not be successful.Table 10-7 provides an overview of upgrading the Oracle Entitlements Server Administration Server upgrade.
Table 10-7 Upgrade Roadmap for Oracle Entitlements Server Administration Server
| Task No. | Task | For More Information |
|---|---|---|
|
1 |
Shut down all servers. |
|
|
2 |
Upgrade the Oracle Entitlements Server Administration Server using the Oracle Identity and Access Management 11.1.2 Installer. |
See Upgrading Oracle Entitlements Server Administration Server 11g Release 2 (11.1.2.1) |
|
3 |
Update Platform Security Services and Metadata Services Schemas. |
See Updating Platform Security Services and Metadata Services Schemas Using the Patch Set Assistant |
|
4 |
Verify the schema upgrade. |
|
|
5 |
Upgrade Oracle Platform Security Services. |
See Upgrading Oracle Platform Security Services 11.1.2.1.x to 11.1.2.2 |
10.10.1.2 Shutting Down Administration Server and Managed Servers and Stop the Node Manager and Deployment Manager
The upgrade process involves changes to the binaries and to the schema. Therefore, before you begin the upgrade process, you must shut down the Administration Server and Managed Servers and stop the Node Manager and Deployment Manger.
Stop the Node Manager and Deployment Manger
On the Deployment Manager Machine, stop the Node Manager and Deployment Manager by running the following commands:
$WAS_HOME/profiles/Custom01/stopNode.sh -profileName server_profile_name -username wasadmin_username -password wasadmin_password
$WAS_HOME/profiles/dmgr_profile_name/stopManager.sh -profileName dmgr_profile_name -username wasadmin_username -password wasadmin_password
You can also stop IBM WebSphere servers with profile scripts. To stop the IBM WebSphere servers, navigate to the following directory in the IBM WebSphere home and enter the command:
(UNIX) PROFILE/bin/stopServer.sh server_name
-username username -password password
You can also stop IBM WebSphere servers from Oracle Enterprise Manager Fusion Middleware Control.
For example, to stop a server from Fusion Middleware Control:
-
Navigate to the Server home page.
-
From the WebSphere Application Server menu, select Control, and then select Shut down.
Fusion Middleware Control displays a confirmation dialog box.
-
Click Shutdown.
Note:
Fusion Middleware Control is deployed to the OracleAdminServer. As a result, if you stop the OracleAdminServer, then Fusion Middleware Control will be stopped, and you must use the profile scripts to start the servers.
Stopping the Administration Server
To stop the OracleAdminServer, navigate to the following directory in the IBM WebSphere home, and enter the following command:
$WAS_HOME/profiles/profile_name/bin/stopServer.sh OracleAdminServer
 -profileName profileName
10.10.1.3 Upgrading Oracle Entitlements Server Administration Server 11g Release 2 (11.1.2.1)
To upgrade Oracle Entitlements Server Administration Server, you must use the Oracle Identity and Access Management 11.1.2.2 Installer. During the procedure, point the Middleware Home to your existing 11.1.2.1 Middleware Home. Your Oracle Home is upgraded from 11.1.2.1 to 11.1.2.2.0
10.10.1.3.1 Starting the Oracle Identity and Access Management Installer
This topic explains how to start the Oracle Identity and Access Management 11.1.2.2 Installer.
Start the Installer by doing the following:
-
Move from your present working directory to the directory where you have extracted the contents of the Installer to.
-
Move to the following location:
cd Disk1
-
Run the following command:
./runInstaller -jreLoc $JAVA_HOME
10.10.1.3.2 Installing Oracle Identity and Access Management 11g Release 2 (11.1.2.2.0)
Use the Oracle Identity and Access Management 11.1.2.2 Installer to upgrade Oracle Entitlements Server 11.1.2.1 to Oracle Entitlements Server 11.1.2.2.0:
-
After you start the Installer, the Welcome screen appears.
-
Click Next on the Welcome screen. The Install Software Updates screen appears. Select whether or not you want to search for updates. Click Next.The Prerequisite Checks screen appears. If all prerequisite checks pass inspection, click Next. The Specify Installation Location screen appears.
-
On the Specify Installation Location screen, point the Middleware Home to your existing 11.1.2.1 Middleware Home installed on your system.
-
In the Oracle Home Directory field, specify the path of the existing Oracle Identity and Access Management Home. This directory is also referred to as
IAM_HOMEin this book.Click Next. The Installation Summary screen appears.
-
The Installation Summary screen displays a summary of the choices that you made. Review this summary and decide whether you want to proceed with the installation. If you want to modify any of the configuration settings at this stage, select a topic in the left navigation page and modify your choices. To continue installing Oracle Identity and Access Management, click Install. The Installation Progress screen appears. Click Next.
-
The Installation Complete screen appears. On the Installation Complete screen, click Finish.
This installation process copies the 11.1.2.2.0 Oracle Identity and Access Management software to your system.
For more information, see Section 2.6, "Task 6: Install Oracle Identity and Access Management Suite" and the Oracle Fusion Middleware Installation Guide for Oracle Identity and Access Management.
10.10.1.4 Updating Platform Security Services and Metadata Services Schemas Using the Patch Set Assistant
To update Platform Security Services and Metadata Services schemas using the Patch Set Assistant, proceed as follows:
-
Start the Patch Set Assistant.
-
Move from your present working directory to the MW_HOME/Oracle_IDM1/bin directory by running the following command on the command line:
cd $MW_HOME/Oracle_IDM1/bin
-
Run the following command:
./psa
The Patch Set Assistant requires that you have
sysdbaaccess to the database. If an ORA-28009 error occurs when running Patch Set Assistant, make sure you have providedsys as sysdbafor the DBA user name on the database system.After starting the Patch Set Assistant Installer, follow the instructions on the screen to update your schemas.
-
-
In the Select Component screen, select Oracle Platform Security Services and click Next.
-
In the Prerequisite screen, verify that you have satisfied the database prerequisites.
-
In the OPSS Schema screen, specify the database credentials (
sysdba) to connect to the database that contains the OPSS schema and the OPSS schema credentials and select the OPSS schema to be upgraded. Then, click Next. -
In the Examine screen, verify that your schemas have a "successful" indicator in the Status column. The Examine screen displays the status of the Patch Set Assistant as it examines each component schema.
-
In the Upgrade screen, verify that the schema are the ones you want to upgrade. The Upgrade Progress screen shows the progress of the schema upgrade.
-
Once the upgrade completes, exit the wizard.
10.10.1.5 Verifying Schema Upgrade
You can verify the upgrade by checking the log files. When the Patch Set Assistant is launched it tells you where the logs are stored. Usually the log files are written to the following location:
<MW_HOME>/oracle_common/upgrade/logs/psatimestamp.log
The timestamp reflects the actual date and time that Patch Set Assistant was run.
If any failures occur when running Patch Set Assistant, you can use these log files to help diagnose and correct the problem. Do not delete them. You can alter the contents of the log files by specifying a different -logLevel from the command line.
Some of the operations performed by Patch Set Assistant may take longer to complete than others. If you want to see the progress of these long operations, you can see this information in the log file, or you can use the following query:
SELECT VERSION, STATUS, UPGRADED FROM SCHEMA_VERSION_REGISTRY WHERE OWNER='schema_name';
In the query results, the STATUS field is either UPGRADING or UPGRADED during the schema patching operation, and becomes VALID when the operation is completed.
10.10.1.6 Upgrading Oracle Platform Security Services 11.1.2.1.x to 11.1.2.2
To upgrade Oracle Platform Security Services (OPSS) schema, do the following:
-
Run the Oracle Fusion Middleware
wsadmincommand-line shell from Oracle_IDM1/bin:$IDM_HOME/common/bin/wsadmin.sh -profileName profilename -connType SOAP -user admin_user -password admin_password
-
At the
wsadminprompt, run the following command:Opss.upgradeOpss(jpsConfig="WAS_HOME/ profiles/DM_PROFILE_NAME/config/cells/HOST_NAME_CELL_NAME/ fmwconfig/jps-config.xml", jaznData="MW_HOME/ oracle_common/modules/oracle.jps_11.1.1/ domain_config/was/system-jazn-data.xml", jdbcDriver="oracle.jdbc.driver.OracleDriver", url="jdbc:oracle:thin:@host:1521/node_name.us.example.com", user="R2PS1WAS_OPSS", password="R2PS1WAS_OPSS__PASSWORD", upgradeJseStoreType="true")
10.10.2 Upgrading Oracle Entitlements Server Client Server
This section contains the following topics:
10.10.2.1 Upgrade Roadmap for Oracle Entitlements Server Client Server
Note:
If you do not follow the exact sequence provided in this task table, your Oracle Entitlements Server Client Server upgrade may not be successful.Table 10-8 lists the steps for upgrading Oracle Entitlements Server Client Server upgrade.
Table 10-8 Upgrade Roadmap for Oracle Entitlements Server Client Server
| No. | Task | For More Information |
|---|---|---|
|
1 |
Shut down all security modules. This includes shutting down the Administration Server and Managed Servers too. |
|
|
2 |
Upgrade the Oracle Entitlements Server Client Server using the 11.1.2 installer. |
See Upgrading Oracle Entitlements Server Client 11g Release 2 (11.1.2.2.0) |
|
3 |
Apply the patch. |
See Applying a Patch |
|
4 |
Start the security modules. |
|
|
5 |
Verify the Oracle Entitlements Server Client Server upgrade. |
10.10.2.2 Stopping all Security Module Instances
Bring down all security module instances, Administration Server, and Managed Servers.
The security module instances shuts down when the Administration Server and Managed Servers are shut down.
To stop the servers, see Section 10.10.1.2, "Shutting Down Administration Server and Managed Servers and Stop the Node Manager and Deployment Manager.".
10.10.2.3 Upgrading Oracle Entitlements Server Client 11g Release 2 (11.1.2.2.0)
To upgrade Oracle Entitlements Server Client Server, you must use the 11.1.2.2 installer. During the procedure, point the Middleware Home to your existing 11.1.2.1 Oracle Entitlements Server Middleware Home. This upgrades your Middleware Home and Oracle Home from 11.1.2.1 to 11.1.2.2.0
This section contains the following topics:
10.10.2.3.1 Prerequisites
You must install and configure Oracle Entitlements Server Administration Server, as described in Table 10-7, "Upgrade Roadmap for Oracle Entitlements Server Administration Server".
10.10.2.3.2 Installing Oracle Entitlements Server Client Server 11g Release 2 (11.1.2.2.0)
For more information on installing Oracle Entitlements Server Client Server 11g Release 2 (11.1.2.2.0), see Section 10.4, "Installing Oracle Entitlements Server Client."
10.10.2.3.3 Verifying the Installation
To verify that your Oracle Entitlements Server Client install was successful, go to your Oracle Home directory which you specified during installation and verify that the Oracle Entitlements Server Client installation files are created.
10.10.2.4 Applying a Patch
You may need to apply a patch if you have installed Oracle Entitlements Server Client software in a separate Middleware Home than the Oracle Entitlements Server Administration Server. For information, see "Applying a Patch Using OPatch" in Oracle Fusion Middleware Installation Guide for Oracle Identity and Access Management.
10.10.2.5 Starting the Security Modules
You must start the security modules by starting the Administration Server and Managed Servers.
To start the servers, see Section 10.3.6, "Starting the Administration Server".
10.10.2.6 Verifying the Upgrade
To verify, create an authorization, as mentioned in "Using the PEP API" in the Oracle Fusion Middleware Developer's Guide for Oracle Entitlements Server, and see if it works correctly.
The Application Runtime Authorization continues working.
10.11 Upgrading Oracle Entitlements Server High Availability Deployment from 11g Release 2 (11.1.2.1) to 11g Release 2 (11.1.2.2.0)
The section high-level instructions for upgrading a high availability deployment for Oracle Entitlements Server.
10.11.1 Deployment Manager (DMGR Host), Node 1
Upgrading Oracle Entitlements Server Administration Server
To upgrade Oracle Entitlements Server Administration Server, you must use the Oracle Identity and Access Management 11.1.2.2 Installer. During the procedure, point the Middleware Home to your existing 11.1.2.1 Middleware Home. Your Oracle Home is upgraded from 11.1.2.1 to 11.1.2.2.0
-
Start the Oracle Identity and Access Management Installer. See Section 10.10.1.3.1, "Starting the Oracle Identity and Access Management Installer."
-
Install Oracle Identity and Access Management 11g Release 2 (11.1.2.2.0). See Section 10.10.1.3.2, "Installing Oracle Identity and Access Management 11g Release 2 (11.1.2.2.0)."
Upgrade Oracle Entitlements Server Schemas by Patch Set Assistant
Use the Patch Set Assistant to update the Platform Security Services and Metadata Services Schemas in the Oracle RAC database. See Section 10.10.1.4, "Updating Platform Security Services and Metadata Services Schemas Using the Patch Set Assistant."
Upgrade the Oracle Platform Security Services
Run the Oracle Fusion Middleware wsadmin command-line shell from Oracle_IDM1/bin:
$IDM_HOME/common/bin/wsadmin.sh
-profileName profilename
-connType SOAP
-user admin_user
-password admin_password
At the wsadmin prompt, run the following command:
Opss.upgradeOpss(jpsConfig="WAS_HOME/
profiles/DM_PROFILE_NAME/config/cells/HOST_NAME_CELL_NAME/
fmwconfig/jps-config.xml",
jaznData="MW_HOME/oracle_common/modules/oracle.jps_11.1.1/
domain_config/was/system-jazn-data.xml",
jdbcDriver="oracle.jdbc.driver.OracleDriver",
url="jdbc:oracle:thin:@host:1521/node_name.us.example.com",
user="R2PS1HA_OPSS", password="R2PS1HA_OPSS_PASSWORD",
upgradeJseStoreType="true")
10.11.2 Remote Host, Node 2
-
Start the Oracle Identity and Access Management Installer. See Section 10.10.1.3.1, "Starting the Oracle Identity and Access Management Installer."
-
Install Oracle Identity and Access Management 11g Release 2 (11.1.2.2). See Section 10.10.1.3.2, "Installing Oracle Identity and Access Management 11g Release 2 (11.1.2.2.0)."