When you have associated the source adapter with a source system type, the next steps include:
Selecting Source Columns. See Selecting Source Columns.
Defining Parameters. SeeDefining Parameters.
Defining URLs for drill through. See Defining URLs for Drill Through.
Use source columns to specify the columns that are available for mapping in the import format. There is no validation of the table or column names in this section—the source columns are registered so that they are available in import format for mapping.
The source columns added in this section must match the columns specified in the data model for the source table in the Oracle Data Integrator.
 To add a source column:
From the Source Column task bar, select Add.
Entry fields are displayed for the Column Name, Table Name, and Display Name columns.
In Column Name, enter the source column name.
For example, enter SEGMENT1. The source column name must have a corresponding column name in the ODI model.
In Table Name, enter the table name.
For example, enter LOGICAL_BALANCES. The table name must have a corresponding table name in the ODI model.
In Display Name, enter the display name used for the import format.
Use the Parameters tab to specify the list of parameters for a ODI Scenario. The parameter definition includes a non-translated parameter name and a translated prompt. The prompt is used for display on the data rule page.
This section includes information on:
Adding Parameters. See Adding Parameters.
Deleting Parameters. See Deleting Parameters.
When you add a parameter for the source adapter, a definition is created, which includes a non-translated parameter name and a translated prompt.
 To add a source column:
From the Parameters task bar, select Add.
Entry fields are displayed for the Parameter Name, Parameter Data Type, and Parameter Prompt columns.
In Parameter Name, enter the parameter name.
For example, enter p_actual_flag. This is the name of the parameter in the ODI project.
In Parameter Data Type, select the data type of the parameter:
Char
Number
Date
In Parameter Prompt, enter the parameter prompt.
For example, enter Balance Type in this row.
Note:
When a new parameter is added and you are in a multilanguage environment, then set the browser locale to the appropriate language and edit the prompts as needed in that language.
FDMEE provides a framework for using URLs for drill through. You click the hyperlink in the amount cell, and the source system is launched in a new EPM Workspace tab or a new window. Multiple drill through URLs are provided to drill to different pages in the source system based on the import format mapping.
See also Drilling Through.
To create a drill through URL, specify the URL name, URL, request method, and URL prompt.
 To add a drill through URL:
On the Drill URL task bar, select Add.
Entry fields are displayed for the Drill URL Name, Drill URL, Request Method, and Drill URL Prompt columns.
In Drill URL Name, enter a user defined name for the drill through URL.
In Drill URL, enter the URL used for the drill through.
Enter the URL without the server and port information. The URL must contain the parameter name and column name from the TDATASEG table enclosed in the symbol $.
For example, enter: LEDGER_ID=$ATTR1$&GL_PERIOD=$ATTR2$.
In the above example the value of ATTR1 is passed as a value for the LEDGER_ID parameter, and ATTR2 is passed as the value for the GL_PERIOD parameter. Parameters are separated by the “&” character.
To specify the request-response between a client and server for the drill URL format, enter either:
GET—Form data is encoded into the URL. For example, specify: GET@http://www.oracle.com/.. If no method is specified, then GET is the assumed request-response.
POST—Form data is displayed in the message body. For example, specify: POST@http://www.oracle.com/.
Note:
A JavaScript specification can also be used for the drill-through. See Adding Drill Through using JavaScript.
In the Drill URL Prompt, enter a user-defined prompt for the drill-through prompt.
For example, enter Default.
You can specify a JavaScript based drill through that enables you to drill through to a graphical user interface instead of an URL. To do this, you write a script in the Script Editor and store it in a custom script directory.
The JavaScript for the drill through is associated with the source adapter. You invoke JavaScript from the drill through link by specifying “#javascript” instead of “http URL” in the source system. You can also pass contextual parameters to a JavaScript function similar to the http drill URL.
 To add a drill through using JavaScript:
Select the source system file for the JavaScript based drill through.
In the detail section, from Drill Through URL, enter #javascript.
From the Create Script Options window, in Script Type, select Drill.
Note:
The Technology drop-down is JavaScript because drill through scripts can only be created based on JavaScript.
In Target Application, select the target application for this drill through script.
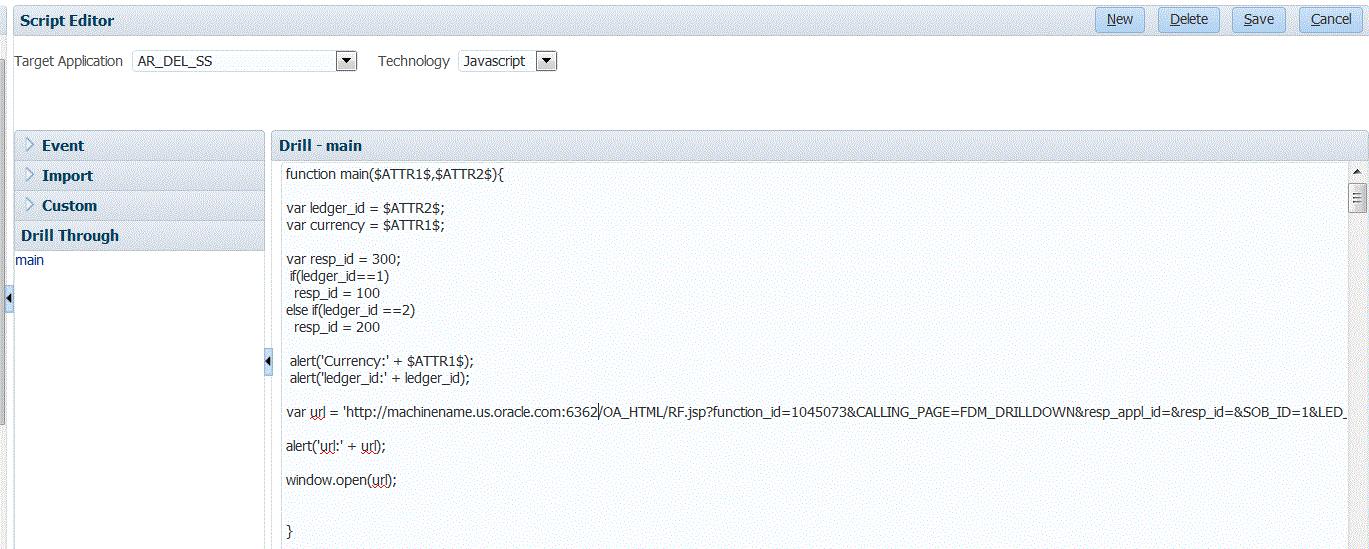
Write the code for the custom in the Script Editor.
Ensure the name of the JavaScript function is same as the file name.
For example,
function main($ATTR1$,$ATTR2$){var ledger_id = $ATTR2$; var currency = $ATTR1$;
var resp_id = 300;
 if(ledger_id==1)
  resp_id = 100
else if(ledger_id ==2)
  resp_id = 200
alert('Currency:' + $ATTR1$);
alert('ledger_id:' + ledger_id);
var url = 'http://machinename.us.oracle.com:6362/OA_HTML/RF.jsp?function_id=1045073&CALLING_PAGE=FDM_DRILLDOWN&resp_appl_id=&resp_id=&SOB_ID=1&LED_ID='+ledger-id+'&fdm_per=Jan-03&fdmccid=13098&fdm_currency+'+currency+'fdm_balance_type=A
alert('url:' + url);window.open(url);
}

On the Drill URL task bar, select Add.
Entry fields are displayed for the Drill URL Name, Drill URL, Request Method, and Drill URL Prompt columns.

In Drill URL Name, enter a user defined name for the drill through URL.
In the Drill URL, enter the Function name of the drill through.
The Function name should be same as the file name.
For example, enter: main($ATTR1$,$ATTR2$).
In Drill URL Prompt, enter a user-defined prompt for the drill-through prompt.
When you drill down from the workbench, a new window is launched with the specified URL.