9 High Availability
Oracle Enterprise Manager Ops Center has several capabilities that can be used to recover data and resume functions if the Enterprise Controller system or a Proxy Controller system fail.
If you set up a High Availability configuration during the installation and configuration process, you can fail over to the standby Enterprise Controller if the active Enterprise Controller fails.
The following features and topics are covered in this chapter:
9.1 Introduction to High Availability
Oracle Enterprise Manager Ops Center has several tools that can be used for disaster recovery. These tools let you preserve Oracle Enterprise Manager Ops Center data and functionality if the Enterprise Controller or Proxy Controller systems fail.
Some of the procedures described in this section use the ecadm command. See Appendix A, "Command Line Administration" for more information about this command.
-
On Oracle Solaris systems, this command is in the
/opt/SUNWxvmoc/bin/directory. -
On Linux systems, this command is in the
/opt/sun/xvmoc/bin/directory.
9.1.1 Enterprise Controller High Availability
High Availability is a setup involving multiple Enterprise Controllers using Oracle Clusterware and a remote database. The active Enterprise Controller is used for all Oracle Enterprise Manager Ops Center operations. The standby Enterprise Controllers are configured as backups. The user interface uses a virtual IP address (VIP), which always connects to the active Enterprise Controller.
If the active Enterprise Controller must be taken offline, you can make another Enterprise Controller active. One of the standby Enterprise Controllers is also activated if the active Enterprise Controller fails.
Figure 9-1, "Enterprise Controller High Availability Configuration" shows an example Enterprise Controller High Availability configuration.
Figure 9-1 Enterprise Controller High Availability Configuration

Description of "Figure 9-1 Enterprise Controller High Availability Configuration"
Note:
If you have not yet installed Oracle Enterprise Manager Ops Center, the Oracle Enterprise Manager Ops Center Installation Guide for Oracle Solaris Operating System and Oracle Enterprise Manager Ops Center Installation Guide for Linux Operating Systems explain how to install with Enterprise Controller High Availability.The following are requirements for a High Availability environment:
-
Use two or more systems of the same model and configured identically:
-
Processor class
-
Operating system
-
Oracle Enterprise Manager Ops Center software version, including updates
-
Network interfaces that are cabled identically to the same subnets
-
-
Add an asset tag to identify the active Enterprise Controller and to distinguish it from the standby Enterprise Controller using the Edit Asset action.
-
Maintain the standby Enterprise Controller's system in the same way as the active Enterprise Controller. The active and standby Enterprise Controllers must use the same version of Oracle Enterprise Manager Ops Center software. If you cannot use the user interface to verify the installed software versions at the time that you need to transfer functions to the standby system, view the content of the
/n1gc-setup/.version.propertiesfile. The product.version property lists the specific revision level of the installed software. For example:cat /n1gc-setup/.version.properties #Note: This file is created at build time. #Sat Nov 03 23:48:37 MDT 2012 jar.sign=true date=2012/11/03 23\:48 build.variation=xvmopscenter oc.build.type=dev-ga product.version=12.2.0.2457 product.installLocation=/var/opt/sun/xvm/EnterpriseController_installer_12.2.0.2457 #
Verify that the product.version property lists the same version on the active and standby Enterprise Controllers before you perform a relocate procedure.
-
Configure one shared private network. Gigabit speed is recommended.
-
Configure at least one shared public network. Gigabit speed is recommended.
-
Make the following public network addresses available:
-
<node#>-vip - One address of this format should be available for each node.
-
cluster SCAN address
-
-
An EC HA environment must use a customer-managed database on a system other than the Enterprise Controller systems.
-
The Enterprise Controller libraries must be NFS shares that are accessible by every Enterprise Controller system.
-
Configure a shared storage solution. This can be:
-
A shared NFS filesystem configured for root access by each node.
-
Shared SAN storage with at least one FibreChannel LUN connected to each server with identical
/dev/dskand/dev/rdsknames.
-
The following are limitations of a High Availability environment:
-
User accounts and data that are not associated with Oracle Enterprise Manager Ops Center are not part of the relocate process. Only Oracle Enterprise Manager Ops Center data is moved between the active and standby Enterprise Controllers.
-
UI sessions are lost on relocate.
-
The EC HA configuration applies only to the Enterprise Controller.
9.1.2 Proxy Controller High Availability
A specific Proxy Controller manages each asset. If a Proxy Controller fails or is uninstalled, you are prompted to migrate assets to another Proxy Controller if one is available. Alternatively, you can enable automatic failover, which automatically migrates assets to another Proxy Controller if their current Proxy Controller becomes unreachable. In either case, you can manually move assets to a new Proxy Controller at any time.
To migrate an asset to a new Proxy Controller, the destination Proxy Controller must either be connected to the networks of the assets being moved, or be associated with those networks and have them enabled. The destination Proxy Controller must also be online and reachable.
9.2 Enabling and Using Enterprise Controller High Availability
You can use Oracle Clusterware and Oracle Real Application Cluster software to create a High Availability configuration. A High Availability configuration includes one active Enterprise Controller node and one or more standby Enterprise Controller nodes, all using an external database. If the active Enterprise Controller node fails, a standby node is made active, and a notification is sent to notify the user that the relocate has occurred.
Figure 9-2, "Enterprise Controller High Availability States" shows the possible states of an Enterprise Controller High Availability configuration and the steps needed to move between them.
Figure 9-2 Enterprise Controller High Availability States
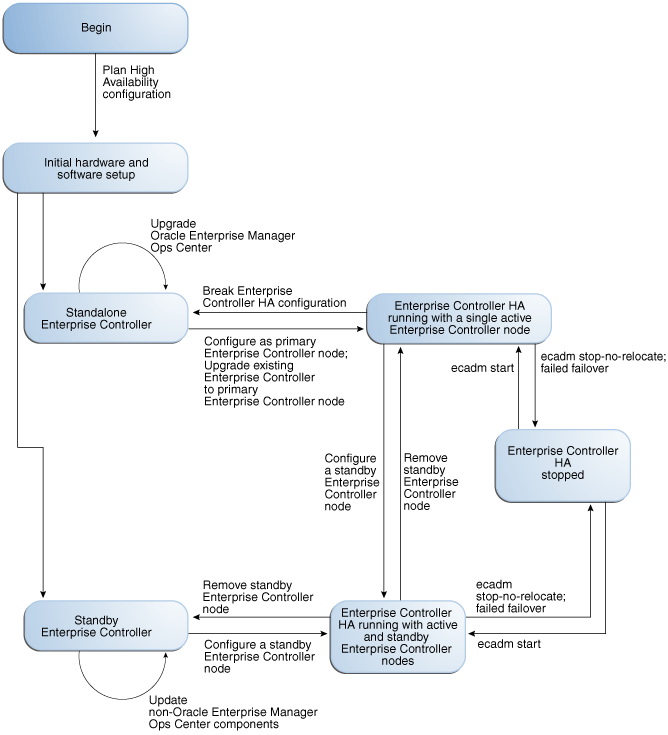
Description of "Figure 9-2 Enterprise Controller High Availability States"
9.2.1 Converting a Single Enterprise Controller to High Availability
If you are using a single configured Enterprise Controller, you can switch to a high availability configuration.
This procedure assumes that you have already installed and configured a single Enterprise Controller. If you have not installed and configured an Enterprise Controller, see the Oracle Enterprise Manager Ops Center Installation Guide for Oracle Solaris Operating System or the Oracle Enterprise Manager Ops Center Installation Guide for Linux Operating Systems for information on installing with High Availability.
9.2.1.1 Preparing for High Availability with Oracle Clusterware
Installing and configuring Oracle Clusterware is the first step in setting up High Availability in your environment.
-
Install Oracle Clusterware in your environment using the Grid Infrastructure Installation Guide for Oracle Solaris Systems or the Grid Infrastructure Installation Guide for Linux Systems.
-
If you are using a local database, switch to a remote database. See Chapter 3, "Database Management" for more information.
9.2.1.2 Making the Current Enterprise Controller the Primary Node
Once your environment is prepared, configure the current Enterprise Controller as the primary node.
-
Stop the Enterprise Controller using the
ecadmcommand and thestopsubcommand. -
Use the
ecadmcommand with theha-configure-primarysubcommand to configure the system as the active Enterprise Controller.If the clusterware
crsctlcommand is not in the/u01directory, use the--crsctl_basepath <location>option to specify its location.For example:
# ./ecadm ha-configure-primary
INFO: HAECClusterwareAdapter/doConfigurePrimary() Stopping Ops Center ...
INFO: HAECClusterwareAdapter/doConfigurePrimary() Ops Center stopped
INFO: HAECClusterwareAdapter/createActionScript() created Resource Action Script='/var/opt/sun/xvm/ha/EnterpriseController'
INFO: HAECClusterwareAdapter/doConfigurePrimary() created Clusterware Action Script='/var/opt/sun/xvm/ha/EnterpriseController'
INFO: HAECClusterwareAdapter/doConfigurePrimary() created Clusterware Resource='EnterpriseController'
INFO: HAECClusterwareAdapter/doHAStart() starting resource='EnterpriseController' on node='primary-system'
INFO: HAECClusterwareAdapter/doHAStart()statusSB='CRS-2672: Attempting to start 'EnterpriseController' on 'primary-system'
CRS-2676: Start of 'EnterpriseController' on 'primary-system' succeeded'
INFO: HAECClusterwareAdapter/doHAStart() started resource='EnterpriseController' on node='primary-system'
INFO: HAECClusterwareAdapter/doConfigurePrimary() Ops Center started on node='primary-system'
ecadm:    --- Enterprise Controller successfully configured HA primary node
#
9.2.1.3 Installing a Standby Node
Once you have configured one Enterprise Controller as the active node, you can install and configure standby nodes.
-
If you are installing on Oracle Solaris 11, and if the system requires an HTTP proxy to reach the Internet, set the
http_proxyandhttps_proxyenvironment variables. These values are only used during the installation. Use the following format:-
http_proxy=http://<proxy IP address>:<port number>orhttp://<username:password>@<proxy IP address>:<port number>- This variable specifies the proxy server to use for HTTP. -
https_proxy=https://<proxy IP address>:<port number>orhttps://<username:password>@<proxy IP address>:<port number>- This variable specifies the proxy server to use for HTTPS.
For example:
export http_proxy=http://10.79.204.11:8080
export https_proxy=https://10.79.204.12:8080
-
-
If you are installing on Oracle Solaris 11, check the user type for the root user. If root is a role, configure root as a normal user. For example:
# grep root /etc/user_attr
root::::type=role;auths=solaris.*,solaris.grant;profiles=...
# sudo rolemod -K type=normal root
-
Create a temporary directory on your system, then copy or move the appropriate Oracle Enterprise Manager Ops Center archive for your system from delivery media to the temporary directory that you created. For example:
# mkdir /var/tmp/OC
# cp enterprise-controller.Solaris.i386.12.2.0.2457.tar.gz /var/tmp/OC
The installation archive consumes about 3.5 GBytes of disk space.
-
Change to the directory where the installation archive is located on your system.
# cd /var/tmp/OC
#
-
Expand the installation archive, then list the contents of the expanded directory.
-
If your installation archive has the
.zipextension, use theunzipcommand to uncompress the archive. For example:# unzip enterprise-controller.Solaris.i386.12.2.0.2457.zip # ls enterprise-controller.Solaris.i386.12.2.0.2457.zip xvmoc_full_bundle #
-
If your installation archive has the
.tar.zipextension, use theunzipandtarcommands to uncompress and un-tar the archive, then list the contents of the temporary directory. The following command example retains the original compressed archive file. The data extracted from the archive consumes about 1 GB of additional space. For example:# unzip enterprise-controller.Solaris.i386.12.2.0.2457.tar.zip | tar xf - # ls enterprise-controller.Solaris.i386.12.2.0.2457.tar.zip xvmoc_full_bundle #
-
-
Create a database properties file on the Enterprise Controller system. The database properties file must contain the location of the customer-managed database and a user name and password that can access the database.
The database information can be found in the
tnsnames.orafile.For example:
# vi /var/tmp/RemoteDBProps.txt
mgmtdb.appuser=TESTSCHEMA
mgmtdb.password=TESTSCHEMA_PWD
mgmtdb.roappuser=TESTSCHEMA_RO
mgmtdb.ropassword=TESTSCHEMA_RO_PWD
mgmtdb.dburl=jdbc:oracle:thin:@<database host name>:<port>/<database service name>
The mgmtdb.dburl property can be entered in any of these formats:
mgmtdb.dburl=jdbc:oracle:thin:@<database host name>:<port>/<database service name>
mgmtdb.dburl=jdbc:oracle:thin:@<database host name>:<port>:<SID>
mgmtdb.dburl=jdbc:oracle:thin:@(DESCRIPTION=(ADDRESS=(PROTOCOL=TCPS)(HOST=<host>)(PORT=<port>))(CONNECT_DATA=(SERVICE_NAME=<service>)))
-
Change directory to
xvmoc_full_bundle, and run theinstallscript with the--remoteDBprops <path to database properties file>and--standbyECoptions. For example:# cd xvmoc_full_bundle # ./install --remoteDBprops=/var/tmp/remoteDBProps.txt --standbyEC
-
The Oracle Configuration Manager installation text is displayed. Enter the My Oracle Support user name or email address that you want to associate with Oracle Enterprise Manager Ops Center.
Provide your email address to be informed of security issues, install and
initiate Oracle Configuration Manager. Easier for you if you use your My
Oracle Support Email address/User Name.
Visit http://www.oracle.com/support/policies.html for details.
Email address/User Name:
-
If you want security updates to appear on your My Oracle Support page, enter your My Oracle Support password.
Provide your My Oracle Support password to receive security updates via your My Oracle Support account.
Password (optional):
The screen clears, then the install script displays a list of installation tasks that automatically updates as the installation proceeds. For example:
Ops Center Enterprise Controller Installer
(version 12.2.0.2457 on SunOS)

1. Check for installation prerequisites.                       [Not Completed]
2. Configure file systems.                                     [Not Completed]
3. Install prerequisite packages.                              [Not Completed]
4. Install Agent components.                                   [Not Completed]
5. Create Deployable Proxy Bundles.                            [Not Completed]
6. Install application packages.                               [Not Completed]
7. Run postinstall tasks.                                      [Not Completed]
8. Install Expect.                                             [Not Completed]
9. Install IPMI tool.                                          [Not Completed]
10. Set database credentials.                                  [Not Completed]
11. Install and Configure Oracle Database.                     [Not Completed]
12. Seed Ops Center Database Schema                            [Not Completed]
13. Install Service container components.                      [Not Completed]
14. Install Core Channel components.                           [Not Completed]
15. Install Proxy Core components.                             [Not Completed]
16. Set Proxy database credentials.                            [Not Completed]
17. Install Enterprise Controller components.                  [Not Completed]
18. Install Update Connection - Enterprise.                    [Not Completed]
19. Install Ops Center BUI components.                         [Not Completed]
20. Install OS provisioning components.                        [Not Completed]
21. Initialize and start services.                             [Not Completed]
Executing current step:  Check for installation prerequisites...
-
Review and correct any problems when the
installscript checks for installation prerequisites that are not met. For example, thisinstallscript detected insufficient disk space:Warning for Step: Check for installation prerequisites. The following is a portion of the installer log which may indicate the cause of the warning. If this does not indicate the cause of the warning, you will need to view the full log file. More information on how to do that is available below. You may choose to ignore this warning by selecting to continue. * * * * * * * * * * * * * * * * * * * * * * * * * * * * * * * * * * * * Ignoring job: 01checkRPMs.pl Ignoring job: 03removeEmptyDirs.pl Executing job: jobs/00checkPrereqs.pl --install WARNING: Installation prerequisites not met: Disk: / 72G needed, 24G available. * * * * * * * * * * * * * * * * * * * * * * * * * * * * * * * * * * * * Please fix the problem and then try this step again. For a full log of the failed install see the file: /var/tmp/installer.log.9361. t. Try this step again (correct the failure before proceeding) c. Continue (ignore the warning) x. Exit Enter selection: (t/c/x)
You can enter
tto try again,cto continue and ignore the warning, orxto exit the install script. You should exit the install script, correct the problem, and then run the install script again, which resumes from where it stopped. Choose to continue and ignore the warning only if you accept the impact of the error condition on your installation. Enteringttypically produces the same error, unless you are able to correct the problem before trying the step again. If the install script finds that all prerequisites have been satisfied, or if you choose to continue despite the warning, the install script continues and installs all Enterprise Controller and Proxy Controller components.When complete, the install script displays a confirmation that all components have been installed. The
/var/tmp/installer.log.latestfile contains the installation log. -
Create a password file containing the root user name and password for the active Enterprise Controller. For example:
# touch /tmp/creds.props
# chmod 400 /tmp/creds.props
# vi /tmp/creds.props
# cat /tmp/creds.props
username:root
password:XXXXX
-
Use the
ecadmcommand with theha-configure-standbyand-p <password file>subcommands to configure the node as a standby node.If the clusterware
crsctlcommand is not in the/u01directory, use the--crsctl_basepath <location>option to specify its location.For example:
# ecadm ha-configure-standby -p /tmp/creds.props
INFO: HAECClusterwareAdapter/doConfigureStandby() Stopping Ops Center ...
INFO: HAECClusterwareAdapter/doConfigureStandby() Ops Center stopped
INFO: remoteFileCopy() copied '/etc/passwd' from remoteHostname='primary-system' to local file='/tmp/activeNodepw'
<output omitted>
ecadm:    --- Enterprise Controller successfully configured HA standby node
-
Use the
ecadmcommand with theha-status -doption to check the status of the standby Enterprise Controller.For example:
# ecadm ha-status -d
INFO: HAECClusterwareAdapter/doHAStatus() Status:
# HAEC Cluster Info: Thu Sep 29 15:49:09 MDT 2011
haec.cluster.active.node=primary
haec.cluster.nodes=standby, primary
haec.ec.public.nics=nge1
haec.ec.status=ONLINE
<output omitted>
haec.cluster.script=/var/opt/sun/xvm/ha/EnterpriseController
haec.cluster.crsctl=/u01/app/11.2.0/grid/bin/crsctl
# End of Cluster Info
ecadm:    --- Enterprise Controller ha-status command succeeded
Status stored in file: /var/opt/sun/xvm/ha/HAECStatus
#
9.2.2 Converting a High Availability Configuration to a Single Enterprise Controller
You can convert your High Availability configuration to a single Enterprise Controller.
-
As root, log on to each standby Enterprise Controller node.
-
On each standby Enterprise Controller node, use the
ecadmcommand with theha-unconfigure-standbysubcommand to remove the node from the High Availability configuration.The node is removed from the cluster.
-
As root, log on to the active Enterprise Controller node.
-
Use the
ecadmcommand with theha-stop-no-relocatesubcommand to stop the active node without bringing up a new node.The active Enterprise Controller node is stopped.
-
Use the
ecadmcommand with theha-unconfigure-primarysubcommand to unconfigure the Enterprise Controller as part of a High Availability configuration.The active Enterprise Controller node is unconfigured as the active node.
-
Use the
ecadmcommand with thestartsubcommand to start the active node.The Enterprise Controller is restarted.
9.2.3 Performing a Manual Relocate
You can manually relocate from the current Enterprise Controller to a standby Enterprise Controller.
-
As root, log in to the active Enterprise Controller node.
-
Use the
ecadmcommand with theha-relocatesubcommand to switch to a different node. If multiple standby nodes are available, use the--node <standby node>option to switch to the specified standby node.Another node is activated and the current node is switched to standby mode.
9.2.4 Managing HA Network Resources
Oracle Clusterware provides support for one network address known as the Single Client Access Name (SCAN). However, in some deployments, systems must communicate with the Enterprise Controller on a network separate from the SCAN network.
You can add and manage network resources for high availability using the Clusterware crsctl command.
For more information about these commands, and information about deleting, starting, stopping, or checking the status of network resources, see the Oracle Clusterware Administration and Deployment Guide 11g Release 2.
9.2.4.1 Adding a Network Resource
You can add a network resource using the crsctl command.
To add a network resource, run the crsctl add resource command with the following format:
/u01/app/11.2.0/grid/bin/crsctl add resource <resource name> -type application -attr ACTION_SCRIPT=/u01/app/11.2.0/grid/bin/usrvip, USR_ORA_NETMASK=<netmask>,USR_ORA_VIP=<vip IP address>,USR_ORA_START_TIMEOUT=0,USR_ORA_STOP_TIMEOUT=0,USR_ORA_STOP_MODE=immediate,USR_ORA_IF=<network interface>,USR_ORA_OPI=false,USR_ORA_CHECK_TIMEOUT=0,USR_ORA_DISCONNECT=false,USR_ORA_PRECONNECT=none,HOSTING_MEMBERS=<node1>:<node2>
The following options are included in this format:
-
<resource name>: Specifies the resource name. -
-type application -
USR_ORA_IF=<network interface>: Specifies the network interface (NIC) for the network resource. -
USR_ORA_VIP= <ipaddress>: Specifies the IP address for the network resource. -
USR_ORA_NETMASK=<netmask>: Specifies the netmask for the network resource. -
USR_ORA_IF=<network interface>: Specifies the network interface (NIC) for the network resource. -
HOSTING_MEMBERS=<node1>:<node2>: Specifies the cluster nodes hosting the Enterprise Controller. -
ACTION_SCRIPT=/u01/app/11.2.0/grid/bin/usrvip -
PLACEMENT=favored
9.2.4.2 Modifying a Network Resource
You can modify an existing network resource using the crsctl command.
To add a network resource, run the crsctl modify resource command with the following format:
./crsctl modify resource <resource name> -attr <attribute>=<new value>, <attribute>=<new value>,...
The following attributes can be modified:
-
USR_ORA_IF=<network interface>: Specifies the network interface (NIC) for the network resource. -
USR_ORA_VIP= <ipaddress>: Specifies the IP address for the network resource. -
USR_ORA_NETMASK=<netmask>: Specifies the netmask for the network resource. -
USR_ORA_IF=<network interface>: Specifies the network interface (NIC) for the network resource. -
HOSTING_MEMBERS=<node1>:<node2>: Specifies the cluster nodes hosting the Enterprise Controller. -
ACTION_SCRIPT=/u01/app/11.2.0/grid/bin/usrvip -
PLACEMENT=favored
9.2.5 Removing a Standby Enterprise Controller Node
You can remove a standby Enterprise Controller node from the cluster.
-
As root, log on to the standby Enterprise Controller node.
-
Use the
ecadmcommand with theha-unconfigure-standbysubcommand to remove the node from the High Availability configuration.The node is removed from the cluster. You can uninstall the Enterprise Controller on the node using the normal Enterprise Controller uninstall procedure.
9.2.6 Checking the Status of the Enterprise Controller Cluster
You can check the status of the cluster from any Enterprise Controller node.
-
As root, log on to an Enterprise Controller node.
-
Use the
ecadmcommand with theha-statussubcommand and the-doption to check the status of the cluster.The node's status is displayed.
9.2.7 Shutting Down the Enterprise Controller Temporarily Without Relocating
You can stop the active node without making a different node active. The user interface and the command-line interface are unusable while all Enterprise Controller nodes are shut down.
-
As root, log on to the active Enterprise Controller node.
-
Use the
ecadmcommand with theha-stop-no-relocatesubcommand to stop the active node without bringing up a new node.The active node is stopped.
-
Use the
ecadmcommand with theha-startsubcommand to start the active node.The active node is restarted.
9.3 Enabling and Using Proxy Controller High Availability
A specific Proxy Controller manages each asset. If a Proxy Controller fails or is uninstalled, you are notified and given the option to migrate the failed Proxy Controller's assets to another Proxy Controller. Alternatively, you can enable automatic failover, which automatically migrates assets to another Proxy Controller if their current Proxy Controller fails. You can also move an asset from one functional Proxy Controller to another.
To migrate an asset to a new Proxy Controller, the destination Proxy Controller must either be connected to the networks of the assets being moved, or be associated with those networks and have them enabled. The destination Proxy Controller must also be online and reachable.
9.3.1 Enabling Automatic Failover
You can enable automatic failover, which automatically migrates assets to another Proxy Controller if their current Proxy Controller becomes unreachable. The Alert indicating that the Proxy Controller is unreachable triggers the automatic failover.
Before you enable automatic failover, close all existing unreachability incidents on remote Proxy Controllers.
Oracle Enterprise Manager Ops Center cannot migrate assets to a Proxy Controller if it has any alerts indicating that it is unreachable.
Note:
Automatic Failover only applies to remote Proxy Controllers. Assets cannot be automatically relocated from a co-located Proxy Controller.-
Click the Enterprise Controller in the Administration section of the Navigation pane.
-
Click the Configuration tab.
-
Select Proxy Manager in the Subsystem drop-down list.
-
Change the value of the AUTO_FAILOVER property to true.
-
Click the Save Properties icon.
Automatic Failover is enabled.
9.3.2 Disabling Automatic Failover
You can disable automatic failover to resume manual failover or to prevent failover during a scheduled Proxy Controller outage. Automatic failover is disabled by default.
-
Click the Enterprise Controller in the Administration section of the Navigation pane.
-
Click the Configuration tab.
-
Select Proxy Manager in the Subsystem drop-down list.
-
Change the value of the AUTO_FAILOVER property to false.
-
Click the Save Properties icon.
Automatic Failover is disabled.
9.3.3 Setting the Relative Power for Proxy Controllers
When Oracle Enterprise Manager Ops Center migrates an asset, it targets the available Proxy Controller with the lowest load. You can edit a Proxy Controller's relative power to make it a more or less common target for automatic migration.
The load for each Proxy Controller is determined by the following formula:
Load = (managedResourceCount + (managedAgentCount * RELATIVE_CASCADE_WEIGHT)) / PC.RELATIVE_POWER
In this formula, the following variables are used:
-
managedResourceCount– The number of assets managed by the Proxy Controller. -
managedAgentCount– The number of Agent Controllers managed by the Proxy Controller. -
RELATIVE_CASCADE_WEIGHT– A relative weight ofmanagedAgentCountacross all Proxy Controllers. -
PC.RELATIVE_POWER– A Proxy Controller-specific variable that specifies the relative power of the Proxy Controller.
You can edit the PC.RELATIVE_POWER for a Proxy Controller to make it a more or less common target for automatic migration. Proxy Controllers with a higher Relative Power than other Proxy Controllers are more likely to be targets for automatic migration. You can also edit the RELATIVE_CASCADE_WEIGHT to increase or decrease the importance of Agent Controllers in the load calculation; a higher value for this variable increases the importance of Agent Controllers in the load calculation.
-
Click the Enterprise Controller in the Administration section of the Navigation pane.
-
Click the Configuration tab.
-
Select Proxy Manager in the Subsystem drop-down list.
The Proxy Manager variables are displayed. Two variables are relevant:
-
RELATIVE_CASCADE_WEIGHT– A relative weight ofmanagedAgentCountacross all Proxy Controllers. The default value is five. -
<PROXY CONTROLLER>.RELATIVE_POWER– Each Proxy Controller has a Relative Power variable. The default value is one.
-
-
(Optional) Edit the value of the
RELATIVE_CASCADE_WEIGHTproperty. -
Edit the value of the
<PROXY CONTROLLER>.RELATIVE_POWERproperty for the target Proxy Controllers.Note:
You cannot set thePC.RELATIVE_POWERvalue to zero. If it is set to zero or to a non-numeric value, it will be reset to the default of one when a migration job is launched or when automatic failover is enabled.If you want a Proxy Controller to be temporarily disabled as a target for automatic migration, place the Proxy Controller in maintenance mode as described in the Infrastructure chapter.
-
Click the Save Properties icon.
9.3.4 Recovering After an Automatic Failover
An automatic failover can require some cleanup actions. Depending on the circumstances of the failover, access points for failed or old Proxy Controllers can remain on some assets. These access points do not cause any known issues, but can cause confusion for users.
If an automatic failover occurs and the failed Proxy Controller is permanently unavailable, unconfigure and delete the Proxy Controller. See Removing a Proxy Controller from the User Interface for more information.
If an automatic failover occurs and the failed Proxy Controller is restarted, manually migrate the assets to the desired Proxy Controllers. Then view the access points for each asset. If an asset has an access point for an incorrect Proxy Controller, delete that access point. See the Asset Management chapter of the Feature Reference Guide for more information about deleting access points.
9.3.5 Migrating Assets Between Proxy Controllers
You can migrate an asset from one functional Proxy Controller to another to balance job load or if you intend to uninstall a Proxy Controller.
-
Select the source Proxy Controller in the Administration section of the Navigation pane.
-
Click the Managed Assets tab.
-
Select one or more assets to move, then click the Migrate Assets icon.
If another Proxy Controller is available that can manage the assets, the Asset Migration Wizard is displayed.
If no other Proxy Controller is available that can manage the assets, an error message is displayed.
-
Within the Asset Migration Wizard, the selected assets are displayed in groups which can be migrated together. Select one or more groups, then select the destination Proxy Controller from the list of Proxy Controllers, or select Auto Balance across Proxies to automatically select a destination Proxy Controller.
-
Click Migrate.
A job is launched to migrate the selected assets to the destination Proxy Controller. The migration status is displayed in the job and in the Managed Assets tab.
9.3.6 Migrating Assets from a Failed Proxy Controller
If a Proxy Controller fails, Oracle Enterprise Manager Ops Center sends an alert giving you the option of migrating assets from the failed Proxy Controller to another Proxy Controller.
If you expect the Proxy Controller to come back online, leave the assets under its management. However, if you expect the Proxy Controller not to come back online, you can migrate them to another available Proxy Controller. This action also removes the Proxy Controller.
For a Proxy Controller to serve as a destination for an asset migration, the asset must be connected to a network that can be accessed by the Proxy Controller. If no other Proxy Controller can reach an asset, it cannot be migrated.
-
Open the alert indicating that a Proxy Controller has failed.
-
Click Migrate Assets.
If another Proxy Controller is available that can manage the assets, the Asset Migration Wizard is displayed.
If no other Proxy Controller is available that can manage the assets, an error message is displayed.
-
Within the Asset Migration Wizard, the selected assets are displayed in groups which can be migrated together. Select one or more groups, then select the destination Proxy Controller from the list of Proxy Controllers, or select Auto Balance across Proxies to automatically select a destination Proxy Controller.
-
Click Migrate.
A job is launched to migrate the selected assets to the destination Proxy Controller. The migration status is displayed in the job and in the Managed Assets tab.