Specifying Field-Level Security Options
You can set up field-level security for business units and SetIDs because EPM warehouse tables are keyed by either SetID or business unit. The Security Options page enables you to enable this type of security. The page updates one row in the INSTALLATION_FS table. Only one row is ever in this table (only one type of security can be active at a time). For example, if you select operator security, only selected fields (business unit, SetID, or both) have security applied.
After specifying field-level security options you must associate security views with specific users, permission lists, business units, or SetIDs and run the apply security application engine process (which reads the INSTALLATION_FS table, determines the security type, such as none, permission list or operator, and applies your selected field-level security parameters).
After running the apply security process, you must associate specific users or permission lists with the business unit and/or SetID restrictions (data group restrictions) you defined in the previous steps.
This topic discusses how to:
Set up field-level security options.
Set up security view names.
Establish SetID security by permission list or user ID.
Establish business unit security by permission list or user ID.
Pages Used to Specify Field-Level Security Options
|
Page Name |
Definition Name |
Navigation |
Usage |
|---|---|---|---|
|
Security Options |
SECURITY_OPTIONS |
|
Set up field-level security for business units and SetIDs. |
|
Security View Names |
SECURITY_VIEWS |
|
Set up security view names. |
|
Request Security Processing |
RUN_FIN9001 |
EPM Foundation, EPM Security, Advanced, Apply Security Setups, Request Security Processing |
Run the Apply Security process to apply the security setup throughout the system. |
|
TableSet Security by Permission List |
SEC_SETID_CLS |
|
Establish SetID security by permission list. Valid values for permission list are taken from your PeopleTools security setup. |
|
TableSet Security by User ID |
SEC_SETID_OPR |
|
Establish SetID security by user ID. Valid values for user are taken from your PeopleTools security setup. |
|
Unit Security by Permission List |
SEC_BU_CLS |
|
Establish business unit security by permission list. |
|
Unit Security by User ID |
SEC_BU_OPR |
|
Establish business unit security by user ID. |
Security Options Page
Use the Security Options page (SECURITY_OPTIONS) to set up field-level security for business units and SetIDs.
Image: Security Options page
This example illustrates the fields and controls on the Security Options page. You can find definitions for the fields and controls later on this page.

You can implement security using any of the following fields:
Unit: Business unit, the primary key for all transaction data.
SetID: The primary key for all accounting structure and rules tables.
Ledger
Book
Project
Analysis Group
Pay Cycle
For either field, you can set the security in the following ways:
Security View Names Page
Use the Security View Names page (SECURITY_VIEWS) to set up security view names.
Image: Security View Names page
This example illustrates the fields and controls on the Security View Names page. You can find definitions for the fields and controls later on this page.
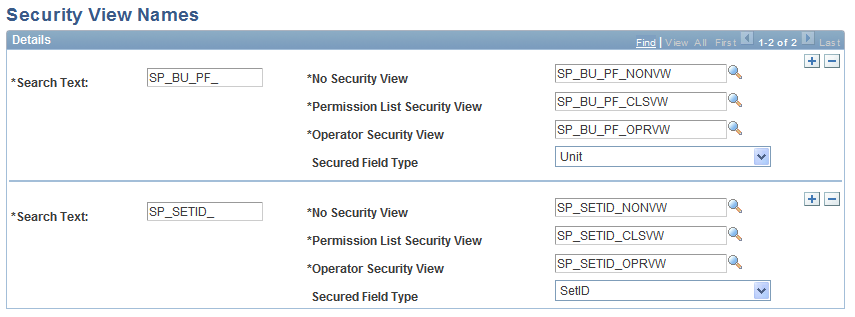
After you have set up your security views, you can specify which users or permission lists can access the pages that contain secured field values using the Security View Names page. Within each page, you also can hide specific fields from particular permission lists. The Security View Names page also indicates the type of field (business unit or SetID) secured by each view.
The system stores the list in the SEC_VIEW_NAMES table, where you can review or update this information. You can add any security views that you configure for your system.
View names use one of three file extensions to reflect the type of security that you selected when you specified your security options:
_NONVW: Indicates that no security has been selected for that view.
_OPRVW: Indicates that operator (user) security has been selected for that view.
_CLSVW: Indicates that permission list security has been selected for that view.
Use the Search Text field to search for a security view table. This field lists the view name prefixes that are supplied by each of your applications. When you run the Apply Security Setup process, the process uses these prefixes to search the system for view names that begin with these prefixes. If a view name begins with a prefix from this list, the process changes the view name extension to match the security type that you selected when you specified security options. The type of field (business unit or SetID) that is secured by each view is embedded in the view name.
After you have selected your security options and defined your security views, you must run the Apply Security FIN9001 SQR process for the options to take effect.
Request Security Processing Page
Use the Request Security Processing page (RUN_FIN9001) to run the Apply Security process to apply the security setup throughout the system.
EPM Foundation, EPM Security, Advanced, Apply Security Setups, Request Security Processing
Run the Apply Security process to apply the security parameters you set up on the Security Options and Security View Names pages. The Apply Security process reads the INSTALLATION_FS table to determine the security type (none, permission list, operator) and then switches the prompt table views to the new view names, based on SEC_VIEW_NAMES. The process searches for the values in the Search Text field on the Security View Names page and replaces the table names as specified.
Note: This process should not be confused with the request security processing process (PF_SECURITY) which is discussed later in this topic. The PF_SECURITY process applies security parameters specified for security roles and users.
TableSet Security by Permission List Page
Use the TableSet Security by Permission List page (SEC_SETID_CLS) to establish SetID security by permission list or use the TableSet Security by User ID page (SEC_SETID_OPR) to establish SetID security by user ID.
Valid values for permission list are taken from your PeopleTools security setup.
Valid values for user are taken from your PeopleTools security setup.
Image: TableSet Security by Permission List page
This example illustrates the fields and controls on the TableSet Security by Permission List page. You can find definitions for the fields and controls later on this page.
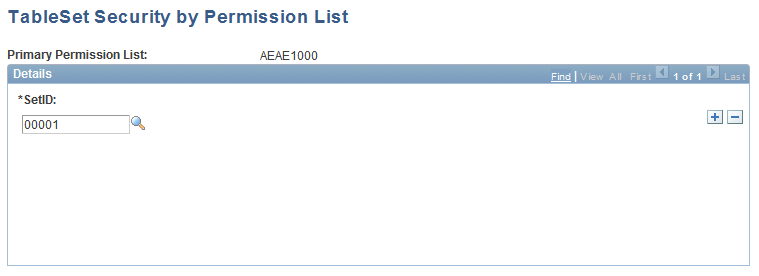
For each user ID or primary permission list, select the SetID or SetIDs that the users or permission list can access.
Unit Security by Permission List Page
Use the Unit Security by Permission List page (SEC_BU_CLS) to establish business unit security by permission list and use the Unit Security by User ID page (SEC_BU_OPR) to establish business unit security by user ID.
Image: Unit Security by Permission List page
This example illustrates the fields and controls on the Unit Security by Permission List page. You can find definitions for the fields and controls later on this page.
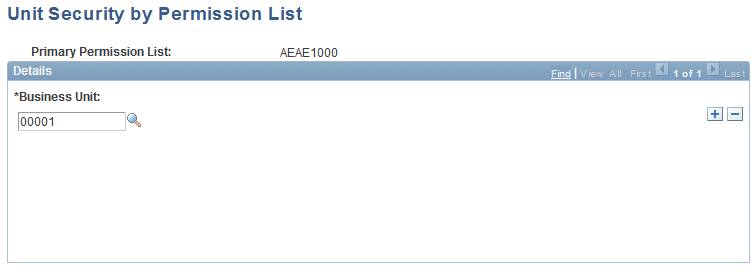
For each user ID or primary permission list, select the warehouse business unit or units that the user or permission list can access.