Setting Up a Compensation Scenario
To set up a compensation scenario, use the WA_CP_ELEM_DFN.GBL, WA_CP_GOALMTRX_DFN.GBL, WA_CP_MERIT_DFN.GBL, WA_CP_PYOUT_DFN.GBL, WA_CP_BASE_PAY.GBL, WA_CP_RULE_DFN.GBL, WA_CP_OTHER_DFN.GBL, and WA_CP_MODEL_DFN.GBL components.
This section discusses how to:
Link employee information to a compensation scenario.
Define performance-based calculation rules with a goals matrix.
Define base compensation increase rules with a merit matrix.
Control compensation distribution payout rules.
Define base pay rules.
Define variable pay rules.
Specify other pay rules.
Define frequency details for compensation models.
Set up workforce groups for compensation models.
Set up model IDs for compensation models.
Define a compensation planning and simulation model.
Set up compensation scenario IDs.
Set up the Compensation Planning and Simulation process run control.
Run the Compensation Planning and Simulation process.
Review and alter compensation planning scenario data using the Analytic Calculation Engine (ACE).
Pages Used to Set Up and Run a Compensation Scenario
|
Page Name |
Definition Name |
Navigation |
Usage |
|---|---|---|---|
|
Data Element |
WA_CP_ELEM_DFN |
|
Create data elements that link employee-based information in the system to compensation planning rules. |
|
Goals Matrix |
WA_CP_GOALMTRX_DFN |
|
Define performance-based calculation rules for group or employee performance based on a goals matrix. |
|
Merit Matrix |
WA_CP_MERIT_DFN |
|
Create a merit matrix which defines the amount rules for base compensation increases for your workers. |
|
Payout Rule |
WA_CP_PYOUT_DFN |
|
Establish the amount rules for how to pay out compensation based on a flat amount, percentage of base pay, or criteria in a data element. |
|
Base Pay Compensation Rule |
WA_CP_BASE_PAY |
|
Create a base pay compensation rule. |
|
Variable Pay Rule |
WA_CP_VC_PAY |
|
Create a variable pay compensation rule, for bonuses for example. |
|
Other Pay Rule |
WA_CP_OTHER_PAY |
|
Create other pay rules, for benefits for example. |
|
Compensation Model |
WA_CP_MODEL_DFN |
|
Set up a model to bring together the workforce groups and compensation rules needed to run a scenario. |
|
Workforce Group Description |
WA_CP_MODEL_SEC1 |
Click the Workforce Group Info (information) button alongside the group ID field on the Compensation Model page. |
View a description of the workforce group. |
|
Compensation Rule Description |
WA_CP_MODEL_SEC2 |
Select the Compensation Rule Info (information) button alongside the rule ID field on the Compensation Model page. |
View a description of the compensation rule. |
|
Run Compensation Scenario - Run Jobstream |
RUN_PF_JOBSTREAM |
|
Run the compensation planning and simulation process. |
Data Element Page
Use the Data Element page (WA_CP_ELEM_DFN) to create data elements that link employee-based information in the system to compensation planning rules.
Image: Data Element page
This example illustrates the fields and controls on the Data Element page. You can find definitions for the fields and controls later on this page.
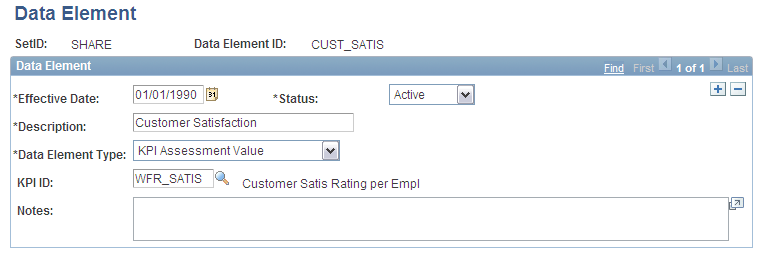
Data elements, at their most simple level, define information that you link to an employee. At a more complex level, you use data elements when you build compensation rules, to tell the system what data to retrieve about your workforce groups, and what performance measures to apply to your compensation scenario.
Selecting a Data Element Type
Select a Data Element Type from the list of translate table values:
DataSet Data Element Type
Goals Matrix Score Data Element Type
For a Data Element Type of Goals Matrix Score, first create the Goals Matrix on the Goals Matrix page. Then, while still on that page, choose to have the system automatically create a corresponding Data Element with the same name. If you already have a Goals Matrix built, and you want to define a Data Element with a different name, then create the Data Element using this page. In either case, each Goals Matrix ID must be linked to a corresponding Data Element ID.
Some Important Points about Creating KPIs for Use with Workforce Rewards
When you use Scorecard to create KPIs for use in Workforce Rewards, remember the following important points:
The Enterprise Scorecard pages you use to create KPIs are located by navigating to Key Performance Indicators, Define KPI's. They are as follows:
Data Element Definition (if you are using data elements in your KPI.)
Calculation Definition.
Assessment Definition (if you are using a target rule, then specify the assessment usage as Workforce Analytics to ensure required values are populated.)
KPI Definition.
KPI Calculation Rule.
KPI Object.
KPI Target Rule (if you are using assessed values then specify the target rule type as Workforce Analytics.)
Specify the model IDs for your KPIs in the KPI Model column, on the EPM Foundation, Business Metadata, Business Framework, Scenarios - Forecast Business Rules page.
Processing is done by using the Workforce Rewards jobstreams (either WA_CPS or WA_RETENT). None of the KPI jobstreams need to be run if the KPI is only used in Workforce Rewards.)
Workforce-specific KPIs are delivered with Workforce Scorecard. If your implementation includes Workforce Scorecard, you can use those KPIs on the Data Element page in Workforce Rewards.
Note: You can only use the KPI-related options if your implementation includes Scorecard or Workforce Scorecard.
Goals Matrix Page
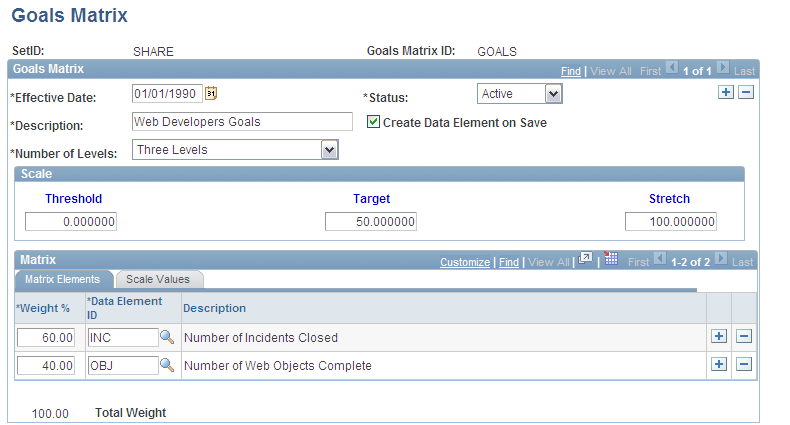
Use the Goals Matrix page (WA_CP_GOALMTRX_DFN) to define performance-based calculation rules for group or employee performance based on a goals matrix.
Image: Goals Matrix setup page
This example illustrates the fields and controls on the Goals Matrix setup page. You can find definitions for the fields and controls later on this page.
Indicating the Number of Award Levels in the Scale
Using the Scale Group Box
The system labels the lowest, middle, and highest levels of the scale the Threshold, Target and Stretch, respectively:
Scale Group Box
Using the Matrix Group Box
Your goals matrix is made up of performance goals (which are the rows), and performance measures (which are the columns). Individual performance goals are defined using data elements. You create data elements using the Data Element page. On the average, a goals matrix may have from three to five goals, but some may have as many as ten. To list multiple goals in the Goals Matrix, place the cursor in the Data Element ID field and insert additional data rows.
For each individual goal follow these steps:
On the Matrix Elements tab, define the goal by selecting a Data Element ID from the prompt list values from the WA_CP_ELEM_VW table.
Enter a weight value for the goal in the Weight% (weight percentage) field. The system totals the weight percentages for all of the goals and displays the figure in the Total Weight field at the bottom of the page. You must ensure that the cumulative weights for all of your goals adds up to 100.00.
In each of the performance measure columns on the Scale Values tab, enter the Threshold, Target and Stretch values for this specific goal. For example, if the goal is Quarterly Billable Hours, and there are three levels, the performance measure values might be 200, 300, and 400 hours respectively.
Performing Goals Matrix Calculations for a Target Plan
Create a goals matrix with this page for use in conjunction with a compensation plan type called a target plan. The system uses the Goals Matrix to calculate a total score for an employee. The system compares the employee's total score to the scoring criteria defined in the target matrix in the Compensation Rules component, and determines the monetary value of the pay out the employee receives based upon their performance. Here's an example of how this calculation process works:
For this example let's take a goals matrix for employees who are off-site consultants, that calculates their quarterly bonus. We have three goals: billable hours (with values of 200, 300, and 400), customer satisfaction rating (with values of 1,2, and 3), and customer courses taught (with values of 2, 4, and 6). Because the goals are so different, we standardize them using a three level scale of 0, 50, and 100. Our Scale and goals look like this:
|
Scale or Goal |
Weight |
Threshold |
Target |
Stretch |
|---|---|---|---|---|
|
Scale |
0 |
50 |
100 |
|
|
Billable Hours |
50% |
200 |
300 |
400 |
|
Customer Satisfaction Rating |
25% |
1 |
2 |
3 |
|
Courses Taught |
25% |
2 |
4 |
6 |
An employee, William Avery, has 350 billable hours, a customer satisfaction rating of 3, and he has taught 3 customer courses. Here's what happens when the system uses this goals matrix to evaluate his performance.
The system looks at his 350 billable hours, and interpolates this against the scale. (Interpolation means using an equation to calculate the value in between two known values.) The system does the same for his customer rating of 3, and his 3 courses. The results of the interpolation are as follows:
|
Goal |
Employee's Performance |
Interpolated Scale Value |
Explanation |
|---|---|---|---|
|
Billable Hours |
350 |
75 |
Because 350 is midway between 300 and 400, the system interpolates that 75 is midway between the standardized scale values of 50 and 100. |
|
Customer Satisfaction Rating |
3 |
100 |
3 corresponds exactly to 100 on the scale. |
|
Courses Taught |
3 |
25 |
Because 3 is midway between 2 and 4, the system interpolates that 25 is midway between the standardized scale values of 0 and 50. |
The interpolated scale value is the employee's actual performance standardized against the scale. Then, for each goal, the system multiplies the interpolated scale value by the weighting, to create a weighted rating for the goal. Then the system adds up the weighted ratings for all of the goals to get a total score.
The calculation process looks like this:
|
Goal |
Weight |
Employee's Performance |
Interpolated Scale Value |
Weighted Rating |
|---|---|---|---|---|
|
Billable Hours |
50% |
350 |
75 |
.5 x 75 = 37.5 |
|
Customer Satisfaction Rating |
25% |
3 |
100 |
.25 x 100 = 25 |
|
Courses Taught |
25% |
3 |
25 |
.25 x 25 = 6.25 |
|
Total Score |
37.5 + 25+ 6.25 = 68.75 |
The system then compares the employee's total score against the scoring criteria defined in the target matrix in the Compensation Rules component, and determines the monetary value of the pay out the employee receives based upon their performance. For example, if the target matrix indicates that all employees with a goals matrix score between 50 and 75 should receive a bonus pay out equal to 2 percent of their base pay, then the system calculates a 2 percent bonus for William Avery.
Performing Goals Matrix Calculations for a Formula Plan
Create a goals matrix with this page for use in conjunction with a compensation plan type called a formula plan. In the formula plan, the pay out score is calculated in association with a payout rule. The payout rule must have a payout type of data element, where the data element is a goals matrix such as the one in the previous example. The pay out score is calculated from the goals matrix, as in the prior example, and interpolated against the monetary amounts in the scale to determine the actual pay out amount.
Creating a Data Element From the Goals Matrix
Merit Matrix Page
Use the Merit Matrix page (WA_CP_MERIT_DFN) to create a merit matrix which defines the amount rules for base compensation increases for your workers.
Image: Merit Matrix page
This example illustrates the fields and controls on the Merit Matrix page. You can find definitions for the fields and controls later on this page.
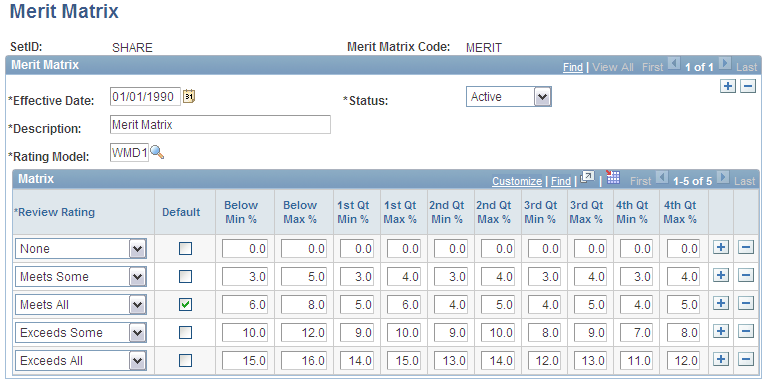
| Rating Model |
Select a Rating Model from the prompt list values, which are from the WA_RTGMDL_R00 table. |
Completing and Using the Merit Matrix
Insert an additional row of data for each Review Rating in the Rating Model. Then, for each Review Rating, enter the recommended percentage pay increase for each of the employee pay range values as follows:
When you run the Compensation Planning and Simulation process (WA_CPS) to generate a compensation scenario, the system looks at an employees review rating, and determines where their current grade and pay fits on this matrix. The system then uses the averaged percentage increase recommendations to calculate the simulated percentage pay increase for the employee.
When you enter the recommended pay increase percentages into the merit matrix, take into account your organization's pay strategy, or the pay strategy that you want to model in a scenario. You may want to create multiple merit matrices to test the costs and benefits of changing your pay strategy. For example, you might create one merit matrix that provides higher pay increase percentages for employees who are at the low end of their salary ranges, but keeps pay increases at a minimum for employees who are currently at the top of their salary range. Or you may want to create a merit matrix that rewards high performers with higher recommended pay increases, and provides poor performers with lower recommended pay increases.
Payout Rule Page
Use the Payout Rule page (WA_CP_PYOUT_DFN) to establish the amount rules for how to pay out compensation based on a flat amount, percentage of base pay, or criteria in a data element.
Image: Payout Rule page
This example illustrates the fields and controls on the Payout Rule page. You can find definitions for the fields and controls later on this page.
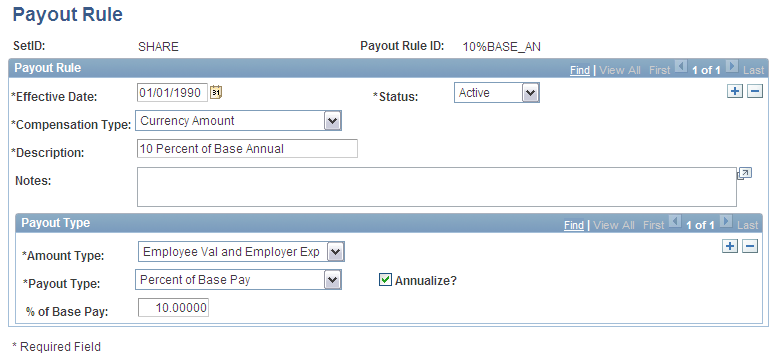
| Compensation Type |
Select a Compensation Type for the payout rule. Valid values are Currency Amount and Unit of Measure. A separate set of fields appear for each compensation type you select. |
Defining Currency Amount Compensation
Defining Unit of Measure Compensation
You can also base the payout type on a Unit of Measure. Valid values include: Days, Dollars, Each, Man Hours, Number, Percent, Seconds, Square Feet, Stock Units, Time, and Units. If this is the case, then enter the Units and Value Per Unit.
Base Pay Compensation Rule Page
Use the Base Pay Compensation Rule page (WA_CP_BASE_PAY) to create a base pay compensation rule.
Image: Base Pay Compensation Rule page
This example illustrates the fields and controls on the Base Pay Compensation Rule page. You can find definitions for the fields and controls later on this page.
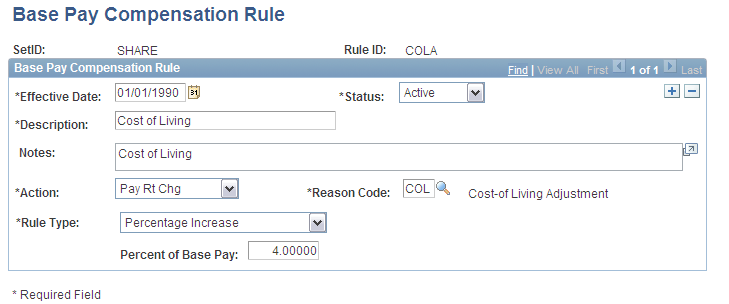
Your next step is to use the setup data you have entered to define compensation rules. Building compensation rules is a little like creating a compensation plan. Except, rather than just specifying the compensation types that go into a compensation plan, you define rules for calculating the predicted pay out for a population of employees who participate in the compensation plan. You define rules for base pay, variable pay, and other pay (for example benefits), either individually or in any given mix that you specify.
Entering a Rule Type
Enter a Rule Type by selecting from the list of translate table values:
Specifying the Equity Type
For a Rule Type of Equity Increase, specify the type of equity in the Equity group box from the following options:
Variable Pay Rule Page
Use the Variable Pay Rule page (WA_CP_VC_PAY) to create a variable pay compensation rule, for bonuses for example.
Image: Variable Pay Rule page
This example illustrates the fields and controls on the Variable Pay Rule page. You can find definitions for the fields and controls later on this page.
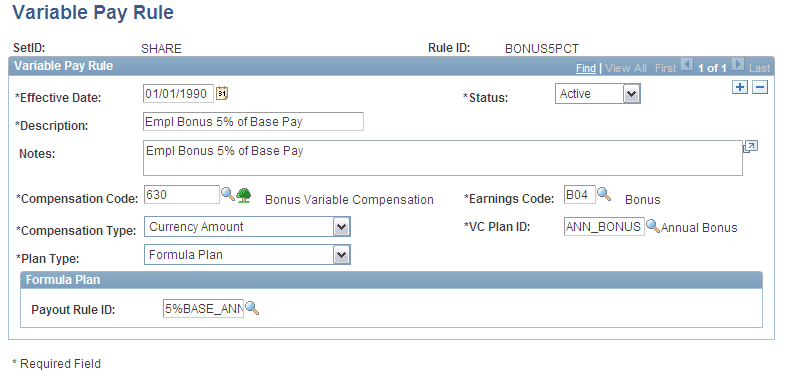
Using this Page
To complete this page follow these three basic steps:
Specify the Compensation Code, Compensation Type, and VC Plan ID (variable compensation plan identification code).
Specify the compensation distribution Plan Type.
Define the compensation rules in one of the three plan type group boxes.
Identifying the Variable Compensation Code and Type
Identifying the Compensation Distribution Plan Type
Enter a compensation distribution Plan Type by selecting from the list of Translate values.
Specifying Discretionary Plan Details
For a Plan Type of Discretionary Plan, select the Distribution Type from the list of translate table values: Business Unit, Department, Group, Job Code, and Location. You can choose to vary the distribution, or compensation pay out, to employees using any one of these dimensions. For any of these options select a Payout Rule ID from the list of prompt values, which are from the WA_CP_PYOUT_DFN table.
The discretionary plan takes the results of a payout rule, but distributes it based on the Distribution Type field. For example, if the Distribution Type is Department, the payout is distributed as a fraction of how many employees belong to a particular department. That is, if person X belongs in a department of 10 people and the payout to be distributed is 1000 units, each employee in that department receives 100 units as a pay out.
Specifying Formula Plan Details
The formula plan calculation process takes the results of a payout rule and distributes it to each employee in a workforce group who has that compensation rule assigned to it, without prorating or otherwise diluting the payout.
Select a Payout Rule ID for the formula plan from the list of prompt values, which are from the WA_CP_PYOUT_DFN table.
Specifying Target Plan Details
For a Plan Type of Target Plan, select the Data Element ID from the prompt list values, which are from the WA_CP_ELEM_VW table. The target plan applies a case or evaluation method for determining what payout is paid to an employee. The level of award for an employee is linked directly to a predetermined level of performance.
Note: Remember, if you are using a goals matrix with a target plan, you create a goals matrix on the Goals Matrix page. Then you tie the goals matrix to a data element on the Data Element page. The data element that you select using this page is the one that references the goals matrix you want to use with this target plan.
In the Compare Type field specify whether you want the first Data Element compared against a Static Value or against another Data Element. If you select Static Value, then complete the following fields:
If you select Data Element, then complete the following fields:
Other Pay Rule Page
Use the Other Pay Rule page (WA_CP_OTHER_PAY) to create other pay rules, for benefits for example.
This page is essentially the same as the Variable Pay Rule page, with the following exceptions:
It does not have the variable compensation plan ID field.
Its intended use is for benefits-related compensation, so instead of earning code field it has a benefit plan field
Setting Up Frequency Details for Compensation Models
You use Frequency ID Codes on the Compensation Model page. You set up these codes on the EPM Foundation, EPM Setup, Common Definitions, Calendars, Frequency and Frequency Details pages. You can also access the Frequency Details page directly from the Workforce Analytics, Compensation Strategy menu, enabling you to review the frequency IDs in the system. These pages are documented in the Enterprise Performance Management Fundamentals
Setting Up Workforce Groups for Compensation Models
You use workforce groups on the Compensation Model page. You set up workforce groups using the Workforce Analytics, Workforce Analytics Setup, Workforce Groups component. These pages are documented in the PeopleSoft Workforce Analytic Applications
Setting Up Model IDs for Compensation Models
Before you use the Compensation Model page, you must set up a model ID on the EPM Foundation, Business Metadata, Business Framework, Models page. This page is documented in the Enterprise Performance Management Fundamentals
Compensation Model Page
Use the Compensation Model page (WA_CP_MODEL_DFN) to set up a model to bring together the workforce groups and compensation rules needed to run a scenario.
Image: Compensation Model page
This example illustrates the fields and controls on the Compensation Model page. You can find definitions for the fields and controls later on this page.
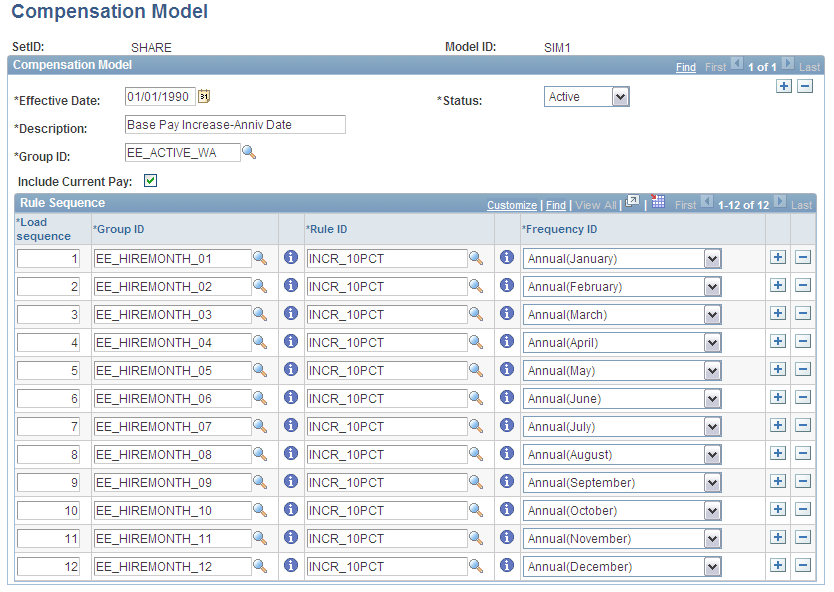
Understanding the Purpose of this Page
The purpose of this page is to tie together the SetID, model ID, workforce groups, compensation rules, and calculation frequencies needed to use the model in a scenario. The model definition tells the Compensation Planning and Simulation process (WA_CPS) what compensation data to calculate for what group of employees, and on what frequency.
Two Methods for Beginning the Model Definition
You have option of cloning your model and rules from an existing one. To do this select a model ID in the Clone Model ID field. Prompt values are from the WA_CP_MODL_TBL table. If you choose to do this, edit the model setup and rules to create your new model.
You also have the option of creating your new model manually. To do this bypass the Clone Model ID field and proceed to complete the fields on the remainder of the page.
In the Group ID field, select the overall workforce group which encompasses all of the workers you want to include in the model. Prompt values are from the WA_CP_GROUP_DFN table.
Select the Include Current Pay check box if you want the system to automatically include employees' current base salary in their compensation calculations. This is useful when you want to model the total compensation impact of compensation changes. Leave it cleared if you want the system to omit current pay from the compensation calculations. This is useful when you want to model only the change in compensation.
Note: Always select the Include Current Pay option if you plan to use the data from a compensation analytic model in the Planning and Budgeting Position Budgeting feature.
Defining the Rule Sequence
Use the Rule Sequence group box to specify the sequence of groups and compensation rules you want to include in the model.
Setting Up Compensation Scenario IDs
Before you run the Compensation Planning and Simulation process in Compensation Strategy, you must have set up a scenario ID using the EPM Foundation, Business Metadata, Business Framework, Scenarios page. These pages are documented in the Enterprise Performance Management Fundamentals
Run Compensation Scenario - Run Jobstream Page
Use the Run Compensation Scenario - Run Jobstream page (RUN_PF_JOBSTREAM) to run the compensation planning and simulation process.
Image: Compensation Planning and Simulation - Run Jobstream page
This example illustrates the fields and controls on the Compensation Planning and Simulation - Run Jobstream page. You can find definitions for the fields and controls later on this page.
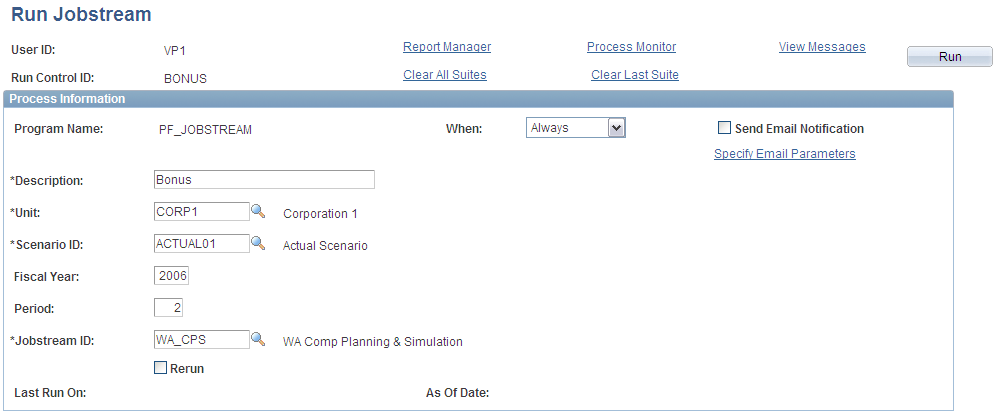
To generate a Compensation Planning scenario, you run a PeopleTools Application Engine (AE) process called Compensation Planning and Simulation (WA_CPS). The run control definition includes these basic elements:
Business unit
Scenario ID
Fiscal year and accounting period
Jobstream ID
Scenario ID: Running CPS as a Forecast versus Historical Process
The scenario ID you select using this page can be for either a Forecast or a Historical scenario.
The Retention Assignment and Workforce Simulation processes can serve as a basis for input to the CPS process, when it is run for Forecast scenarios. You can use constraints to integrate the results of the Retention Assignment engine into your compensation rules, or use the reduced employees in WA_GROUP_F00 as a workforce group. You can also use the Workforce Simulation process to generate a simulated workforce in WA_JOB_S00, consisting of your existing employees in a business unit, plus any new simulated employees and reduced employees (employees to be removed from your workforce). The CPS process can take the simulated workforce generated by the Workforce Simulation process, and use it as input for calculating compensation costs and values. CPS can simulate several varieties of base compensation rules, as well as an infinite number of changes to variable and benefits compensation rules.
If you run CPS as a Historical scenario the system uses the existing workforce from JOB_F00 to populate WA_JOB_S00. In this case you do not use inputs from either retention strategy or workforce simulation.
Jobstream ID
When you use the Run Jobstream run control you can access and run other jobstreams, but these are the basic jobstreams and engines delivered for Compensation Planning and Simulation:
|
Jobstream ID |
Job ID |
Application Engine ID |
|---|---|---|
|
WA_CPS |
WA_CPS, WA_CPS_MRG |
WA_CPS |
CPS Process
The CPS process performs calculations using the groups and rules that apply to the business unit, SetID, model ID and scenario ID defined on the run control, if the process is not already approved. The process performs calculations using the annual rate and annual amount base currency equivalent fields in the tables. The process does not convert rates and amounts back to hourly or monthly. For each job with changed compensation data, new rows of data are added to the WA_JOB_S00 table. Each row of data is associated with a personnel action of PAY and a reason of CPS.
The high-level sequence of tasks performed by the CPS process is as follows:
Resolves the model rules.
Prepares input from the WA_JOB_S00 table.
Flattens trees (for Job Code, Organization, and Compensation Code).
Calls the subprograms stored in the application libraries in the following order:
CPS Process Output Tables
When you run CPS, the process populates these final output tables:
|
Table |
Purpose |
|---|---|
|
WA_CALC_F00 |
Stores all final calculation results of the CPS process. This includes the appropriate costs or value per employee based on the rules specified in the scenario. The system only performs calculations for, and updates, the annual rate and annual amount base currency equivalent fields in the table. The system does not convert rates and amounts back to hourly or monthly. If part of the scenario process run includes a workforce simulation where simulated employees are added to the workforce, the new employees are assigned a currency code (in WA_JOB_S00) that is the same as the existing employees for that same scenario. |
|
WA_JOB_S00 |
A clone of JOB_F00 with the addition of PF_SCENARIO_ID in it. For each job with changed base compensation data, new rows of data are added to the table. Each row of data is associated with a personnel action of PAY and a reason of CPS. |
|
WA_GROUP_F00 |
Contains the list of employees in a workforce group specified in the scenario. WA_GROUP_F00 is populated by both WFS and CPS. If a reduction rule is specified in the scenario, the WA_GROUP_F00 table is populated with the employees that are to be reduced from the workforce during the WFS run. A reduction rule points to a workforce group to be reduced, this forces the WFS process to call the Group Builder process to run and create the group in WA_GROUP_F00. |
|
WA_DATAEE_F00 |
Contains the resolved values for all data elements specified in the scenario. The table is populated by the WA_DATA_ELEM AE library that is called by CPS. |
|
WA_JOBPAY_F00 |
Contains base pay compensation data for employees in the scenario calculations. Provides you the ability to direct the CPS process to either include or exclude current base pay from the process calculations. |
Loading the Analytic Model
After the CPS Process generates your scenario, it automatically calls the Load Analytic Model (WA_CP_BAM_LD) application engine to generate an analytic model instance with the same ID as the scenario ID. Hence, you need not run the process from the Load Compensation ACE Model page. You can still manually load an analytic model using the page, should you wish to reload the model or to load the scenario results into multiple analytic models.
Immediately after the Load Analytic Model application engine process completes, you can review the scenario results in the ACE model.