| Skip Navigation Links | |
| Exit Print View | |

|
Oracle SuperCluster M6-32 HTML Owner’s Guide |
Determining SuperCluster M6-32 Configurations
Determine the Number of Compute Servers
Determine the Number of DCUs in Each Compute Server
Determine the Number of CMUs in Each DCU
Determine the Amount of Memory in Each DCU
Determine the PDomain Configuration on Each Compute Server
Determine the LDom Configuration for Each PDomain
Determining the Best Configuration for Your Situation
Understanding PDomain Configurations
Allocating CPU Resources for LDoms
Allocating Memory Resources for LDoms
Understanding PCIe Cards and Slots for LDoms
Understanding Storage for LDoms
Understanding SuperCluster M6-32
Identifying SuperCluster M6-32 Components
Understanding DCU Configurations
Understanding Half-Populated DCU Root Complexes
Understanding Fully-Populated DCU Root Complexes
Extended Configuration PDomain Overview
Understanding Extended Configuration PDomains
Understanding Base Configuration PDomains
Understanding Compute Server Hardware and Networks
Understanding LDom Configurations for Extended Configuration PDomains
Understanding LDom Configurations for Base Configuration PDomains
Understanding Clustering Software
Cluster Software for the Database Domain
Cluster Software for the Oracle Solaris Application Domains
Understanding System Administration Resources
Understanding Platform-Specific Oracle ILOM Features
Oracle ILOM Remote Console Plus Overview
Oracle Hardware Management Pack Overview
Time Synchronization and NTP Service
Multidomain Extensions to Oracle ILOM MIBs
Hardware Installation Overview
Hardware Installation Task Overview
Hardware Installation Documents
Preparing the Site (Storage Rack and Expansion Racks)
Prepare the Site for the Racks
Network Infrastructure Requirements
Compute Server Default Host Names and IP Addresses
Compute Server Network Components
Storage Rack Network Components
Cable the ZFS Storage Appliance
ZFS Appliance Power Cord Connection Reference
ZFS Storage Appliance Cabling Reference
Leaf Switch 1 Cabling Reference
Leaf Switch 2 Cabling Reference
IB Switch-to-Switch Cabling Reference
Cable the Ethernet Management Switch
Ethernet Management Switch Cabling Reference
Connect SuperCluster M6-32 to the Facility Networks
Expansion Rack Default IP Addresses
Understanding Internal Cabling (Expansion Rack)
Understanding SuperCluster Software
Identify the Version of SuperCluster Software
Controlling SuperCluster M6-32
Powering Off SuperCluster M6-32 Gracefully
Power Off SuperCluster M6-32 in an Emergency
Monitoring SuperCluster M6-32 (OCM)
Monitoring the System With ASR
Configure ASR on the Compute Servers (Oracle ILOM)
Configure SNMP Trap Destinations for Storage Servers
Configure ASR on the ZFS Storage Appliance
Configuring ASR on the Compute Servers (Oracle Solaris 11)
Enable the HTTP Receiver on the ASR Manager
Enable HTTPS on ASR Manager (Optional)
Register Compute Servers With Oracle Solaris 11 or Database Domains to ASR Manager
Change ssctuner Properties and Disable Features
Configuring CPU and Memory Resources (osc-setcoremem)
Minimum and Maximum Resources (Dedicated Domains)
Supported Domain Configurations
Plan CPU and Memory Allocations
Display the Current Domain Configuration (osc-setcoremem)
Display the Current Domain Configuration (ldm)
Change CPU/Memory Allocations (Socket Granularity)
Change CPU/Memory Allocations (Core Granularity)
Access osc-setcoremem Log Files
Revert to a Previous CPU/Memory Configuration
Remove a CPU/Memory Configuration
Obtaining the EM Exadata Plug-in
Known Issues With the EM Exadata Plug-in
Configuring the Exalogic Software
Prepare to Configure the Exalogic Software
Enable Domain-Level Enhancements
Enable Cluster-Level Session Replication Enhancements
Configuring Grid Link Data Source for Dept1_Cluster1
Configuring SDP-Enabled JDBC Drivers for Dept1_Cluster1
Create an SDP Listener on the IB Network
Administering Oracle Solaris 11 Boot Environments
Advantages to Maintaining Multiple Boot Environments
Mount to a Different Build Environment
Reboot to the Original Boot Environment
Create a Snapshot of a Boot Environment
Remove Unwanted Boot Environments
Monitor Write-through Caching Mode
Perform this task after completing these tasks:
For more information on the process, see ASR MOS 5.3+ Activation Process (Doc ID 1329200.1).
Note - If a subscriber has not been set up, then the subsequent Auto Service Request activation fails.
list_asset
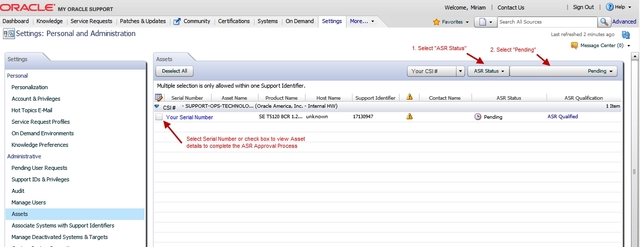
The ASR assets in your SuperCluster system are listed, including compute servers, storage servers, and ZFS storage controllers.
A complete list of all qualified ASR assets that are awaiting approval are displayed.

By default, all support identifiers that you are associated with are displayed. If this list of assets is long, you can limit the display to show only assets associated to one support identifier. You can also search for an asset's serial number.
Tip - For each component in the SuperCluster system, you should see two host names associated with each serial number. If you see only the Oracle ILOM host name, that means that you did not activate ASR for that component. If you see more than two host names associated with each serial number, you might need to request support. To do this, open a hardware SR with “Problem Category” set to “My - Auto Service Request (ASR) Installation and Configuration Issues.”
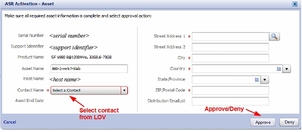
If there is any missing asset information the ASR Activation window is displayed, prompting you to enter the missing information.

Note - ASR Host name is updated when an activation request is sent to Oracle from the ASR software on the asset. (For example, from the asr activate_asset command on the ASR Manager.)
Required fields for ASR asset activation are:
Contact Name: You can only select a name associated with the support identifier. Click the drop-down menu to see the list of available names.
A contact must have the Create SR privilege for the asset's support identifier.
Street Address 1: Type the street address for the asset.
Note - By default, all support identifiers that you are associated with are displayed. If this list of assets is long, you can limit the display to show only assets associated to one support identifier. You can also search for an asset's serial number.
Country: Select the asset's country location from the drop-down menu.
ZIP/Postal Code: type the ZIP/postal code for the asset's location. If there is no postcode insert "-".
Distribution Email List: Add email addresses that receive all ASR mail notifications. Separate multiple email addresses with a comma. For example:
asr-notifications-1@mycompany.com, asr-notifications-2@mycompany.com
ASR sends email to the Contact's email address and the Distribution Email List, if provided. This is a useful feature if your organization has a team that should be informed about Service Requests created by ASR.
Note - A system asset must be in an active ASR state in My Oracle Support for Service Request autocreate to work.
# asradm send test email-address@company.com
This command sends a test alert e-mail to the e-mail address.