After defining the application details and dimension details, for Essbase , define the application options.
Note: | The user attempting to load data to Planning must be provisioned with Essbase administrator or Planning administrator rights. |
 To define application options for Essbase applications:
Select the Setup tab, and then under Register, select Target Application.
In the Target Application summary grid, select a Essbase target application.
After defining the application details and dimension details in Application Detail, select the Application Options tab.
Complete the application options as needed.
Essbase application options are described in Table 6, Essbase Application Options and Descriptions.
Table 6. Essbase Application Options and Descriptions
| Option | Description |
|---|---|
| Purge Data File | When a file based data load to Essbase is successful, specify whether to delete the data file from the application outbox directory. Select Yes to delete the file, or No to retain the file. |
| Prefix Dimension for Duplicate Members | When set to Yes member names are prefixed by the Dimension Name. The member name that is loaded is in the format [Dimension Name]@[Dimension Member]. The prefixed dimension name is applied to all dimensions in the application when this option is enabled. You cannot select this option if there is a dimension in the target that has duplicate members. That is, only select this option when the duplicate members cross dimensions. If the application supports Duplicate Members and Prefix is set to No, then the user is responsible to specify the fully qualified member names. Refer to Essbase Documentation for fully qualified member name format Note: Planning does not support duplicate members. |
| Global User for Application Access | Option to override the Single Sign-On logon to the Essbase and the Planning applications. When a user name is specified for this option, this user name is used to access Essbase/Planning applications instead of the FDMEE sign-on user name. Specify the user name of a user who has administrator access to the Planning application, and/or Application/Database Manager access to the Essbase applications. |
| Batch Size | Specify the batch size used to write data to file. The default size is 10,000. |
| Load Rule Name | Specify the rule name for loading data from the TDATASEG staging table to Essbase. Available methods:
|
| Check Entity Calculation Method | Specify the calculation method for check entities. Available methods are:
|
| Source Language for Member Description | Select the default language for the member descriptions. To understand how languages are processed, see How Languages are Processed. |
| Drill Region | Select Yes, to create a drill region. A drillable region is created to use the drill through feature for Essbase, or Planning data. Note: FDMEE does not support drilling through to human resource data. The drill region URL allows Essbase, Oracle Smart View for Office, and Oracle Hyperion Financial Reporting to drill to the proper landing page. When loading data from FDMEE, the drill region is loaded to Planning data. A drill region includes the Entity/Account/Scenario/Year/Period for Planning, a URL to get back to FDMEE, and a region name. For Essbase, you select the dimension to use for the drill region.Select Yes to enable or No to disable. |
When loading data to Essbase or Planning, FDMEE enables you to run custom calculation scripts. A calculation script is a series of calculation commands, equations, and formulas that allow you to define calculations other than those defined by the database outline. Calculation scripts are defined in Essbase and Planning.
Custom calculation scripts are supported in the target application and the check entity group. In the target application:
Scripts can be parameterized so that you can specify a parameter for each script.
Scripts can be assigned to run before or after the data load.
Scripts are assigned a scope of applicability. The scope may be at the Application, Category, Location, and Data Rule level. If scripts are assigned at the lowest level, then they take precedence over script at higher level. Data Rule is the lowest level and Application is the highest level. Only scripts at one level are executed.
To add a calculation script:
Select the Setup tab, and then under Register, select Target Application.
From the Calculation Script tab, select a calculation script.
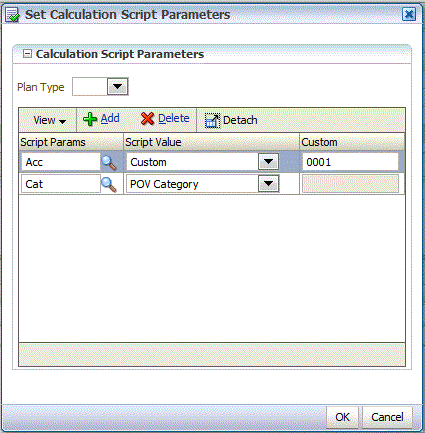
For Planning applications only, select the Plan Type to retrieve the parameters defined in the calculation script.
Select the parameter that has been defined for the script.
You can also click Browse, select the parameter, and click OK. You can also manually type in the parameter name.
In Script Value select a predefined parameter value, or select Custom to specify your own script value.
Optional: If you selected Custom in the Script Value field, enter the value in Custom.
For example, enter 0001.
Click
 to add the parameters for the calculation script.
For more information, see Adding Calculation Script Parameters.
In Script Scope, select the scope of applicability,
Note that scripts assigned at the lowest level take precedence over scripts at higher level.
Available scopes in order of highest scope to lowest are:
Application (default scope)
Category
Location
Data Rule
In Scope Entity, select the specific value associated with the script scope.
For example, if the script scope is “Location,” select the location associated with the application.
The Application script scope is disabled for the scope entity.
In Event, select the event that executes the calculation script.
Available events:
Before Data Load
After Data Load
Before Check
After Check
In Sequence, specify the order in which the script is executed.
Since multiple scripts can be executed for a event, this sequence values provides the numeric order in which each script is executed. You can enter any number, but the number has to be unique within an Event.
You parameterize calculation scripts by identifying and defining the list of values in the scripts. Parameter values can be predefined for a list of values, for example, the POV Period, POV Location, POV Category, Check Group Entity, and all data load entities.
You can also specify custom parameters, in which case, you can enter any Essbase filter syntax.
Additionally, you can reference values stored in the Integration Option 1-4 fields in the Location table to drive calculation logic. Location Option 1, Location Option 2, Location Option 3, and Location Option 4 values can be referenced. In this case, the exact string that is passed as a parameter has to be stored in the Integration Option field of the Location table.
Similarly, you can reference four option fields in the Data Rule for parameters. These fields are Data Rule Option 1, Data Rule Option 2, Data Rule Option 3, and Data Rule Option 4. The column added to the Data Rule is called RULE_OPTION1, RULE_OPTION2, RULE_OPTION3 and RULE_OPTION4.
To add calculation script parameters:
From the Calculation Script tab, add or select a calculation script.
For Planning applications only: select the Plan Type for Accounting and Entity dimensions.
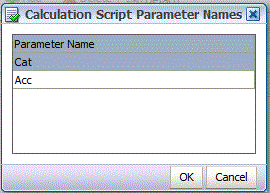
In Script Parameters, select the parameter that has been defined for the script.
You can click the Browse icon, select the parameter, and click OK.
In Script Value, select the value to which to apply the calculation script and click OK.
To add a custom script parameter: