| Oracle® Enterprise Manager Ops Center Creating Oracle Solaris 10 Zones Guide 12c Release 1 (12.1.0.0.0) Part Number E27335-01 |
|
| PDF · Mobi · ePub |
| Oracle® Enterprise Manager Ops Center Creating Oracle Solaris 10 Zones Guide 12c Release 1 (12.1.0.0.0) Part Number E27335-01 |
|
| PDF · Mobi · ePub |
Creating Oracle Solaris 10 Zones Guide
12c Release 1 (12.1.0.0.0)
E27335-01
April 2012
This guide provides an end-to-end example for how to use Oracle Enterprise Manager Ops Center.
This example shows you how to create a non-global zone on an Oracle Solaris 10 operating system. The non-global zone type is a whole root zone. The non-global zone configuration details are: shared IP zone, local storage and file system.
A whole root non-global zone uses a root file system that does not share components of the global zone's root file system. You can define the size of the root file system for the non-global zone. The default size for the root file system is eight (8) GBytes for whole root zones.
Profile and plan templates guide you through the steps needed to create a customized discovery profile and create zones plan for your organization. Your customized profiles and plans are saved in the Plan Management section. You can use and reuse the plans to manage assets and to create zones.
See Related Articles and Resources for links to related information and articles about different zone configurations, including choosing the type of storage library, complex network configurations, and server pools that enable you to migrate zones between pools.
Before creating zones, you must determine where to store the zone's metadata. Metadata includes the configuration of the zone's operating system, CPU, memory, and network. The storage library must have sufficient space to accommodate the metadata.
You can use the local filesystem on the virtual host's server, an NFS server, or a SAN network for the zone storage library. The metadata is stored on either a local filesystem or an NFS server. When you create a guest, you assign it to one of the storage libraries associated with its virtual host. The guest's data, which results from its operations, can reside in the same storage library or in a different storage library.
You need the following to create an Oracle Solaris 10 zone:
Discover and manage an Oracle Solaris 10 OS.
Prepare a global zone.
Zone storage. For local storage, nothing is required. The filesystem is always implemented as a ZFS filesystem.
Network. You will need a network that is associated with the global zone and that is availabe for the zone. This example uses the default network that is created when you add the OS.
IP address for the zone. When you use Shared IP mode, the global zone is sharing its IP link with the zone.
A password or SSH key to log into the zone. This example uses a user name and password.
Appropriate roles and permissions. You need the following Oracle Enterprise Manager Ops Center roles:
Asset admin – Discover and manage virtualization hosts.
Profile and plan admin – Create and manage zone profiles and plans.
Virtualization admin – Create and manage zones.
In this example, you are creating a zone that has a shared IP mode network configuration. The storage library is the local filesystem. Each zone has a default local filesystem storage library named /guests where data and metadata for the host's guests are stored.
Configure the following:
Install Oracle Solaris 10 operating system. This example uses Oracle Solaris 10 10/09.
At least 5 GB File system and at least 6 GB virtual disk for Zone storage.
Local storage for the zone metadata. This example uses the local library.
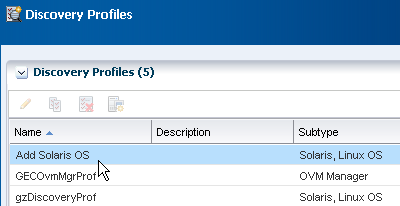
Use a Discovery profile to add an asset to the Oracle Enterprise Manager Ops Center UI. The following task shows you how to create and run a new Discovery profile to add an Oracle Solaris 10 OS to the UI.
In Plan Management, scroll down to Profiles and Policies, then click Discovery.

Click Create Profile in the Actions pane.
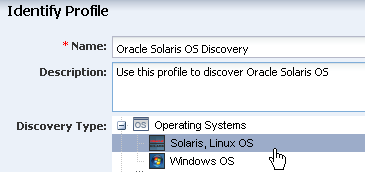
Enter a name for the discovery profile, and select Solaris/Linux OS as the type of asset to be discovered. Click Next.
Click Next to skip adding tags.
Do not specify IP addresses at this time. Click Next.
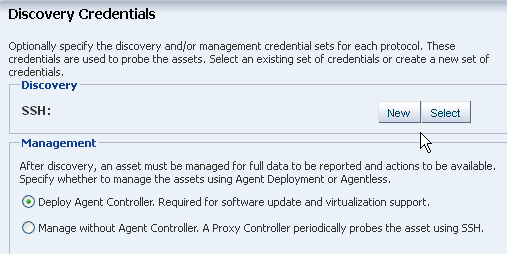
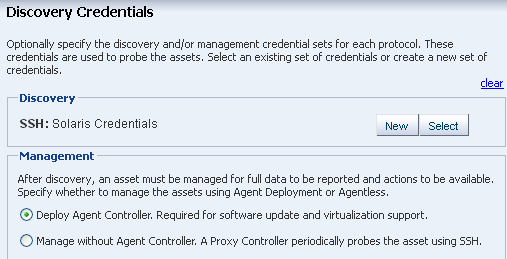
Define the discovery credentials and management option.
To use previously defined credentials, click Select and choose from the list
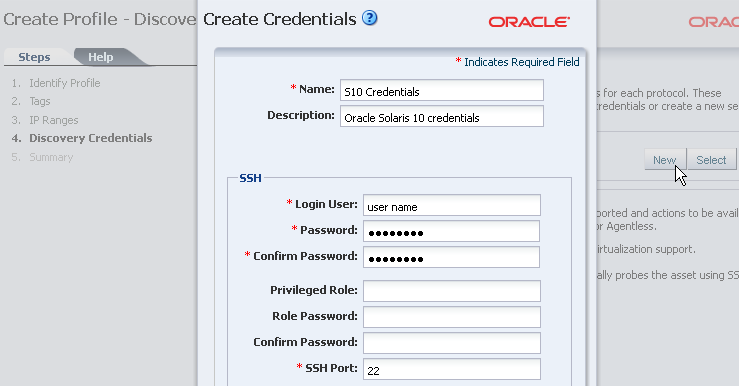
To create a new set of credentials, click New to launch a pop-up wizard.
For new credentials, enter a name and description that identifies the credential. Enter the root user name and password for the system, then click OK to return to the Discovery Credentials page.
In the Management section of the Discovery Credentials page, select Deploy Agent Controller to install Agent Controller on the asset.
Click Finish to create the Discovery profile. The new profile appears in the center pane.
Double-click the new Discovery profile, then click Add Assets in the Action pane.
Enter the host name or IP address, then click Add Now.
A job is launched to discover and manage the asset.
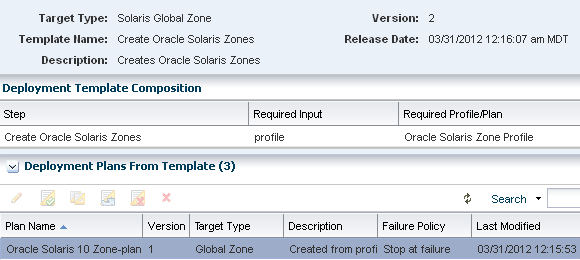
A zone profile defines the zone configuration details and creates a deployment plan that you can use to deploy the profile to create a zone. You can reuse the plan to create additional identical zones, or you can use it to create new plans. You can edit the zone configuration details at any time.
In Plan Management, select Oracle Solaris Zone from the Profiles and Policies section.
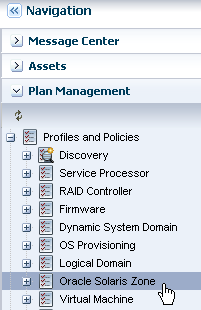
Click Create Profile in the Actions pane.
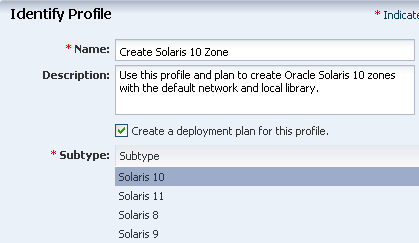
Enter a name and description for the profile, then select Oracle Solaris 10 from the Subtype list.
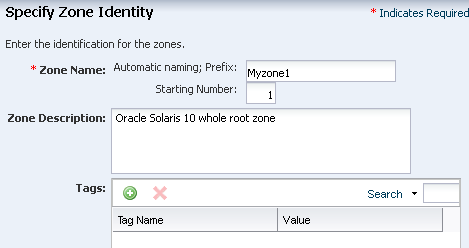
To identify the zones that are created with this profile, add a zone prefix name and a number to start the series. Do not add any tags for the zone.
Each zone created uses the prefix name appended with a sequential number. For example, if the prefix name is Myzone and the number to start from is 1, the zone names are Myzone1, Myzone2, and Myzone3.
Select Native, Whole Root Zone, then click Next.

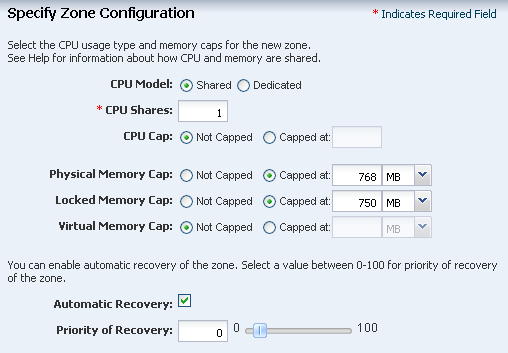
Select the Shared CPU model and define one CPU share. Set the memory thresholds and verify that the locked memory threshold value is less than or equal to the physical memory threshold.
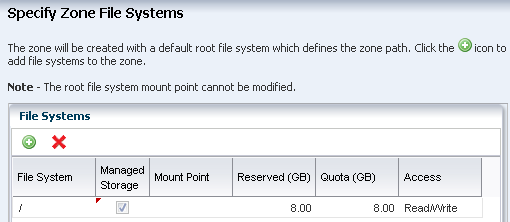
The zone uses the default root file system, which is the zone path. Do not define additional file systems. Click Next.
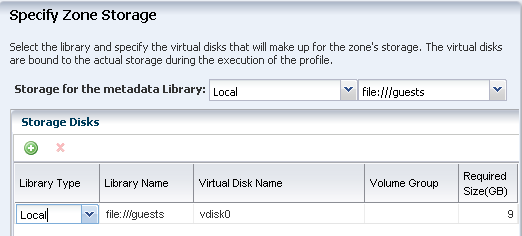
In this example the zone uses the local library. Edit the required disk size, as needed. Click Next.
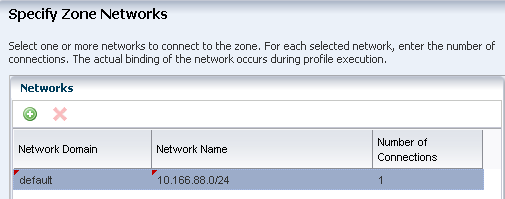
Add the network that you want to connect to the zone and the number of connections. The network is not bound until you execute the plan.
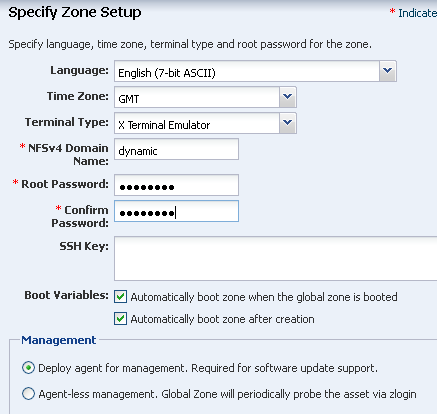
Define the language, time zone, terminal-type, and root password for the zone.
Accept the default value, dynamic, for the NFSv4 Domain Name.
Provide the root password.
Set the boot properties for the new zone. You can set the zone to boot after it is created or whenever the global zone boots.
Select the option to deploy the agent for management.
Click Next to skip the Zone Naming Service.

Click Finish to create the zone profile and associated deployment plan.
The zone profile and the corresponding deployment plan are created and appear in the list of Oracle Solaris Zone Profiles and Oracle Solaris Zone Plans.
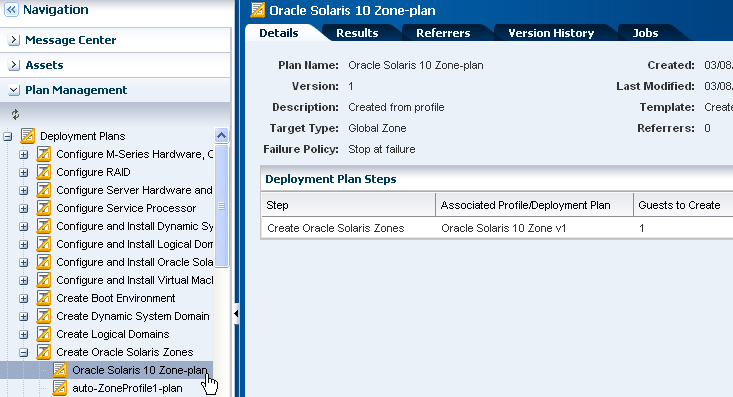
Use the plan that you created in Create an Oracle Solaris 10 Whole Root Zone Profile and Plan to create a zone, and then view the new zone in the UI.
In Plan Management, expand Deployment plans, then select the Oracle Solaris Zone plan that you created in the previous section.
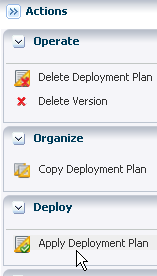
Click Apply Deployment Plan.
Select the target from the list of Available Items, then click Add to Target List. 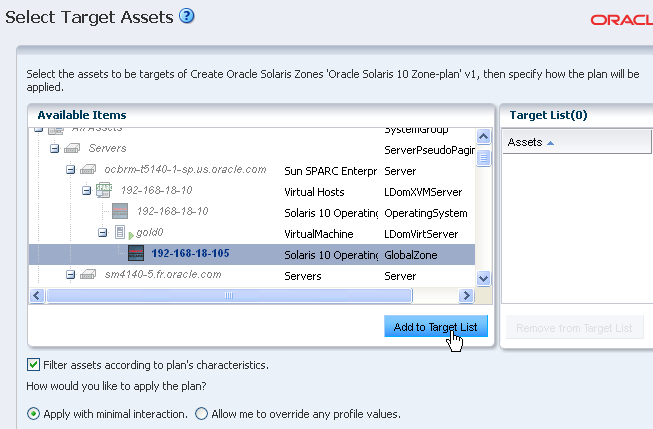
Description of the illustration selecttarget.png
Specify the Zone Identity. The fields are populated with the information from the profile.
Select local storage as the library to save the zone metadata. Click Next. 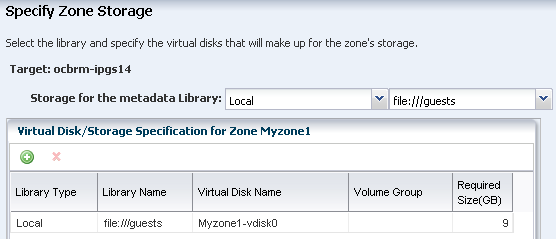
Description of the illustration apply_storage.png
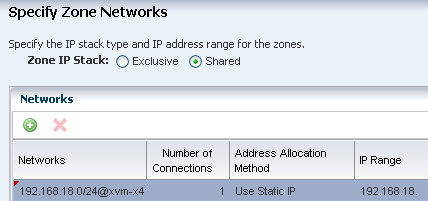
Select the shared zone IP stack. In Networks, select a network and IP range, then click Next.
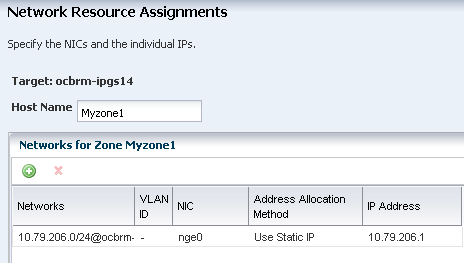
The Network Resource Assignments page shows the shared network and IP address.
Host name – You can change the zone's host name to be different from the zone name, which might be useful when you are using a naming server.
Network Connections – You can add, modify, or delete network connections. For example, you can have Network1 and Network2. When you create two zones you can connect Myzone1 to Network1 and Network 2 and connect Myzone2 to Network1 and remove Network2.
IP address – The IP address for a set of zones appears in a range. You can enter the IP addresses in a comma delimited list.
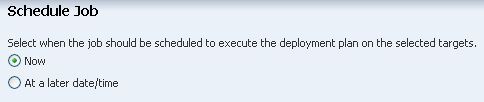
Schedule when you want the job to run.
Click Apply to run the job. When the job finishes successfully, the new zone appears in the Asset tree. Click the asset to see the dashboard.
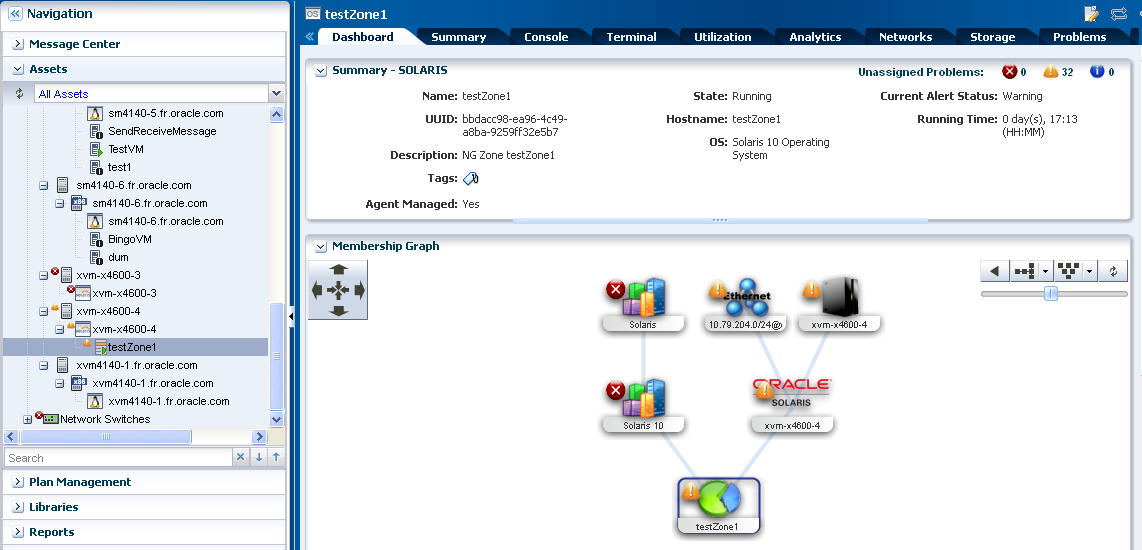
After creating a zone, you can perform various operations, such as boot, reboot, shut down, and halt on the zone. You can use the plan to create additional zones. The Analytics feature enables you to manage zone performance. You can view the CPU and memory utilization for each zone, and an historical view of the top consumers.
See the Oracle Enterprise Manager Ops Center Feature Reference Guide for more information on the features. The documentation is available at http://www.oracle.com/pls/topic/lookup?ctx=oc121.
See the Oracle Solaris Zones documentation at http://www.oracle.com/technetwork/documentation/solaris-10-192992.html for more information about zones.
For information about Oracle's commitment to accessibility, visit the Oracle Accessibility Program website at http://www.oracle.com/pls/topic/lookup?ctx=acc&id=docacc.
Oracle customers have access to electronic support through My Oracle Support. For information, visit http://www.oracle.com/pls/topic/lookup?ctx=acc&id=info or visit http://www.oracle.com/pls/topic/lookup?ctx=acc&id=trs if you are hearing impaired.
Oracle Enterprise Manager Ops Center Creating Oracle Solaris 10 Zones Guide, 12c Release 1 (12.1.0.0.0)
E27335-01
Copyright © 2007, 2012, Oracle and/or its affiliates. All rights reserved.
This software and related documentation are provided under a license agreement containing restrictions on use and disclosure and are protected by intellectual property laws. Except as expressly permitted in your license agreement or allowed by law, you may not use, copy, reproduce, translate, broadcast, modify, license, transmit, distribute, exhibit, perform, publish, or display any part, in any form, or by any means. Reverse engineering, disassembly, or decompilation of this software, unless required by law for interoperability, is prohibited.
The information contained herein is subject to change without notice and is not warranted to be error-free. If you find any errors, please report them to us in writing.
If this is software or related documentation that is delivered to the U.S. Government or anyone licensing it on behalf of the U.S. Government, the following notice is applicable:
U.S. GOVERNMENT RIGHTS Programs, software, databases, and related documentation and technical data delivered to U.S. Government customers are "commercial computer software" or "commercial technical data" pursuant to the applicable Federal Acquisition Regulation and agency-specific supplemental regulations. As such, the use, duplication, disclosure, modification, and adaptation shall be subject to the restrictions and license terms set forth in the applicable Government contract, and, to the extent applicable by the terms of the Government contract, the additional rights set forth in FAR 52.227-19, Commercial Computer Software License (December 2007). Oracle America, Inc., 500 Oracle Parkway, Redwood City, CA 94065.
This software or hardware is developed for general use in a variety of information management applications. It is not developed or intended for use in any inherently dangerous applications, including applications that may create a risk of personal injury. If you use this software or hardware in dangerous applications, then you shall be responsible to take all appropriate fail-safe, backup, redundancy, and other measures to ensure its safe use. Oracle Corporation and its affiliates disclaim any liability for any damages caused by use of this software or hardware in dangerous applications.
Oracle and Java are registered trademarks of Oracle and/or its affiliates. Other names may be trademarks of their respective owners.
Intel and Intel Xeon are trademarks or registered trademarks of Intel Corporation. All SPARC trademarks are used under license and are trademarks or registered trademarks of SPARC International, Inc. AMD, Opteron, the AMD logo, and the AMD Opteron logo are trademarks or registered trademarks of Advanced Micro Devices. UNIX is a registered trademark of The Open Group.
This software or hardware and documentation may provide access to or information on content, products, and services from third parties. Oracle Corporation and its affiliates are not responsible for and expressly disclaim all warranties of any kind with respect to third-party content, products, and services. Oracle Corporation and its affiliates will not be responsible for any loss, costs, or damages incurred due to your access to or use of third-party content, products, or services.
Copyright © 2007, 2012, Oracle and/or its affiliates. All rights reserved. Legal Notices |
|