| Oracle® Fusion Middleware Oracle Directory Server Enterprise Editionインストレーション・ガイド 11g リリース1 (11.1.1.7.0) B72437-01 |
|
 前 |
 次 |
| Oracle® Fusion Middleware Oracle Directory Server Enterprise Editionインストレーション・ガイド 11g リリース1 (11.1.1.7.0) B72437-01 |
|
 前 |
 次 |
この章の内容は次のとおりです。
ODSEEをインストールするには、次の各項で説明する手順を実行します。
次の注意事項を確認して、追加のインストール前タスクが必要かどうか判断してください。
『Oracle Directory Server Enterprise Editionリリース・ノート』のハードウェアとオペレーティング・システムの要件に関する説明を確認します。
Directory Serverバージョン6、5.2または11gリリース1の以前のバージョンをすでに使用しており、11gリリース1 (11.1.1.7.0)インストールと同じレガシー・インスタンスを使用する場合は、『Oracle Directory Server Enterprise Editionアップグレードおよび移行ガイド』を参照してください。
コンピュータにVisual C++ 2008がインストールされていない場合、Microsoft Visual C++ 2008再頒布可能パッケージ (x86)をインストールする必要があります。
Directory Server Enterprise Edition 11gリリース1 (11.1.1.7.0)は、Microsoft Visual C++ 2008再頒布可能パッケージに依存します。このパッケージの1バージョンがDirectory Server Enterprise Editionディストリビューションとともに提供されますが、http://www.microsoft.com/downloadsのMicrosoft Download Center (http://www.microsoft.com/downloads)から最新バージョンをインストールすることをお薦めします(製品ファミリ: 開発者ツール)。
JavaテクノロジベースのアプリケーションおよびユーティリティでAES_256を使用するには、http://www.oracle.com/technetwork/java/javase/downloads/index.htmlからJCE Unlimited Strength Jurisdiction Policy Filesをダウンロードしてインストールする必要があります。
Identity Synchronization for Windowsのインストールの詳細は、Identity Synchronization for Windows 6のインストール・ガイドおよびIdentity Synchronization for Windows 6.0 Service Pack 1のリリース・ノートを参照してください。
zipディストリビューション・ファイルをダウンロードすると、このzipファイルはダウンロード・ターゲット・ディレクトリに格納されます。zipファイルには、Directory Server Enterprise Editionソフトウェア、idsktune、Identity Synchronization for Windowsソフトウェアおよび関連法律ファイルが含まれます。
zipディストリビューションをroot以外のユーザーとしてインストールできます。
Directory Server Enterprise Editionのzipディストリビューション・バイナリをダウンロードします。
ダウンロードするファイルの名前と場所の最新情報は、『Oracle Directory Server Enterprise Editionリリース・ノート』のソフトウェアの入手に関する説明を参照してください。
zipディストリビューション・ファイルを解凍します。
この例では、download-dirがダウンロード・ターゲット・ディレクトリ、install-dirがインストール・ターゲット・ディレクトリです。
# cd /download-dir
# unzip -q ODSEE11_1_1_7_0_xxx.zip
# cd ODSEE_ZIP_Distribution
# unzip -q sun-dsee7.zip -d install-dir
# cd install-dir/dsee7
install-dirディレクトリは、すべてのソフトウェア要素が配置される場所です。このディレクトリには1GB以上の領域が必要です。
install-dir/dsee7ディレクトリには、idsktuneユーティリティを除くすべてのDirectory Server Enterprise Editionコンポーネントが含まれます。idsktuneユーティリティは、/download-dir/ODSEE_ZIP_Distributionに配置されます。このガイドの残りの部分では、/install-dir/dsee7をinstall-pathと呼びます。
Directory Service Control Center (DSCC)は、Directory ServerおよびDirectory Proxy Serverインスタンスを管理するためのWebベースのインタフェースです。管理ホストとして選択するコンピュータ・システムでDSCCを設定します。
$ install-path/bin/dsccsetup ads-create
Choose password for Directory Service Manager:directory-service-pwd
Confirm password for Directory Service Manager:directory-service-pwd

Creating DSCC registry...
DSCC Registry has been created successfully
directory-service-pwdに指定する値はDSCCログイン・ページの認証に必要で、DSCCレジストリ・パスワードとしても使用されます。
DSCCは、Directory Serverの独自のローカル・インスタンスを使用して、ディレクトリ・サービス構成についての情報を格納します。このインスタンスは、DSCCレジストリと呼ばれます。
$ install-path/bin/dsccsetup war-file-create

Created dscc-war-file-path
dscc-war-file-path (DSCC warファイルのパス)を書き留めます。
DSCCレジストリに割り当てるポートとパスを書き留めます。
# install-path/bin/dsccsetup status
...
Path of DSCC registry is dscc-registry-path
Port of DSCC registry is dscc-registry-port
...
dscc-registry-portは、dsccsetup ads-createによってDSCCレジストリに割り当てられるポートです。DSCCレジストリに割り当てられるデフォルトのポートは、3998です。
DSCCがデプロイされるのと同じホストでサーバー・インスタンスを作成するために、DSCCエージェントをDSCCレジストリに追加します。
DSCCエージェントを作成します。
$ install-path/bin/dsccagent create
Enter DSCC agent password: ***
Confirm the password: ***
Agent instance install-path/var/dcc/agent has been created successfully
Run the following command to register the agent in the registry: install-path/bin/dsccreg add-agent install-path/var/dcc/agent
新しいDSCCエージェントをDSCCレジストリに追加します。
前の手順の完了時に表示されるコマンドを使用します。次に例を示します。
$ install-path/bin/dsccreg add-agent install-path/var/dcc/agent
DSCCエージェントを起動します。
$ install-path/bin/dsccagent start
The agent install-path/var/dcc/agent has been started
SNMPを介して監視するすべてのDirectory Serverインスタンスを構成します。詳細は、『Oracle Directory Server Enterprise Edition管理者ガイド』の第14章「ディレクトリ・サーバーの監視」を参照してください。
次のコマンドを実行し、SNMPを介して監視するインスタンスのDSポート番号を取得します。
# install-path/bin/dsccagent info
Instance Path         :   install-dir/dsee7/var/dcc/agent
Owner                 :   root
JMX port              :   3997
SNMP port             :   3996
DS port               :   3995
State                 :   Stopped
PID                   :   -
DSCC hostname         :   host2
DSCC non-secure port  :   3998
DSCC secure port      :   3999
SNMP v3               :   Disabled
Instance version      :   A-A00
前の手順で取得したDSポート番号を使用して次のコマンドを実行し、ポート番号の引数を設定します。
# install-path/bin/dsconf set-plugin-prop dssnmp argument:on argument:3995
サポートされているアプリケーション・サーバーでDSCC WARファイルをデプロイします。
サポートされているアプリケーション・サーバーに関する重要な情報と、システムおよびソフトウェアの最小要件については、付録A「Oracle iPlanet Web ServerでDSCC WARファイルをデプロイするには」を参照してください。使用するアプリケーション・サーバーに該当する次のいずれかの項の手順を実行します。
DSCCの設定が適切に機能していることを確認します。
次のコマンドを入力し、WARファイルおよびDSCCレジストリの場所とその他の統計情報を確認します。
$ install-path/bin/dsccsetup status
DSCCエージェントを作成してDSCCレジストリに追加します。トポロジ内のそれぞれのDirectory ServerホストまたはDirectory Proxy Serverホストに対してこれを行う必要があります。
DSCCエージェントを作成します。
# install-path/bin/dsccagent create
Enter DSCC agent password: ***
Confirm the password: ***
Agent instance install-path/var/dcc/agent has been created successfully
Run the following command to register the agent in the registry: install-path/bin/dsccreg add-agent install-path/var/dcc/agent
新しいDSCCエージェントをDSCCレジストリに追加します。
# install-path/bin/dsccreg add-agent -h dscc-host -p dscc-registry-port install-path/var/dcc/agent
DSCCエージェントを起動します。
# install-path/bin/dsccagent start
The agent install-path/var/dcc/agent has been started
SNMPエージェントを作成し、SNMPエージェントを使用するようにDirectory Serverインスタンスを構成します。詳細は、『Oracle Directory Server Enterprise Edition管理者ガイド』の第14章「ディレクトリ・サーバーの監視」を参照してください。
SNMPエージェントを作成します。
# install-path/bin/dsccagent enable-snmp
SNMPを介して監視するすべてのDirectory Serverインスタンスを構成します。
次のコマンドを実行し、SNMPを介して監視するインスタンスのDSポート番号を取得します。
# install-path/bin/dsccagent info
Instance Path         :   install-dir/dsee7/var/dcc/agent
Owner                 :   root
JMX port              :   3997
SNMP port             :   3996
DS port               :   3995
State                 :   Stopped
PID                   :   -
DSCC hostname         :   host2
DSCC non-secure port  :   3998
DSCC secure port      :   3999
SNMP v3               :   Disabled
Instance version      :   A-A00
前の手順で取得したDSポート番号を使用して次のコマンドを実行し、ポート番号の引数を設定します。
# install-patch/bin/set-plugin-prop dssnmp argument:on argument:3995
事前構成操作中に収集される次の情報を記録しておく必要があります。
| 情報 | 説明 | コメント |
|---|---|---|
|
install-path |
Directory Server Enterprise Edition 11gリリース1 (11.1.1.7.0)がインストールされるパス。 |
|
|
directory-service-pwd |
ディレクトリ・サービス・マネージャに割り当てられるパスワード。 |
|
|
dscc-war-file-path |
アプリケーション・サーバーにデプロイされるDSCC WARファイルのパス。 |
|
|
dscc-registry-path |
DSCCレジストリのパス |
|
|
dscc-registry-port |
DSCCレジストリのポート |
install-path/bin/dsccsetup status |
|
dscc-agent-port |
DSCCエージェントのポート |
3997またはランダム。DSCCエージェントのポートは、次のコマンドを入力することで取得できます。
install-path |
Directory Server Enterprise Editionソフトウェアを正常にインストールして事前構成したら、サーバー・インスタンスを作成して作業することで、インストールを確認できます。
この項の内容は次のとおりです。
次の一連のコマンドでは、サンプル・サーバー・インスタンスを作成し、サンプル・データを移入してDSCCに登録します。ソフトウェアが正しくインストールされて構成されていると、これらのコマンドはエラーなしで実行されます。
root以外のユーザーでもサーバー・インスタンスを作成できます。
コマンドラインを使用してDirectory Serverインスタンスを作成するには、次の手順を参照してください。
新しいDirectory Serverインスタンスを作成します。
次の例では、デフォルトのポート番号が指定されています。ただし、必要に応じて他のポート番号を指定できます。
$ dsadm create -p 1389 -P 1636 /local/dsInst

Choose the Directory Manager password:xxxxxxxx
Confirm the Directory Manager password:xxxxxxxx
Use 'dsadm start /local/dsInst' to start the instance
既存のディレクトリ/local/にdsInstインスタンスが作成され、Directory Managerのパスワードとしてxxxxxxxxが割り当てられます。
インスタンスを起動します。
$ dsadm start /local/dsInst
Server started: pid=2845
サンプル接尾辞を準備します。
空の接尾辞を作成します。
$ dsconf create-suffix -p 1389 -e dc=example,dc=com
Enter "cn=Directory Manager" password:xxxxxxxx
root dc=example,dc=comの接尾辞が作成されます。
接尾辞にLDIFデータを移入します。
$ dsconf import -p 1389 -e\
install-path/resources/ldif/Example.ldif dc=example,dc=com

Enter "cn=Directory Manager" password:

New data will override existing data of the suffix "dc=example,dc=com".
Initialization will have to be performed on replicated suffixes.

...
...
## Closing files...
## Import complete.  Processed 160 entries in 4 seconds. (40.00 entries/sec)

Task completed (slapd exit code: 0).
Example.ldifからサンプル・データが接尾辞に移入されます。
新しいインスタンスでデータを検索します。
$ ldapsearch -p 1389 -b dc=example,dc=com "(uid=ajensen)" mail

version: 1
dn: uid=ajensen, ou=People, dc=example,dc=com
mail: ajensen@example.com
DSCCを使用してサーバー・インスタンスを管理します。
次の手順は、次のことを前提としています。
DSCCはdscc-hostにインストールされます。
DSCCエージェントはローカル・ホストに作成され、DSCCレジストリに登録されます。
サーバー・インスタンスをDSCCに登録します。
$ dsccreg add-server /local/dsInst/host2

Enter DSCC administrator's password: directory-service-pwd
/local/dsInst2/host2 is an instance of DS

Agent No    Hostname Port Owner    iPath
--------    -------- ---- -------- --------------------------------
0           host2    1636 ajensen  install-path/var/dcc/agent

The registration will use DSCC agent on port: 1389
Enter password of "cn=Directory Manager" for /local/dsInst/host1: xxxxxxxx
This operation will restart /local/dsInst/host1.
Do you want to continue ? (y/n) y
Starting /local/dsInst/host1
Connecting to /local/dsInst/host1 (using ldap://127.0.0.1:1389)
Enabling DSCC access to /local/dsInst/host1
Restarting /local/dsInst/host1
Registering /local/dsInst/host1 in DSCC on dscc-host.
DSCCに現在登録されているサーバーとエージェントを一覧表示します。

このインストールを本番用に使用する必要があり、システムをクリーンアップする場合は、次のコマンドを入力します。
# dsccreg remove-server -h dscc-host -p dscc-registry-port /local/dsInst
# dsadm delete /local/dsInst
次の手順
接尾辞をさらに追加し、他のサーバー・インスタンスとのレプリケーションを構成して、インスタンスをチューニングし、他の一般的な構成操作を続行できます。
コマンドライン管理ツールを使用したDirectory Serverの構成手順は、『Oracle Directory Server Enterprise Edition管理者ガイド』の第I部「Directory Server管理」を参照してください。
コマンドラインを使用したDirectory Proxy Serverインスタンス作成の詳細は、『Oracle Directory Server Enterprise Edition管理者ガイド』の第17章「Directory Proxy Serverインスタンス」を参照してください。
開始する前に: DSCCが、サポートされているアプリケーション・サーバーにすでにデプロイされている必要があります。付録A「DSCC WARファイルのデプロイ」を参照してください。
root以外のユーザーでもサーバー・インスタンスを作成できます。
DSCCを使用してサーバー・インスタンスを作成するには、次の手順を参照してください。
http://dscc-host:port/dscc7を使用してDSCCにアクセスします。
http://dscc-host:port/dscc7またはhttps://dscc-host:port/dscc7を使用してDSCCにアクセスします(dscc-portは、アプリケーション・サーバー構成によって決定されます)。
ディレクトリ・サービス・マネージャとしてDSCCにログインします。
ディレクトリ・サービス・マネージャのエントリはDSCCレジストリに格納されます。また、ディレクトリ・サービス・マネージャは、DSCCに登録されているサーバー・インスタンスへの管理者アクセス権があります。
次の値を入力します。
    *  Directory Server Manager: admin
    * Password: directory-service-pwd
「ログイン」ボタンをクリックします。
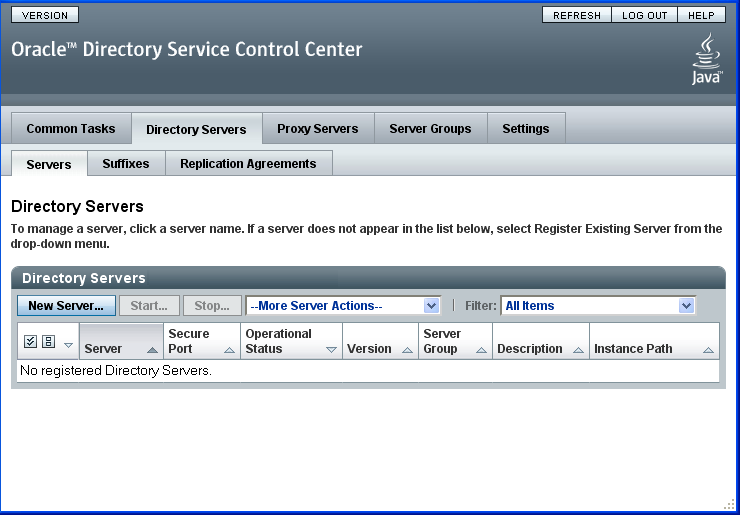
「ディレクトリ・サーバー」タブで、「新規サーバー」をクリックします。
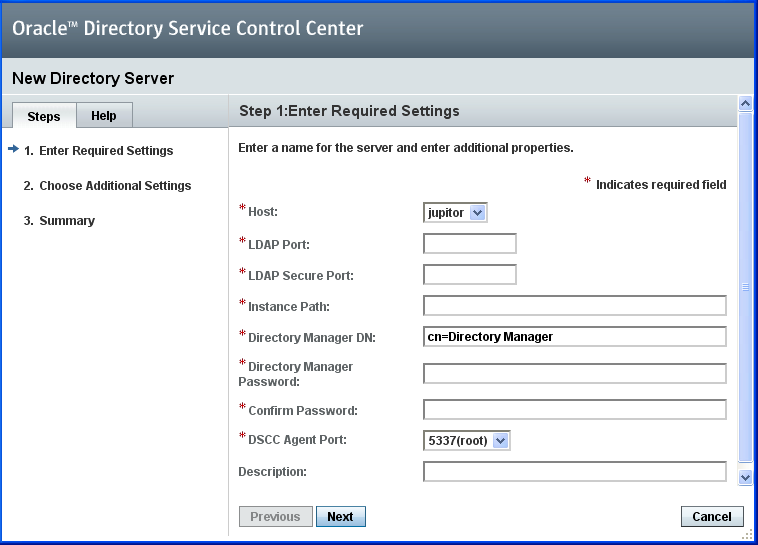
Directory Service Control Centerの新規ディレクトリ・サーバーウィザードが表示されます。

Directory Service Control Centerの新規ディレクトリ・サーバーウィザードの指示に従って、サーバー・インスタンスを作成します。

新しいサーバー・インスタンスの作成中に、次の情報を指定する必要があります。この例では、LDAPポート1389とLDAPSポート1636がデフォルト値です。必要に応じて他の値を指定できます。
    * Host: server-host   # Host where DSCC agent has been configured
    * LDAP Port: 1389
    * LDAPS Port: 1636
    * Instance Path: /local/dsInst
    * Directory Manager Password: xxxxxxxx
    * Confirm Password: xxxxxxxx
    * DSCC Agent Port: dscc-agent-port
|
注意: インスタンス・パスでは非ASCII文字はサポートされていません。 |
グラフィカル・ユーザー・インタフェースに表示される指示に従って、サーバー・インスタンス作成プロセスを完了します。
「--その他のサーバー・アクション--」ドロップダウン・メニューで「削除」をクリックすると、サーバー・インスタンスを削除できます。
関連項目
同様に、「プロキシ・サーバー」タブを使用してDirectory Proxy Serverインスタンスを作成できます。
Directory ServerインスタンスとDirectory Proxy Serverインスタンスの詳細な構成と管理については、『Oracle Directory Server Enterprise Edition管理者ガイド』を参照してください。
グラフィカル・ユーザー・インタフェースを使用したDirectory ServerおよびDirectory Proxy Serverの構成に関するヒントは、Directory Service Control Centerのオンライン・ヘルプを参照してください。
この項では、サーバー・インスタンスの作成や、Directory Server Resource Kitおよびソフトウェア開発キットの使用に役立つ、設定可能な環境変数を示します。
| 環境変数 | 説明 | 参照 |
|---|---|---|
|
|
dpconfコマンド |
|
|
|
dpconfコマンド |
|
|
|
dsconfコマンド |
|
|
|
dsconfコマンド |
|
|
|
dsccreg、dsccmonコマンド |
|
|
|
dsccreg、dsccmonコマンド |
|
|
サーバー・インスタンスがDirectory Service Control Centerに登録されている場合、この変数を、ディレクトリ・サービス・マネージャのパスワードが格納されているファイルに設定すると、ディレクトリ・マネージャのパスワードが異なっていてもすべてのサーバー・インスタンスを管理できます。 |
dpconf、dsconf、dsccreg、dsccmonコマンド |
|
|
サーバー・インスタンスがDirectory Service Control Centerに登録されている場合、この変数を、 |
dpconf、dsconf、dsccreg、dsccmonコマンド |
|
install-path/resources/man/:\
$ install-path/resources/man
|
|
|
|
あるいは、 |
|
|
|
|
Directory Server Enterprise Editionコマンド |
|
|
zipディストリビューション: |
Directory Server Resource KitおよびLDAPクライアント・コマンド |