9 Configuring the LTFS-LE Client
This chapter describes how to connect a Windows or Linux client to the LTFS-LE server using the Samba (CIFS) network protocol. It presents examples of typical LTFS-LE client configurations.
The following topics are included:
Configuring Samba on the LTFS-LE Server
Ensure that you have installed Samba client and server software as part of the Linux operating system installation, as described in the Linear Tape File System, Library Edition Planning and Installation Guide.
Once you have installed the Samba software, you must perform the following steps to configure this software on the server:
Note:
The following represents a sample configuration. For complete configuration instructions you can use to customize and tune your Samba configuration, refer to the Samba documentation available at:-
Add a share definition entry to the /etc/samba/smb.conf file pointing to the /LTFSLE directory.
It is recommended that you first make a backup of the original:
# cp /etc/samba/smb.conf /etc/samba/smb.conf.ORIG
-
Edit the etc/samba/smb.conf shared definitions entry.
For example:
#===== Share Definitions =====

[LTFSLE]
        comment = Oracle StorageTek Library Tape Filesystem
        path = /LTFSLE
        browseable = yes
        writable = yes
        public = yes
        read only = no
    printable = no
    guest ok = yes
    strict locking = yes
#=============================
Note:
In the example above, the LTFSLE share definition entry is the name of the share that the client will connect to. It does not need to match the specified path. However, the path must exist on the server. -
Add a Samba user to access the share.
In the following example, user
rootis added with a password ofltfs1234:# smbpasswd -a root New SMB password: ltfs1234 Retype new SMB password: ltfs1234
-
Enter the following command to start the Samba server services on the LTFS-LE server:
# service smb start
The following confirmation messages are displayed:
Starting SMB services:    [  OK  ]
Starting NMB services:    [  OK  ]
Samba server configuration is complete.
Connecting a Client to the LTFS-LE Server
LTFS-LE supports both Windows and Linux clients. The following sections include examples of client connections using the Samba (CIFS) network protocol.
Connecting a Windows Client
Microsoft Windows includes Samba (CIFS) client capabilities that allow you to map to the /LTFSLE Samba share on the LTFS-LE server.
Once you create this client connection, you can use a Samba client session to access files included in the LTFS-LE library.
Mapping the Windows Client
To create the Windows client connection:
From a Windows 7 client system, perform the following steps:
-
From the Desktop, right-click the Computer icon and select Map Network Drive.
The Map Network Drive dialog box appears.
-
Click the Drive menu and select a drive letter to dedicate to this client connection.
-
In the Folder field, enter the path to the LTFS-LE Samba share, using the following format:
\\servername.domain\sharewhere:
-
servername.domainis the path to the LTFSLE server. -
shareis the LTFS-LE share name you defined as part of LTFS-LE Samba server configuration. See "Configuring Samba on the LTFS-LE Server".
-
-
Click Finish.
The Windows Security dialog box appears.
-
Enter the User name and password you defined during LTFS-LE Samba server configuration. See "Configuring Samba on the LTFS-LE Server".
-
Click OK.
The client connection is now mapped to the Samba share on the LTFS-LE server.
Adjusting the Samba Client Session Timeout Value
By default, each Windows Samba client session features an automatic 45 second timeout period that takes effect after the precalculated Samba (CIFS) response time expires. This timeout value is specified by the SESSTIMEOUT parameter, included in the Windows registry.
To avoid undesired timeout events from occurring during LTFS-LE client/server processing, it is recommended that you increase the SESSTIMEOUT parameter value.
To increase the SESSTIMEOUT value:
-
From the Windows Start menu, select the Run command.
The Run dialog box appears.
-
Enter
regeditand click OK.The Registry Editor window appears.
-
Navigate to the following directory:
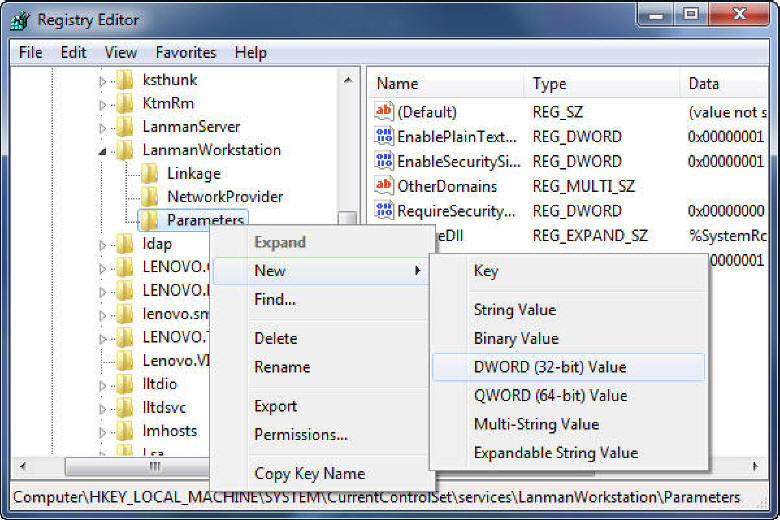
\HKEY_LOCAL_MACHINE\SYSTEM\CurrentControlSet\Services\LanmanWorkstation\Parameters\ -
Right-click Parameters and select New, followed by DWORD (32-bit) Value, as shown in the following figure:
-
Rename
New Value #1toSessTimeout. -
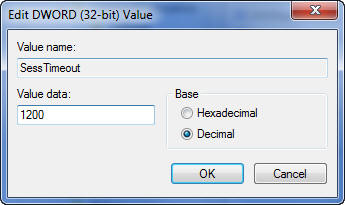
Right-click SessTimeout and select Modify.
The Edit DWORD (32-bit) Value dialog box appears.
-
Select Decimal under Base, and enter an integer value in the Value data field. This value represents the new client timeout value, in seconds.
In the following example, this value is set to 1200 seconds (20 minutes):
-
Click OK.
Starting a Samba Client Session
To start a Samba LTFS-LE client session:
-
In Windows, double-click the Computer icon and locate the mapped Samba share (drive).
-
Open the Samba share.
A Windows security dialog box appears.
-
Enter the user name and password you defined during LTFS-LE Samba server configuration and click OK.
The LTFS-LE Samba share opens. It contains the LOST+FOUND+VOLUMES folder, as shown in the following figure:
Figure 9-3 LTFS-LE Client LOST+FOUND+VOLUMES Folder
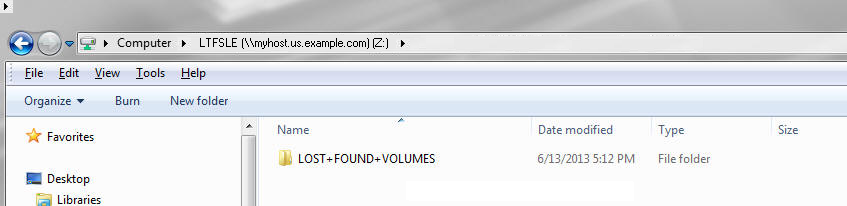
Description of ''Figure 9-3 LTFS-LE Client LOST+FOUND+VOLUMES Folder''
-
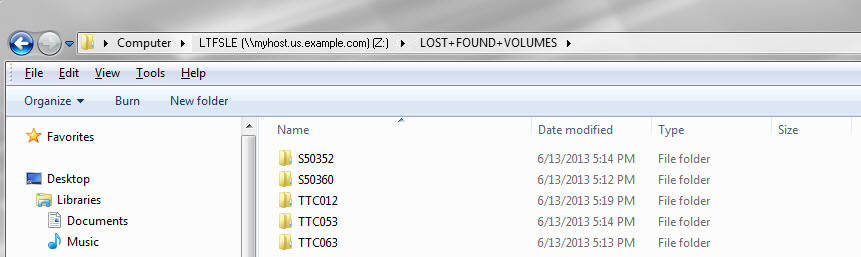
Open the LOST+FOUND+VOLUMES folder to display the LTFS-LE Volume folders. Each folder represents an LTFS formatted volume in the LTFS-LE library, as shown in the following figure:
-
Open a volume folder to display its file contents, as shown in the following figure:
-
You can drag and drop individual files to your desktop. If you encounter a Windows Security message, click OK to proceed.

Note:
Though it is possible to open a file directly from a volume folder, Oracle strongly recommends that you only copy files to and from volume folders to preserve drive resources for other users.Connecting a Linux Client
To configure the Linux client:
-
By default, the Samba client software package should already be installed on the Linux client system. For verification, enter the following command from the Linux client system:
# rpm -qa |grep samba
The installed packages are displayed:
samba-common-version.platform
samba-client-version.platform
Note:
version and platform may vary depending on the Linux distribution you are using.Note:
You can install any of the required Samba software packages from the Oracle Enterprise Linux x86_64 DVD you used to install the operating system. -
Create a mount point for the Samba share. For example:
# mkdir /mnt/LTFSLE
-
Mount the LTFSLE share from the LTFS-LE server to the client. For example:
# mount -t cifs //LTFSLE-server.domain.com/LTFSLE /mnt/LTFSLE -orw,noacl,rsize=1048576,wsize=1048576Where
LTFSLE-server.domain.com is the name of your LTFS-LE server. -
At the Password prompt, enter your password to access the Samba share on the LTFS-LE server.
-
Enter the following command to check the mount:
# mount
The following is displayed:
//LTFSLE-server.domain.com/on /mnt/bohemia-LTFSLE-smb type cifs (rw,mand)
-
Enter the following command to view the volumes on the Samba share:
# ls /mnt/LTFSLE
The LTFS-LE LOST+FOUND+VOLUMES directory is listed:
LOST+FOUND+VOLUMES S50348 TTC063
This directory contains a separate subdirectory for each LTFS-LE formatted volume. You can move files to and from these directories.
Note:
Though it is possible to open a file directly from a volume folder, Oracle strongly recommends that you only copy files to and from volume folders to preserve drive resources for other users. -
Optionally, disable opportunistic locking.
On Linux Samba clients, data transfers of large files or multiple smaller files to tape volumes can cause connection resets (producing I/O errors). To remedy this issue, you can disable opportunistic locking on the Linux Samba client by running the following command on the Linux Samba client machine:
# echo 0 > /proc/fs/cifs/OplockEnabled
To return to the default, issue the following command:
# echo 1 > /proc/fs/cifs/OplockEnabled
Note:
No action is required on the Samba server (LTFS-LE server).