8 Managing LTFS-LE BUI User Access
This chapter describes how to manage user access to the LTFS-LE BUI. The following topics are included:
Access Control and User Roles
When you add a new LTFS-LE user, you assign a specific role that determines the user's access to the functions provided by the LTFS-LE BUI.
There is no limit to the number of users the administrator can define. However, each user can be associated with only one role.
You may assign any of the following roles:
-
This role is reserved for the system administrator responsible for configuring and managing the LTFS-LE system. It provides access to all LTFS-LE system facilities.
-
This role applies to a basic user who wants to monitor drives, volumes, and system resources. It provides limited access to the LTFS-LE system, with read-only permissions.
-
This role applies to the Service Representative. It provides Administrator level access, but uses login credentials that are specific to Services. This role may include additional command-line interface (CLI) capabilities for servicing procedures.
It is important to note that these roles apply only to LTFS-LE BUI access. They do not apply to client-level access to LTFS-LE.
The ability to define which files can be accessed depends on data path user roles outside of the control of LTFS-LE. Customers may associate access to LTFS-LE with the credentials in an existing infrastructure (LDAP, Active Directory or NIS+). In this scenario, file system users are authenticated with passwords managed by the external security infrastructure. Refer to the appropriate networking documentation for more information about these strategies.
Viewing Users from the User Management Page
Use the User Management page in the LTFS-LE BUI to view a list of users.
To access this page, click the Settings tab and select User Management from the selection panel.
The following figure shows the User Management page:
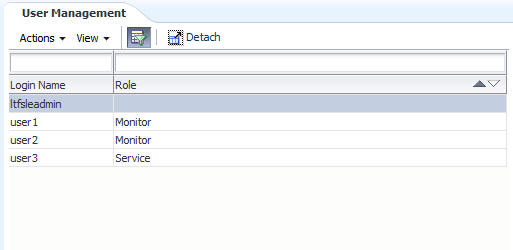
As shown in Figure 8-1, the User Management page lists all LTFS-LE user login names and their assigned roles. In this example, the administrator has added three users.
Performing User Management Tasks
You can use the Action drop-down menu on the User Management page in the LTFS-LE BUI to perform the following user management tasks:
-
Insert a user
-
Edit a user
-
Delete a user
-
Change a password
Inserting a User
To insert a new user:
-
Click the Settings tab and select User Management from the selection panel.
The User Management page appears.
-
From the User Management page, click the Action drop-down menu and select Insert User.
-
In the Log in Name field, enter a name for the new user.
-
In the Password field, enter a password for the new user.
-
In the Confirm Password field, reenter the password.
-
Click the Role drop-down menu and select one of the following:
-
Admin
-
Monitor
-
Service
Note:
See "Access Control and User Roles" for information about these roles.There is no limit to the number of users you can define. However, each user can be associated with only one role.
-
-
Click Apply. Your settings are validated and the OK button becomes active.
-
Click OK to commit your settings or click Cancel to exit the page.
Once you click OK, the User Management page appears and the new user is displayed in the listing.
Editing a User
To edit a user:
-
Click the Settings tab and select User Management from the selection panel.
The User Management page appears.
-
From the User Management page listing, click the user name you want to edit.
-
Click the Action drop-down menu and select Edit User.
-
Edit the Log in Name and Role as desired.
-
Click Apply. Your settings are validated and the OK button becomes active.
-
Click OK to commit your settings or click Cancel to exit the page.
Once you click OK, the User Management page appears and your changes are displayed in the listing.
Deleting a User
To delete a user:
-
Click the Settings tab and select User Management from the selection panel.
The User Management page appears.
-
From the User Management page listing, click the user name you want to delete.
-
Click the Action drop-down menu and select Delete User.
A confirmation dialog box appears.
-
Click OK to delete the user, or click Cancel to return to the User Management page.
Once you click OK, the User Management page appears and the deleted user no longer appears in the listing.
Changing a Password
To change a password:
-
Click the Settings tab and select User Management from the selection panel.
The User Management page appears.
-
From the User Management page listing, click the user name whose password you want to change.
-
Click the Action drop-down menu and select Change Password.
-
In the Old Password field, enter the existing password.
-
In the New Password field, enter a new password.
-
In the Confirm New Password field, enter the new password again.
-
Click Apply. Your input is validated and the OK button becomes active.
-
Click OK to commit your settings or click Cancel to exit the page.