7 Installing Processing Engines
This chapter describes the prerequisites and procedure for installing Processing Engines. Note that the use of Processing Engines is only supported for remote Collectors. A combined installation of a Processing Engine and Collector on the same system is not supported.
7.1 Prerequisites
This section describes the steps that should be taken before starting to install the Processing Engine software. Ensure that the Reporter and remote Collector systems are up and running before proceeding with the installation process.
Important:
It may be necessary to increase the maximum number of processes available to the databases within your environment. The procedure to do this is described in Section G.16, "ORA-00020: maximum number of processes (%s) exceeded".7.1.1 Planning the Software Installation Location
Depending on the installation location of the database and the RUEI software, the necessary disk space needs to be carefully planned. During operating system installation, you will need this information at hand for the disk partitioning phase.
Table 7-1 shows the disk space requirements for the RUEI installation components.
Table 7-1 Required Disk Space Specifications
| Partition | Minimum Required Disk Space (GB) | Component |
|---|---|---|
|
ORACLE_BASE (default |
300 |
Processing Engine Database |
|
RUEI_HOME (default |
1 |
Processing Engine |
|
RUEI_DATA (default |
100 |
Processing Engine |
Footnote 1 This is the example database location used throughout this guide.
Important:
The Processing Engine and database servers require high-performance data storage. RAID-10 or RAID-5 (or equivalent) storage configurations with high-performance disks are strongly recommended.7.1.2 Operating System Security Configuration
When the system boots for the first time, a post-installation wizard appears, and allows you to finalize the operating system configuration settings. Ensure that:
-
The RUEI firewall rules shown in Table 1-6 are correctly configured.
-
Security Enhanced Linux (SELinux) is disabled. This is necessary for the correct operation of RUEI. Note that changing the SELinux setting requires rebooting the system so that the entire system can be relabeled.
-
For security reasons, it is strongly recommended that you check the Encrypt System check box during operating system installation so that all sensitive data is stored in a secure manner. A passphase is required during booting the system.
7.1.3 Verify NTP Daemon Operation
Ensure that the date and time settings are correctly specified. The use of NTP is strongly recommended, and is required in a split-server deployment. In addition, all time zones specified for Reporter, Collector, and Processing Engine systems must be identical.
Because the NTP daemon is a critical component of RUEI, especially in a split server configuration, it is recommended that you verify that it is activated in at least run level 5 during boot. Use the following commands:
/sbin/chkconfig --list | grep ntpd
ntpd     0:off   1:off   2:off   3:off   4:off   5:off   6:off
/sbin/chkconfig ntpd on
/sbin/chkconfig --list | grep ntpd
ntpd     0:off   1:off   2:on    3:on    4:on    5:on    6:off
/etc/init.d/ntpd start
Starting ntpd:                                     [  OK  ]
Note that if the NTP daemon is not already running, you can start it by issuing the following command:
/etc/init.d/ntpd restart
The following sample output shows when the NTP daemon is synchronized (indicated by an "*").
ntpq -pn
       remote           refid      st t when poll reach   delay   offset  jitter
  ==============================================================================
  *194.171.167.130     .PPS.         1 u 994 1024 377     6.429   0.041   0.093
  +80.85.129.25        130.235.20.3  3 u 725 1024 377     4.435   0.673   0.129
  +82.94.235.106       135.81.191.59 2 u 678 1024 377     1.709   1.774   0.020
   127.127.1.0         .LOCL.       10 l   8   64 377     0.000   0.000   0.001
Important:
In distributed environments, all time zones specified for Reporter, Collector, and Processing Engine systems must be identical.7.1.4 Installing the RUEI Prerequisites
Note that the procedure described in this section is only required for a Processing Engine system. The required packages are available from the Oracle Linux or RedHat Enterprise Linux distribution sets.
RedHat Enterprise/Oracle Linux 5.x
Issue the following command to install all prerequisites for the Reporter:
rpm -Uhv lm_sensors-2.10.7-*.el5.x86_64.rpm \
net-snmp-5.3.2.2-*.el5.x86_64.rpm \
net-snmp-utils-5.3.2.2-*.el5.x86_64.rpm
RedHat Enterprise/Oracle Linux 6.x
Issue the following command to install all prerequisites for the Reporter:
rpm -Uhv lm_sensors-3.1.1-*.el6.x86_64.rpm \
net-snmp-5.5-*.el6.x86_64.rpm \
net-snmp-utils-5.5-*.el6.x86_64.rpm
Installing All Requirements Using a Yum Repository (Alternative)
As an alternative to manual installation, you can use a Yum repository to install the required RPMs. This requires a working Yum repository. Information about Yum repositories is available at the following location:
http://linux.duke.edu/projects/yum/
Install the necessary Reporter packages using the following command:
yum -y install net-snmp-utils
7.1.5 Oracle Database Software Installation
Download and install Oracle Database 11g Enterprise Edition from the Oracle database home page at the following location:
http://www.oracle.com/technology/software/products/database/index.html
The procedure for installing the Oracle database is fully described in the product documentation. It is strongly recommended that you download and review the appropriate Oracle Database 11g Quick Installation Guide. It is available from the Oracle Database Documentation Library. A summary of this procedure is described in Appendix A, "Installing the Oracle Database Software". Note that the path, user, and group names used in this guide are based on the Oracle database product documentation.
7.2 The RUEI Configuration File
The /etc/ruei.conf file specifies the settings used within your installation. A template of this file is provided in the /root/RUEI/extra directory of the RUEI distribution zip. Note that all components in your RUEI environment (such as the remote database and Collectors) require the same global /etc/ruei.conf configuration file except the value specified for RUEI_DB_TNSNAME_CFG.
Within the Processing Engine ruei.conf file, the following two settings must be carefully distinguished:
-
RUEI_DB_TNSNAME_CFG must contain the alias to the Reporter database (in this guide referred to as
config). -
RUEI_DB_TNSNAME must contain the alias to the Processing Engine database (in this guide referred to as
uxinsight).
7.3 Processing Engine Installation
This section describes the procedure for installing the required components for a Processing Engine system. These include the Oracle database Instant Client.
7.3.1 Creating Groups and Users
Create the moniforce group and user. The home directory of moniforce should be set to /var/opt/ruei, with read permissions for group members. Issue the following commands:
/usr/sbin/groupadd moniforce
/usr/sbin/useradd moniforce -g moniforce -d /var/opt/ruei
chmod -R 750 /var/opt/ruei
chown -R moniforce:moniforce /var/opt/ruei
7.3.2 Installing the Oracle Database Instant Client
Install the Oracle database Instant Client and SQLplus extension by issuing the following commands as the root user:
cd /root/RUEI/IC
rpm -Uhv oracle-instantclient11.2-basic-*.rpm
rpm -Uhv oracle-instantclient11.2-sqlplus-*.rpm
7.3.3 Creating the Processing Engine Database Instance
The Processing Engine database can reside either locally (that is, on the Processing Engine server) or on a remote database server. In this section you will create the database instance required for the Processing Engine, and generate the "connection data" required for the Processing Engine to connect to its database instance and the central RUEI database instance. As an alternative for the database setup described in this chapter, you can follow the procedure described in Appendix B, "Generic Database Instance Setup".
You will need the following scripts to be present on the system where the database instance (RUEI_DB_INST) will be created:
-
ruei-prepare-db.sh: creates the database instance, Oracle wallet, and database connect files. Note that this script will only run on Linux. If you are installing the Oracle database on a different operating system, see Appendix B, "Generic Database Instance Setup" for more information. -
sql_scripts: this directory contains a number of SQL scripts that are called by theruei-prepare-db.shscript. -
ruei-check.sh: this is a hardware and environment check utility, and is automatically invoked byruei-prepare-db.sh. The script can also be used as a stand-alone troubleshooting utility. For a complete description of the script, refer to Appendix E, "The ruei-check.sh Script".
The four "connection data" files created during the procedure described in this section are as follows:
-
cwallet.sso -
ewallet.p12 -
sqlnet.ora -
tnsnames.ora
The RUEI configuration file (/etc/ruei.conf) also needs to be present on the database server and configured as described in Section 7.2, "The RUEI Configuration File".
Do the following:
-
Copy the
ruei-prepare-db.shandruei-check.shscripts, and thesql_scriptsdirectory to the server on which you intend to run the database instance, and make them executable for theoracleuser. These scripts and directory can be found in the RUEI distribution zip (/root/RUEI/121). -
Review the settings in the
/etc/ruei.conffile to match your needs as described in Section 7.2, "The RUEI Configuration File". -
Logon to the database server as the
oracleuser, and set the ORACLE_HOME environment variable. You need to run theruei-prepare-db.shscript as theoracleuser. This script creates the RUEI_DB_INST database, but only after a number of hardware and software environment checks have been performed. The actual checks performed depend on the system type you are currently installing.The script prompts you for the RUEI database user and wallet passwords, and the hostname of the database server. This enables the RUEI application to login to the database automatically. The script also creates the "connection data" files for you now.
Issue the following commands:
chmod +x ruei-prepare-db.sh ruei-check.sh
export ORACLE_HOME=/u01/app/oracle/product/11.2.0/dbhome_1Foot 1
./ruei-prepare-db.sh create

Before setting up the database, we will need to perform a system check
to verify that the hardware has been set up correctly. You will be
prompted for the root password.

Run the system check (requires root password) (y/n)? y
...

system_check done
____________________________________________________________

create_database ...
____________________________________________________________

The database instance 'ux' will be created. Please specify a password
for the SYS/SYSTEM users.

Specify a password for the SYS/SYSTEM users:
Confirm password:

Specify the global database name which must have the form
"db_name.db_domain". For example "sales.us.example.com". If this database
will be part of a distributed deplyment, the name must be unique within
that deployment.

global database name [ux.proc1.example.com]:

Creating database 'ux.proc1.example.com' and instance 'ux' ...
Copying database files
1% complete
3% complete
...

The database user UXINSIGHT will be created. Please choose a password
for this user.

Choose password for UXINSIGHT:
Confirm password:

creating wallet

Please provide the connection information to the configuration database
(RUEI_DB_TNSNAME_CFG='config'). This information will be added to
the wallet.

Configuration database hostname: reporter.example.com
Password for 'UXINSIGHT' in the configuration database:
Confirm password:

cwallet.sso
ewallet.p12
sqlnet.ora
tnsnames.ora

If the RUEI installation will be on this same server, then the database
configuration for user moniforce can be automatically completed. You
will be prompted for the root password.

Complete the installation automatically (requires root password) (y/n)? y
If you run the
ruei-prepare-db.shscript for a combined Processing Engine/Database server, all files are placed automatically in the correct locationFoot 2 . In case of a remote database, a separate .tarfile is generated, and you will need to perform the extra step 4.If you ran the above commands on a combined Processing Engine/Database server, you can skip step 4 and proceed to step 5.
-
This step only applies when using a remote Processing Engine database.
In the case of a Processing Engine system using a remote database, you will need to copy the generated
/tmp/ruei-database-configuration.tarfile in step 3 from the database server to the Processing Engine system. The/tmp/ruei-database-configuration.tarfile must be extracted on the Processing Engine server in the directory/var/opt/ruei(RUEI_DATA). The permissions of the files need to be set so that the specified RUEI_USER (moniforce) can use them.Copy the generated .
tarfile, which holds connection data files to the Processing Engine system. Logon to the Processing Engine server and extract the .tarfile using the following commands:cd /var/opt/ruei tar xvf path-to-tar-file/ruei/database-configuration.tar chown moniforce:moniforce cwallet.sso ewallet.p12 sqlnet.ora tnsnames.ora -
Because logging of the database can consume a large amount of disk space, it is recommended that you install a clean-up script to avoid the usage of unnecessary disk space. Copy the (example) script to the
oracleuser directory and activate it viacronusing the following commands:mkdir -p /home/oracle/bin cp /root/RUEI/extra/ruei-clean.sh /home/oracle/bin chmod +x /home/oracle/bin/ruei-clean.sh su - oracle -c 'echo "10 0 * * * /home/oracle/bin/ruei-clean.sh" | crontab'
7.3.4 Installation of the Processing Engine Software
-
The RUEI directory locations are flexible. Therefore, it is necessary to use the exact directory name described as configured in the
/etc/ruei.conffile. Create the RUEI application root directory using the following commands:mkdir -p /opt/ruei chmod 750 /opt/ruei
Note:
The specified RUEI_HOME and RUEI_DATA directories must have 750 permissions defined for them. -
Go to the directory that holds the RUEI software, and install the RUEI packages. You can specify
reporterorcollectorto theruei-install.shscript depending on the required installation:cd /root/RUEI/121 chmod +x ruei-install.sh ./ruei-install.sh reporter
-
Verify that the RUEI software was correctly installed by issuing the following command:
./ruei-check.sh postinstall
7.4 Configuring Processing Engine Communication
Table 1-7 provides a complete description of all required connections. Figure 7-1 shows a summary of those relevant to Processing Engines.
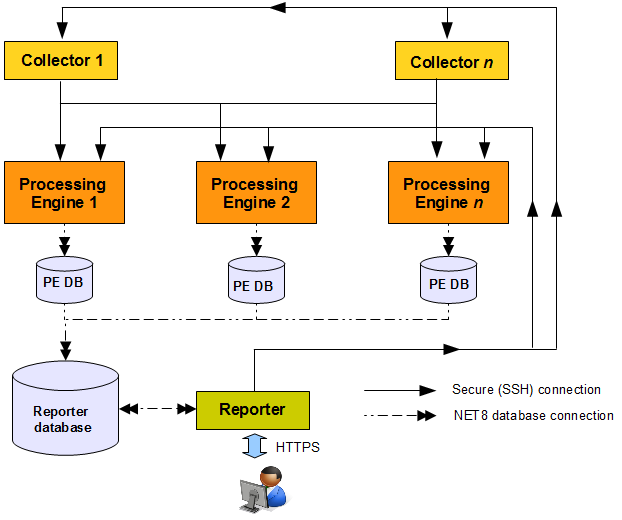
Each Processing Engine requires two database connections: one to the Reporter database, and the other to its own database. In addition, a passwordless SSH connection is required to each Collector system (and any failover Collector systems if applicable).
The Reporter system requires a connection to the Reporter database, and each Processing Engine database. In addition, a connection is required to each Collector system.
7.4.1 Configuring the SSH Connections
A password-less SSH connection must be setup between the Moniforce user from the Reporter system to each Processing Engine, and from every Processing Engine to all Collector systems.
Configuring the Reporter-Processing Engine SSH Connection
-
Logon to the Reporter server as
root. Issue the following commands:su - moniforce ssh-keygen -P ""
Press Enter to accept the defaults.
-
Logon as
rootto each of the Processing Engine systems and become themoniforceuser by issuing the following command:su - moniforce
-
Create the .
sshdirectory (if it does not already exist) for themoniforceuser on each Processing Engine system by issuing the following commands:mkdir ~/.ssh chmod 700 ~/.ssh
-
Copy the SSH key from the Reporter system to the required location on the Processing Engine system by issuing the following commands:
cd ~/.ssh
ssh root@Reporter cat /var/opt/ruei/.ssh/id_rsa.pub >> authorized_keys
(you will need to specify the Reporter system
rootpassword)chmod 600 authorized_keys
-
Check that it is now possible to execute a remote command (as
moniforceuser) on the Reporter system without using a password. For example:-
Logon as
rooton the Reporter server. -
Logon as
moniforceuser:su - moniforce. -
Execute a remote
pwdcommand:sshProcessingEnginepwd. -
Enter yes to the question "Are you sure you want to continue connecting (yes/no)?".
-
The command should return
/var/opt/ruei.
-
-
Steps 1, 2, and 3 above must be performed for each Processing Engine system. Steps 4 and 5 must be performed for each Collector system.
Configuring the Processing Engine-Collector SSH Connection
-
Logon to the Processing Engine server as
root. Issue the following commands:su - moniforce ssh-keygen -P ""
Press Enter to accept the defaults.
-
Logon as
rootto each of the Collector systems and become themoniforceuser by issuing the following command:su - moniforce
-
Create the
.sshdirectory (if it does not already exist) for themoniforceuser on each Collector system by issuing the following commands:mkdir ~/.ssh chmod 700 ~/.ssh
-
Copy the SSH key from the Processing Engine system to the required location on the Collector system by issuing the following commands:
cd ~/.ssh
ssh root@ProcessingEngine cat /var/opt/ruei/.ssh/id_rsa.pub >> authorized_keys
(you will need to specify the Processing Engine system
rootpassword)chmod 600 authorized_keys
-
Check that it is now possible to execute a remote command (as
moniforceuser) on the Processing Engine system without using a password. For example:-
Logon as
rooton the Processing Engine server. -
Logon as
moniforceuser:su - moniforce. -
Execute a remote
pwdcommand:sshCollectorpwd. -
Enter yes to the question "Are you sure you want to continue connecting (yes/no)?".
-
The command should return
/var/opt/ruei.
-
-
The above steps must be performed for each Collector system!
7.4.2 Configuring the Database Link Connections
Create the database links for each required Processing Engine by logging onto the Reporter system as the moniforce user, and executing the following command:
make-dblink proc1.example.com
The script will show a summary of the database link properties, and prompt you for the Reporter database password, as shown below:
database link  : ux.proc1.example.com
hostname       : proc1.example.com
DB instance    : ux
DB server type : DEDICATED
Manual Creation of Database Links
As an alternative to the above, you can manually create the database links for each required Processing Engine by logging onto the Reporter system as the moniforce user, and executing the following commands:
SQL> create database link
  ux.proc1.example.com
connect to
  UXINSIGHT
identified by
  "password"
using
  '(DESCRIPTION =
    (ADDRESS = (PROTOCOL = tcp)(HOST = proc1.example.com)(PORT = 1521))
    (CONNECT_DATA =
      (SID = UX)
    )
  )'
;
Note that you will need to modify the above example to meet your RUEI environment requirements.
7.5 Registering Processing Engines
Once installed and configured, each Processing Engine must be registered with the Reporter. This is fully described in the Oracle Real User Experience Insight User's Guide.
7.6 Configuring Multiple Processing Engines
When using more than two Processing Engines within your deployment, you need to modify the Collector /etc/ssh/sshd_config file. For each required Collector system, increase the MaxStartups setting from it default value of 10 to 100. When ready, restart each Collector system using the following command:
/etc/init.d/sshd restart
Footnote Legend
Footnote 1: This line requires customization based on your database version and installation path.Footnote 2: If you do not know the
root password, you can select the "remote database" option, and manually extract the connection tar file. This is described in step 4.