| Oracle® Argus Insight Installation Guide Release 7.0.3 E41483-01 |
|
|
PDF · Mobi · ePub |
| Oracle® Argus Insight Installation Guide Release 7.0.3 E41483-01 |
|
|
PDF · Mobi · ePub |
Once you have installed the BI Publisher (BIP), you need to configure certain settings to be able to view the available reports in BIP. This chapter introduces you with the steps to make those configuration changes using BIP.
This chapter comprises the following sub-sections:
Managing Users and Roles: Oracle Fusion Middleware Security Model
Configuring BIP Users and Roles: Oracle Fusion Middleware Security Model
Configuring BIP Roles and Permissions: BI Publisher Security Model
Note:
You must be logged in to BIP with the BI Admin User credentials to be able to upload the Argus Insight.xdrz file. You can refer to Table 6-3 for more information on the BI Admin User.To upload the Argus Insight.xdrz file to BIP, execute the following steps:
Copy the Argus Insight.xdrz file from the following location on the Argus Insight Web Server to the local file system:
Drive:\<Argus Insight Installation Folder>\ArgusInsight\BIP\Repository
Log on to BIP using the BI Admin User credentials. This displays the BIP Home Page as depicted in the following figure:
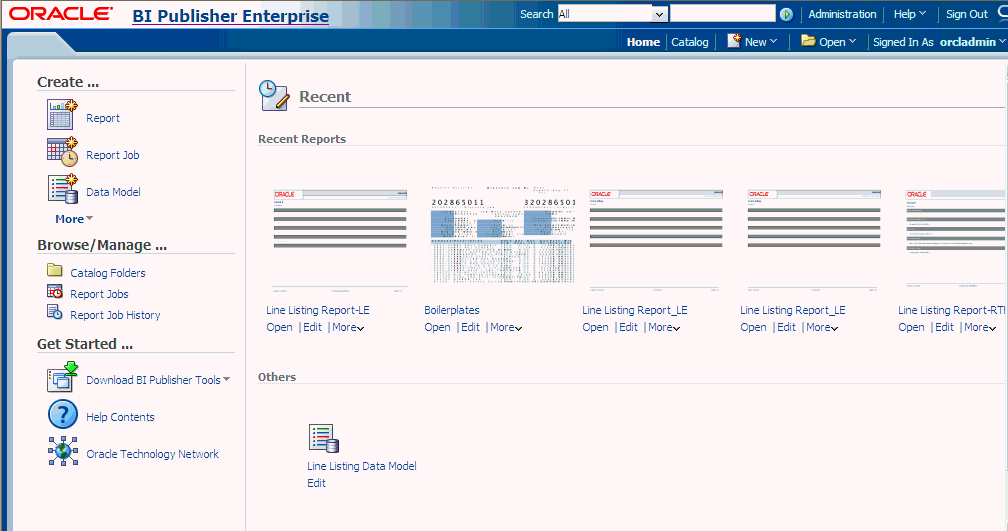
Click Catalog as highlighted in the following figure:
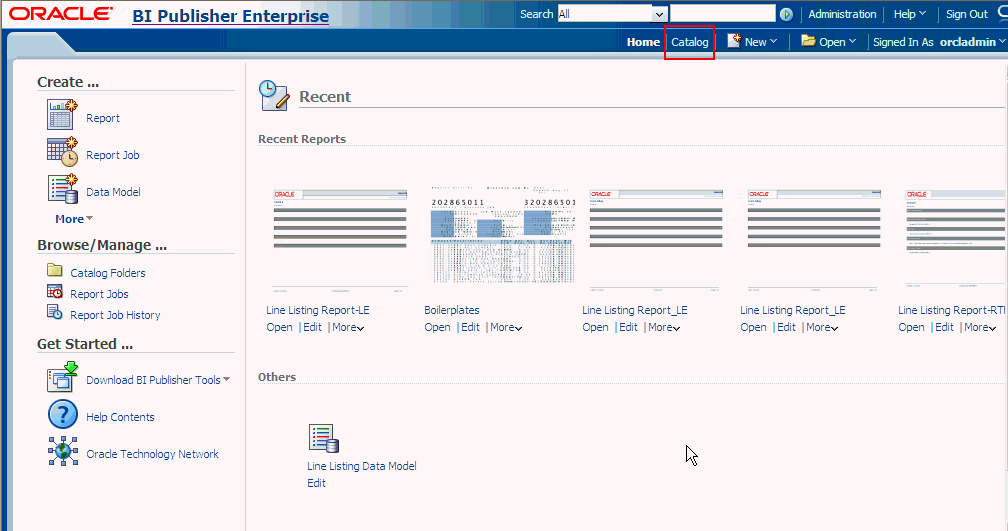
This displays the Catalog screen with the Folders and Tasks sections.
Click Shared Folders in the Folders section as shown in the following figure:
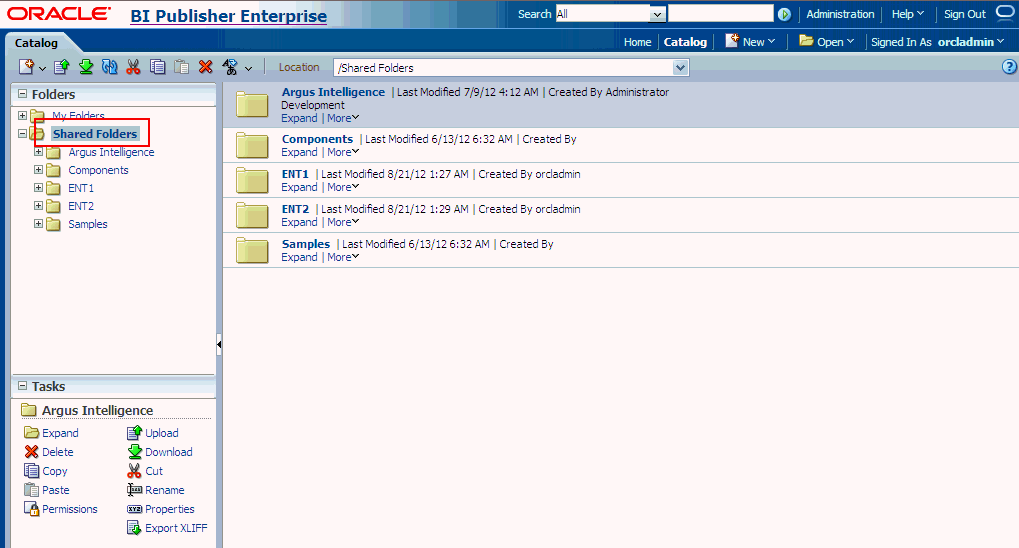
Click Upload in the Tasks section as highlighted in the following figure:
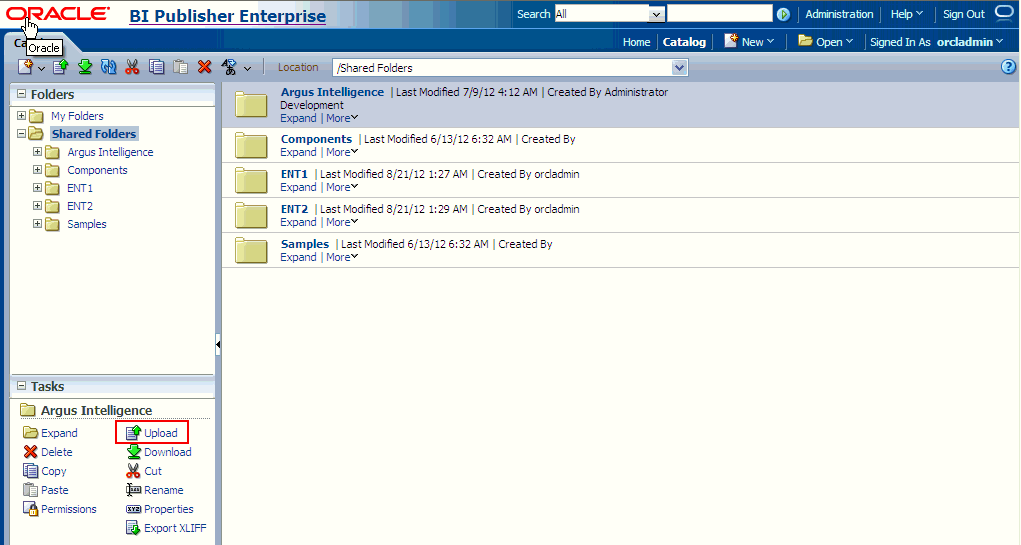
This displays the Upload dialog box as shown in the following figure:
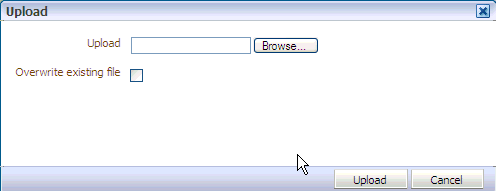
Click Browse and navigate to the location where you have saved the Argus Insight.xdrz file on the local file system.
Click Upload. Once done, an Argus Insight folder is created in Shared Folders.
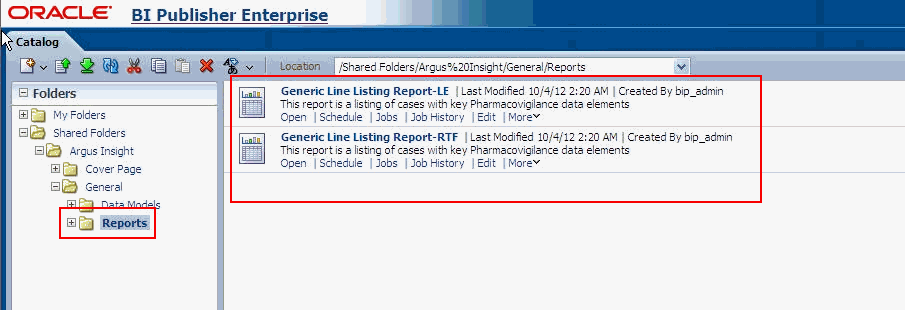
Expand the Argus Insight folder to verify that the Generic Line Listing Data Model exists in the Data Models sub-folder and the Generic Line Listing Report in LE and RTF formats exists in the Reports sub-folder as highlighted in the following figure:
If you are installing BIP on a Windows machine, the TNS entry of Argus Insight must be added in TNSNAMES.ora file of the BIP Web Server.
If BIP is installed on a Linux machine, no modifications to the TNSNAMES.ora file are required.
Once you have uploaded the Argus Insight.xdrz file to BIP, you also need to create a connection between the BIP and the database.
To connect the BIP and the database, execute the following steps:
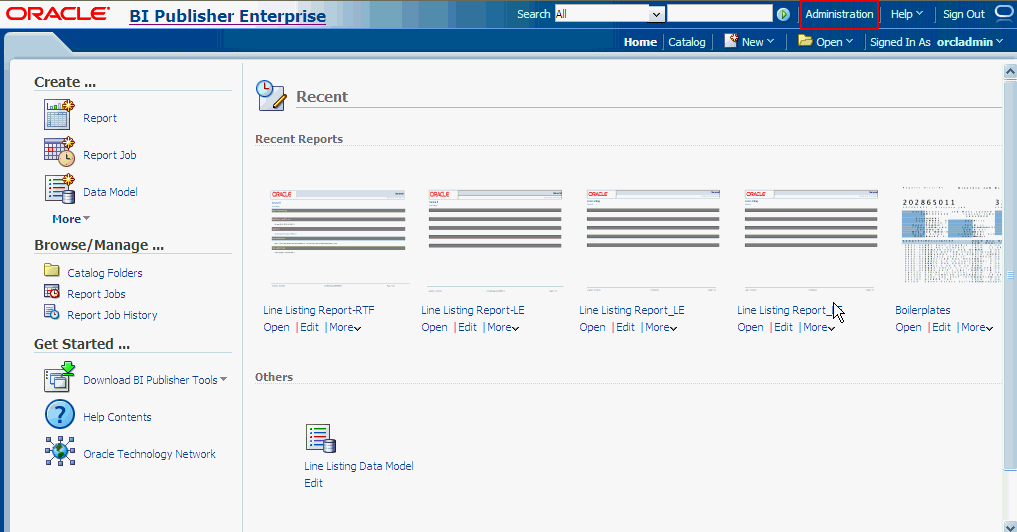
Log on to BIP using the administrator credentials. This displays the BIP Home Page as depicted in the following figure:

Click Administration as highlighted in the following figure:
Click JDBC Connection in the Data Sources section as shown in the following figure:
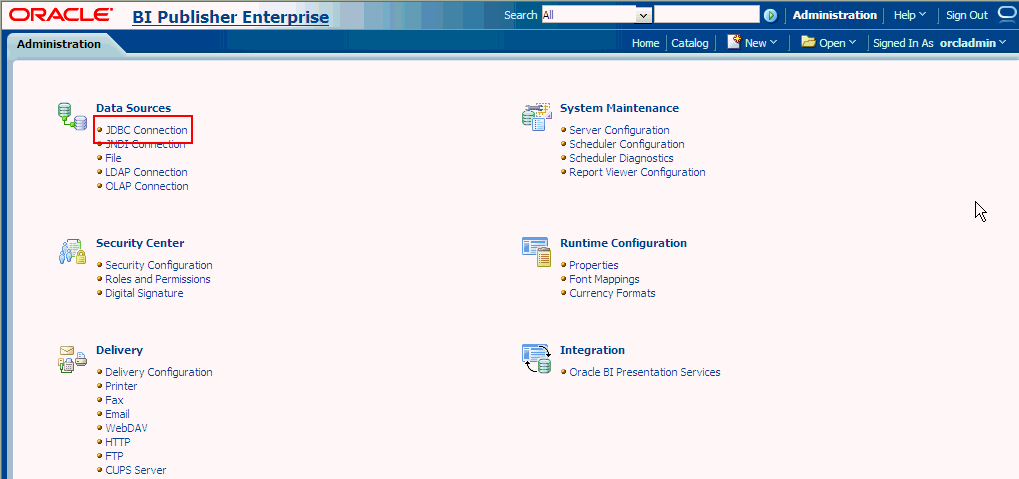
This displays the Data Sources Screen.
Click Add Data Source as highlighted in the following figure:

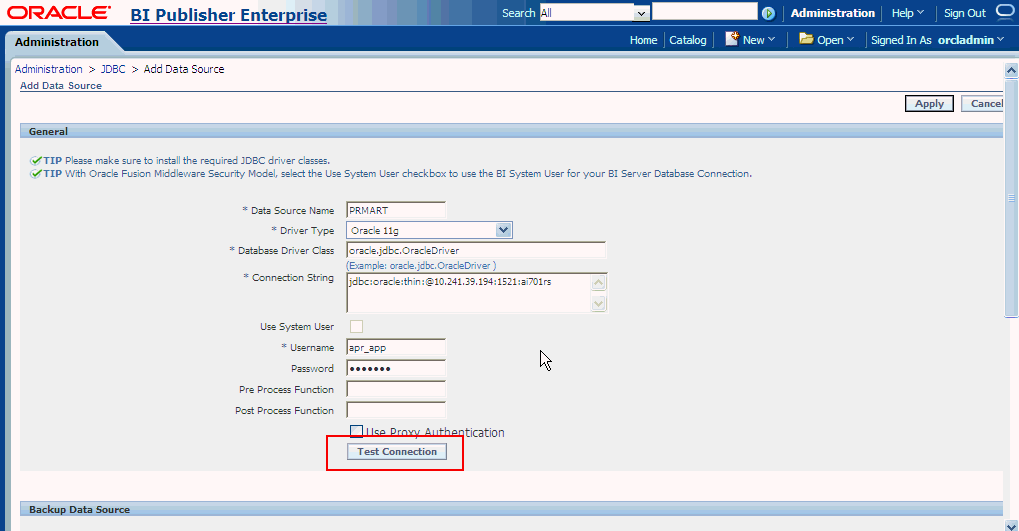
In the Add Data Source section:
Enter PRMART in the Data Source Name field.
Select the database from the Driver Type drop-down list. This auto-populates the Database Driver Class field.
Enter the connection string in the Connection String field. You must enter all the details in lower case in this field.
Enter the username (Argus Insight application DB user, for example, apr_app) to connect to the database in the Username field.
Enter the password for the user in the Password field.
Click Test Connection as shown in the following figure:
If successful, this displays a confirmation message, as shown in the following figure:

Click Apply. This displays the PRMART Data Source in the list of already existing data source names as shown in the following figure:

This successfully creates a connection between BIP and the database.
Once you have uploaded the Argus Insight.xdrz file to BIP and created the JDBC connection, you can start creating the users for the BI Publisher Security Model.
This section introduces you to the steps that you need to execute to create users, assign the roles and permissions to those users, and configure server settings for the BI Publisher Security Model.
This section comprises the following sub-sections:
Note:
When using file systems such as NFS, Windows, or NAS for the repository, ensure that the file system is secured.To configure the server settings for the BI Publisher Security Model, execute the following steps:
Log on to BIP using the administrator credentials. This displays the BIP Home Page.
Click Administration as highlighted in the following figure:

Click Server Configuration in the System Maintenance section as highlighted in the following figure:
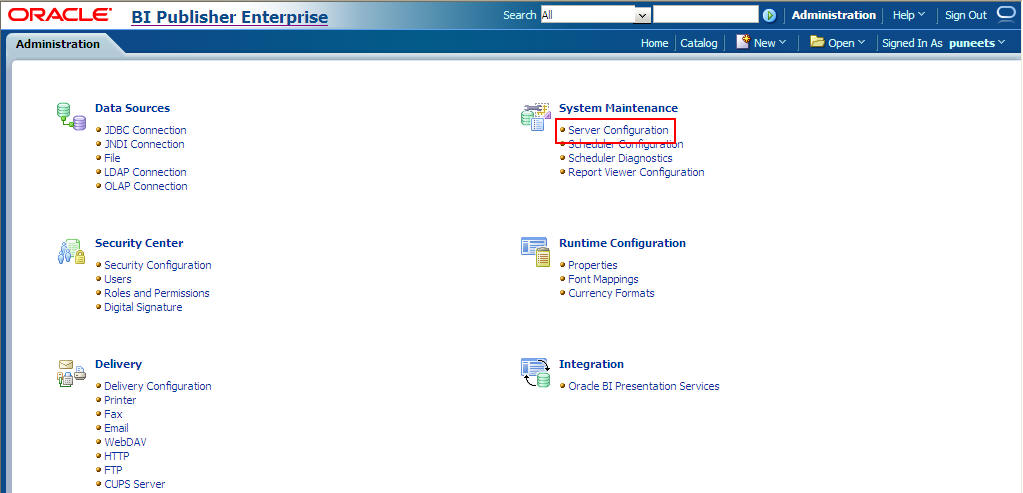
This displays the Server Configuration Screen.
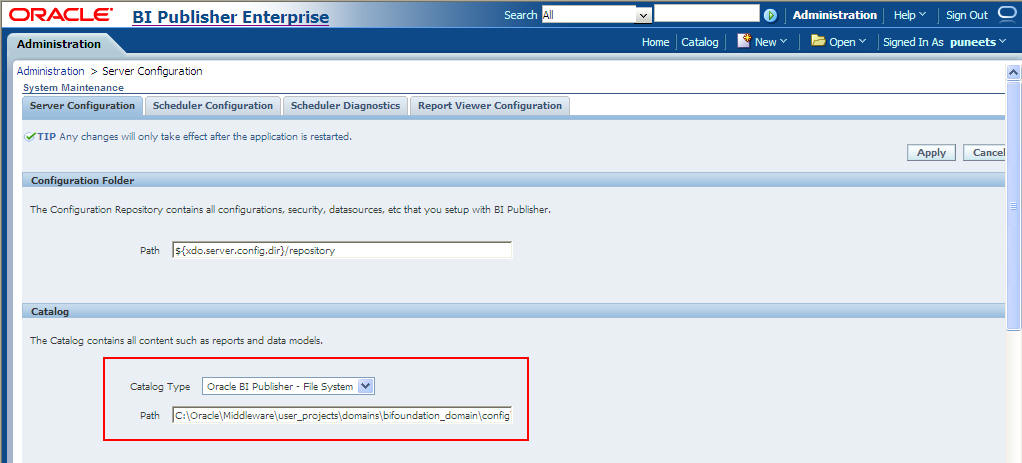
In the Catalog section, select Oracle BI Publisher - File System from the Catalog Type drop-down list. If the Catalog Type is not Oracle BI Publisher - File System, the folder level permission settings cannot be done in BIP. Refer to the BIP Technical Reference document for more information.
Note:
Only Oracle BI Publisher - File System is supported in this release.Enter the path where all BIP folders, data models, and BIP reports will be stored in the BIP server as highlighted in the following figure:
Click Apply to save the changes.
Restart the BI server.
Note:
Because the repository is in the file system, the case sensitivity of folder and Report Names is determined by the platform on which you run BI Publisher. For Windows-based environments, the repository object names are not case-sensitive. For UNIX-based environments, the Repository Object Names are case-sensitive.For more information, refer to the Configuring Server Properties section of the Administrator's guide for Oracle BIP.
To create users and assign the required roles to the users in the BI Publisher Security Model, execute the following steps:
Log on to BIP using the administrator credentials. This displays the BIP Home Page.
Click Administration as highlighted in the following figure:

Click Users in the Security Center section as highlighted in the following figure:
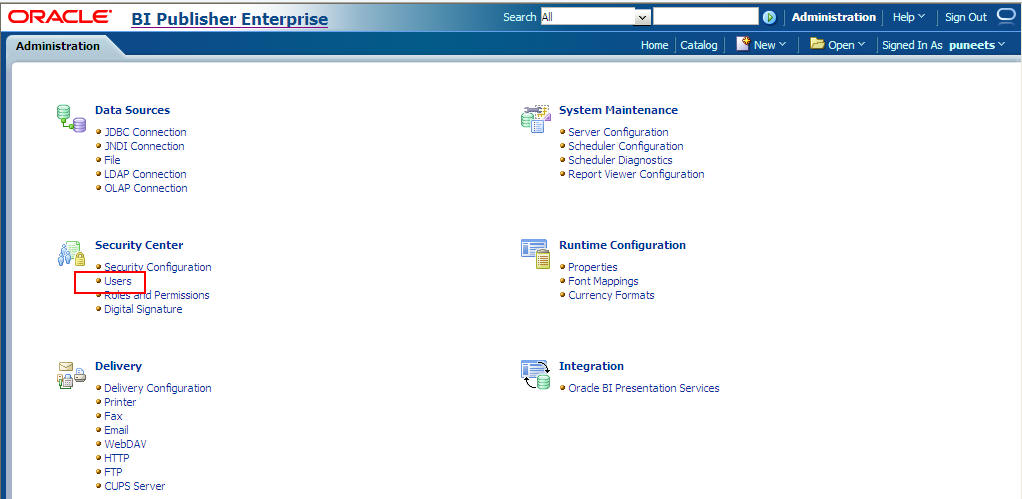
This displays the Users screen.
Click Create User as highlighted in the following figure:
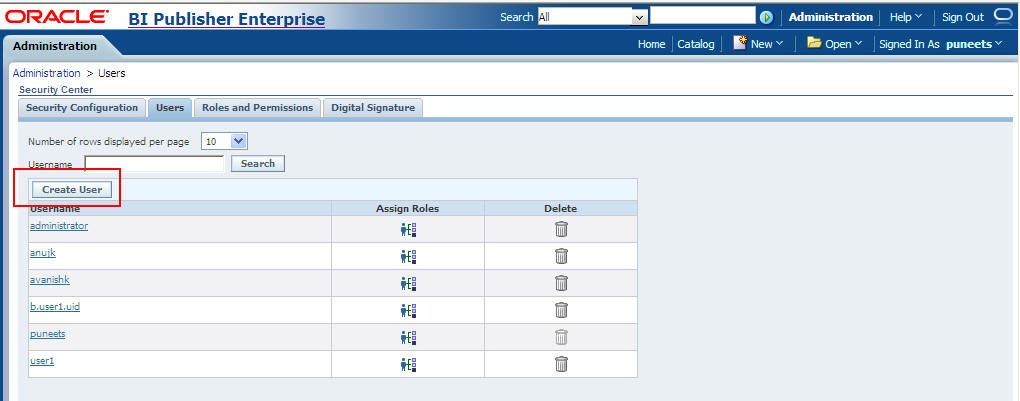
This displays the Create User Screen as shown in the following figure:

Enter the name of the user in the Username field.
Enter the password in the Password field.
Click Apply. The name of the user is displayed in the list of existing users.
Once you have created the user, you need to assign the required roles to the user.
Click the Assign Roles icon corresponding to the user that you have created as highlighted in the following figure:
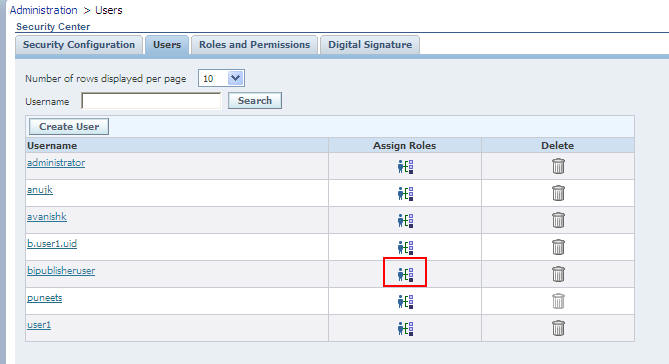
This displays the Assign Roles Screen for the user. The BIP system roles such as BI Publisher Administrator, BI Publisher Excel Analyzer, BI Publisher Online Analyzer, BI Publisher Developer, BI Publisher Scheduler, and BI Publisher Template Designer are available by default along with the custom roles (if any) that have been created by you. See section Creating Roles, Adding Data Sources, and Assigning Roles for the steps to create custom roles. For more information on system roles, refer to Understanding BI Publisher's Users, Roles, and Permissions in Administrator's Guide for Oracle Business Intelligence Publisher.
Select the role that you want to assign to the user from the Available Roles section and click Move(>) to move the selected role to the Assigned Roles section as depicted in the following figure:

Click Apply. This assigns the selected roles to the user.
For the list of users that you need to configure using BIP, refer to the Configuring BIP Users and Roles: Oracle Fusion Middleware Security Model section of this chapter.
In addition to creating users and assigning them the required roles, you also need to create certain roles, add data sources, and assign them the required roles.
To create roles, add data sources, and assign them the required roles, execute the following steps:
Log on to BIP using the administrator credentials. This displays the BIP Home Page.
Click Administration as highlighted in the following figure:

Click Roles and Permissions in the Security Center section as highlighted in the following figure:
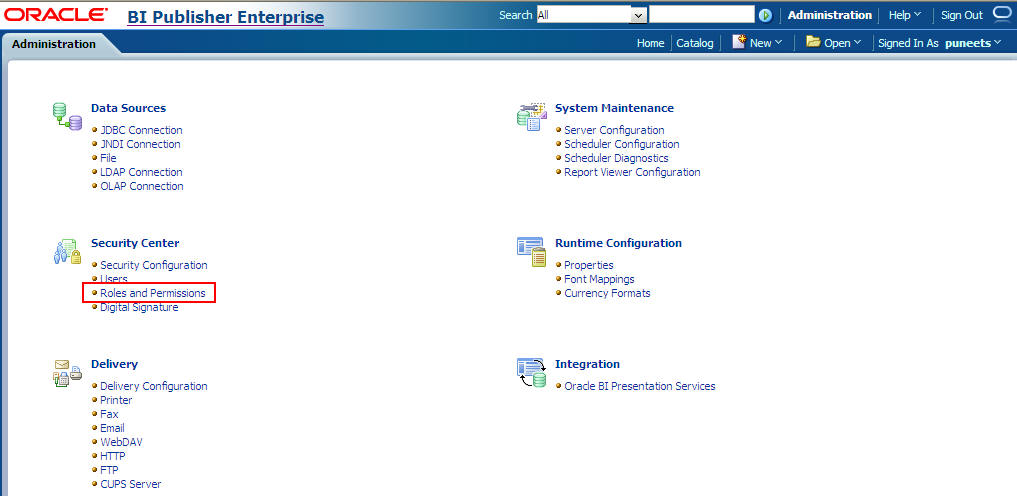
This displays the Roles and Permissions Screen.
Click Create Role as shown in the following figure:
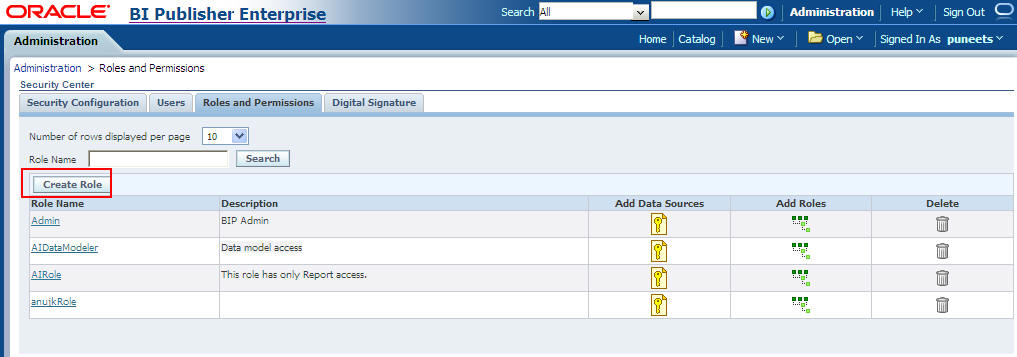
This displays the Create Role Screen.
Enter the name of the role in the Name field.
Enter the description for the role in the Description field.
Click Apply to create the new role, as highlighted in the following figure:

This displays the role in the list of existing roles on the Roles and Permissions Screen.
Click Add Data Sources Icon, corresponding to the role which you have just created, as depicted in the following figure:
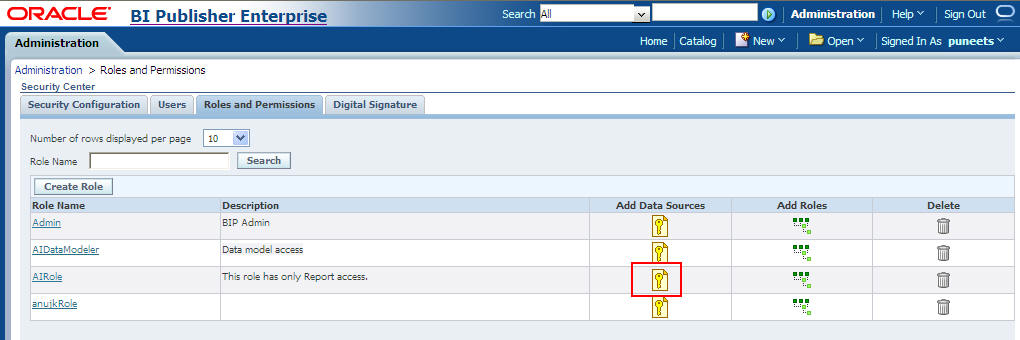
This displays the Add Data Sources Screen.
Select PRMART from the Available Data Sources section and click Move(>) to move it to the Allowed Data Sources section, as highlighted in the following figure:

Click Apply to save the changes. This again displays the Roles and Permissions Screen. See Creating PRMART JDBC Connection section for the steps to create the JDBC connection.
Click the Add Roles icon, corresponding to the role which you have just created to add the required roles, as shown in the following figure:
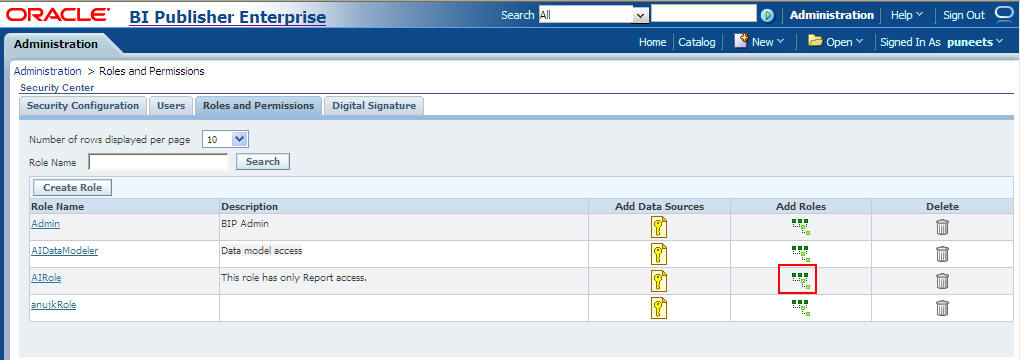
This displays the Add Roles Screen.
Select the roles that you want to include for the role from the Available Roles section and click Move(>) to move the selected roles to the Included Roles section, as highlighted in the following figure:

Click Apply to save the changes.
For more information, refer to the Configuring Users, Roles, and Data Access section in Oracle Administrator's guide for Oracle BIP.
For the list of roles that you need to configure using BIP, refer to the Configuring BIP Users and Roles: Oracle Fusion Middleware Security Model section of this chapter.
This section introduces you with the steps that you need to execute to create users, assign the roles and permissions to those users, and configure server settings for the Oracle Fusion Middleware Security Model.
This section comprises the following sub-sections:
The steps to configure the server settings in the Oracle Fusion Middleware Security Model are exactly the same as that of the BI Publisher Security Model. Refer to Configuring Server Settings for the steps to configure the server settings.
Creating users for LDAP or SSO users is done using the LDAP servers which is beyond the scope of this manual.
For the list of users that need to be configured, refer to the Configuring BIP Users and Roles: Oracle Fusion Middleware Security Model section of this chapter.
To create roles, add data sources, and assign roles in WebLogic Enterprise Manager, execute the following procedure:
Log on to the Enterprise Manager. This displays the Enterprise Manager home page with a list of folders in the left pane.
Expand the Business Intelligence folder in the left pane and click coreapplication, as shown in the following figure:
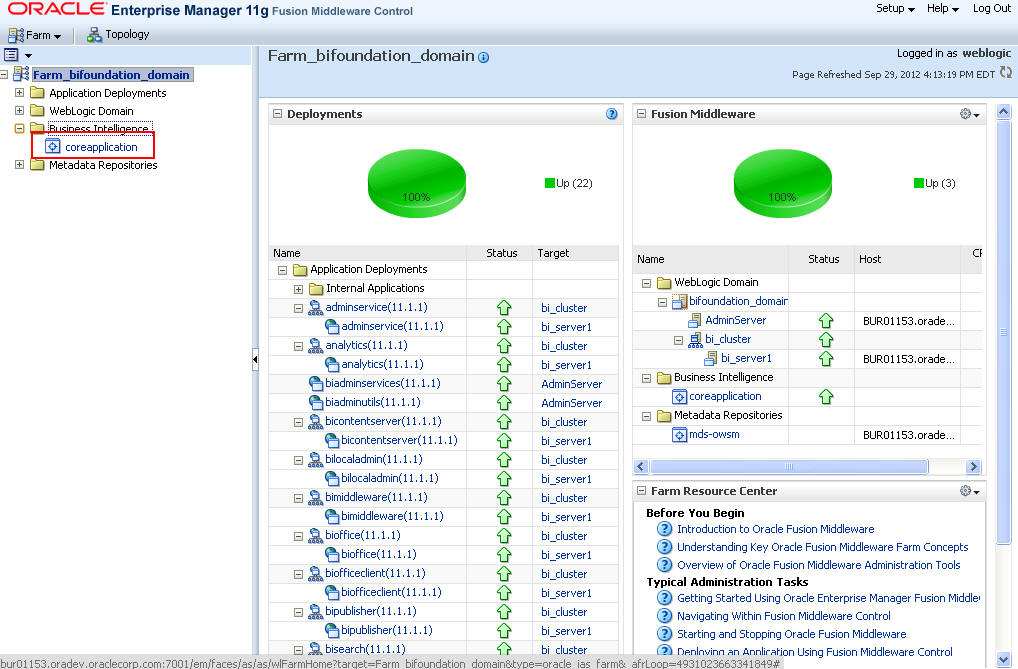
This displays the coreapplication Screen in the right pane.
Click Configure and Manage Application Roles in the Application Policies and Roles section, as shown in the following figure:
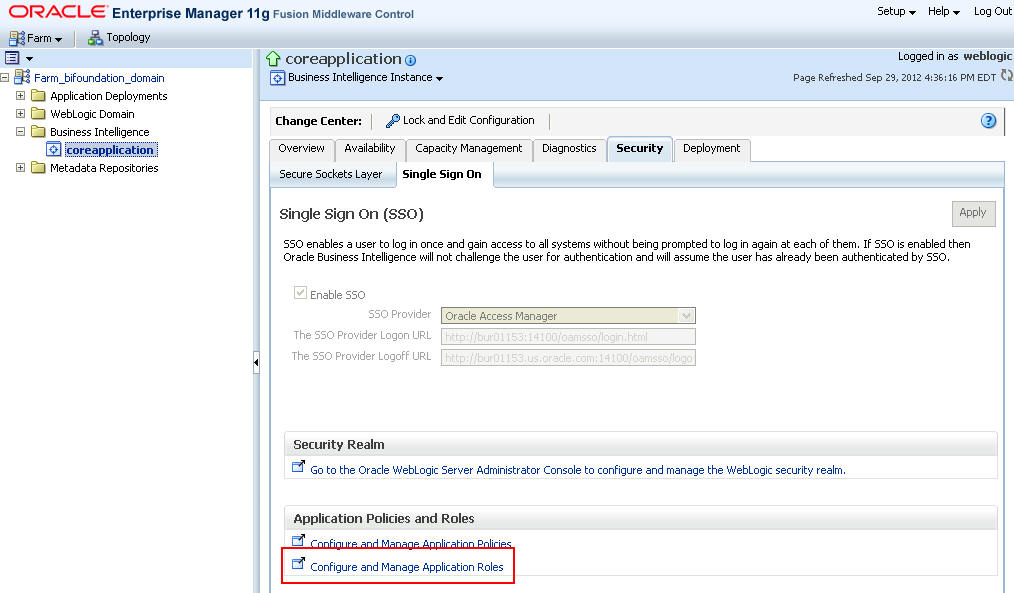
This displays the Application Roles Screen.
Select the required application stripe from the Application Stripe drop-down list.
Select any existing role (for example, BIConsumer) and click Create Like, as shown in the following figure:
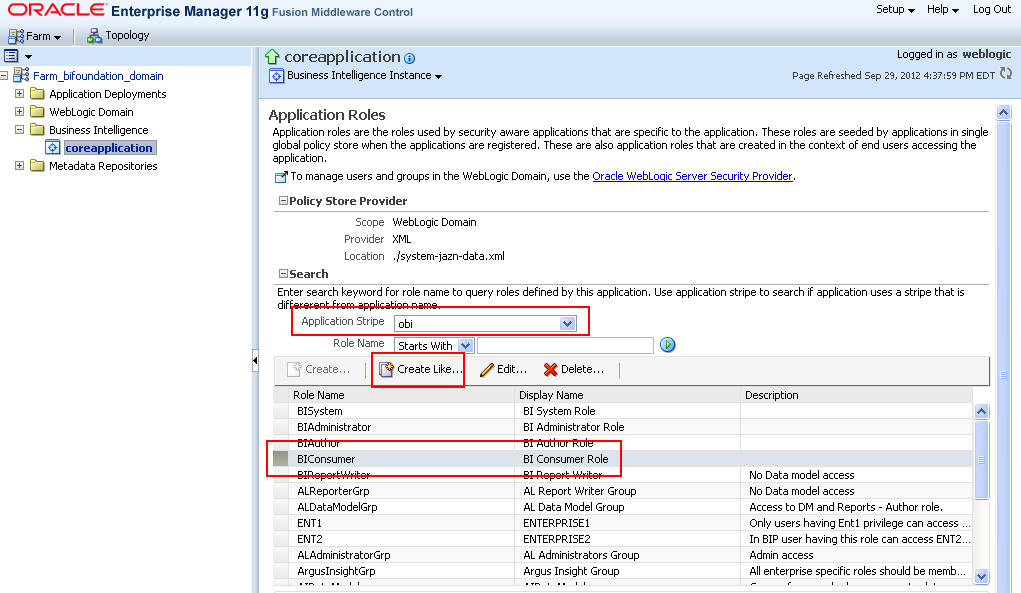
This displays the Create Application Role Screen.
Enter the name of the role in the Role Name field.
Enter the display name and description for the role in the Display Name and Description fields. These are optional fields.
Click Add to add any existing application role/group/user to the new role as shown in the following figure:
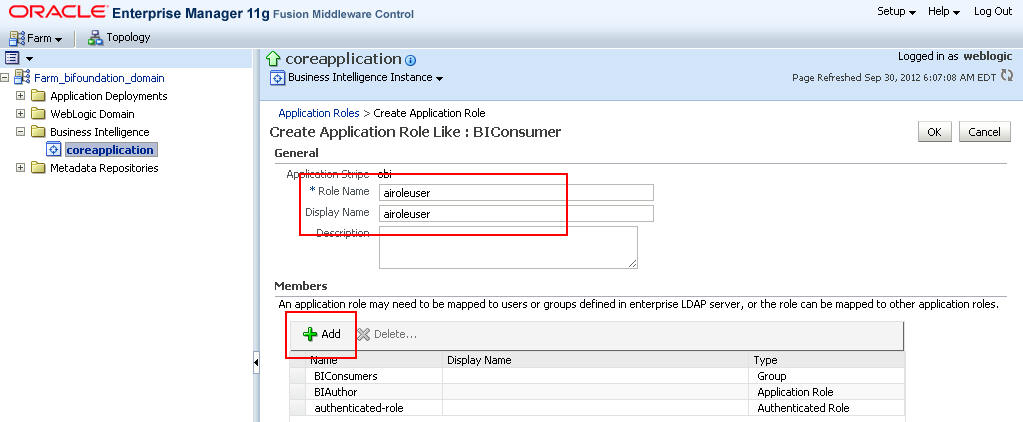
This displays the Add Principal Screen.
Click the > icon close to the Display Name field to display the list of all the roles, groups, and users that are created in LDAP server, as highlighted in the following figure:
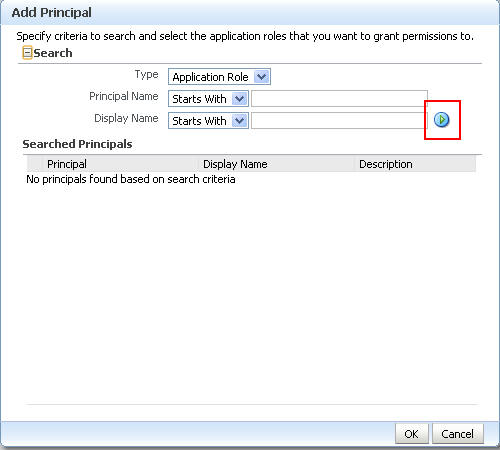
Select the name of the role, group, or user that you want to add to the new role and click OK. For example, for the BIReportWriter role, BIConsumer and authenticated-role are mandatory members. Besides that, the AIRole must also be a part of the BIReportWriter Role. These roles are displayed in the Members section of the Create Application Screen, as shown in the following figure:

Note:
The BIReportWriter role must be added to the BIReportWriter application policy. You can refer to the Creating Application Policy section for the steps to create the application policy for the BIReportWriter role.Repeat steps 8 to 10 to add more roles, users, and groups to the new role.
Click OK on the Create Application Role Screen to save the changes.
Once you have created the role and added the required list of users, roles, and groups to the new role. You must add the PRMART data source to the new role.
Log on to BIP using the administrator credentials. This displays the BIP Home Page.
Click Administration as highlighted in the following figure:

Click Roles and Permissions in the Security Center section as highlighted in the following figure:
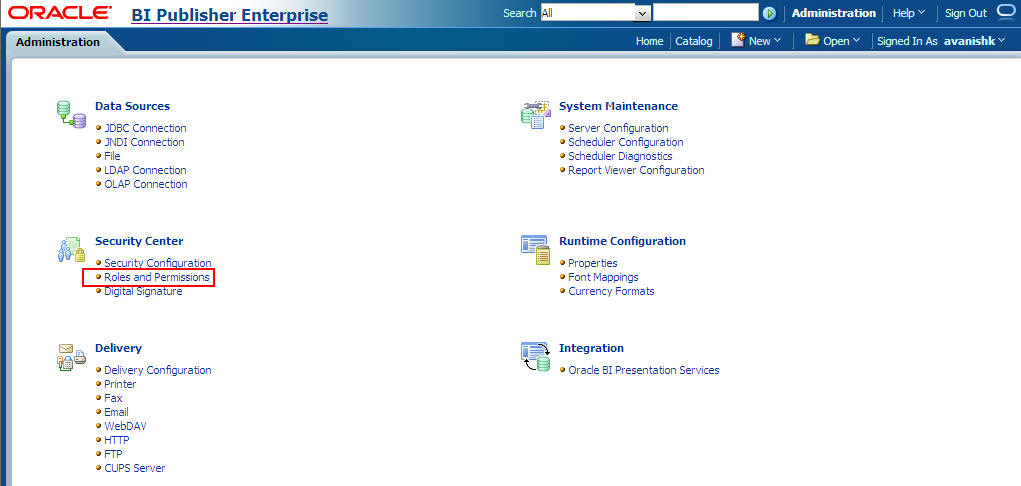
This displays the Roles and Permissions Screen. You can view the name of the new role which you have just created in the list of role names.
Click the Add Data Sources icon corresponding to the name of the new role, as depicted in the following figure:
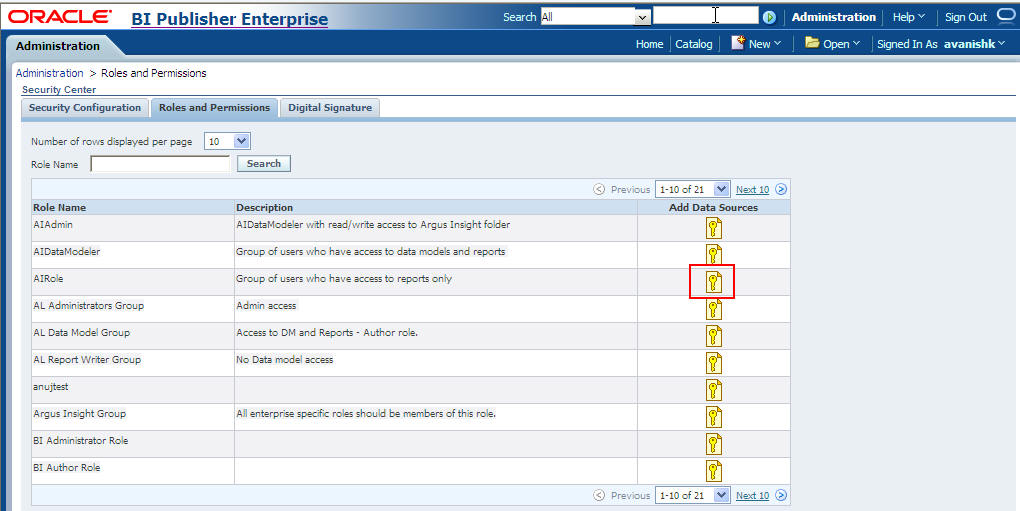
This displays the Add Data Sources Screen.
Select PRMART from the Available Data Sources section and click the Move (>) icon to move the PRMART data source to the Allowed Data Sources section as shown in the following figure:
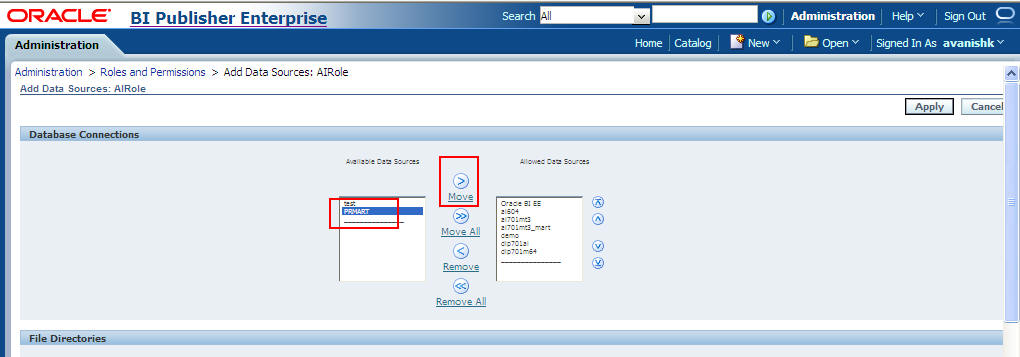
Click Apply to save the changes.
For more information, refer to the Creating Application Roles Using Fusion Middleware Control section of the Oracle Administrator's guide for Oracle BIP.
For the list of roles that need to be configured, refer to the Configuring BIP Users and Roles: Oracle Fusion Middleware Security Model section of this chapter.
Once you have created the new role and assigned the required roles, users, and data sources to the role, you also need to create the application policy for the new role.
Before creating a BI Publisher policy, you must have created an empty role in the Enterprise Manager.
Note:
The steps mentioned in this section are valid for creating BIReportWriter application policy.To create the application policy for the new role, execute the following steps:
Log on to the Enterprise Manager. This displays the Enterprise Manager home page with a list of folders in the left pane.
Expand the Business Intelligence folder in the left pane and click coreapplication, as shown in the following figure:

This displays the coreapplication Screen in the right pane.
Click Configure and Manage Application Policies in the Application Policies and Roles section, as shown in the following figure:
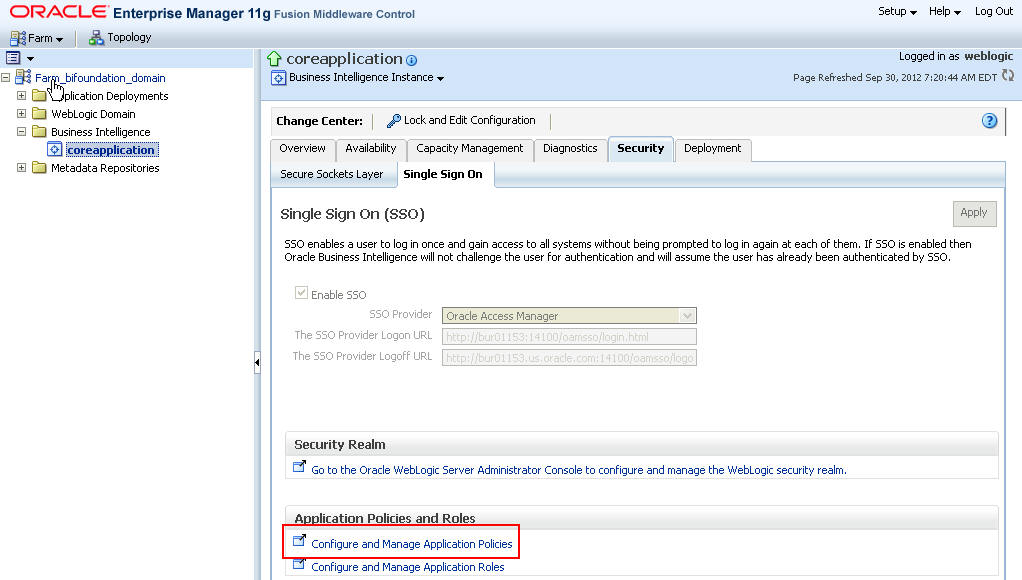
This displays the Application Policies Screen.
Select obi from the Application Stripe drop-down list.
Select the BIAuthor policy and click Create Like as shown in the following figure:
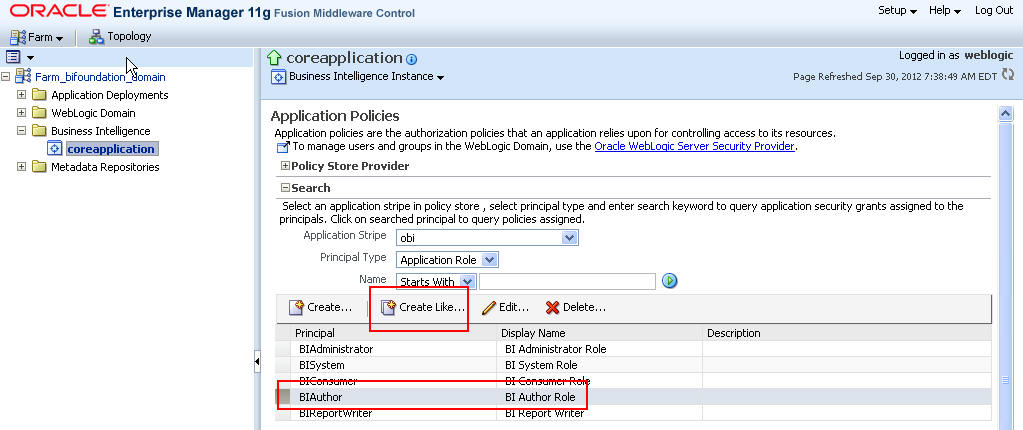
This displays the Create Application Grant Like Screen with the Grantee and Permissions sections.
Click Add in the Grantee section, as highlighted in the following figure:
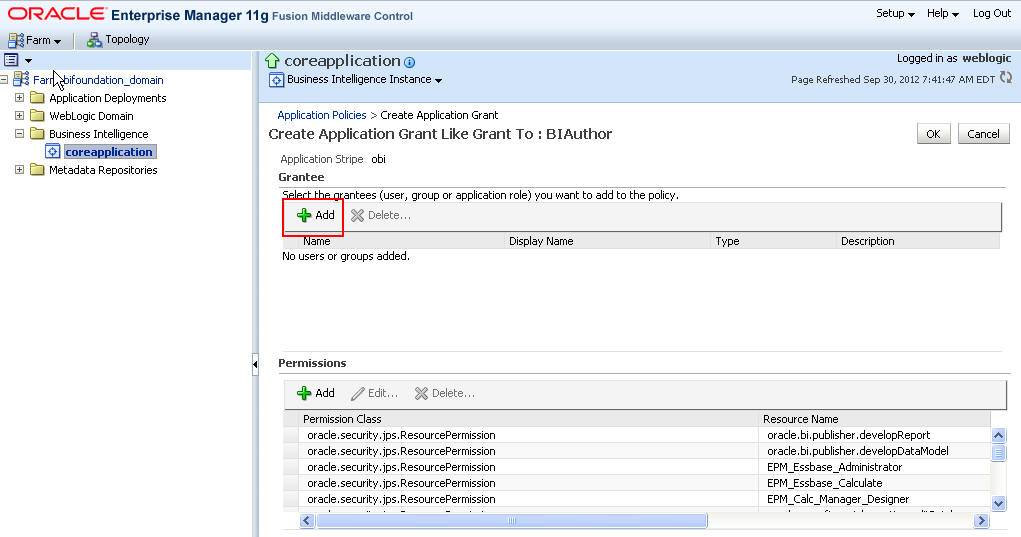
This displays the Add Principal Screen.
Click the > icon close to the Principal Name field to retrieve the list of all the available application roles, as shown in the following figure:
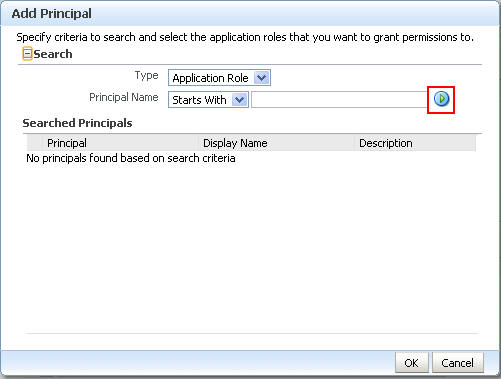
Select the name of the role from the Searched Principals section (for example, BIReportWriter) and click OK. This again displays the Create Application Grant Like Screen.
Select the developDataModel Resource Name from the list of Permission Classes and click Delete.
Click OK to apply the changes.
This section lists the names of the <Admin Users> and roles that you need to configure using the steps given in Managing Users and Roles: BI Publisher Security Model and Managing Users and Roles: Oracle Fusion Middleware Security Model sections of this chapter.
An Admin user refers to the user who has BI Publisher administrative rights. This user should belong to the BIAdministration functional role.
An Argus Insight Data Model user refers to the user who should have access to both Data Models and Reports in the Argus Insight folder. This user should belong to AIDataModeler custom role.
There are Enterprise specific Modeler users, who have access to Data Models and Reports in Enterprise specific folders and Argus Insight folder. These users should have Enterprise specific Modeler roles assigned to them. This user should belong to Enterprise specific Modeler roles.
An Argus Insight Role (AIRole) user refers to the user who should have access to Reports only, and should have Read-only access to the Data Model which is required to create the reports. This user should belong to AIRole.
There can be users who have access to reports of specific Enterprises. These users can Read/Write reports in Enterprise specific Report folder and Argus Insight Report folder. However, these users have Read-only access to the Data Models in the Enterprise specific Data Model and Argus Insight Data Model folder. This user should belong to Enterprise specific Report roles.
An AI Admin Role user should have full access to the Argus Insight folder (Read/Write/Delete).
An Enterprise specific Admin user should have full access to the Enterprise specific folders (Read/Write/Delete) and Argus Insight folder (Read/Write/Delete).
The following table illustrates the Roles that you need to configure using BIP:
Table 6-1 Configuring BIP Roles
| Role | Users/Roles to be added |
|---|---|
|
BIAdministration (Functional Role) |
Super user who has full access to any folder and BIP Administration access |
|
AIRole |
All Argus Insight role users, AIDataModelerRole, and All Enterprise Report Roles (for specific enterprises) |
|
AIDataModelerRole |
All AI Data Modeler Users, All Enterprise Modeler Roles, and AIAdminRole |
|
Enterprise Report Role |
Users that belong to a specific Enterprise with Reports access and Enterprise Modeler Role |
|
Enterprise Modeler Role |
Users that belong to a particular Enterprise with both Data Models and Reports access |
|
Enterprise Admin Role |
Enterprise specific Admin users. These users should have full access to the Enterprise specific folders. |
|
AIAdminRole |
Any User with this role should have full access to the Argus Insight Folder. The Enterprise Admin Role should be added to this role. |
|
BIAdministrator (Functional Role) |
BI Admin User |
|
BIAuthor (Functional Role) |
AIDataModelerRole |
|
BIReportWriter (create this role using the steps given in section 8.4.3 and create an Application Policy for this role using the steps given in section 8.4.4) |
AIRole |
This section explains the Folder Level permissions that you need to grant using BIP.
Refer to the About Catalog Permissions section in Oracle Administrator's Guide for Oracle BIP for more information.
Table 6-2 Folder Level Permissions
| Folder | Roles to be added | Permissions |
|---|---|---|
|
Argus Insight |
AIAdminRole |
Full access |
|
Argus Insight > General > Data Model |
AIDataModelerRole, AIRole |
AIDataModelerRole - Full accessAIRole - Read, Run, Schedule, and View report |
|
Argus Insight > General > Reports |
AIRole |
Full access |
|
Argus Insight > CoverPage |
AIRole |
Full access |
|
Enterprise specific folders |
Enterprise Specific Admin Role |
Full access |
|
Enterprise Specific Folder -- Data Model |
Enterprise Modeler Role, Enterprise Report Role |
Enterprise Modeler Role - Full accessEnterprise Report Role -Read, Run, Schedule, and View report |
|
Enterprise Specific Folder - Reports |
Enterprise Report Role |
Full access |
This section explains the users, which you need to create, and the roles that you need to assign to those users using the BI Publisher.
This section comprises the following sub-sections:
The Argus Insight folder comprises two sub-folders:
Data Models
Reports
There are three types of Argus Insight specific users and their corresponding roles. The following is the list of users that you need to create along with the name of the role for each user:
User Name: AIAdminRole Users, Role Name: AIAdminRole
User Name: AIDataModeler Users, Role Name: AIDataModelerRole
User Name: AIRole Users, Role Name: AIRole
In addition to these users that you need to create, there is a default BI Admin User for the application. This user is a super user with a BIP administration access and has also got access to upload the Argus Insight repository.
The access to the Data Models and Reports folder depends on the type of the user and the role assigned to that user. In addition, the BI publisher also allows you to add roles (Nested Role) to a role (Super Role). In that case, the user with the Super Role privileges also has the privileges of the nested role. For example, a user has been assigned an X role and you add Y role to the X role, that user also has the privileges of the Y role, even though Y role is not directly assigned to the user.
You can refer to Managing Users and Roles: BI Publisher Security Model or Managing Users and Roles: Oracle Fusion Middleware Security Model section, depending on the Security Model that you are using for the steps to create users, create roles, and assign roles to users and roles.
The following table lists the Argus Insight specific users that you need to create, the roles that you need to assign to the users, and the description about the privileges for each user and role:
Table 6-3 Argus Insight Specific Users and Roles
| Name of the User/Role | Users/Roles to be added | Description |
|---|---|---|
|
BI Admin User |
BI Administration (Functional Role) |
The BI Admin User has access to upload the Argus Insight repository and works as a Super user who has BIP Administration access. |
|
AIAdminRole |
AIDataModelerRole |
The user with this role has full access to the Argus Insight Folder. |
|
AIAdminRole Users |
AIAdminRole |
This user has full access to the Argus Insight Folder. |
|
AIDataModelerRole |
BI Publisher DeveloperAIRole |
The user with this role has access to the Argus Insight Data Models and Reports folders. |
|
AIDataModeler Users |
AIDataModelerRole |
The user has access to Argus Insight Data Models and Reports folders. |
|
AIRole |
BITemplate Designer and BI Publisher Scheduler roles |
The users belonging to this role have read-only access to the Argus Insight Data Models folder and full access of the Argus Insight Reports folder. |
|
AIRole Users |
AIRole |
This user has read-only access to the Argus Insight Data Models folder and full access to the Argus Insight Reports folder. |
In addition to the Argus Insight specific users and roles, you can also create Enterprise specific users and roles, and add extra privileges to those users and roles by adding Argus Insight specific roles to them.
Similar to the Argus Insight folder, each enterprise comprises the Data Models and Reports folder.
There are three types of Enterprise specific users and their corresponding roles. The following is the list of enterprise specific users that you need to create along with the name of the role for each user:
User Name: Enterprise Specific Admin Users, Role Name: Enterprise Admin Role
User Name: Enterprise Modeler Role Users, Role Name: Enterprise Modeler Role
User Name: Enterprise Report Role Users, Role Name: Enterprise Report Role
Table 6-4 Enterprise Specific Users and Roles
| Name of the User/Role | Users/Roles to be added | Description |
|---|---|---|
|
Enterprise Admin Role |
AIAdminRole (Created in 8.6.1 section) |
The user belonging to this role has full access to the Enterprise specific folder.In addition, the user belonging to this role also has full access to the Argus Insight folder. |
|
Enterprise Specific Admin Users |
Enterprise Admin Role |
This user has full access to the Enterprise specific Folder.In addition, this user has full access to the Argus Insight folder. |
|
Enterprise Modeler Role |
AIDataModelerRole (Created in 8.6.1 section)Enterprise Report Role |
The user belonging to this role has access to:Argus Insight Data Models folder (Full access)Argus Insight Reports folder (Read, Run, Schedule, View report)Enterprise specific Data Models folder (Full access)Enterprise specific Reports folder (Read, Run, Schedule, View report) |
|
Enterprise Modeler Role Users |
Enterprise Modeler Role |
This user has access to: Argus Insight Data Models folder (Full access) Argus Insight Reports folder (Read, Run, Schedule, View report) Enterprise specific Data Models folder (Full access) Enterprise specific Reports folder (Read, Run, Schedule, View report) |
|
Enterprise Report Role |
AIRole (Created in 8.6.1 section) |
The user belonging to this role has access to:Argus Insight Data Models folder (Read only)Argus Insight Reports folder (Full access) Enterprise specific Data Models folder (Read only)Enterprise specific Reports folder (Full access) |
|
Enterprise Report Role Users |
Enterprise Report Role |
This user has access to: Argus Insight Data Models folder (Read only) Argus Insight Reports folder (Full access) Enterprise specific Data Models folder (Read only) Enterprise specific Reports folder (Full access) |
For information on the Folder Level permissions that you need to grant using BIP, refer to the Folder Level Permissions section.